
Popular categories
Looking for a yarn?


Comments / Questions (79)
![]() Tânia Santos wrote:
Tânia Santos wrote:
Por gentileza, a empresa vende as peças prontas ? Faz entrega ? Aguardo retorno e muito obrigada !
27.05.2020 - 16:50
![]() Aud wrote:
Aud wrote:
Venter på at Annica får svar. Hun skjønte hva jeg mente med mitt spørsmål.
25.05.2020 - 23:04DROPS Design answered:
Hej Aud, du gentager A.1a til du deler arbejdet ved ærmerne. God fornøjelse!
27.05.2020 - 13:23
![]() Annica wrote:
Annica wrote:
Frågar samma som Aud. När har man stickat klart A1.a? Alltså hur många repetitioner ska man göra? Förstår att man ska sticka v 4-7 på hela oket, men hur länge till? Det står ju bara på FRAM- OCH BAKSTYCKE att "När sista repetitionen av A1.a är färdigstickat på höjden..." Det säger mej ingenting
25.05.2020 - 17:23DROPS Design answered:
Hej Annica, du gentager A.1a til du deler arbejdet ved ærmerne. God fornøjelse!
27.05.2020 - 13:28
![]() Aud wrote:
Aud wrote:
Under avsnitt om bol står det: "Når repitisjon av A.1a er strikket ferdig ........." Jeg skjønner ikke når repetisjon A.1a er ferdig .
22.05.2020 - 16:23DROPS Design answered:
Hei Aud. Se på diagram A.1 (4.-7. rad av A.1 er A.1a og dette er 1 repetisjon). mvh DROPS design
25.05.2020 - 14:36
![]() Aud wrote:
Aud wrote:
Jeg strikker jakken og lurer på om annen hver linle i Mønster-tegningen feks A3a , viser både omgangene på vrangsiden og rettsiden. Eller er det bare omgangene på rettsiden som fremgår der???
13.05.2020 - 21:50DROPS Design answered:
Hei Aud, Alle diagram viser alle rad fra retten. God fornøyelse!
15.05.2020 - 07:27
![]() Vale wrote:
Vale wrote:
Molto bello ed elegante. Domani lo inizierò, ho filato di viscosa di bambù da lavorare con i ferri numero 3. Grazie per le splendide idee.
12.05.2020 - 22:25
![]() Elsie Hedenskog wrote:
Elsie Hedenskog wrote:
När kommer mönstret har redan köpt garn
07.05.2020 - 12:53
![]() Susanne wrote:
Susanne wrote:
Glæder mig til at strikke den
18.04.2020 - 18:36
![]() MARIA PIA wrote:
MARIA PIA wrote:
BELLISSIMO QUANDO LE SPIEGAZIONI?
15.04.2020 - 06:25
![]() Gisi wrote:
Gisi wrote:
Gefällt mir sehr gut, wäre sehr dankbar, wenn Anleitung erscheinen würde....Bitte
10.04.2020 - 09:20
|
|||||||||||||||||||||||||||||||
Springs Surrender Jacket#springssurrenderjacket |
|||||||||||||||||||||||||||||||
 |
 |
||||||||||||||||||||||||||||||
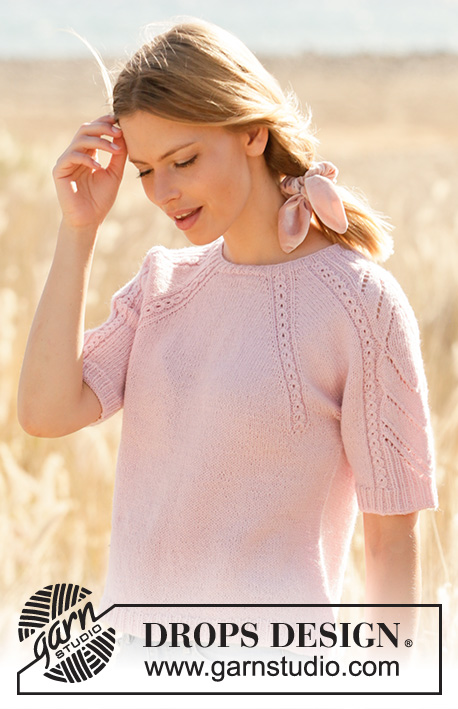
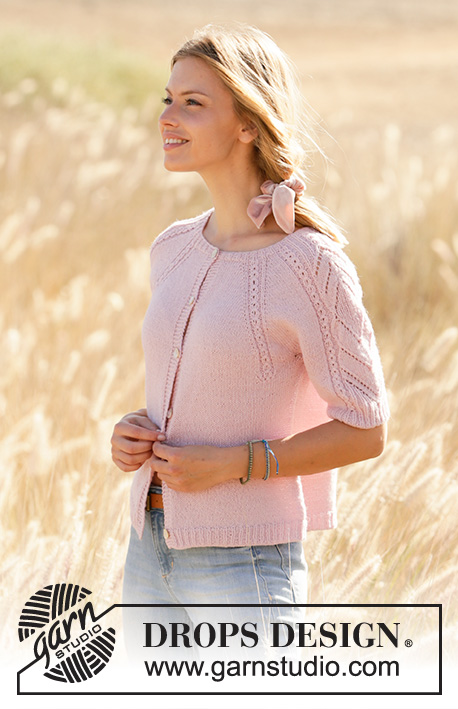
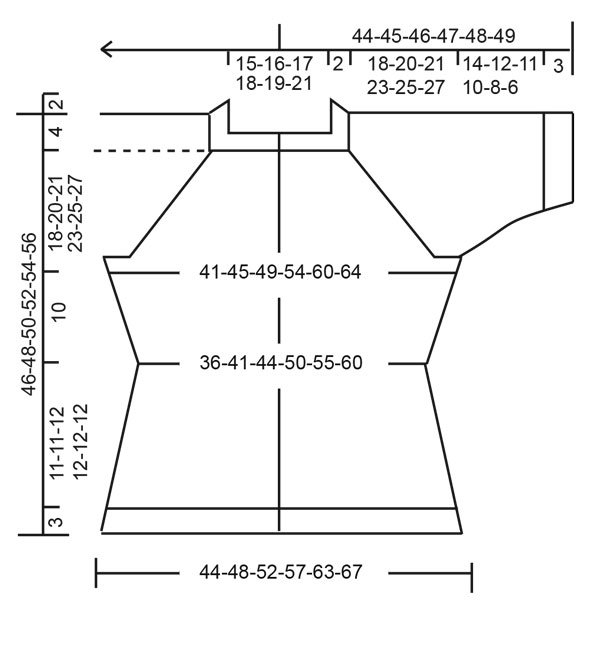
Knitted jacket with raglan in DROPS Alpaca. Piece is knitted top down with lace pattern and short sleeves. Size: S - XXXL
DROPS 212-39 |
|||||||||||||||||||||||||||||||
|
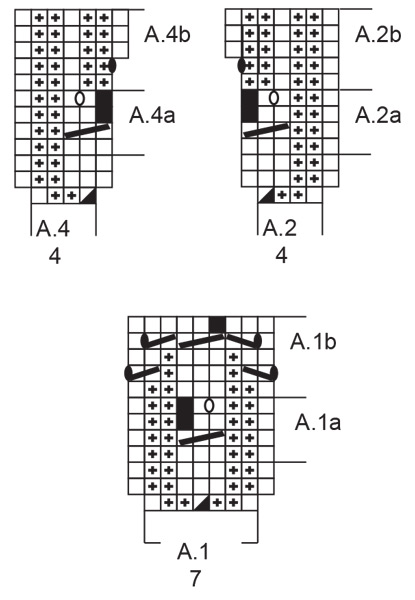
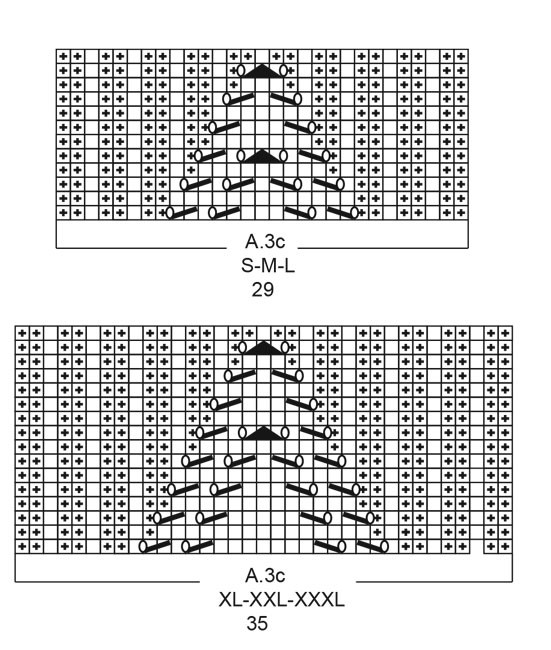
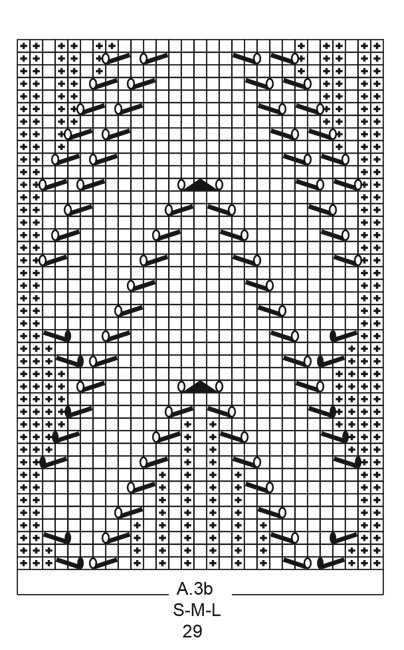
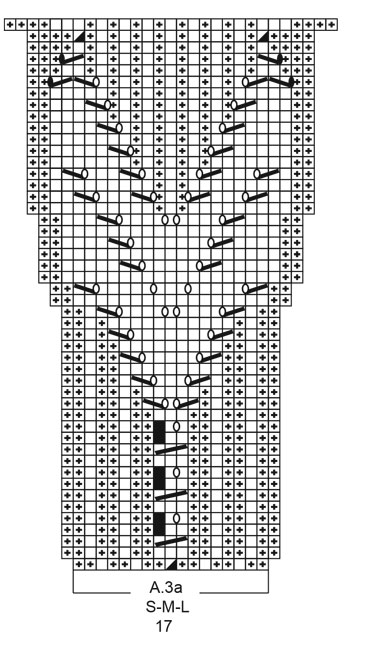
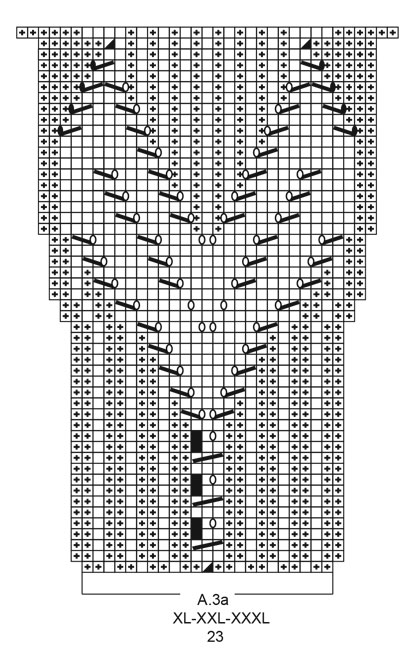
---------------------------------------------------------- EXPLANATION FOR THE PATTERN: ---------------------------------------------------------- GARTER STITCH (back and forth): Knit all rows. 1 ridge vertically = knit 2 rows. PATTERN: See diagrams A.1 to A.4. Choose diagram for your size. Diagrams show all rows in pattern seen from the right side. INCREASE TIP-1 (applies to raglan): All increases are done on a row from right side. Increase 1 stitch by making 1 yarn over between 2 stitches. On next row purl yarn over twisted to avoid hole. Then work the new stitches in stockinette stitch. INCREASE TIP-2 (applies to sides of body): All increases are done on a row from right side. Work until 2 stitches remain before marker thread, 1 yarn over, knit 4 (marker thread is in the middle of these stitches), 1 yarn over. On next row purl yarn overs twisted to avoid holes. Then work the new stitches in stockinette stitch. DECREASE TIP (applies to side on body and sleeves): All decreases are done on a row from right side. Decrease 1 stitch on each side of marker thread as follows: Work until 3 stitches remain before marker thread and knit 2 together, knit 2 (marker thread is between these stitches), slip 1 stitch knitwise, knit 1, pass slipped stitch over stitch worked. NUMBER OF STITCHES: As both increases and decreases are done in A.1a, A.2a, A.3a and A.4a, number of stitches vary according to which row it is counted on (depending on you are increasing/decreasing in pattern). BIND-OFF TIP: To avoid a tight bind-off edge you may use a larger needle. If this also is too tight, make 1 yarn over after approx. every 4th stitch and bind off these as regular stitches. BUTTONHOLES: Decrease for buttonholes on right band (when garment is worn). Decrease from right side when 3 stitches remain on row as follows: Make 1 yarn over, knit the next 2 stitches together, knit last stitch. On next row knit yarn over to make holes. Decrease first buttonhole when neck edge measures approx. 1½-2 cm = ½"-¾". Then decrease the next 5-5-5-5-6-6, approx. 8-8½-8½-9-8-8 cm = 3⅛"-3¼"-3¼"-3½"-3⅛"-3⅛" apart. ---------------------------------------------------------- START THE PIECE HERE: ---------------------------------------------------------- JACKET - SHORT OVERVIEW OF THE PIECE: Work neck edge and yoke back and forth on circular needle from mid front, top down. Now divide yoke for body and sleeves. Work body back and forth on circular needle, top down. Work sleeves in the round on double pointed needles, top down. NECK EDGE: Cast on 119-131-137-143-146-155 stitches (including 5 band stitches in each side towards mid front) on circular needle size 2.5 mm = US 1,5 with Alpaca. Purl 1 row (= wrong side). Work next row as follows from right side: Work 5 band stitches in GARTER STITCH - read explanation above, * knit 1, purl 2 *, work from *-* until 6 stitches remain, knit 1 and finish with 5 band stitches in garter stitch. Decrease for BUTTONHOLES - read explanation above. Continue rib like this for 2 cm = ¾". Switch to circular needle size 3 mm = US 2,5. Insert 1 marker after band at the beginning of row mid front, measure yoke from this marker! YOKE: Now work as follows from right side: Left front piece: Work 5 band stitches in garter stitch, 6-9-9-9-9-12 stitches in stockinette stitch, A.1 (= 7 stitches). Left sleeve: Work 2 stitches in stockinette stitch, A.2 (= 4 stitches), A.3a (= 17-17-17-23-23-23 stitches), A.4 (= 4 stitches), 2 stitches in stockinette stitch. Back piece: Work A.1 over 7 stitches, 11-17-23-17-20-23 stitches in stockinette stitch, A.1 over 7 stitches. Right sleeve: Work 2 stitches in stockinette stitch, A.2 over 4 stitches, A.3a over 17-17-17-23-23-23 stitches, A.4 over 4 stitches, 2 stitches in stockinette stitch. Right front piece: Work A.1 over 7 stitches, 6-9-9-9-9-12 stitches in stockinette stitch and finish with 5 band stitches in garter stitch. On next row from right side increase for raglan on each side of every A.1 – read INCREASE TIP-1 (= 8 stitches increased). REMEMBER THE KNITTING GAUGE! Increase like this every other row 22-24-28-33-37-40 times in total. When the first 3 rows in pattern A.1, A.2 and A.4 has been worked, repeat A.1a, A.2a and A.4a in height. When A.3a has been worked 1 time vertically, work A.3b (= 29-29-29-35-35-35 stitches) over A.3a. When increase for raglan is done, there are 335-363-401-447-482-515 stitches on needle – read NUMBER OF STITCHES. Work in the established pattern until piece measures 18-20-21-23-25-27 cm = 7"-8"-8¼"-9"-9¾"-10⅝" from marker. Adjust so that next row is a row with total number of stitches (i.e. 335-363-401-447-482-515 stitches), this because number of stitches can vary because of decreases/increases in diagrams. On next row divide piece for body and sleeves as follows: Work over the first 50-55-59-66-72-77 stitches as before, slip the next 73-77-87-97-101-107 stitches on a stitch holder for sleeve and cast on 8 stitches under sleeve, work over the next 89-99-109-121-136-147 stitches, slip the next 73-77-87-97-101-107 stitches on a stitch holder for sleeve and cast on 8 stitches under sleeve and work the last 50-55-59-66-72-77 stitches. BODY: = 205-225-243-269-296-317 stitches. Insert 1 marker thread after 54-59-63-70-76-81 stitches in from each side (= in the side of body). There are 97-107-117-129-144-155 stitches between marker threads on back piece. Move the marker threads upwards when working; they should be used for increase and decrease later in the sides. When last repetition of A.1a from the yoke has been worked vertically, work A.1b over every A.1a. When A.1b has been worked 1 time vertically, there are 201-221-239-265-292-313 stitches on needle. Work in stockinette stitch with 5 band stitches in garter stitch in each side. When piece measures 2 cm = ¾" from division, decrease 1 stitch on each side of the marker thread in each side - read DECREASE TIP (= 4 stitches decreased). Decrease like this every 2 cm = ¾" 4 times in total = 185-205-223-249-276-297 stitches. When piece measures 10 cm = 4" from division, increase 1 stitch on each side of marker threads in the sides - read INCREASE TIP-2(= 4 stitches increased). Increase like this every cm = ⅜" 9 times in total = 221-241-259-285-312-333 stitches. When piece measures 21-21-22-22-22-22 cm = 8¼"-8¼"-8¾"-8¾"-8¾"-8¾" from division, increase 12-13-13-14-14-14 stitches evenly = 233-254-272-299-326-347 stitches. Switch to circular needle size 2.5 mm = US 1,5 and work from right side as follows: Work 5 band stitches in garter stitch, * knit 1, purl 2 *, repeat from *-* until 6 stitches remain, finish with knit 1 and 5 band stitches in garter stitch. When piece measures 24-24-25-25-25-25 cm = 9½"-9½"-9¾"-9¾"-9¾"-9¾" from division, bind off all stitches by knitting from right side - read BIND-OFF TIP. SLEEVES: Slip the 73-77-87-97-101-107 stitches from stitch holder in one side of piece on double pointed needles size 3 mm = US 2,5 and pick up 1 new stitch in each of the 8 stitches cast on under sleeve = 81-85-95-105-109-115 stitches – remember number of stitches. Insert 1 marker thread in the middle of the 8 new stitches. Move the marker thread upwards when working; it should be used for decrease mid under sleeve. READ ALL OF THE FOLLOWING SECTION BEFORE CONTINUING! Work pattern and decrease stitches mid under sleeve as follows: Work A.2a, A.3b and A.4a over the middle stitches, knit the remaining stitches. When A.3b has been worked, work A.3c over A.3b. When sleeve measures 1 cm = ⅜" from division, decrease 1 stitch on each side of marker thread (= 2 stitches decreased). Decrease like this every cm = ⅜" 3-3-3-3-5-5 times in total, then decrease every other cm = ⅜" 2-2-2-2-0-0 times in total = 71-75-85-95-99-105 stitches. On last round in A.3c increase 0-1-2-0-1-1 stitches before pattern, and 2-0-1-2-0-0 stitches after the pattern = 73-76-88-97-100-106 stitches. When A.3c has been worked 1 time vertically, piece measures approx. 14-12-11-10-8-6 cm = 5½"-4¾"-4⅜"-4"-3⅛"-2⅜" from division. Switch to double pointed needles size 2.5 mm = US 1,5. Work next round as follows: * Knit 1, purl 2 *, work from *-* over the first 15-18-24-24-27-30 stitches, A.2b over A.2a, continue with knit over knit and purl over purl over stitches in A.3c, A.4b over A.4a, * purl 2, knit 1 *, work from *-* over 15-15-21-24-24-27 stitches and finish with purl 2 = 75-78-90-99-102-108 stitches. Continue with knit over knit and purl over purl until piece measures 17-15-14-13-11-9 cm = 6¾"-6"-5½"-5⅛"-4⅜"-3½" from division, then bind off by knitting. Work the other sleeve the same way. ASSEMBLY: Sew the buttons on to the left band. |
|||||||||||||||||||||||||||||||
Diagram explanations |
|||||||||||||||||||||||||||||||
|
|||||||||||||||||||||||||||||||
 |
|||||||||||||||||||||||||||||||
 |
|||||||||||||||||||||||||||||||
 |
|||||||||||||||||||||||||||||||
 |
|||||||||||||||||||||||||||||||
 |
|||||||||||||||||||||||||||||||
 |
|||||||||||||||||||||||||||||||
 |
|||||||||||||||||||||||||||||||
Have you finished this pattern?Tag your pictures with #dropspattern #springssurrenderjacket or submit them to the #dropsfan gallery. Do you need help with this pattern?You'll find 28 tutorial videos, a Comments/Questions area and more by visiting the pattern on garnstudio.com. © 1982-2026 DROPS Design A/S. We reserve all rights. This document, including all its sub-sections, has copyrights. Read more about what you can do with our patterns at the bottom of each pattern on our site. |
|||||||||||||||||||||||||||||||


With over 40 years in knitting and crochet design, DROPS Design offers one of the most extensive collections of free patterns on the internet - translated to 17 languages. As of today we count 324 catalogs and 12290 patterns - 12280 of which are translated into English (US/in).
We work hard to bring you the best knitting and crochet have to offer, inspiration and advice as well as great quality yarns at incredible prices! Would you like to use our patterns for other than personal use? You can read what you are allowed to do in the Copyright text at the bottom of all our patterns. Happy crafting!
Post a comment to pattern DROPS 212-39
We would love to hear what you have to say about this pattern!
If you want to leave a question, please make sure you select the correct category in the form below, to speed up the answering process. Required fields are marked *.