
Popular categories
Looking for a yarn?


Comments / Questions (140)
![]() Andreea wrote:
Andreea wrote:
Hi, I'm working M size. After completing the 34 cm, if the beginning marker is between 2 purls, 9 stiches will end with a purl stich and starting A1 with a purl will be on a knitted column stiches. Something is not ok here Thank you for your answer but not responding to my question: the thing is that after 9 purls from garter at the beginning of the line the next stich is a purl(from A1) it is on a knitted stich on the previous round , so the column is disrupted.
03.06.2022 - 16:27DROPS Design answered:
Dear Andreea, after 34 cm you work a slight cast off edge under the armhole, in garter stitch. So the stitches of A.1 are disrupted. A.2 and A.3 disrupt A.1, because you start working the cast off edge under each armhole in garter stitch and you start shaping the front. Happy knitting!
04.06.2022 - 18:56
![]() Andreea wrote:
Andreea wrote:
Hi, I'm working M size. After completing the 34 cm, if the beginning marker is between 2 purls, 9 stiches will end with a purl stich and starting A1 with a purl will be on a knitted column stiches. Something is not ok here . Or maybe I missed something can you help with this? Thank, Andreea
03.06.2022 - 11:48DROPS Design answered:
Dear Andrea, when piece measures 34 cm you will work a small edge in garter stitch on each side (= 18 sts on each side worked with A.2 = garter stitch), then you will cast off the middle 8 of these 18 sts as follows: 5 sts in garter stitch (edge of front/back piece), 8 sts cast off for armhole, 5 sts in garter stitch (edte of back/front piece). Happy knitting!
03.06.2022 - 15:56
![]() Susi Zimmermann wrote:
Susi Zimmermann wrote:
Hallo, kann mir jemand helfen wie ich die strick schrift A4 und A5 lesen muss? Und welches ist die hin und rück Reihe.
07.03.2022 - 11:32DROPS Design answered:
Liebe Frau Zimmermann, die Diagramme zeigen (wie alle anderen Diagramme) alle Reihen, dh die Hin- sowie die Rückreihen; die Hinreihen lesen Sie rechts nach links und die Rückreihen links nach rechts. Hier lesen Sie mehr. Viel Spaß beim stricken!
07.03.2022 - 20:03
![]() Andrea Weber wrote:
Andrea Weber wrote:
Hilfe, ich habe Probleme bei A7. Ich habe 44 Maschen, d.h. ich beginne mit den 5 Maschen kraus rechts für den Rand. Danach kommt A7 mit 34 Maschen und wieder 5 Maschen kraus rechts für den Rand. Soweit okay. Aber A7 beginnt dann mit 7 rechten Maschen, das macht die Streifen kaputt. Irgendwas verstehe ich falsch. Könnt Ihr mir bitte helfen?
11.01.2022 - 19:31DROPS Design answered:
Liebe Frau Weber, A.7 wird über 34 Maschen gestrickt, Sie müssen A.6 stricken bis 34 Maschen übrig sind, dh bei jeder Hinreihe nehmen Sie 1 Masche beidseitig von den 4 mittleren Maschen (und stricken Sie die anderen Maschen wie zuvor) bis 34 M übrig sind = diese übrigen Maschen stricken Sie dann wie im Diagram für Ihre Größe gezeigt ist (die 5 Maschen kraus rechts sind auch in A.7 gezeichnet). Viel Spaß beim stricken!
12.01.2022 - 06:57
![]() Judy wrote:
Judy wrote:
In regards to the 3 “ridges” to be done on the back piece, does this mean 3 rows of garter stitch? Or 6 rows? Thank you
07.01.2022 - 04:55DROPS Design answered:
Hi Judy, 3 ridges is 6 rows of garter stitch. Happy knitting!
07.01.2022 - 06:56
![]() Margarita Torrijos Cano wrote:
Margarita Torrijos Cano wrote:
En la espalda en A4 hay 13 puntos y empieza con 7 puntos del derecho. Pero además hay que hacer los 5 puntos musgo o solo se hacen en la fila del revés?
02.10.2021 - 21:37DROPS Design answered:
Hola Margarita, la labor ya se ha dividido, estamos trabajando la espalda y los 5 puntos en punto musgo solo se trabajan en los delanteros. Entonces, se trabaja A.4, punto elástico y se termina con A.5.
03.10.2021 - 23:30
![]() Sophia wrote:
Sophia wrote:
In the back piece after the 5 edge sts in garter stitch how I knit the A4 & A5? From right to left both diagrams? Thank you
20.08.2021 - 22:57DROPS Design answered:
Dear Sophia, the diagrams always showevery row from the right side. The pattern says that I.e. work first row from right side", whixh means you should read the diagram from right to left. Happy Stitching!
22.08.2021 - 00:53
![]() Åse wrote:
Åse wrote:
Hei igjen. Jeg fikk svar på spørsmålet ang A6 og A7, men får ikke svaret til stemme da det strikkes annehver omgang fra rettside og vrangside. Da stemmer ikke mønsteret, eller skal man strikle frem og tilbake fra rettsiden plutselig? I så fall går det nok fint.
04.08.2021 - 09:23DROPS Design answered:
Hej Åse, Nederst i opskriften finder du en video som viser hvordan man strikker efter diagram :)
06.10.2021 - 13:51
![]() Åse wrote:
Åse wrote:
Kan dere rette opp i diagram A6? Det blir ikke rettmasker oppover midt på slik diagrammet er nå. Dette gjelder alle str tror jeg. Ser flere har kommentert/stilt spørsmål om dette.
03.08.2021 - 22:59DROPS Design answered:
Hej Åse, jo du tager ind ifølge A.6. Det vil sige at du på hver pind strikker til du har 7 masker før mærket i midten, da vil du altid få de 2 midterste masker i glatstrik. God fornøjelse!
04.08.2021 - 08:13
![]() Åse wrote:
Åse wrote:
Kan dere rette opp i diagram A7? Feil i 5 kantmasker og midtmasker uansett str. Blir ikke riller på kantene eller rettmasker oppover midt på slik diagrammet er nå. Det bør også stå at vrangbord alltid justeres slik at r masker er over r masker og vr masker er over vr masker uansett str. Super topp ellers.
03.08.2021 - 22:17DROPS Design answered:
Hej igen, jo de 5 yderste masker i hver side af diagram A.7 strikkes i retstrik (ret fra retsiden og ret fra vrangen) når du følger diagrammet. På første pind har du 17 masker før mærket i midten, på næste pind har du 15 masker før mærket i midten osv. God fornøjelse!
04.08.2021 - 08:18
|
||||||||||||||||||||||
Strawberry Summer#strawberrysummertop |
||||||||||||||||||||||
 |
 |
|||||||||||||||||||||
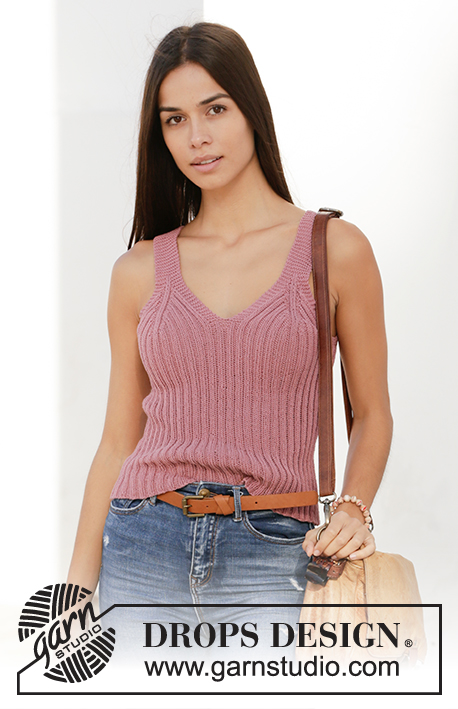
Knitted top in DROPS Safran. Piece is knitted bottom up with rib. Size: S - XXXL
DROPS 211-18 |
||||||||||||||||||||||
|
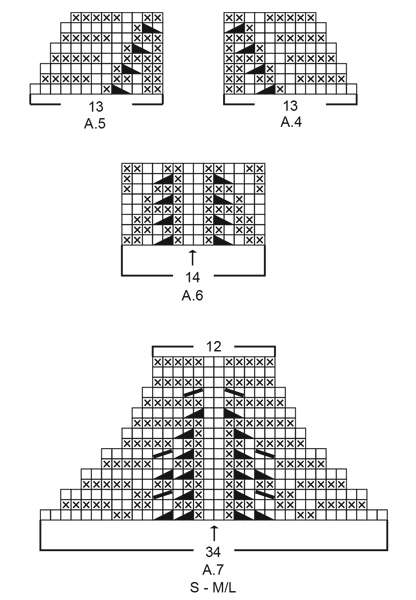
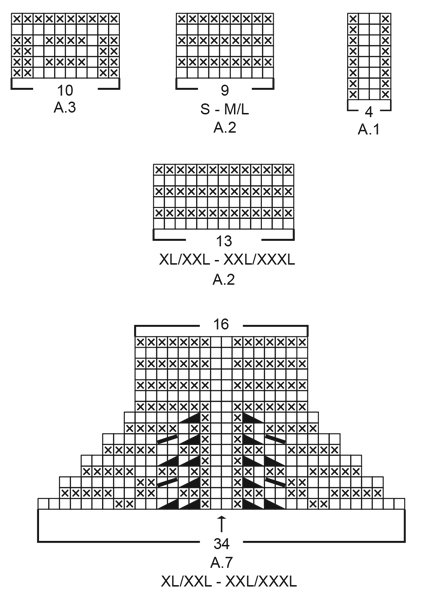
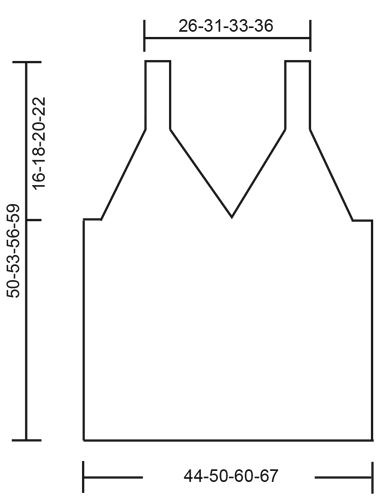
---------------------------------------------------------- EXPLANATION FOR THE PATTERN: ---------------------------------------------------------- GARTER STITCH (back and forth): Knit all rows. 1 ridge vertically = knit 2 rows. PATTERN: See diagrams A.1 to A.7. Choose diagram for your size (applies to A.2 and A.7). Diagrams show all rows in pattern seen from the right side. ---------------------------------------------------------- START THE PIECE HERE: ---------------------------------------------------------- TOP - SHORT OVERVIEW OF THE PIECE: Work body in the round on circular needle, from the bottom and up to armholes. Then work back piece and the 2 front pieces separately, back and forth on circular needle until finished measurements. Straps on front piece are fastened to back piece. BODY: Cast on 224-256-304-336 stitches on circular needle size 3 mm = US 2,5 with Safran. Work A.1 in the round – insert at the same time 1 marker thread at the beginning of round (= left side when garments is worn), and 1 marker thread after 112-128-152-168 stitches (= right side when garment is worn). Both marker threads is between 2 purl stitches. Move the marker thread upwards when working. REMEMBER THE KNITTING GAUGE! When piece measures 33-34-35-36 cm = 13"-13⅜"-13¾"-14¼", work next round as follows (approx. 1 cm = ⅜" remains until piece is divided mid front, and decrease for armholes): Work A.2 (= 9-9-13-13 stitches), continue A.1 over the next 42-50-58-66 stitches, work A.3 (= 10 stitches mid front), continue A.1 over the next 42-50-58-66 stitches), work A.2 over the next 18-18-26-26 stitches (= 2 repetitions of 9-9-13-13 stitches – marker thread is between these 2 repetitions), continue A.1 over the next 94-110-126-142 stitches (= back piece), and work A.2 over the remaining 9-9-13-13 stitches. Continue pattern like this until A.2 and A.3 have been worked vertically. On next round bind off for armholes, i.e. work next round as follows: Bind off 4-4-8-8 stitches for armhole, work 5 stitches in GARTER STITCH – read explanation above, continue A.1 over the next 42-50-58-66 stitches, work 10 stitches in garter stitch (= mid front), continue A.1 over the next 42-50-58-66 stitches, work 5 stitches in garter stitch, bind off 8-8-16-16 stitches for armhole, work 5 stitches in garter stitch, continue A.1 over the next 94-110-126-142 stitches, work 5 stitches in garter stitch, and bind off the remaining 4-4-8-8 stitches for armhole. Cut the yarn. Finish back piece and front pieces separately. BACK PIECE: = 104-120-136-152 stitches. Begin from wrong side and work 1 row in rib as before with 5 edge stitches in garter stitch in each side. Continue to work in rib with 5 edge stitches in garter stitch in each side while AT THE SAME TIME decreasing for armholes on every row from right side as explained below. I.e. work first row from right side as follows: Work A.4 (= 13 stitches), continue rib as before until 13 stitches remain on row, finish with A.5 (= 13 stitches). Continue pattern like this until A.4 and A.5 have been worked 4-4-5-6 times in total vertically (= 16-16-20-24 stitches decreased in each side) = 72-88-96-104 stitches remain. Work 3 ridges back and forth over all stitches. Bind off - make sure that the bind-off edge is not too tight. Back piece measures approx. 11-11-14-16 cm = 4⅜"-4⅜"-5½"-6¼" from where piece was divided for front piece and bac piece. FRONT PIECE: = 104-120-136-152 stitches. Divide the piece mid front and slip half the stitches on 1 stitch holder or extra needle. Then work first part as explained below. PART-1: = 52-60-68-76 stitches. Begin from wrong side and work 1 row in rib as before with 5 edge stitches in garter stitch in each side. Insert 1 marker between the 2 middle stitches on row (= between 2 knit stitch seen from right side). Marker indicates the middle. Continue to work in rib with 5 edge stitches in garter stitch in each side while at the same time decreasing on each side of the middle as explained below. I.e. work first row from right side as follows: 5 edge stitches in garter stitch, work rib as before until 7 stitches remain before marker, work A.6 (= 14 stitches), work rib as before until 5 stitches remain on row, and finish with 5 edge stitches in garter stitch. Continue pattern like this, and repeat A.6 vertically until 34 stitches remain on row – finish after 1 row from wrong side. Now work A.7 over these 34 stitches. When A.7 has been worked, 12-12-16-16 stitches remain on needle for strap, and front piece measures approx. 11-13-16-18 cm = 4⅜"-5⅛"-6¼"-7" from where piece was divided for front and back piece. Work strap as explained below. STRAP: = 12-12-16-16 stitches. Work in garter stitch back and forth until the strap measures approx. 10-12-10-10 cm = 4"-4¾"-4"-4" – try the top on and work to desired length, strap should continue over the shoulder and down to back piece. Bind off. PART-2: Slip the 52-60-68-76 stitches from stitch holder or extra needle back on circular needle size 3 mm = US 2,5, and work part-2 the same way as part-1. Then work strap the same way as on part-1. Bind off. ASSEMBLY: Fasten straps to back piece - begin at the edge in each side and sew stitch too stitch. Cut and fasten the thread. |
||||||||||||||||||||||
Diagram explanations |
||||||||||||||||||||||
|
||||||||||||||||||||||
 |
||||||||||||||||||||||
 |
||||||||||||||||||||||
 |
||||||||||||||||||||||
Have you finished this pattern?Tag your pictures with #dropspattern #strawberrysummertop or submit them to the #dropsfan gallery. Do you need help with this pattern?You'll find 15 tutorial videos, a Comments/Questions area and more by visiting the pattern on garnstudio.com. © 1982-2026 DROPS Design A/S. We reserve all rights. This document, including all its sub-sections, has copyrights. Read more about what you can do with our patterns at the bottom of each pattern on our site. |
||||||||||||||||||||||


With over 40 years in knitting and crochet design, DROPS Design offers one of the most extensive collections of free patterns on the internet - translated to 17 languages. As of today we count 324 catalogs and 12291 patterns - 12281 of which are translated into English (US/in).
We work hard to bring you the best knitting and crochet have to offer, inspiration and advice as well as great quality yarns at incredible prices! Would you like to use our patterns for other than personal use? You can read what you are allowed to do in the Copyright text at the bottom of all our patterns. Happy crafting!
Post a comment to pattern DROPS 211-18
We would love to hear what you have to say about this pattern!
If you want to leave a question, please make sure you select the correct category in the form below, to speed up the answering process. Required fields are marked *.