
Popular categories
Looking for a yarn?


Comments / Questions (255)
![]() Humeau Nadia wrote:
Humeau Nadia wrote:
Je vais donc devoir tout remettre à zéro. Ce qui me dérangeait c'est qu avec 20 augmentations de raglan j avais déjà plus de Mailles de prévu pour l ensemble du tricot. Aurais je fait une erreur sur les augmentations. Pourtant j ai bien tenu compte de l'augmentation avant ou après la maille marqueur ! 1 augmentation côté dos manche et 1 de chaque côté manches devant soit 4 à chaque tour ?
10.05.2022 - 10:38DROPS Design answered:
Bonjour Mme Humeau, vous augmentez 2 mailles sur le devant/le dos tous les 2 rangs (après 28 augmentations = 56 augmentations), mais pour les diagrammes A.1 et A.3, attention, car vous augmentez parfois 2 mailles (cf réponses précédentes); donc 1 au début et à la fin du dos et du devant, et soit 1 soit 2 au début et à la fin de chaque manche, comme dans A.1/A.3. Bon tricot!
10.05.2022 - 14:01
![]() Humeau Nadia wrote:
Humeau Nadia wrote:
Je viens de compter mes rangs de diagramme A1 je suis au 40 ème rang pour 368 mailles en tour pour mon tricot dont seulement si je comprend bien les 28 augmentations au total tous les 2 rangs j en ai 19 augmentations jetées , pourquoi ces mailles en trop. Je reste sur mon problème.
10.05.2022 - 07:21DROPS Design answered:
Bonjour Mme Humeau, il est difficile de repérer votre erreur à distance, essayez de bien vérifier votre nombre de mailles pour chaque partie dos/devant et manches. Vérifiez votre nombre d'augmentations également. Si vous avez tricoté 40 tours depuis le début, vous devez avoir augmenté 20 fois (on augmente tous les 2 tours). Vous avez ainsi: 18+20=38 m pour le demi-dos avant la maille avec le fil marqueur. Bon tricot!
10.05.2022 - 08:56
![]() Humeau Nadia wrote:
Humeau Nadia wrote:
Bonjour désolée suite à mon message hier soir je me suis trompée de nombres de mailles. Pour la taille M j ai au total 368 mailles au lieu de 356, je pensais qu il fallait finir un dessin complet du diagramme 2 du coup j'ai continué. Je ne comprenais pas le sens de augmenter 28 fois au total tous les 2 tours ... J ai le diagramme 2 avec 4 épis presque finis. Dois je redémarrer mon travail du coup et jusqu'à quel rang des diagramme. Merci d avance.
10.05.2022 - 06:59DROPS Design answered:
Bonjour Mme Humeau, effectivement, 28 fois tous les 2 tours signifie que vous allez augmenter sur 28 rangs sur l'endroit (56 tours au total); pour que votre nombre de mailles soit juste pour la suite, il sera probablement plus simple de défaire les rangs en trop pour que vous retombiez juste; Si vous le souhaitez, vous pourrez terminer le motif ajouré des manches avant de terminer par les 2 côtes mousse. Bon tricot!
10.05.2022 - 08:51
![]() HUMEAU NADIA wrote:
HUMEAU NADIA wrote:
Bonsoir Une question concernant la fin du diagramme manche et mes augmentations raglan. Que signifie pour la taille M augmenter 28 fois au total tous les 2 tours à chaque fil marqueur ? Je pense avoir été trop loin dans le dessin. Je me retrouve avec 356 Mailles au lieu de 356 donc plus de Mailles pour les 1/2dos et le devant. Je ne savais pas jusqu'où travailler le diagramme des manches. Je laisse mon travail en suspend le temps d avoir vos conseils. Merci d avance.
09.05.2022 - 20:02DROPS Design answered:
Bonjour Mme Humeau, vous devez augmenter à chaque tour d'augmentation des raglans: 1 m au début + 1 m à la fin de chaque dos et du devant comme indiqué sous RAGLAN, les augmentations du dos/devant se tricotent en jersey et celles des manches comme dans les diagrammes A.1 et A.3 - à chaque fois que vous tricotez les 24 rangs des diagrammes, vous avez augmenté 14 mailles dans A.1 et A.3 (aux rangs 11 et 23 , on augmente 2 mailles ans A.1 et 2 m ailles dans A.3 = 4 m pour chacune des manches, soit 12 mailles au total sur ce tour). Vérifiez votre nombre de mailles d'après celui indiqué pour la division, ceci pourrait vous aider. Bon tricot!
10.05.2022 - 08:41
![]() Humeau wrote:
Humeau wrote:
Binsiir Je viens de finir les diagrammes A1 A2 A3. Dos manches devant. Pour continuer mon tricot avec les raglans et la continuité du motif où dois je reprendre ce dessin. Au 1er rg.? Merci pour votre aide et merci de m avoir bien expliqué les autres fois. Je suis bien répartie. Nadia Humeau
04.05.2022 - 23:11DROPS Design answered:
Bonjour Mme Humeau, tout à fait, vous allez répéter les diagrammes ainsi: A.1 au-dessus des 2 premières m du A.1 précédent et A.2 sur les 14 m suivantes (=les 16 m du dernier rang de A.1), répétez A.3 comme avant jusqu'aux 17 m du dernier rang de A.3, tricotez alors A.2 (= 14 m) et A.3 (= 3 m). Continuez les diagrammes ainsi, autrement dit, vous tricotez 2 fois A.2 en plus entre A.1 et A.3. Bon tricot!
05.05.2022 - 09:06
![]() Humeau wrote:
Humeau wrote:
Tous les cas merci merci de nous répondre ainsi ça aide beaucoup. Nadia Humeau
01.05.2022 - 09:25
![]() Katrin wrote:
Katrin wrote:
Ich stricke gdie Größe S. Bald habe ich das Muster 2x gestrickt, aber dann habe ich noch nicht 26 Raglanzunahmen gemacht. Muss ich das Muster nochmal wiederholen oder stricke ich jetzt glatt rechts über den Ärmel bis alle Raglanzunahmen gestrickt sind?
29.04.2022 - 08:19DROPS Design answered:
Liebe Katrin, wenn die Diagramme fertig in der Höhe sind, dann wiederholen Sie sie in der Höhe, dh: A.1 über die 2 ersten Maschen, dann wiederholen Sie A.2 über die nächsten Maschen bis 3 Maschen (vorrigen A.3) bleiben und stricken Sie A.3 über diese 3 Maschen. Viel Spaß beim stricken!
29.04.2022 - 08:32
![]() Humeau Nadia wrote:
Humeau Nadia wrote:
Merci pour votre retour sur mes interrogations seulement vous parlez de Jersey sur l'endroit mais dans ce cas sur les rangs pairs il faut aussi tricoter à l endroit donc point mousse dans le schéma. J ai tenté de refaire le diagramme mais je suis toujours bloquée aux rangs pairs quand il y a le jeté et le x sur le rang impair. Comment dois je les tricoter. Désolée pour cette nouvelle question mais du coup je pense que je décale le dessin et ça ne donne rien. Merci beaucoup
27.04.2022 - 16:53DROPS Design answered:
Bonjour Mme Humeau, quand on tricote du jersey en rond, on tricote toutes les mailles à l'endroit (cf vidéo - pour tricoter du point mousse, on devrait alterner 1 tour endroit, 1 tour envers - cf cette autre vidéo). Autrement dit, vis vous tricotez bien en rond, tricotez les cases blanches à l'endroit (= jersey endroit) et les croix à l'envers (jersey envers). Bon tricot!
28.04.2022 - 11:31
![]() Humeau wrote:
Humeau wrote:
Bonjour j ai du mal à démarrer le point fantaisie. Le schéma correspond bien aux rangs endroit et envers donc Au rang 2 on se retrouvé avec des points mousse est ce cela quand on fait 1 maille endroit sur l endroit et l envers. De plus je n arrive pas à savoir où placer la maille marquée et le jeté. A chaque rang endroit dois je d abord faire la jeté ou dois je tricoter celle du rang précédent. Merci pour votre aide
26.04.2022 - 20:37DROPS Design answered:
Bonjour Mme Humeau, on tricote ce top en rond, en tricotant les rangs impairs du diagramme à l'endroit, vous obtiendrez du jersey (les x correspondent à des mailles jersey envers, tricotez à l'envers tous les tours). Faites suivre les marqueurs, ils doivent toujours rester dans la même maille, ainsi vous ne les perdrez pas, et vous augmenterez pour le dos/devant avant/après cette maille; les augmentations des manches se font dans le diagramme (= 2 m après/avant cette maille). Bon tricot!
27.04.2022 - 08:18
![]() Früh Anita wrote:
Früh Anita wrote:
Hallo. Die Frage mit den Raglanzunahmen habe ich glaube ich rausbekommen. Aber etwas verstehe ich nicht ganz (Knopf in der Leitung): bei in dieser Weise weiterarbeiten heisst es „jedesmal wenn A.1, A.2, und A.3 1x in der Höhe gestrickt wurden 2 Rapporte von A.2 zwischen A.1 und A.3 Stricken. „ Woher sind die Maschen dazu ? Besten Danke für die Weiterhilfe.
18.04.2022 - 19:54DROPS Design answered:
Liebe Frau Früh, die Raglanzunahmen bei den Ärmeln stricken Sie in A.1 (rechts im Diagram) und A.3 (links im Diagram); jedesmal diese beide Diagramme in der Höhe gestrickt sind, haben Sie 14 Maschen in je A.1/A.3 = so haben Sie genügend Maschen für 1 x A.2 beidseitig. Dh über die 16 Maschen A.1 stricken Sie: A.1, A.2 und über die 17 Maschen A.3 stricken Sie: A.2, A.3. Viel Spaß beim stricken!
19.04.2022 - 11:45
|
|||||||||||||||||||
Catch the Wind#catchthewindtop |
|||||||||||||||||||
 |
 |
||||||||||||||||||
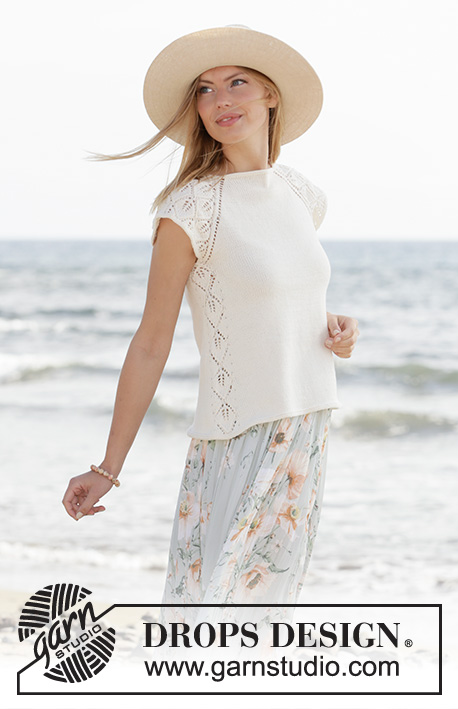
Knitted top with raglan and short sleeves in DROPS Safran. The piece is worked top down with lace pattern. Sizes XS - XXL.
DROPS 211-5 |
|||||||||||||||||||
|
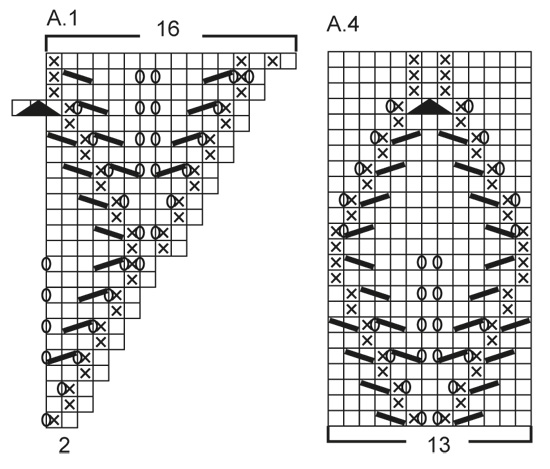
------------------------------------------------------- EXPLANATIONS FOR THE PATTERN: ------------------------------------------------------- RIDGE/GARTER STITCH (worked in the round): 1 ridge in height = 2 rounds; Knit 1 round and purl 1 round. PATTERN: See diagrams A.1 to A.4. RAGLAN: Increase to raglan on each side of the back piece and each side of the front piece (towards the sleeves). Increase by making 1 yarn over before/after the stitch with the marker thread; on the next round knit the yarn overs to leave holes. The increases on the sleeves are drawn into patterns A.1 and A.3. ------------------------------------------------------- START THE PIECE HERE: ------------------------------------------------------- TOP – SHORT OVERVIEW OF THE PIECE: The neck and yoke are worked in the round with circular needle, top down. The yoke is divided for body and sleeves and the body continued in the round. A small edge is worked around the armholes. NECK: Cast on 106-110-116-120-124-132 stitches with circular needle size 3 mm = US 2,5 and Safran. Work 2 RIDGES – read description above. Then work the yoke as described below. YOKE: Insert 4 marker threads in the piece as described below (without working the stitches). The threads will be used when increasing to raglan. Count 16-17-18-19-20-22 stitches (= half back piece), insert 1 marker thread in the next stitch, count 19 stitches (= sleeve), insert 1 marker thread in the next stitch, count 32-34-37-39-41-45 stitches (= front piece), insert 1 marker thread in the next stitch, count 19 stitches (= sleeve), insert 1 marker thread in the next stitch. There are 16-17-19-20-21-23 stitches after the last marker thread (half back piece). The first round is worked as follows: Work stockinette stitch as far as the first marker-stitch, make 1 yarn over (first increase to RAGLAN – see description above), work the marker-stitch in stockinette stitch, A.1 (= 2 stitches), A.2 (= 14 stitches) and A.3 ( = 3 stitches) (= 19 stitches on the sleeve), work the marker-stitch in stockinette stitch, 1 yarn over, work stockinette stitch as far as the next marker-stitch (= front piece), 1 yarn over, work the marker-stitch in stockinette stitch, A.1 (= 2 stitches), A.2 (= 14 stitches) and A.3 (= 3 stitches) (= 19 stitches on the sleeve), work the marker-stitch in stockinette stitch, 1 yarn over, work stockinette stitch over the remaining stitches (= half back piece). Continue this pattern with stockinette stitch on the front and back pieces and A.1, A.2 and A.3 on the sleeves. Each time A.1, A.2 and A.3 are worked 1 time in height, you work 2 more repeats of A.2 between A.1 and A.3. REMEMBER THE KNITTING GAUGE! AT THE SAME TIME continue to increase to raglan every 2nd round a total of 22-26-28-31-35-39 times at each marker thread (including the first increase described above). The new stitches are worked in stockinette stitch on the front and back pieces and in lace pattern as shown in the diagrams on the sleeves. When the increases to raglan are finished there are 294-334-356-388-424-468 stitches on the needle. The next round is worked as follows: Work 39-44-47-51-56-62 stitches (= half the back piece), place the next 69-79-83-91-99-109 stitches on 1 thread for the sleeve, cast on 9-9-9-11-13-15 new stitches on the needle (= in side under sleeve), work 78-88-95-103-113-125 stitches (= front piece), place the next 69-79-83-91-99-109 stitches on 1 thread for the sleeve, cast on 9-9-9-11-13-15 new stitches on the needle (= in side under sleeve), work the last 39-44-48-52-57-63 stitches (= half back piece). Body and sleeves are finished separately. THE PIECE IS NOW MEASURED FROM HERE! BODY: = 174-194-208-228-252-280 stitches. Insert 1 marker thread in the middle of the 9-9-9-11-13-15 stitches cast on under each sleeve. Cut the strand and begin the round 6 stitches before 1 of the stitches with marker thread. Work A.4 (= 13 stitches), work 74-84-91-101-113-127 stitches in stockinette stitch, work A.4 and then stockinette stitch over the last 74-84-91-101-113-127 stitches. Continue this pattern, AT THE SAME TIME, when the piece measures 2 cm = ¾", increase by making 1 yarn over on each side of A.4, on the next round knit the yarn over twisted to avoid holes (= 4 increased stitches). Repeat the increase every 1 ½ cm = ½" a total of 18 times; the increased stitches are worked in stockinette stitch = 246-266-280-300-324-352 stitches. When the piece measures 28-29-29-30-29-29 cm = 11"-11⅜"-11⅜"-11¾"-11⅜"-11⅜" from the division work 2 ridges over all stitches, then bind off. SLEEVE-EDGE: Place the 69-79-83-91-99-109 stitches on one of the threads on short circular needle size 3 mm = US 2,5 and knit up 1 stitch in each of the 9-9-9-11-13-15 new stitches under the sleeve = 78-88-92-102-112-124 stitches. Work 2 ridges over all stitches, then bind off. Work the other sleeve-edge in the same way. |
|||||||||||||||||||
Diagram explanations |
|||||||||||||||||||
|
|||||||||||||||||||
 |
|||||||||||||||||||
 |
|||||||||||||||||||
 |
|||||||||||||||||||
Have you finished this pattern?Tag your pictures with #dropspattern #catchthewindtop or submit them to the #dropsfan gallery. Do you need help with this pattern?You'll find 19 tutorial videos, a Comments/Questions area and more by visiting the pattern on garnstudio.com. © 1982-2026 DROPS Design A/S. We reserve all rights. This document, including all its sub-sections, has copyrights. Read more about what you can do with our patterns at the bottom of each pattern on our site. |
|||||||||||||||||||


With over 40 years in knitting and crochet design, DROPS Design offers one of the most extensive collections of free patterns on the internet - translated to 17 languages. As of today we count 324 catalogs and 12278 patterns - 12268 of which are translated into English (US/in).
We work hard to bring you the best knitting and crochet have to offer, inspiration and advice as well as great quality yarns at incredible prices! Would you like to use our patterns for other than personal use? You can read what you are allowed to do in the Copyright text at the bottom of all our patterns. Happy crafting!
Post a comment to pattern DROPS 211-5
We would love to hear what you have to say about this pattern!
If you want to leave a question, please make sure you select the correct category in the form below, to speed up the answering process. Required fields are marked *.