
Looking for a yarn?


Comments / Questions (194)
![]() Elsie wrote:
Elsie wrote:
Hi there. If I want to change my wool to DK (elle Cotton On) and change my needles to 4mm......do I knit a lager size?
25.06.2025 - 12:52DROPS Design answered:
Dear Elsie, if your tension is different than the one in the pattern you might have to recount the whole pattern with your own tension in both width and height. Happy knitting!
25.06.2025 - 15:50
![]() Marisa wrote:
Marisa wrote:
Grazie per la Vostra solerte ed esaustiva risposta..l errore è stato il mio perché non ho impastato il lavoro al secondo giro,ma al terzo quando avevo già eseguito un giro di 2/2 ...Grazie mille...siete una grande risorsa di idee e applicazioni
16.06.2025 - 18:23
![]() Marisa wrote:
Marisa wrote:
Buonasera La partena del numero di maglie nella tagliaXL é di138 maglie e il lavoro coste due/due richiede un numero di maglie divisibili per 4..conviene diminuire o aumentare per ottenere un n appropriato per poter fare le coste 2/2?..non si rischia un collo troppo grande e troppo piccolo, Grazie mille
14.06.2025 - 20:38DROPS Design answered:
Buonasera Marisa, deve procedere con la lavorazione come indicato. Buon lavoro!
16.06.2025 - 00:26
![]() Marisa wrote:
Marisa wrote:
Buonasera La partena del numero di maglie nella tagliaXL é di138 maglie e il lavoro coste due/due richiede un numero di maglie divisibili per 4..conviene diminuire o aumentare per ottenere un n appropriato per poter fare le coste 2/2?..non si rischia un collo troppo grande e troppo piccolo, Grazie mille
14.06.2025 - 20:37DROPS Design answered:
Buonasera Marisa, deve procedere con la lavorazione come indicato. Buon lavoro!
16.06.2025 - 00:26
![]() Marisa wrote:
Marisa wrote:
A quale taglia corrisponde la taglia XL?
14.06.2025 - 20:30DROPS Design answered:
Buonasera Marisa, in fondo alla pagina può trovare lo schema completo delle misure. Buon lavoro!
16.06.2025 - 00:24
![]() Tee wrote:
Tee wrote:
Can you list in sections how to increase on the neck. Like others, this is my 7th attempt, I’m not getting K2 P3. Can you explain in detail section by section. Please, it’s driving me mad
10.06.2025 - 20:24DROPS Design answered:
Dear Tee, over the stitches worked previously with rib P1, K2 increasing 1 stitch in every P section so that you will get rib P2, K2 between 1st and 2nd marker thread and between 3rd and 4th marker threads. At the same time, the stitches before 1st marker thread, between 2nd and 3rd marker thread and after 4th marker thread to end of the round are worked in stocking stitch increasing stitches evenly (see calculator to help you). Happy knitting!
11.06.2025 - 08:03
![]() Eva wrote:
Eva wrote:
Hallo, Ich stricke das Shirt in Größe S und habe eine Frage zu den Abnahmen am Rumpfteil. Nach 4cm nehme ich beidseitig von den beiden Markieren unterm Arm jeweils eine Masche ab (-4M). Danach soll nach jeweils 8cm 2x in der weise abgenommen werden. Wenn ich richtig rechne komme ich dann doch auf insgesamt -12M also ergebe es 136-4-4-4=124M. In der Anleitung stehen aber 128M. Wo liegt der Fehler? Vielen Dank im Voraus
28.05.2025 - 19:15DROPS Design answered:
Liebe Eva, man muss insgesamt nur 2 Mal abnehmen: die 1. Abnahmen entsteht nach 4 cm und die nächste 8 cm danach : nach 12 cm; dann stricken Sie bis 20 cm und nehmen Sie 4 Mal in jeder 3 cm zu: 1. nach 20 cm, 2. nach 23 cm, 3. nach 26 cm und letzte nach 29 cm, noch 1 cm stricken und dann stricken Sie Bündchen. Viel Spaß beim Stricken!
30.05.2025 - 08:21
![]() Marilena Merz wrote:
Marilena Merz wrote:
Ich kann leider das Bild meines Pullovers nicht hochladen🤷♀️das Formular dazu habe ich ausgefüllt aber wo soll ich das Bild hochladen? Danke im Voraus. Gruss Marilena
25.05.2025 - 20:54DROPS Design answered:
Liebe Frau Merz, Hochlanden können Sie nicht, aber einen Links teilen Sie gerne mit uns, mehr lesen Sie hier. Danke im voraus!
26.05.2025 - 09:42
![]() Marilena Merz wrote:
Marilena Merz wrote:
Sorry hat sich erledigt🤭ich habe nicht richtig gelesen👍Gruss Marilena
15.05.2025 - 13:03
![]() Marilena Merz wrote:
Marilena Merz wrote:
Grösse L 126 Maschenanschlag. Dann 12, 36, 20, 36 und 8 Maschen aufteilen in Rumpf und Ärmel. Damit komme ich aber nicht auf die 126 M des Anschlags. Was mache ich falsch?
15.05.2025 - 12:12DROPS Design answered:
Liebe Frau Merz, so stricken Sie die 126 M: 12 M (2 re/2 li), 1 M re, 1 M re, 36 M (2 re/2 li), 1 M li, 1 M re, 1 M re, 20 M (1 li, 2 re), 2 M li, 1 M re, 1 M re, 36 M (1 links, 2 re), 1 M li, 1 M re, 1 M re, 8 M (2 li, 2 re), 2 links = 12+1+1+36+1+1+1+20+2+1+1+36+1+1+1+8+2=126. Viel Spaß beim Stricken!
15.05.2025 - 14:04
|
|
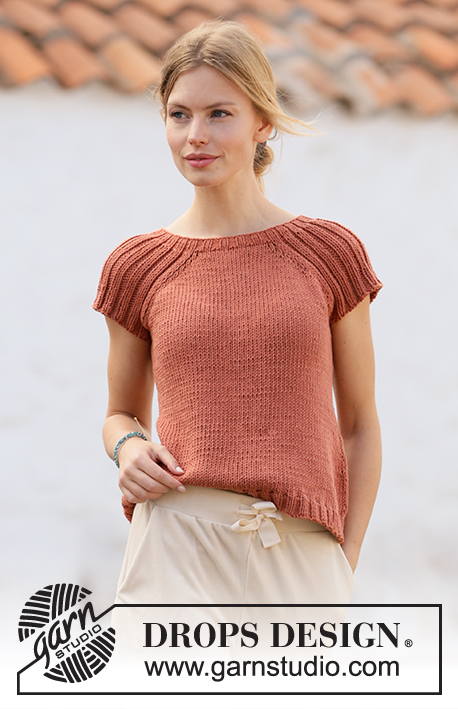
Canyon Clay#canyonclaytop |
|
 |
 |
Knitted top with raglan in DROPS Paris. Piece is knitted top down with rib. Size: S - XXXL
DROPS 212-15 |
|
|
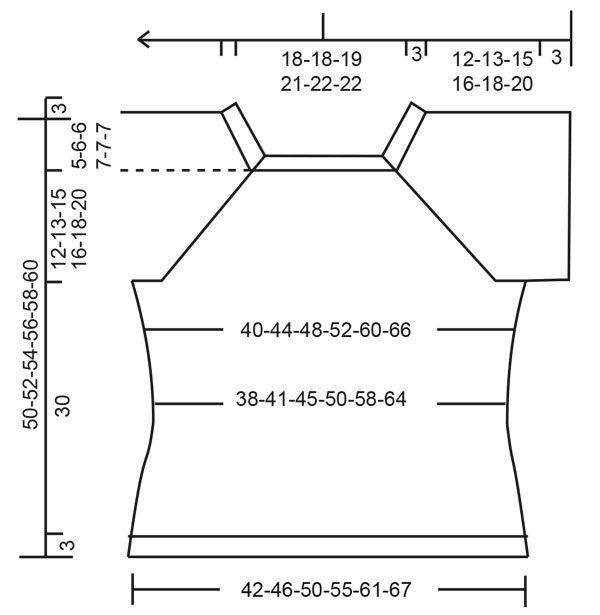
---------------------------------------------------------- EXPLANATION FOR THE PATTERN: ---------------------------------------------------------- INCREASE TIP-1 (evenly): To calculate how to increase evenly, count the stitches to be increased (e.g. 9 stitches) and divide by stitches of increases to be done (e.g. 2) = 4.5. In this example increase by making 1 yarn over after alternately every 4th and 5th stitch. On next row work yarn overs twisted to avoid holes. INCREASE TIP-2: Increase 1 stitch by making 1 yarn over. On next round purl yarn over twisted to avoid holes. Purl the new stitches. INCREASE TIP-3 (applies to sides of body): Work until 2 stitches remain before marker thread, 1 yarn over, knit 4 (marker thread is in the middle of these stitches), 1 yarn over. On next round knit yarn overs twisted to avoid holes. Then work the new stitches in stockinette stitch. DECREASE TIP: Decrease 1 stitch on each side of marker thread as follows: Work until 3 stitches remain before marker thread and knit 2 together, knit 2 (marker thread is between these stitches), slip 1 stitch knitwise, knit 1, pass slipped stitch over stitch worked. RAGLAN: In the beginning increase 2 stitches towards each raglan on front and back piece (= 8 stitches increased on round), and thereafter increase 1 stitch towards each raglan on front and back piece (= 4 stitches increased on round). Increase 2 stitches before marker thread as follows: Work until 2 stitches remain before marker thread: 1 yarn over, knit 1, 1 yarn over, knit 1, marker thread is here. Increase 2 stitches after marker thread as follows: Knit 1, 1 yarn over, knit 1, 1 yarn over. Increase 1 stitch before marker thread as follows: Work until 1 stitch remains before marker thread: 1 yarn over, knit 1, marker thread is here. Increase 1 stitch after marker thread as follows: Knit 1, 1 yarn over. On next round knit yarn overs twisted to avoid holes. Then work the new stitches in stockinette stitch. BIND-OFF TIP: To avoid a tight bind-off edge you may use a larger needle. If this also is too tight, make 1 yarn over after approx. every 4th stitch and bind off these as regular stitches. ---------------------------------------------------------- START THE PIECE HERE: ---------------------------------------------------------- TOP - SHORT OVERVIEW OF THE PIECE: Work neck edge and yoke in the round on circular needle from mid back, top down. Now divide yoke for body and sleeves. Work body in the round on circular needle. Work sleeves in the round on double pointed needles/short circular needle, top down. NECK EDGE: Cast on 112-118-126-138-144-144 stitches on circular needle size 3.5 mm = US 4 with Paris. Knit 1 round. Work next round as follows: (Knit 2/purl 2) over the first 8-8-12-12-12-12 stitches, knit 1, insert a marker thread here (= in transition between back piece and right sleeve), knit 1, (purl 1/knit 2) over the next 33-36-36-42-45-45 stitches, purl 1, knit 1, insert a marker thread here (= in transition between right sleeve and front piece), knit 1, (purl 2/knit 2) over the next 16-16-20-20-20-20 stitches, purl 2, knit 1, insert a marker thread here (= in transition between front piece and left sleeve), knit 1, (purl 1/knit 2) over the next 33-36-36-42-45-45 stitches, purl 1, knit 1, insert a marker thread here (= in transition between left sleeve and back piece), knit 1, (purl 2/knit 2) over the next 8-8-8-8-8-8 stitches, purl 2. Continue in the round like this until rib measures 3 cm = 1⅛". When rib is done, work next round as follows: Knit until first marker thread and increase at the same time 2-3-3-3-3-4 stitches evenly – read INCREASE TIP-1, knit over knit and purl over purl until next marker thread and increase at the same time 1 stitch in every purl section – read INCREASE TIP-2, knit until next marker thread and increase at the same time 4-6-5-5-6-8 stitches evenly, knit over knit and purl over purl until next marker thread and increase at the same time 1 stitch in every purl section, knit the last 11-11-11-11-11-11 stitches and increase at the same time 2-3-2-2-3-4 stitches evenly = 144-156-162-178-188-192 stitches. Work 1 row with knit over knit and purl over purl (work the yarn overs twisted to avoid holes). Switch to circular needle size 5 mm = US 8. Insert 1 marker at the beginning of round (= approx. mid back), measure yoke from this marker! YOKE: Knit over knit and purl over purl. On first round start increase for RAGLAN – read explanation above. Only increase on front piece and back piece towards each raglan. Increase 2 stitches every other round 9-9-8-10-12-13 times in total, then increase 1 stitch every other round 2-4-6-6-8-8 times = 224-244-250-282-316-328 stitches. REMEMBER THE KNITTING GAUGE! Continue with knit over knit and purl over purl until piece measures 12-13-15-16-18-20 cm = 4¾"-5⅛"-6"-6¼"-7"-8" from marker. The yoke is finished. Then work in the outermost stitch in each side of front piece and back piece in on sleeves. Work next round as follows: Work the first 30-33-37-41-47-50 stitches, slip the next 50-54-54-62-66-66 stitches on a stitch holder for sleeve and cast on 6-6-10-10-10-14 stitches on needle (= in the side under sleeve), work the next 62-68-71-79-92-98 stitches (= front piece), slip the next 50-54-54-62-66-66 stitches on a stitch holder for sleeve and cast on 6-6-10-10-10-14 stitches on needle (= in the side under sleeve), work the remaining 32-35-34-38-45-48 stitches on needle. Then finish body and sleeves separately. NOW MEASURE PIECE FROM HERE! BODY: = 136-148-162-178-204-224 stitches. Insert 1 marker thread in the in each side, in middle of the new stitches cast-on under the sleeves (= 3-3-5-5-5-7 new stitches on each side of marker thread). Move the marker threads upwards when working; they should be used for increase later in the sides. Work in stockinette stitch in the round. When piece measures 4 cm = 1½" from division, decrease 1 stitch on each side of marker threads - read DECREASE TIP. Decrease like this approx. every 8-7-6-5-4-3 cm = 3⅛"-3½"-2⅜"-2"-1½"-1⅛" 2 times in total = 128-140-154-170-196-216 stitches. When piece measures 20-18-16-14-12-10 cm = 8"-7"-6¼"-5½"-4¾"-4" from division, increase 1 stitch on each side of marker threads - read INCREASE TIP-3. Increase like this approx. every 3-4-4-5-6-6 cm = 1⅛"-1½"-1½"-2"-2⅜"-2⅜" 4-4-4-4-3-3 times in total = 144-156-170-186-208-228 stitches. When piece measures 30 cm = 8" from division (3 cm = 1⅛" remain until finished measurements - work to desired length), knit 1 round while increasing 28-28-34-38-40-44 stitches = 172-184-204-224-248-272 stitches. Switch to circular needle size 3.5 mm = US 4. Work rib (knit 2/purl 2) in the round for 3 cm = 1⅛". Bind off with knit over knit and purl over purl - read BIND-OFF TIP. Top measures total 50-52-54-56-58-60 cm = 19¾"-20½"-21¼"-22"-22¾"-23⅝" in total from shoulder and down. SLEEVE: Slip the 50-54-54-62-66-66 stitches from stitch holder in one side back on double pointed needles/circular needle size 5 mm = US 8, and pick up 1 stitch in each of the 6-6-10-10-10-14 stitches cast on under the sleeve = 56-60-64-72-76-80 stitches. Work rib (knit 2/purl 2) in the round. When sleeve measures 3 cm = 1⅛" from division, bind off with knit over knit and purl over purl - remember BIND-OFF TIP. Work the other sleeve the same way. |
|
|
|
Have you finished this pattern?Tag your pictures with #dropspattern #canyonclaytop or submit them to the #dropsfan gallery. Do you need help with this pattern?You'll find 24 tutorial videos, a Comments/Questions area and more by visiting the pattern on garnstudio.com. © 1982-2025 DROPS Design A/S. We reserve all rights. This document, including all its sub-sections, has copyrights. Read more about what you can do with our patterns at the bottom of each pattern on our site. |
|


With over 40 years in knitting and crochet design, DROPS Design offers one of the most extensive collections of free patterns on the internet - translated to 17 languages. As of today we count 314 catalogs and 11822 patterns - 11812 of which are translated into English (US/in).
We work hard to bring you the best knitting and crochet have to offer, inspiration and advice as well as great quality yarns at incredible prices! Would you like to use our patterns for other than personal use? You can read what you are allowed to do in the Copyright text at the bottom of all our patterns. Happy crafting!
Post a comment to pattern DROPS 212-15
We would love to hear what you have to say about this pattern!
If you want to leave a question, please make sure you select the correct category in the form below, to speed up the answering process. Required fields are marked *.