
Popular categories
Looking for a yarn?


Comments / Questions (66)
![]() Francine wrote:
Francine wrote:
J’ai oublié les 10mailles sous les manches. Donc je ne fais pas d’augmentation. C’est possible?
07.05.2026 - 19:39DROPS Design answered:
Tout à fait, mais on doit augmenter ici juste avant les côtes (pour passer de 178 à 196 m) pour éviter que les côtes ne resserrent le bas du pull (il faut davantage de mailles pour les côtes avec les aiguilles 3 que pour le jersey avec les aiguilles 4, raison pour laquelle on doit augmenter), calculez simplement le nombre de mailles dont vous aurez besoin pour ne pas resserrer le bas. Bon tricot!
08.05.2026 - 08:24
![]() Francine wrote:
Francine wrote:
Est-il possible que lorsqu’on tricote le dos et le devant, on ne fasse pas les diminutions et qu’on répartisse les augmentations sur les 21 cm du dos et du devant i-e que pour le modèle entaille M on passe de 174 à 186 sur 21cm?
07.05.2026 - 19:27DROPS Design answered:
Bonjour Francine, si vous ne voulez pas marquer la taille vous pouvez tout à fait continuer tout droit sans diminuer, pensez juste à augmenter jute avant les côtes pour éviter qu'elles ne resserrent le bas du pull. Bon tricot!
08.05.2026 - 08:23
![]() Monique wrote:
Monique wrote:
Pouvez m aider dans le premier rang de l,empiècement pour une taille XL Faut il tricoter 10 Mailles ou 30 Pouvez vous me décrire le rang complet Merci
05.05.2026 - 15:33DROPS Design answered:
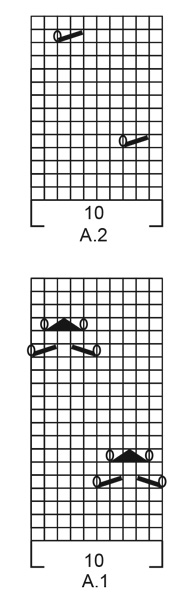
Bonjour Monique, vous devez répéter 3 fois les 10 mailles de A.1 au total pour ainsi tricoter 30 mailles en A.1 au total. Autrement dit, tricotez le 1er tour de l'empiècement ainsi en XL: *1 m end, 1 jeté, 1m end, 3xA.1 (= 3x10=30 m), 5 m de A.1 (les 5 premières du diagramme), 1 m end, 1 jeté, 1m end, (fil marqueur), 2 m endroit, 1 jeté, 1 m endroit, A.1 ( = 10 m), 5 m de A.1 (les 5 premières), 1 m endroit, 1 jeté, 2 m endroit, (fil marqueur)*, et répétez encore 1 fois de *à*. Bon tricot!
05.05.2026 - 16:39
![]() Francine Gendron wrote:
Francine Gendron wrote:
Je viens de comprendre que je dois tenir compte des 2mailles que j’ai tricotées au rang pour séparer l’augmentation du raglan et le jeté du motif.
01.05.2026 - 16:09
![]() Francine Gendron wrote:
Francine Gendron wrote:
Quand je commence le rang 7, je tricote 1 maille puis je fais le jeté. Ensuite est-ce que je commence le motif du rang tout de suite i-e que je tricote 1maille, le jeté , le surjet double , le jeté et ensuite 6 mailles endroits, puis je recommence le motif? Si oui, je n’obtiens pas l’espèce de papillon car mon premier «trou » se retrouve à côté du raglan et non sous le 1er du rang 5. Merci de m’éclairer
01.05.2026 - 04:33DROPS Design answered:
Bonjour Mme Gendron, pour former les papillons, les motifs doivent bien être alignés les uns au-dessus des autres, notez ainsi que la 1ère maille endroit doit être le jeté du rang 5 pour que la double diminution soit bien placée, tricotez en jersey les mailles précédentes (augmentations du raglan) pour que le motif tombe juste, éventuellement, ajoutez un marqueur au début/à la fin de chaque A.1 pour vous aider à bien placer le point ajouré. Bon tricot!
04.05.2026 - 07:59
![]() Pia Hansen wrote:
Pia Hansen wrote:
Er målene krops-mål, eller det færdige arbejdes mål?
05.04.2026 - 08:37DROPS Design answered:
Hei Pia. Færdige arbejdes mål. mvh DROPS Design
07.04.2026 - 13:26
![]() Gudrun wrote:
Gudrun wrote:
Hallo, kann man das Muster A1 erweitern, indem man die obere Runde noch mal nach unten setzt, so das man eine Blume erhält? Oder das Muster einfach umdrehen? LG 💐
12.03.2026 - 16:07DROPS Design answered:
Liebe Gudrun, am Anfang A.1 stricken Sie die neuen Maschen wie die letzte von einem neuen Rapport (lesen Sie das Diagram dann links nach rechts), und am Ende A.1 stricken Sie einfach die neuen Maschen wie die nächste im Diagram (hier wird das Diagram rechts nach links gelest). Viel Spaß beim Stricken!
13.03.2026 - 07:01
![]() Bea wrote:
Bea wrote:
Hej! Jag får det till att bli två omslag bredvid varandra i storlek M på femte varvet. Det står såhär: * sticka 1 rätmaska, gör 1 omslag om stickan, sticka 0 rätmaskor, A.1 (= 10 maskor) över de nästa 30 maskorna Men sedan står det också: Det ska alltid vara 2 rätmaskor mellan ökningen till raglan och det yttersta omslaget mot raglan på 5:e och 15:e varvet i A.1. Varifrån kommer dessa 2 maskor? Tacksam för hjälp.
14.02.2026 - 09:46DROPS Design answered:
Hei Bea. Det økes til raglan, men det skal ikke strikkes hullmønster før man har 2 ekstra masker som kan strikkes rett mellom raglan og kastet til hullmønstret. mvh DROPS Design
23.02.2026 - 08:51
![]() Christine wrote:
Christine wrote:
Hei Jeg får ikke mønstret til å stemme. Strikker str M og får ikke starten til å stemme med 112 masker etter halsen.
06.08.2025 - 20:54DROPS Design answered:
Hei Christine, Du strikker: 1 rett, lager1 kast om pinnen, A.1 x 3 = 30 masker, de første 5 maskene i A.1, lag 1 kast om pinnen, 3 rett (med merketråden etter den første), lag 1 kast om pinnen, A.1 =10 masker, første 5 maskene i A.1, lag 1 kast om pinnen, 2 rett, sett en merketråd her. 1 + 30 + 5 + 3 + 10 + 5 + 2 = 56 masker (+ kastene) og alt dette skal gjentas 1 gang til = 112 masker (+ kastene). Håper dette hjelper. Hilsen Drops Team.
07.08.2025 - 05:22
![]() Elsie wrote:
Elsie wrote:
Hi - can I skip the decrease part of the body and knit straight down?? Bottom measurements will then be 50 Regarfs
04.07.2025 - 20:03DROPS Design answered:
Hi Elsie, Of course you can skip the decreases. Our patterns are guides and can be adjusted as you wish. Regards and happy Summer! Drops Team.
05.07.2025 - 14:28
|
||||||||||||||||
Flocking Gulls#flockinggullssweater |
||||||||||||||||
 |
 |
|||||||||||||||
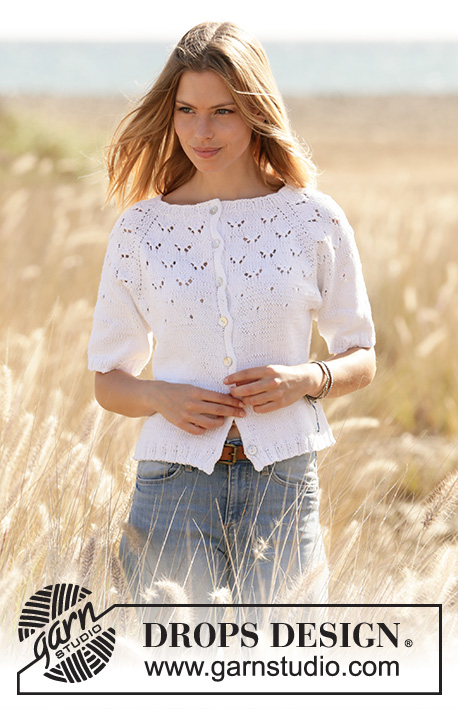
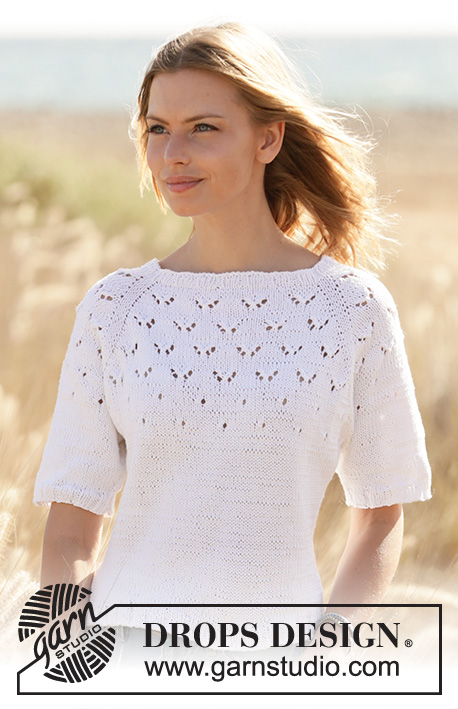
Knitted sweater with short sleeves and raglan in DROPS Muskat. Piece is knitted top down with lace pattern. Size: S - XXXL
DROPS 210-15 |
||||||||||||||||
|
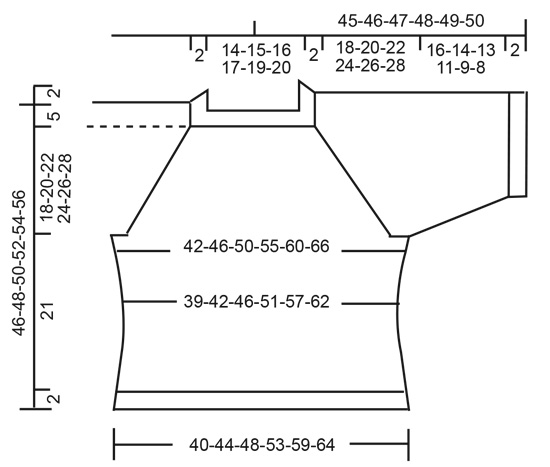
---------------------------------------------------------- EXPLANATION FOR THE PATTERN: ---------------------------------------------------------- PATTERN: See diagrams A.1 and A.2. INCREASE TIP-1 (evenly): To calculate how to increase evenly, use the total number of stitches on row (e.g. 100 stitches) and divide stitches by number of increases to be done (e.g. 12) = 8.3. In this example increase by making 1 yarn over after approx. every 8th stitch. On next round work yarn overs twisted to avoid holes. INCREASE TIP-2 (applies to sides of body): Work until 2 stitches remain before marker thread, 1 yarn over, knit 4 (marker thread is in the middle of these stitches), 1 yarn over. On next round knit yarn overs twisted to avoid holes. Then work the new stitches in stockinette stitch. RAGLAN: Increase 1 stitch on each side of 3 knit stitches in every transition between front/back piece and sleeves (= 8 stitches increased on round). Increase 1 stitch by making 1 yarn over. On next round knit yarn overs twisted to avoid holes. Then work the new stitches in pattern/stockinette stitch. DECREASE TIP: Decrease 1 stitch on each side of marker thread as follows: Work until 3 stitches remain before marker thread and knit 2 together, knit 2 (marker thread is between these stitches), slip 1 stitch knitwise, knit 1, pass slipped stitch over stitch worked. BIND-OFF TIP: To avoid a tight bind-off edge you may use a larger needle. If this also is too tight, make 1 yarn over after approx. every 4th stitch and bind off these as regular stitches. ---------------------------------------------------------- START THE PIECE HERE: ---------------------------------------------------------- SWEATER - SHORT OVERVIEW OF THE PIECE: Neck edge and yoke are worked in the round on circular needle, top down. Now divide yoke for body and sleeves. Then work the body in the round on circular needle. Work sleeves in the round on double pointed needles/short circular needle, top down. NECK EDGE: Cast on 100-105-110-115-120-125 stitches on circular needle size 3 mm = US 2,5 with Muskat. Knit 1 round. Then work rib (= knit 3/purl 2) in the round for 2 cm = ¾". When rib is done, knit 1 round while increasing 12-7-10-5-16-19 stitches evenly - read INCREASE TIP-1 = 112-112-120-120-136-144 stitches. Knit 1 round (knit yarn overs twisted to avoid holes). Switch to circular needle size 4 mm = US 6. Insert 1 marker after rib at the beginning of round, measure yoke from this marker! YOKE: Now insert 4 marker threads in piece, work pattern as follows: Insert a marker thread at the beginning of round (= in transition between left sleeve and back piece), * knit 1, make 1 yarn over, knit 0-0-1-1-3-4, A.1 (= 10 stitches) over the next 30 stitches, work the first 5 stitches in A.1, knit 0-0-1-1-3-4, make 1 yarn over, knit 1, insert a marker thread here, knit 2, make 1 yarn over, knit 0-0-1-1-3-4, A.1 over the next 10 stitches, work the first 5 stitches in A.1, knit 0-0-1-1-3-4, make 1 yarn over, knit 2, insert a marker thread here *, work from *-* 1 more time on round, but do not insert a marker thread at the end of round. There are now 4 marker threads in piece (i.e. 1 marker thread in every transition between body and sleeves), and 1 stitches has been increased on each side of every marker thread for RAGLAN - read explanation above. REMEMBER THE KNITTING GAUGE. READ THE WHOLE NEXT SECTION BEFORE WORKING – increase for raglan and work pattern as follows: Increase for raglan every other round 20-24-27-30-32-35 times in total = 272-304-336-360-392-424 stitches. Then increase 1 more time in each side of front piece and back piece (but do not increase in each side of sleeves) = 276-308-340-364-396-428 stitches. AT THE SAME TIME when increasing stitches, there is room for more repetitions with lace pattern towards each raglan. There should always be 2-2-3-3-5-6 knit stitches between increase for raglan and the outermost yarn over towards raglan on 5th and 15th round in A.1. When A.1 has been worked 1 time vertically, repeat diagram 1 more time vertically. Then work A.2 (= 10 stitches) over A.1, and work as many lace patterns you can towards every raglan when increasing stitches. When A.2 has been worked vertically, continue with stockinette stitch until finished measurements. When all increases are done, the piece measures approx. 15-18-20-22-24-26 cm = 6"-7"-8"-8¾"-9½"-10¼". Continue to work until piece measures 18-20-22-24-26-28 cm = 7"-8"-8¾"-9½"-10¼"-11". Now divide piece for body and sleeves. In size S, M and L divide piece for body at the marker threads and in size XL, XXL and XXXL work 1-3-4 stitches from each side of sleeve in on front and back piece. Work next round as follows: Knit the first 79-87-95-102-112-121 stitches (= back piece), slip the next 59-67-75-79-83-89 stitches on a stitch holder for sleeve, cast on 10-10-10-12-12-14 new stitches on needle (= in the side under sleeve), work the next 79-87-95-103-115-125 stitches (= front piece), insert the next 59-67-75-79-83-89 stitches on a stitch holder for sleeve, cast on 10-10-10-12-12-14 new stitches on needle (= in the side under sleeve), work the last 0-0-0-1-3-4 stitches (= 79-87-95-103-115-125 stitches for back piece). Cut the yarn. Then finish body and sleeves separately. NOW MEASURE PIECE FROM HERE! BODY: = 178-194-210-230-254-278 stitches. Insert 1 marker thread in the middle of the new stitches cast on in the side under the sleeves (= 89-97-105-115-127-139 stitches between marker threads). Move the marker threads upwards when working; they are used when increasing and decreasing in the sides later. Begin round at marker thread in one of the sides. Continue in the round in stockinette stitch. When piece measures 3 cm = 1⅛" from division, decrease 1 stitch on each side of marker threads - read DECREASE TIP. Decrease like this approx. every 2½ cm = ⅞" 4 times in total = 162-178-194-214-238-262 stitches. When piece measures 14 cm = 5½" from division in all sizes, increase 1 stitch on each side of marker thread - read INCREASE TIP-2. Repeat increase when piece measures 16 cm = 6¼" = 170-186-202-222-246-270 stitches. When piece measures 21 cm = 8¼" from division, increase 15-19-23-23-29-35 stitches evenly = 185-205-225-245-275-305 stitches. Switch to circular needle size 3 mm = US 2,5. Work rib (knit 3/purl 2) in the round for 2 cm = ¾". Bind off with knit over knit and purl over purl - read BIND-OFF TIP. Sweater measures approx. 46-48-50-52-54-56 cm = 18"-19"-19¾"-20½"-21¼"-22" from shoulder and down. SLEEVES: Slip the 59-67-75-79-83-89 stitches from stitch holder in one side back on a short circular needle/double pointed needles size 4 mm = US 6 and pick in addition up 1 stitch in each of the new 10-10-10-12-12-14 stitches cast on in the side under sleeve = 69-77-85-91-95-103 stitches. Insert a marker thread in the middle of the new stitches cast on under sleeve. Move the marker thread upwards when working. Use marker later when decreasing under sleeve. Work in stockinette stitch in the round. When sleeve measures 3-3-3-3-2-2 cm = 1⅛"-1⅛"-1⅛"-1⅛"-¾"-¾" from division, decrease 1 stitch on each side of marker thread - remember DECREASE TIP. Decrease like this approx. every 3-2-1½1-1-1 cm = 1⅛"-¾"-½"-⅜"-⅜"-⅜" 5-6-7-7-7-6 times in total = 59-65-71-77-81-91 stitches. When all decreases are done, work in stockinette stitch until sleeve measures 16-14-13-11-9-8 cm = 6¼"-5½"-5⅛"-4⅜"-3½"-3⅛" (shorter measurements in the larger sizes because of longer yoke). Knit 1 round while increasing 1-0-4-3-4-4 stitches evenly = 60-65-75-80-85-95 stitches. Switch to double pointed needles size 3 mm = US 2,5. Work rib (knit 3/purl 2) in the round for 2 cm = ¾". Bind off with knit over knit and purl over purl - remember BIND-OFF TIP. Work the other sleeve the same way. |
||||||||||||||||
Diagram explanations |
||||||||||||||||
|
||||||||||||||||
 |
||||||||||||||||
 |
||||||||||||||||
Have you finished this pattern?Tag your pictures with #dropspattern #flockinggullssweater or submit them to the #dropsfan gallery. Do you need help with this pattern?You'll find 25 tutorial videos, a Comments/Questions area and more by visiting the pattern on garnstudio.com. © 1982-2026 DROPS Design A/S. We reserve all rights. This document, including all its sub-sections, has copyrights. Read more about what you can do with our patterns at the bottom of each pattern on our site. |
||||||||||||||||


With over 40 years in knitting and crochet design, DROPS Design offers one of the most extensive collections of free patterns on the internet - translated to 17 languages. As of today we count 325 catalogs and 12298 patterns - 12288 of which are translated into English (US/in).
We work hard to bring you the best knitting and crochet have to offer, inspiration and advice as well as great quality yarns at incredible prices! Would you like to use our patterns for other than personal use? You can read what you are allowed to do in the Copyright text at the bottom of all our patterns. Happy crafting!
Post a comment to pattern DROPS 210-15
We would love to hear what you have to say about this pattern!
If you want to leave a question, please make sure you select the correct category in the form below, to speed up the answering process. Required fields are marked *.