
Popular categories
Looking for a yarn?


Comments / Questions (48)
![]() Martha wrote:
Martha wrote:
Hi, I really don't understand why you would seam the sleeves first then sew up the side seams of the front and back. I found it difficult to place the sleeves in and then sew up the side seam after I had sewn up the sleeves especially where there was the 5cm allowance for the sleeve. Really difficult to twist and sew in the sides This should have been to sew in the sleeves tops at the shoulders and front and back and then sew up the side seams and sleeve seams all in one go.
23.06.2021 - 04:04DROPS Design answered:
Dear Martha, see previous answer, hope this will help. Happy knitting!
23.06.2021 - 08:04
![]() Martha wrote:
Martha wrote:
Hi, I really don't understand why you would seam the sleeves first then sew up the side seams. I found it difficult to place them in and then sew up the side seam after I had sewn up the sleeves. This should have been to sew in the sleeves at the shoulders first and then sew up the side seams and sleeve seams all in one go.
23.06.2021 - 03:56DROPS Design answered:
Dear Martha, you first sew the shoulders and sew the sleeves; this video shows how to set a sleeve to a yoke/body - in the video the sleeve has been worked in the round, so that you can see how to sew the seamed sleeve on the yoke. But of course feel free to sew the sleeve how you are used to if you rather. Happy assembly!
23.06.2021 - 08:03
![]() Elfrieda wrote:
Elfrieda wrote:
Ik heb een vraag over het voorpand. Ik ben aangekomen bij de armsgaten en ik vroeg me af of ik niet de armsgaten moet afkanten i.p.v. samenbreien zoals gezegd wordt. Voor het achterpand moet er wel afgekant worden, maar voor het voorpand moeten er volgens het patroon 5 steken geminderd worden aan elke kant. Ik ben hierdoor een beetje in de war geraakt.
23.04.2021 - 17:22DROPS Design answered:
Dag Elfrieda,
Ja, er moet denk ik inderdaad afgekant worden in plaats van geminderd. Ik zal het doorgeven aan de ontwerpafdeling ter correctie.
25.04.2021 - 18:04
![]() Nadia wrote:
Nadia wrote:
Buonasera, ho chiesto spiegazioni in riferimento a questa descrizione, "Quando il lavoro misura 30-31-32-33-34-35 cm dal bordo di avvio, diminuire 4-4-4-5-6-6 maglie all’inizio dei 2 ferri successivi per gli scalfi = 69-75-81-85-91-101 maglie." io capisco che bisogna diminuire la mia misura 6 maglie ma tutte in una volta cioè primo ferro diminuisco 6 maglie all\'inizio e secondo ferro rovescio diminuisco altre 6 sempre all\'inizio? È così? Grazie
15.02.2021 - 20:56DROPS Design answered:
Buonasera Nadia, si, esatto, le 6 maglie devono essere diminuite insieme all'inizio dei 2 ferri successivi. Buon lavoro!
16.02.2021 - 22:48
![]() Nadia wrote:
Nadia wrote:
"Quando il lavoro misura 30-31-32-33-34-35 cm dal bordo di avvio, diminuire 4-4-4-5-6-6 maglie all’inizio dei 2 ferri successivi per gli scalfi = 69-75-81-85-91-101 maglie." Io volevo capire esattamente come si lavora la dicitura qui sopra sono principiante e ho paura di non interpretare bene.
08.02.2021 - 11:59DROPS Design answered:
Buonasera Nadia, deve seguire i numeri per la sua taglia e diminuire le maglie indicate. Buon lavoro!
09.02.2021 - 21:51
![]() Mathilde wrote:
Mathilde wrote:
Bonjour, le modèle explique qu'il faut tricoter en aller-retour sur aiguilles circulaires, pensez-vous que je peux réaliser l'ouvrage avec des aiguilles normales ou il faut vraiment des circulaires ? Je vous remercie :)
16.01.2021 - 22:25DROPS Design answered:
Bonjour Mathilde, tout à fait, on utilise ici une aiguille circulaire pour avoir suffisamment de place pour y loger toutes les mailles. Pour le col, vous pourrez coudre d'abord une des épaules, tricoter le col et coudre l'autre épaule et le col. Cette leçon explique comment adapter un modèle sur aiguilles droites. Bon tricot!
18.01.2021 - 09:05
![]() Ashley wrote:
Ashley wrote:
When the it says “when the sleeves measure 8cm to increase” does that mean from cast on edge or after the ribbing? Thanks.
09.01.2021 - 00:06DROPS Design answered:
Dear Ashley, measure the 10 cm (= 4 inches) before increasing from the cast on edge, then work these increases on every 8th cm = first increase will be worked at 10 cm, next at 18 cm, next at 26 cm etc.. Happy knitting!
11.01.2021 - 07:51
![]() Mariann wrote:
Mariann wrote:
Hallo Dropsdesign, Ich habe Schwierigkeiten bei der Halsblende, da ich dem Text nicht entnehmen kann, ob man insgesamt im Ausschnitt 75-96 Maschen aufnehmen soll oder nur vorne? Ich habe vorne 33 Maschen stillgelegt und hinten 39, da ich den Pulli in L stricke. Wieviel Maschen soll ich denn jeweils vorne und hinten noch dazu aufnehmen und dann am Ende insgesamt auf der Nadel haben? Ich hoffe, Sie verstehen meine Frage. LG :)
07.12.2020 - 11:27DROPS Design answered:
Liebe Mariann, Maschen werden Sie auch in den Reihen zwischen den abgekettenen Maschen am Rückenteil und die stillgelegten Maschen vom Vorderteil aufgefassen (siehe Video) - Die Maschenanzahl können Sie immer bei der 1. Runde anpassen, damit die Halsblende nicht zu eng weder nicht zu locker ist, und durch 3 teilbar ist. Viel Spaß beim stricken!
07.12.2020 - 15:53
![]() Kate wrote:
Kate wrote:
Can you please explain why the suggested method here is to knit parts separately? For me it`s much easier to knit circular, devide the work on two pieces and close armholes stitches at the same time. It minimize a number of operations and seems convinient. Thank you for the answer!
26.08.2020 - 17:07DROPS Design answered:
Dear Kate, some people do rather work separate pieces that are sewn together, so that we can have something for everyone - feel free to adapt the pattern if you like to. Happy knitting!
27.08.2020 - 09:23
![]() Christina wrote:
Christina wrote:
Hei kan dere legge ut hjelpevideo som tar for seg hvert tegn i diagrammaet, så det blir demonstrert hvordan vært tegn skal strikkes? Det ville være god hjelp! For det andre dere har lagt ut er desverre ikke nok hjelp. Håper raskt svar tilbake😊
02.08.2020 - 08:39DROPS Design answered:
Hej Christina, det er samme teknikker som går igen, prøv at få hjælp hos din lokale DROPS butik, så er vi sikker på at du kan strikke alle fine hulmønstre fremover. Vi har jo masser af videoer som indeholder disse tegn og som viser hvordan man strikker efter diagram. God fornøjelse!
04.08.2020 - 10:35
|
||||||||||||||||||||||
Seaside Watcher#seasidewatchersweater |
||||||||||||||||||||||
 |
 |
|||||||||||||||||||||
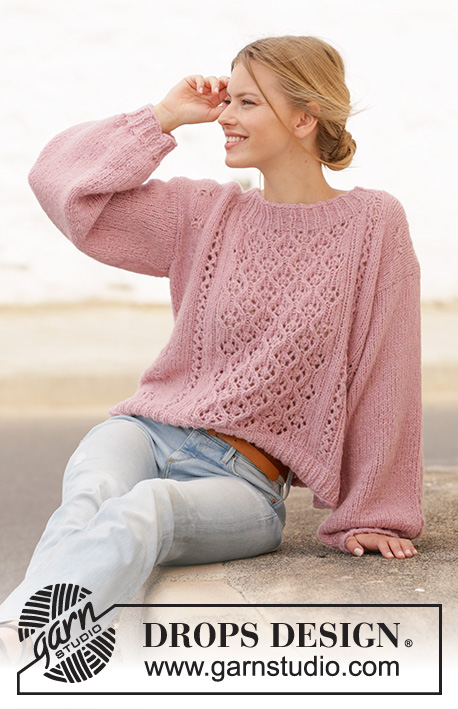
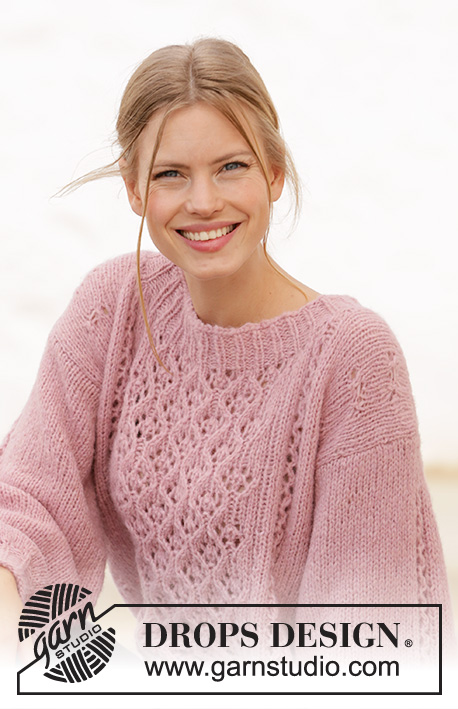
Knitted sweater in DROPS Air. The piece is worked with lace pattern and balloon sleeves. Sizes XS - XXL.
DROPS 212-43 |
||||||||||||||||||||||
|
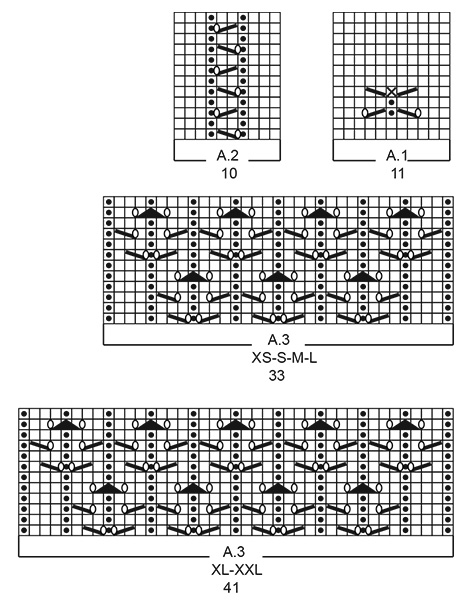
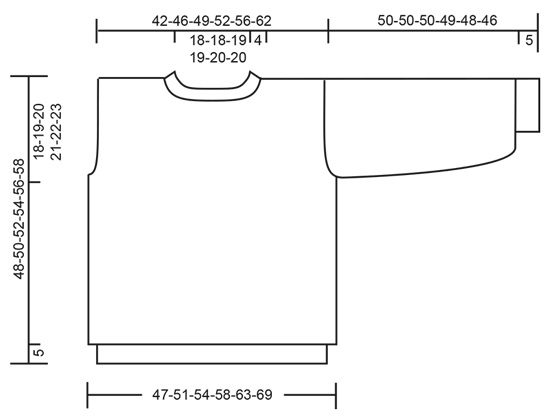
------------------------------------------------------- EXPLANATIONS FOR THE PATTERN: ------------------------------------------------------- RIDGE/GARTER STITCH (worked back and forth): Knit all rows. 1 ridge in height = Knit 2 rows. PATTERN: See diagrams A.1 to A.3. Choose diagram for your size (applies to A.3). The diagrams show all rows in the pattern seen from the right side. DECREASE TIP-1 (evenly spaced): To work out how to decrease evenly, count the total number of stitches on needle (e.g. 100 stitches) and divide by number of decreases to be made (e.g. 11) = 9.09. In this example decrease by knitting approx. each 8th and 9th stitch together. INCREASE TIP: All increases are worked from the right side. Increase by making 1 yarn over on the inside of the 1 edge stitch on each side of the piece (= 2 stitches increased). On the next row the yarn overs are purled twisted. BINDING-OFF TIP: To avoid the bind-off edge being tight you can bind off with a larger size needle. If the edge is still tight, make 1 yarn over after approx. each 4th stitch at the same time as binding off and the yarn overs are bind off as normal stitches. ------------------------------------------------------- START THE PIECE HERE: ------------------------------------------------------- SWEATER – SHORT OVERVIEW OF THE PIECE:. The front and back pieces are worked separately back and forth with circular needle. Stiches are bind off for the armholes and neck and each shoulder is finished separately. The sleeves are worked back and forth with circular needle. The neck is worked after the garment has been sewn together. BACK PIECE: Cast on 88-94-100-106-115-124 stitches (including 1 edge stitch on each side of the piece) with circular needle size 4.5 mm = US 7 and Air. Purl 1 row from the wrong side. Then work rib from the right side as follows: 1 edge stitch in GARTER STITCH – read description above, * purl 2, knit 1 *, work from *-* until there are 3 stitches left, purl 2 and finish with 1 edge stitch in garter stitch. When the rib measures 5 cm = 2", knit 1 row from the right side where you decrease 11-11-11-11-12-11 stitches evenly spaced – read DECREASE TIP = 77-83-89-95-103-113 stitches. Purl 1 row from the wrong side. Change to circular needle size 5.5 mm = US 9. Work stockinette stitch with 1 edge stitch in garter stitch on each side of the piece. REMEMBER THE KNITTING GAUGE! When the piece measures 30-31-32-33-34-35 cm = 11¾"-12¼"-12½"-13"-13⅜"-13¾" from the cast-on edge, bind off 4-4-4-5-6-6 stitches at the beginning of the next 2 rows for the armholes = 69-75-81-85-91-101 stitches. Continue with stockinette stitch and 1 edge stitch in garter stitch on each side. When the piece measures 41-43-45-47-49-51 cm = 16⅛"-17"-17¾"-17¾"-19¼"-20", place the middle 37-37-39-39-41-41 stitches on a thread for the neck, on the next row from the right side, and each shoulder is finished separately = 16-19-21-23-25-30 stitches on each shoulder. RIGHT SHOULDER: Continue with stockinette stitch and 1 edge stitch in garter stitch on each side. Bind off on every row from the neck (i.e. at the beginning of each row from the wrong side) as follows: Bind off 1 stitch 2 times = 14-17-19-21-23-28 stitches. Bind off with knit from the right side when the piece measures 48-50-52-54-56-58 cm = 19"-19¾"-20½"-21¼"-22"-22¾" from the cast-on edge. LEFT SHOULDER: Work as for the right shoulder but when binding off for the neck, bind off at the beginning of each row from the right side. FRONT PIECE: Cast on 87-93-99-105-114-123 stitches (including 1 edge stitch on each side of the piece) with circular needle size 4.5 mm = US 7 and Air. Purl 1 row from the wrong side. Then work rib from the right side as follows: 1 edge stitch in garter stitch, knit 1, * purl 2, knit 1 *, work from *-* until there is 1 stitch left and finish with 1 edge stitch in garter stitch. When the rib measures 5 cm = 2", knit 1 row from the right side and decrease 10-10-10-10-11-10 stitches evenly spaced = 77-83-89-95-103-113 stitches. Purl 1 row from the wrong side. Change to circular needle size 5.5 mm = US 9. Then continue with pattern as follows: Work 1 edge stitch in garter stitch, 0-3-6-9-9-14 stitches in stockinette stitch, A.1 (= 11 stitches), A.2 (= 10 stitches), A.3 (= 33-33-33-33-41-41 stitches), A.2 over 10 stitches, A.1 over 11 stitches, 0-3-6-9-9-14 stitches in stockinette stitch and 1 edge stitch in garter stitch. When the piece measures 30-31-32-33-34-35 cm = 11¾"-12¼"-12½"-13"-13⅜"-13¾" from the cast-on edge, decrease 4-4-4-5-6-6 stitches at the beginning of the next 2 rows for the armholes = 69-75-81-85-91-101 stitches. Continue with the pattern as before with the outermost stitch on each side worked in garter stitch. When the piece measures 38-39-41-42-43-44 cm = 15"-15¼"-15¾"-16½"-17"-17¼", (finish neatly in relation to the pattern), place the middle 33-33-33-33-41-41 stitches on a thread for the neck on the next row from the right side and each shoulder is finished separately = 18-21-24-26-25-30 stitches on each shoulder. RIGHT SHOULDER: Continue with stockinette stitch, A.1 and A.2 as before and the outermost stitch on each side worked in garter stitch. Bind off on each row from the neck (i.e. the beginning of each row from the right side) as follows: Bind off 2 stitches 1-1-1-1-0-0 time, then 1 stitch 2-2-3-3-2-2 times = 14-17-19-21-23-28 stitches. In sizes XS-S-M-L stop working pattern A.2; continue with purl over purl and stockinette stitch over the other stitches. In sizes XL-XXL continue the pattern as before. The outermost stitch on each side is worked in garter stitch. Bind off with knit from the right side when the piece measures 48-50-52-54-56-58 cm = 19"-19¾"-20½"-21¼"-22"-22¾" from the cast-on edge. LEFT SHOULDER: Work as for the right shoulder but when binding off stitches for the neck, bind off at the beginning of each row from the wrong side. SLEEVE: Cast on 35-35-38-38-41-41 stitches (including 1 edge stitch in garter stitch on each side) with circular needle size 4.5 mm = US 7 and Air. Purl 1 row from the wrong side. Then work as follows from the right side: Work 1 edge stitch in garter stitch, * purl 2, knit 1 *, work from *-* until there is 1 stitch left and finish with 1 edge stitch in garter stitch. When the rib measures 5 cm = 2", knit 1 row from the right side and increase as follows: Work 1 edge stitch in garter stitch, knit 4-3-4-4-6-5, * 1 yarn over, knit 1 *, work from *-* until there are 5-4-5-5-7-6 stitches left, knit 4-3-4-4-6-5 and finish with 1 edge stitch in garter stitch = 60-62-66-66-68-70 stitches. Purl 1 row from the wrong side. Change to circular needle size 5.5 mm = US 9. Continue with pattern as follows: 1 edge stitch in garter stitch, 24-25-27-27-28-29 stitches in stockinette stitch, A.2 over the next 10 stitches, 24-25-27-27-28-29 stitches in stockinette stitch and 1 edge stitch in garter stitch. Repeat A.2 in height. When the sleeve measures 10 cm = 4", increase 0-0-0-1-1-1 stitch inside the 1 edge stitch on each side of the piece – read INCREASE TIP. Increase like this every 8 cm = 3⅛" a total of 0-0-0-2-2-3 times = 60-62-66-70-72-76 stitches. When the sleeve measures 47-47-47-46-44-42 cm = 18½"-18½"-18½"-18"-17¼"-16½" from the cast-on edge, insert 1 marker inside the 1 edge stitch at the beginning of the row – it marks the bottom of the armhole. Work until the sleeve measures 50-50-50-49-48-46 cm = 19¾"-19¾"-19¾"-19¼"-19"-18". Bind off – read BINDING-OFF TIP! Work the other sleeve in the same way. ASSEMBLY: Sew the shoulder seams inside the bind-off edge. Sew the sleeve seams but leave a split of 3-3-3-3-4-4 cm = 1⅛"-1⅛"-1⅛"-1⅛"-1½"-1½" at the top (i.e. from the marker). Sew the split to the bottom of the armhole and then sew the sleeves into the body. Sew the side seams inside the 1 edge stitch. NECK: Start on the one shoulder and knit up 75 to 96 stitches around the neck (number of stitches must be divisible by 3) with short circular needle size 4.5 mm = US 7 and Air. Make sure the neck is neither tight nor loose in relation to the neck-line. Work rib in the round (= knit 1, purl 2) for 4 cm = 1½". Bind off with knit. |
||||||||||||||||||||||
Diagram explanations |
||||||||||||||||||||||
|
||||||||||||||||||||||
 |
||||||||||||||||||||||
 |
||||||||||||||||||||||
Have you finished this pattern?Tag your pictures with #dropspattern #seasidewatchersweater or submit them to the #dropsfan gallery. Do you need help with this pattern?You'll find 28 tutorial videos, a Comments/Questions area and more by visiting the pattern on garnstudio.com. © 1982-2026 DROPS Design A/S. We reserve all rights. This document, including all its sub-sections, has copyrights. Read more about what you can do with our patterns at the bottom of each pattern on our site. |
||||||||||||||||||||||


With over 40 years in knitting and crochet design, DROPS Design offers one of the most extensive collections of free patterns on the internet - translated to 17 languages. As of today we count 324 catalogs and 12290 patterns - 12280 of which are translated into English (US/in).
We work hard to bring you the best knitting and crochet have to offer, inspiration and advice as well as great quality yarns at incredible prices! Would you like to use our patterns for other than personal use? You can read what you are allowed to do in the Copyright text at the bottom of all our patterns. Happy crafting!
Post a comment to pattern DROPS 212-43
We would love to hear what you have to say about this pattern!
If you want to leave a question, please make sure you select the correct category in the form below, to speed up the answering process. Required fields are marked *.