
Popular categories
Looking for a yarn?


Comments / Questions (96)
![]() Bettina wrote:
Bettina wrote:
Jeg kan ikke få mønstret til at passe med at række 20 i str M skal starte med 3 ret masker
01.08.2021 - 22:52DROPS Design answered:
Hej Bettina, hvilket diagram, hvilken pind og følger du diagrammet for din størrelse?
04.08.2021 - 12:26
![]() Lis Kronhorst wrote:
Lis Kronhorst wrote:
Hej. På 213-1 forstår jeg ikke række 21 i A1. Mellem 2 rapporter er markeret med sort prik. Strik maske ret, slå om 1 ret i samme maske (ialt 3 masker) Denne maske, der skal strikkes ret findes ikke, da rapporter her kører sammenhængende. Skal der tages 1 løkke op mellem de to rapporter som skal strikkes ret (som udvides til 3 masker)? Jeg er ved at gå i spåner da jeg ikke kan komme videre :( Venlig hilsen Lis
02.06.2021 - 08:48DROPS Design answered:
Hej Lis, nu gætter jeg at du strikker XXL eller XXXL. Du kan se at diagrammet pind 18,19,20 består af 18 masker som strikkes (2vr,1ret) 6gange. - 6.gang du strikker ret tager du den ud til 3 masker (som beskrevet i symbolforklaringen) , det gør du nu hele vejen rundt i hver 6.retmaske. Næste omgang strikker du så de 2 nye masker (1 på hver side af denne retmaske) i ret, det vil sige at du får (2vr,1r)x5 og efter de næste 2 vrang har du nu 3 retmasker. Nu tror jeg du klarer det :)
02.06.2021 - 13:40
![]() Cláudia wrote:
Cláudia wrote:
Olá queridos! Estou amando essas peças lindíssimas! Mas como estou no Brasil temos algumas diferenças nos termos. O que seria tricotar em redondo? Obrigada
08.05.2021 - 14:31DROPS Design answered:
Bom dia, Tricotar em redondo é tricotar em circular. Você tricota a peça como um círculo unindo o princípio e o fim das carreiras na mesma agulha. Pode ver um vídeo explicando como fazer, no link abaixo: https://www.garnstudio.com/video.php?id=44&lang=pt Bons tricôs!
10.05.2021 - 10:33
![]() Margaret Sanford wrote:
Margaret Sanford wrote:
Is there any provision in this pattern for making the back neck sit higher than the front? Thank you.
17.02.2021 - 16:37DROPS Design answered:
Dear Margaret, this design does not have an elevation for the back , however you can add one, if you wish . THIS tutorial might help you with that. Happy Knitting!
18.02.2021 - 00:00
![]() Maria wrote:
Maria wrote:
Hej, Det står att man behöver både rundsticka som är 80 cm och 40 cm, men jag förstår inte vad 40 cm rundstickan ska användas till? Eftersom ärmarna stickas med strumpstickor. Kan ni förklara vad 40 cm rundstickan är till för? Tack.
16.02.2021 - 10:36DROPS Design answered:
Hej Maria, du er nok nødt til at strikke halsen og øverste stykke på en mindre rundpind. God fornøjelse!
16.02.2021 - 15:33
![]() Miriam wrote:
Miriam wrote:
Tusen takk for god hjelp👍😊Hilsen Miriam
18.01.2021 - 14:55
![]() Miriam wrote:
Miriam wrote:
Hei igjen, nå dukket det opp et nytt spørsmål, omg 17 på A 1, hvordan strikkes denne, skjønner ikke start og slutt. Hilsen Miriam
18.01.2021 - 11:42DROPS Design answered:
Hei Miriam. Løft første maske på 17. rad over til høyre, strikk deretter etter diagrammet. Når du kommer på slutten av diagrammet første gang, så strikker du siste maske på diagrammet sammen med 1. maske på neste rapport av diagrammet. Dette gjøres ved hver overgang mellom diagrammene, men siste gang du strikker rad 17, så strikkes siste maske + den masken du løftet over i begynnelsen av omgangen. God Fornøyelse!
18.01.2021 - 14:25
![]() Miriam wrote:
Miriam wrote:
Hei igjen, glem mine spørsmål, nå har jeg forstått det. Takk for all hjelp😊Hilsen Miriam
17.01.2021 - 08:26
![]() Miriam wrote:
Miriam wrote:
Hei, glem mine spørsmål, jeg har funnet ut av det. Jeg skulle bære sette et merke til bærestykket og ikke legge ut masker i omg 2. Takk for hjelp! Hilsen Miriam
16.01.2021 - 20:55
![]() Miriam wrote:
Miriam wrote:
Hei igjen , nå har jeg skjønt mønsteret og hva jeg har gjort feil,men hvordan deler jeg til bærestykket da jeg har strikket ferdig halskant 3 cm? Hilsen Miriam
16.01.2021 - 16:32DROPS Design answered:
Hei Miriam. Så bra. mvh DROPS design
18.01.2021 - 14:16
|
|||||||||||||||||||||||||||||||
Listen to Nature#listentonaturesweater |
|||||||||||||||||||||||||||||||
 |
 |
||||||||||||||||||||||||||||||
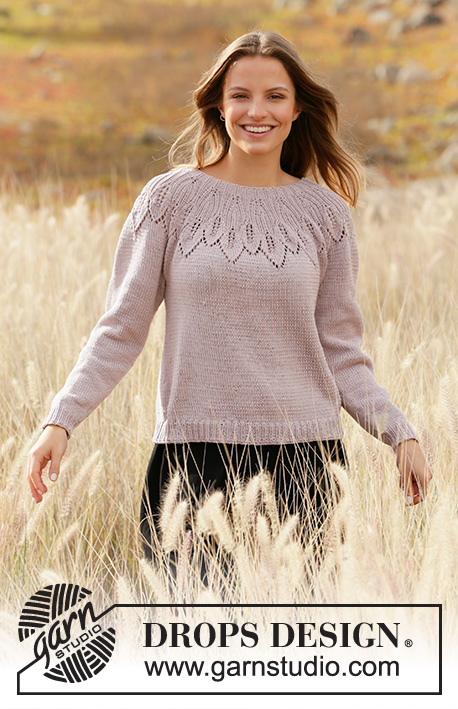
Knitted sweater with round yoke in DROPS Muskat. Piece is knitted top down with leaf pattern and lace pattern. Size: S - XXXL
DROPS 213-1 |
|||||||||||||||||||||||||||||||
|
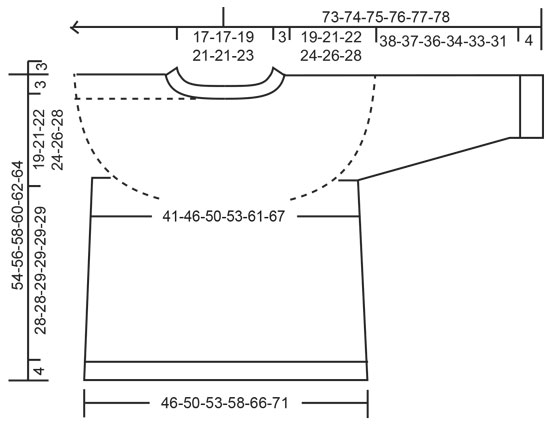
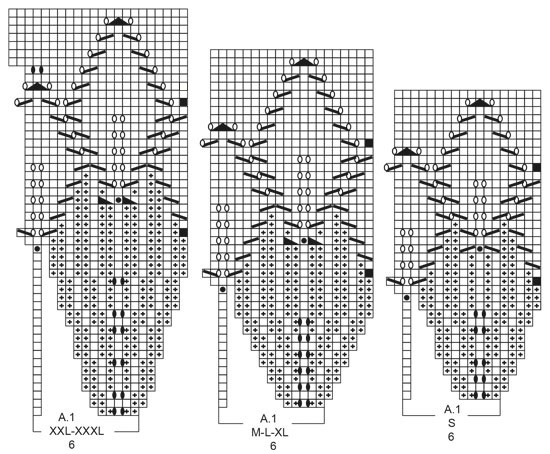
---------------------------------------------------------- EXPLANATION FOR THE PATTERN: ---------------------------------------------------------- PATTERN: See diagram A.1. Choose diagram for your size. INCREASE TIP (applies to sides of body): Work until 2 stitches remain before marker thread, 1 yarn over, knit 4 (marker thread is in the middle of these stitches), 1 yarn over. On next round knit yarn overs twisted to avoid holes. Then work the new stitches in stockinette stitch. DECREASE TIP (applies to sleeves): Decrease 1 stitch on each side of marker thread as follows: Work until 3 stitches remain before marker thread and knit 2 together, knit 2 (marker thread is between these stitches), slip 1 stitch knitwise, knit 1, pass slipped stitch over stitch worked. BIND-OFF TIP: To avoid a tight bind-off edge you may use a larger needle. If this also is too tight, make 1 yarn over after approx. every 4th stitch and bind off these as regular stitches. ---------------------------------------------------------- START THE PIECE HERE: ---------------------------------------------------------- SWEATER - SHORT OVERVIEW OF THE PIECE: Work neck edge and yoke in the round on circular needle from mid back, top down. Now divide yoke for body and sleeves. Body is worked in the round on circular needle, top down. Work sleeves in the round on double pointed needles, top down. NECK EDGE: Cast on 96-96-102-114-114-120 stitches on circular needle size 3 mm = US 2,5 with Muskat. Knit 1 round. Work rib (= purl 2/knit 1). When piece measures 3 cm = 1⅛", switch to circular needle size 4 mm = US 6. Insert 1 marker at the beginning of round mid back, measure yoke from this marker! YOKE: Work A.1 (= 6 stitches) in the round over all stitches (= 16-16-17-19-19-20 times in width). REMEMBER THE KNITTING GAUGE! When A.1 has been worked 1 time vertically, there are 288-320-340-380-418-440 stitches on needle. Piece now measures 14-16-16-16-18-18 cm = 5½"-6¼"-6¼"-6¼"-7"-7" from marker. Knit in the round. When piece measures 19-21-22-24-26-28 cm = 7½"-8¼"-8¾"-9½"-10¼"-11" from marker, divide piece for body and sleeves as follows: Work the first 40-45-49-53-60-65 stitches (= half back piece), slip the next 63-69-72-84-89-90 stitches on a stitch holder for sleeve and cast on 6-6-6-6-8-10 new stitches under sleeve, work the next 81-91-98-106-120-130 stitches (= front piece), slip the next 63-69-72-84-89-90 stitches on a stitch holder for sleeve and cast on 6-6-6-6-8-10 new stitches under sleeve, work the last 41-46-49-53-60-65 stitches (= half back piece). BODY: = 174-194-208-224-256-280 stitches. Insert 1 marker thread in the middle of the 6-6-6-6-8-10 stitches under sleeve in each side (= in the sides of body). There are 87-97-104-112-128-140 stitches between marker threads on front and back piece. Move the marker threads upwards when working; they should be used for increase later in the sides. Knit all stitches. When piece measures 4 cm = 1½" from division, increase 1 stitch on each side of every marker thread - read INCREASE TIP (= 4 stitches increased). Increase like this every 4 cm = 1½" 5-4-4-5-5-5 times in total = 194-210-224-244-276-300 stitches. When piece measures 28-28-29-29-29-29 cm = 11"-11"-11⅜"-11⅜"-11⅜"-11⅜" from division, increase 13-12-13-14-15-15 stitches evenly = 207-222-237-258-291-315 stitches. Switch to circular needle size 3 mm = US 2,5 and work rib (= knit 1/purl 2). Bind off by knitting when rib measures 4 cm = 1½" - read BIND-OFF TIP. Piece measures 32-32-33-33-33-33 cm = 12½"-12½"-13"-13"-13"-13" from where it was divided. SLEEVES: Slip the 63-69-72-84-89-90 stitches from stitch holder in one side of piece on double pointed needles size 4 mm = US 6 and pick in addition up 1 stitch in each of the 6-6-6-6-8-10 new stitches cast on under sleeve = 69-75-78-90-97-100 stitches. Insert 1 marker thread in the middle of the 6-6-6-6-8-10 stitches under sleeve. Move the marker upwards when working. Decrease on each side of this marker thread later. Work in stockinette stitch in the round. When piece measures 2 cm = ¾", decrease 1 stitch on each side of marker thread- read DECREASE TIP (= 2 stitches decreased). Decrease like this every 3-2-2-1½-1-1 cm = 1⅛"-¾"-¾"1/2"-⅜"-⅜" 11-13-14-19-21-22 times in total = 47-49-50-52-55-56 stitches. When piece measures 38-37-36-34-33-31 cm = 15"-14½"-14¼"-13⅜"-13"-12¼", increase 1-2-1-2-2-1 stitches evenly on next round= 48-51-51-54-57-57 stitches. Switch to double pointed needles size 3 mm = US 2,5 and work rib in the round (= knit 1/purl 2). When rib measures 4 cm = 1½", bind off knit over knit and purl over purl. Sleeve measures 42-41-40-38-37-35 cm = 16½"-16⅛"-15¾"-15"-14½"-13¾" from division. Work the other sleeve the same way. |
|||||||||||||||||||||||||||||||
Diagram explanations |
|||||||||||||||||||||||||||||||
|
|||||||||||||||||||||||||||||||
 |
|||||||||||||||||||||||||||||||
 |
|||||||||||||||||||||||||||||||
Have you finished this pattern?Tag your pictures with #dropspattern #listentonaturesweater or submit them to the #dropsfan gallery. Do you need help with this pattern?You'll find 24 tutorial videos, a Comments/Questions area and more by visiting the pattern on garnstudio.com. © 1982-2026 DROPS Design A/S. We reserve all rights. This document, including all its sub-sections, has copyrights. Read more about what you can do with our patterns at the bottom of each pattern on our site. |
|||||||||||||||||||||||||||||||


With over 40 years in knitting and crochet design, DROPS Design offers one of the most extensive collections of free patterns on the internet - translated to 17 languages. As of today we count 324 catalogs and 12290 patterns - 12280 of which are translated into English (US/in).
We work hard to bring you the best knitting and crochet have to offer, inspiration and advice as well as great quality yarns at incredible prices! Would you like to use our patterns for other than personal use? You can read what you are allowed to do in the Copyright text at the bottom of all our patterns. Happy crafting!
Post a comment to pattern DROPS 213-1
We would love to hear what you have to say about this pattern!
If you want to leave a question, please make sure you select the correct category in the form below, to speed up the answering process. Required fields are marked *.