
Popular categories
Looking for a yarn?


Comments / Questions (59)
![]() Aggi wrote:
Aggi wrote:
Hallo, ich habe gleich direkt am Anfang von Runde 2. Probleme, trotz mehrere Versuche fehlen mit in Runde 2. nachdem ich 12 M und A1 gestrickt habe, soll ich nun mit A2 anfangen mit einer linken Masche. Diese Masche fehlt mir aber. Ich habe nur 1 rechte Masche, danach die 3 linken Maschen usw, wie im Muster in der Zeile da drunter. Wo kommen die zusätzlichen linken Maschen am Anfang von Runde 2 bei Muster A2 her? Hoffentlich können Sie mir helfen. Dankeschön
09.03.2022 - 21:01DROPS Design answered:
Liebe Aggi, es sind nur 10 Maschen in A.1, nach der 1. Runde haben Sie 1 Masche beidseitig von A.1 (= Umschlag) zugenommen; diese Umschläge stricken Sie beim Vorder- und Rückenteil verschränkt rechtes; und bei den Ärmeln stricken Sie den Umschläge wie im A.2 gezeigt : 1 Umschlag nach A.1, am Anfang A.2 wird links verschränkt gestrickt und 1 Umschlag am Ende A.2 = vor dem nächsten A.1 wird links verschränkt gestrickt; Kann das Ihnen helfen?
10.03.2022 - 10:39
![]() Chloë Van Kuijck wrote:
Chloë Van Kuijck wrote:
Ik ben op het punt van herhaling in de breedte gekomen. Alleen als ik die herhaling doe, dan verspringt het patroon. Ik heb dus niet genoeg steken als ik het patroon volg. Waar kan dit aan liggen? Moet ik naast de meerderingen die staan bij de uitleg voor de raglan ook nog andere meerderingen doen zodat ik wel genoeg steken heb voor de herhaling in de breedte?
24.02.2022 - 18:29DROPS Design answered:
Dag Chloë,
Je breit de gemeerderde steken gaandeweg mee in het patroon. In het telpatroon A.2 is te zien hoe je de steken breit. Zorg ervoor dat het patroon in de hoogte doorloopt. Dus steeds het samen breien en de omslagen etc. boven die van de vorige naalden doen. Je hoeft alleen de meerderingen van de raglan te doen, geen andere meerderingen.
26.02.2022 - 14:49
![]() Sarah wrote:
Sarah wrote:
Hej drops. Jeg har problemer med ranglen udtagning efter A.1. Det som om mine omslag bliver løse og hullet, trods jeg strikker masken drejet. Og i mønster A.1 yderste maske hvor jeg skal strikke i masken under, bliver også meget løs. Skal man strikke ret på 2 pind af A.1 (som vist i mønster), eller strikkes vrang som vedlagte video? Mvh Sarah
02.01.2022 - 00:03DROPS Design answered:
Hej Sarah, der vil altid blive et lille hul, men hvis du sørger for at strikket omslaget drejet og ret fast, så vil det blive mindre. God fornøjelse!
05.01.2022 - 08:46
![]() Louise wrote:
Louise wrote:
Hallo, ich bin gerade etwas verwirrt... ich stricke Größe L und soll 29x zunehmen, d.h., ich hätte dann 68 Maschen für die Ärmel. In der Aufteilung für den Rumpfteil steht aber, dass ich 72 Ärmel-Maschen stillegen soll - woher kommen die 4 zusätzlichen Maschen? Danke!
13.09.2021 - 14:57DROPS Design answered:
Liebe Louise, die 2 letzten Maschen von A.1 nach Rückenteil/Vorderteil und die 2 ersten Maschen nach der Ärmel werden zu den Ärmeln gestrickt, dh beim 1/2 Rückenteil haben Sie 41 M + 8 M A.1 = 49 M, Ärmel = 2 M A.1 + 68 M + 2 M A.1; Vorderteil: 8 M A.1 + 82 M + 8 M A.1... Viel Spaß beim stricken!
14.09.2021 - 07:38
![]() Emma Speedtsberg wrote:
Emma Speedtsberg wrote:
Kære Drops Mange tak for de fine opskrifter. Jeg har et generelt spørgsmål; hovedparten af jeres opskrifter har størrelse small som den mindste størrelse..jeg har ikke så megen strikkeerfaring endnu, men ønsker at strikke denne trøje så den passer en lille størrelse x-small. Er der nogle generelle råd til hvordan man gør en opskrift "mindre"? Hilsen Emma.
25.03.2021 - 08:24DROPS Design answered:
Hej Emma, Du finder målene i måleskitsen nederst i opskriften. Strikkefastheden på denne opskrift er 21 masker på 10 cm. Det vil sige hvis du vil have den 10 cm mindre i omkreds så trækker du 21 masker (eller 10 masker for 5 cm) fra det mindste antal masker i opskriften. Læs mere om strikkefasthed nederst i opskriften under FAQ. God fornøjelse!
25.03.2021 - 08:55
![]() Mette wrote:
Mette wrote:
Når jeg laver runde 2 af mønstret i bærestykket, skal den raglan udtagning efter den første gang A1 så strikkes som vrang (som der står i A2) eller som drejet vrang eller som drejet ret? Da den jo er en del af ærmestykket.
15.03.2021 - 11:20DROPS Design answered:
Hej Mette, de nye masker strikkes drejet og de strikkes i glatstrik mod for og bagstykket og i A.2 mod ærmerne. God fornøjelse!
19.03.2021 - 14:02
![]() Mette wrote:
Mette wrote:
Hej :) Jeg har et spørgsmål til A1 mønstret. De 4 linjer der er, skal alle 4 linjer bruges i hver runde eller er det første/nederste linje i 1 omgang, anden linje i anden omgang, tredje linje i tredje omgang og fjerde linje i fjerde omgang, og så starter man forfra? Det kan jeg ikke helt læse mig til fra opskriften.
14.03.2021 - 14:10DROPS Design answered:
Hei Mette. Du strikker 1. rad på 1. omgang, 2.rad på 2. omgang, 3. rad på 3. omgang, 4.rad på 4. omgang, så gjentar du A.1 i høyden. 1. rad på 5. omgang, 2. rad på 6. omgang osv. mvh DROPS design
22.03.2021 - 12:05
![]() Mette wrote:
Mette wrote:
Jeg er allerede er oppe i pind 5, og min strikkeprøve hedder 23*30, i stedet for 21*28. Bliver selve strukturen for løs/gennemsigtig hvis jeg går op i pind 5.5? Eller er der andre måder at hjælpe det på? Jeg bruger Drops Sky som anbefalet i opskriften.
11.03.2021 - 08:37DROPS Design answered:
Hej Mette, DROPS Sky er superflot med 21 masker på 10 cm og den kan også med fordel strikkes endnu løsere. Det lyder til at du strikker meget stramt :)
11.03.2021 - 11:01
![]() Mette wrote:
Mette wrote:
Jeg vil lave en strikkeprøve på garnet. Der står ikke hvilken pind strikkeprøven skal laves i?
04.03.2021 - 22:19DROPS Design answered:
Hej Mette, Vi har brugt pind nr 4 til det glatstrikkede :)
05.03.2021 - 08:11
![]() Anni wrote:
Anni wrote:
Guten Morgen liebes Team, meine Frage greift noch mal Frage/ Antwort von Clara auf. Für mich ist auch noch nicht eindeutig klar, ob die Umschläge , die anschließend dem Muster A2 zugehören, direkt laut Muster abgestrickt werden. Also bspw. wie dargestellt „links“ in der zweiten Musterrunde? Hier gilt also nicht, dass Raglanzunahmen immer rechts verschränkt abgestrickt werden? Viele Dank vorab für Ihre Hilfe!
04.03.2021 - 08:38DROPS Design answered:
Liebe Anni, die Umschläge, die im A.2 gezeichnet sind werden immer rechts bei der nächsten Runden gestrickt (= die gehören zum Lochmuster), die Umschläge, die zum Raglanzunehmen gestrickt sind, werden entweder links oder rechts verschränkt gestrickt, dh bei der 2. Runde stricken Sie diese Umschlage beidseiting von A.2 links verschränkt. Diese Zunahmen können Sie immer rechts verschränkt beid er nächsten Runde, aber dann sollen Sie diese Maschen entweder rechts oder links bzw im Muster (= siehe Diagram) stricken. Viel Spaß beim stricken!
04.03.2021 - 11:31
|
||||||||||||||||||||||
Evening Glow#eveningglowsweater |
||||||||||||||||||||||
 |
 |
|||||||||||||||||||||
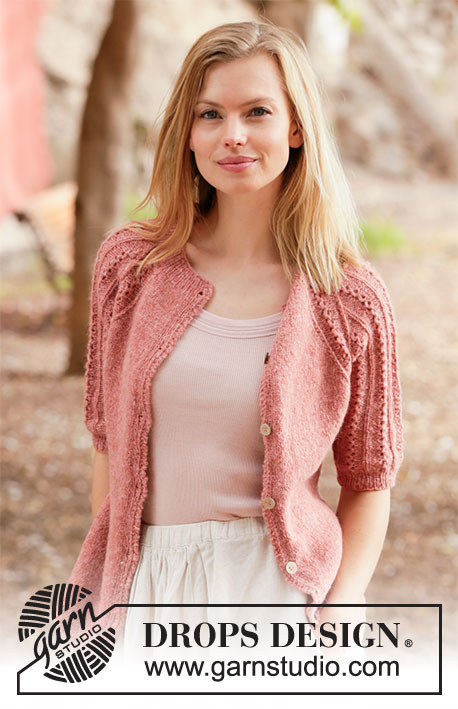
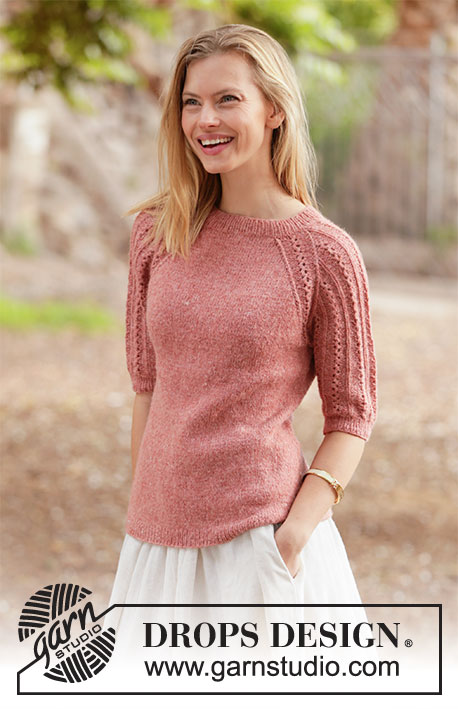
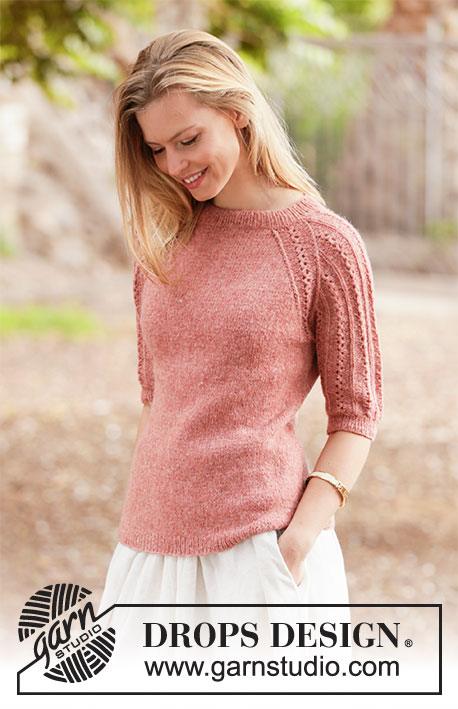
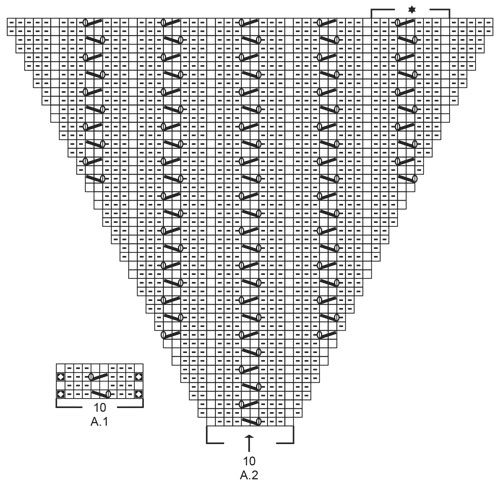
Knitted sweater in DROPS Sky. Piece is knitted top down with raglan and short sleeves with lace pattern. Size: S - XXXL
DROPS 212-1 |
||||||||||||||||||||||
|
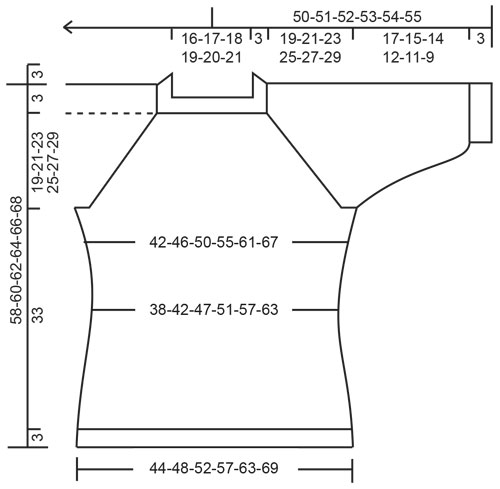
---------------------------------------------------------- EXPLANATION FOR THE PATTERN: ---------------------------------------------------------- INCREASE/DECREASE TIP (evenly): To calculate how to increase/decrease evenly, use the total number of stitches on row (e.g. 92 stitches) and divide stitches by number of increases/decreases to be done (e.g. 4) = 23. In this example increase by making 1 yarn over after every 23rd stitch. On next round work yarn overs twisted to avoid holes. To decrease in this example knit every 22nd and 23rd stitch together. PATTERN: See diagram A.1 (raglan line) and A.2 (pattern on sleeves). RAGLAN: Increase 1 stitch for raglan in each side of the 10 stitches in A.1 in every transition between front/back piece and sleeves (= 8 stitches increased in total on increase round). Increase 1 stitch by making 1 yarn over. On next round knit yarn overs twisted to avoid holes. Then work the new stitches in stockinette stitch on front and back piece and in A.2 on sleeves. DECREASE TIP-1 (applies to sides of body): Decrease 1 stitch on each side of marker thread as follows: Work until 3 stitches remain before marker thread, knit 2 together, knit 2 stitches (marker thread is between these 2 stitches), slip 1 stitch knitwise, knit 1, pass slipped stitch over stitch worked (= 2 stitches decreased). DECREASE TIP-2 (applies to mid under sleeves): Decrease 1 stitch on each side of marker thread as follows: Work until 3 stitches remain before marker thread, purl 2 together, purl 2 (marker thread is in the middle of these 2 stitches), purl 2 twisted together (= 2 stitches decreased). INCREASE TIP (applies to sides of body): Work until 1 stitch remains before marker thread, make 1 yarn over, knit 2 (marker thread is between these 2 stitches), make 1 yarn over (= 2 stitches increased). On next round knit yarn overs twisted to avoid holes. Then work the new stitches in stockinette stitch. BIND-OFF TIP: To avoid a tight bind-off edge you may use a larger needle size. If this also is too tight, work a 1 yarn over after approx. every 8th stitch while binding off (bind off yarn overs as regular stitches). ---------------------------------------------------------- START THE PIECE HERE: ---------------------------------------------------------- SWEATER - SHORT OVERVIEW OF THE PIECE: Work neck edge and yoke in the round on circular needle from mid back, top down. Now divide yoke for body and sleeves. Body is worked in the round from the side, top down. Work sleeves in the round on double pointed needles/short circular needle, top down. NECK EDGE: Cast on 92-96-100-106-110-114 stitches on circular needle size 3 mm = US 2,5 with Sky. Knit 1 round. Then work rib in the round (= knit 1/purl 1) for 3 cm = 1⅛". When rib is done, knit 1 round while increasing 4-8-8-6-2-6 stitches evenly - read DECREASE/INCREASE TIP = 96-104-108-112-112-120 stitches. Insert 1 marker in the middle of row (= mid front). Measure yoke from this marker. Switch to circular needle size 4 mm = US 6 and knit 1 round (knit all yarn overs twisted). Then work yoke as explained below. REMEMBER THE KNITTING GAUGE! YOKE: Insert 4 marker threads in piece as explained below (insert marker threads without working the stitches): Count 14-16-17-18-18-20 stitches (= ½ back piece), insert 1 marker thread before next stitch, count 20 stitches (= sleeve), insert 1 marker thread before next stitch, count 28-32-34-36-36-40 stitches (= front piece), insert 1 marker thread before next stitch, count 20 stitches (= sleeve), insert 1 marker thread before next stitch. 14-16-17-18-18-20 stitches remain on back piece after last marker thread. On next round begin pattern as explained below, AT THE SAME TIME increase for RAGLAN - read explanation above. I.e. work next round as follows: Work 9-11-12-13-13-15 stitches in stockinette stitch (= ½ back piece), increase 1 stitch for raglan, work A.1 (= 10 stitches – marker thread is in the middle of A.1), increase 1 stitch for raglan, work A.2 (= 10 stitches), increase 1 stitch for raglan, work A.1 (= 10 stitches – marker thread is in the middle of A.1), increase 1 stitch for raglan, work 18-22-24-26-26-30 stitches in stockinette stitch (= front piece), increase 1 stitch for raglan, work A.1 (= 10 stitches – marker thread is in the middle of A.1), increase 1 stitch for raglan, work A.2 (= 10 stitches), increase 1 stitch for raglan, work A.1 (= 10 stitches – marker thread is in the middle of A.1), increase 1 stitch for raglan, work 9-11-12-13-13-15 stitches in stockinette stitch (= ½ back piece). Continue pattern like this, and increase for raglan every other round 23-25-29-33-37-40 times in total (including increases explained on first round. NOTE! Work the increased stitches on sleeves in pattern until there are 5-5-7-7-7-7 repetitions in width over sleeve (see star in diagram that marks 1 repetition), then purl the next increased stitches until finished measurements (A.2 shows sleeve with all increases in size S). After last increase for raglan there are 280-304-340-376-408-440 stitches on needle. Work without increases until piece measures 19-21-23-25-27-29 cm = 7½"-8¼"-9"-9¾"-10⅝"-11⅜" from marker by the neck. Now divide yoke for body and sleeves, i.e. work last round as follows: Work 40-44-49-54-60-66 stitches in stockinette stitch (= ½ back piece), slip the next 60-64-72-80-84-88 stitches on 1 stitch holder, cast on 8 new stitches on needle (= in the side under sleeve), work 80-88-98-108-120-132 stitches in stockinette stitch (= front piece), slip the next 60-64-72-80-84-88 stitches on 1 stitch holder, cast on 8 new stitches on needle (= in the side under sleeve) and work the remaining 40-44-49-54-60-66 stitches in stockinette stitch (= ½ back piece). Cut the yarn. Finish body and sleeves separately. BODY: = 176-192-212-232-256-280 stitches. Insert 1 marker thread in each side on body, in the middle of the 8 stitches cast on under each sleeve= 88-96-106-116-128-140 stitches between marker threads. Move the marker threads upwards when working; they should be used for increase and decrease later in the sides on body. Work in stockinette stitch in the round. When piece measures 3 cm = 1⅛" from division, decrease 1 stitch on each side of both marker threads - read DECREASE TIP-1 (= 4 stitches decreased). Decrease like this every 3 cm = 1⅛" 4 times in total in each side = 160-176-196-216-240-264 stitches. Work until piece measures 16 cm = 6¼" from division. On next round increase 1 stitch on each side of both marker threads – read INCREASE TIP (= 4 stitches increased). Increase like this every 2½ cm = ⅞" 6 times in total in each side = 184-200-220-240-264-288 stitches. Work until piece measures 33 cm = 13" from division (approx. 3 cm = 1⅛" remain until finished measurements, try the sweater on and work to desired length). Switch to circular needle size 3 mm = US 2,5. Knit 1 round while increasing 36-40-44-48-52-58 stitches evenly - read INCREASE/DECREASE TIP = 220-240-264-288-316-346 stitches. Work rib in the round = knit 1/purl 1 for 3 cm = 1⅛". Bind off with knit over knit and purl over purl - read BIND-OFF TIP. Sweater measures approx. 58-60-62-64-66-68 cm = 22¾"-23⅝"-24⅜"-25¼"-26"-26¾" from shoulder and down. SLEEVES: Slip the 60-64-72-80-84-88 stitches from stitch holder in one side of piece on double pointed needles or a short circular needle size 4 mm = US 6, and pick in addition up 1 stitch in each of the 8 stitches cast on under sleeve = 68-72-80-88-92-96 stitches. Insert 1 marker thread in the middle of the 8 stitches cast on under sleeve. Move the marker thread upwards when working; it should be used for decrease mid under sleeve. Begin round at the marker thread and continue pattern in the round with A.2 over the middle 46-46-64-64-64-64 stitches, and purl the remaining 22-26-16-24-28-32 stitches mid under sleeve. When sleeve measures 2 cm = ¾" from division in all sizes, decrease 2 stitches mid under sleeve - read DECREASE TIP-2. Decrease like this every 3-2-1½-1-½-½ cm = 1⅛"-¾"-½"-⅜"-⅛"-⅛" 5-6-8-10-12-13 times in total = 58-60-64-68-68-70 stitches. Work until sleeve measures 17-15-14-12-11-9 cm = 6¾"-6"-5½"-4¾"-4⅜"-3½" from division (approx. 3 cm = 1⅛" remain until finished measurements, try the sweater on and work to desired length). NOTE! Shorter measurements in the larger sizes because of wider neck and longer yoke. Knit 1 round while decreasing 6-6-8-10-8-8 stitches evenly - remember INCREASE/DECREASE TIP = 52-54-56-58-60-62 stitches. Switch to double pointed needles size 3 mm = US 2,5. Work rib in the round = knit 1/purl 1 for 3 cm = 1⅛". Bind off with knit over knit and purl over purl - read BIND-OFF TIP. Work the other sleeve the same way. |
||||||||||||||||||||||
Diagram explanations |
||||||||||||||||||||||
|
||||||||||||||||||||||
 |
||||||||||||||||||||||
 |
||||||||||||||||||||||
Have you finished this pattern?Tag your pictures with #dropspattern #eveningglowsweater or submit them to the #dropsfan gallery. Do you need help with this pattern?You'll find 24 tutorial videos, a Comments/Questions area and more by visiting the pattern on garnstudio.com. © 1982-2026 DROPS Design A/S. We reserve all rights. This document, including all its sub-sections, has copyrights. Read more about what you can do with our patterns at the bottom of each pattern on our site. |
||||||||||||||||||||||
With over 40 years in knitting and crochet design, DROPS Design offers one of the most extensive collections of free patterns on the internet - translated to 17 languages. As of today we count 324 catalogs and 12199 patterns - 12189 of which are translated into English (US/in).
We work hard to bring you the best knitting and crochet have to offer, inspiration and advice as well as great quality yarns at incredible prices! Would you like to use our patterns for other than personal use? You can read what you are allowed to do in the Copyright text at the bottom of all our patterns. Happy crafting!
Post a comment to pattern DROPS 212-1
We would love to hear what you have to say about this pattern!
If you want to leave a question, please make sure you select the correct category in the form below, to speed up the answering process. Required fields are marked *.