
Popular categories
Looking for a yarn?


Comments / Questions (11)
![]() Madeleine Beaumier wrote:
Madeleine Beaumier wrote:
J'ai fait ce chandail en simplifiant le patron pour ne pas avoir de couture. J'ai continuer en rond au niveau des emmanchures et relevé les mailles pour les manches. Il serait judicieux de faire tester vos patrons avant de publier. C'est pas toujours clair comme explication et il y a souvent des erreurs
24.04.2023 - 18:28DROPS Design answered:
Bonjour Mme Beaumier, nos modèles sont relus et vérifiés de nombreuses fois mais parfois des erreurs peuvent encore nous échapper, si vous en voyez, n'hésitez surtout pas à nous les indiquer, ainsi nous pourrons vérifier ensemble et faire les corrections nécessaires si besoin. Merci pour votre aide. Bon tricot!
25.04.2023 - 08:49
![]() Celine Francoeur wrote:
Celine Francoeur wrote:
Bonjour j'aimerais tricoter ce modèle avec un seul fil. Possible? si oui, je calcule la moitié de la quantité? est-ce que je conserve le même nombre de mailles? si je veux changer de fil, suggestion ? Merci
23.11.2020 - 14:57DROPS Design answered:
Bonjour Mme Francoeur, vous trouverez plus d'infos sur les alternatives ici - en l'occurrence, vous pourriez remplacer 2 fils Sky (groupe B) par 1 fil Melody (groupe D), mais le résultat serait naturellement différent car les laines sont différentes. Votre magasin DROPS saura vous conseiller, même par mail ou téléphone. Bon tricot!
23.11.2020 - 16:23
![]() Celine Francoeur wrote:
Celine Francoeur wrote:
Question: le patron demande de monter des mailles et de tricoter avec deux fils - un rang envers sur l’envers. L’utilisation de deux fils est juste pour ce rang n’est-ce pas?
22.11.2020 - 18:58DROPS Design answered:
Bonjour Celine! Tout le pull est tricoté avec 2 fils DROPS Sky. Bon tricot!
22.11.2020 - 19:41
![]() Rieke wrote:
Rieke wrote:
Ich glaube, ich stehe auf dem Schlauch: die Anleitung ist für einen Pulli, der von oben nach unten gestrickt wird. Das Foto zeigt aber doch einen Pulli, der von unten (Bund) nach oben (Schultern) gestrickt wurde. Die rechte Masche im Strukturmuster sähe von oben nach unten gestrickt auch komisch aus. Gibt es die Anleitung auch zum Foto passend von unten nach oben?
23.05.2020 - 23:14DROPS Design answered:
Liebe Frau Rieke, unser Design Team sicher wählt das Modell von oben nach unten zu schreiben, denn diese Technik wird am meisten gestrickt. Viel Spaß beim stricken!
25.05.2020 - 12:31
![]() Marie wrote:
Marie wrote:
Bonjour, je ne comprends pas le 1er décalage! Dois je commencer à décaler vers la gauche, avant le rang endroit (celui de la torsade) et le 2ème décalage 2 rangs après? Merci d'avance pour votre réponse
01.03.2020 - 09:38DROPS Design answered:
Bonjour Marie, vous décalez A.2 (épaule droite, devant) vers la gauche = le décalage se fait sur l'endroit - Le décalage ne se fait pas au même rythme que la torsade - vous décalez d'abord tous les 2 rangs (= tous les rangs sur l'endroit) puis tous les 4 rangs (= tous les 2 rangs sur l'endroit), tous les 8 rangs (= tous les 4 rangs sur l'endroit) et tous les 16 rangs (= tous les 8 rangs sur l'endroit). Pour décaler, faites 1 jeté avant A.2, tricotez A.2 et diminuez 1 m après A.2. Bon tricot!
02.03.2020 - 10:30
![]() Paola wrote:
Paola wrote:
è un modello bellissimo, ma alla voce SPOSTAMENTO mi sembra che ci sia un errore: sia alla seconda sia alla sesta riga si spiega come spostare a sinistra, ma la seconda spiegazione dovrebbe essere lo spostamento a destra, vero? grazie e complimenti
18.12.2019 - 20:12DROPS Design answered:
Buongiorno Paola. Abbiamo corretto il testo. La ringraziamo per la segnalazione. Buon lavoro!
19.12.2019 - 09:24
![]() Pilar wrote:
Pilar wrote:
Cuando salen los patrones que faltan? Espero que este salga pronto es muy bonito!!
20.10.2019 - 17:49
![]() Lesley wrote:
Lesley wrote:
Another to the knit list
17.08.2019 - 01:48
![]() Bullermor wrote:
Bullermor wrote:
Dejlig bluse, men tror jeg undlader snorningerne.
19.06.2019 - 23:41
![]() Ellis wrote:
Ellis wrote:
Little challenge, quick and easy for young thin people. haven't seen 1 pattern for men?!
09.06.2019 - 20:25
|
||||||||||||||||||||||
Leaf Piles#leafpilessweater |
||||||||||||||||||||||
 |
 |
|||||||||||||||||||||
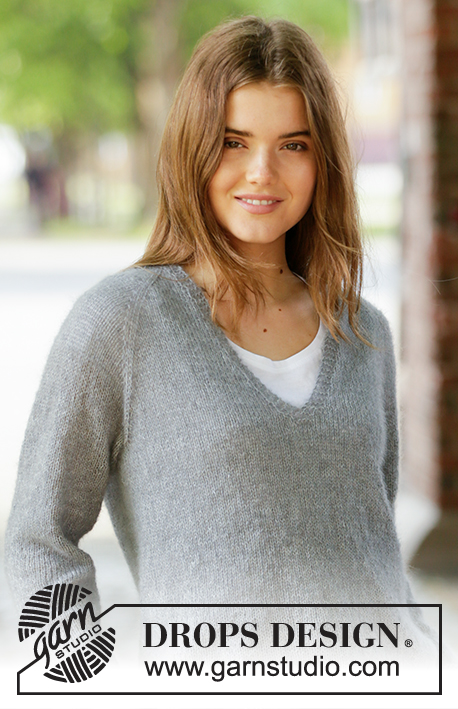
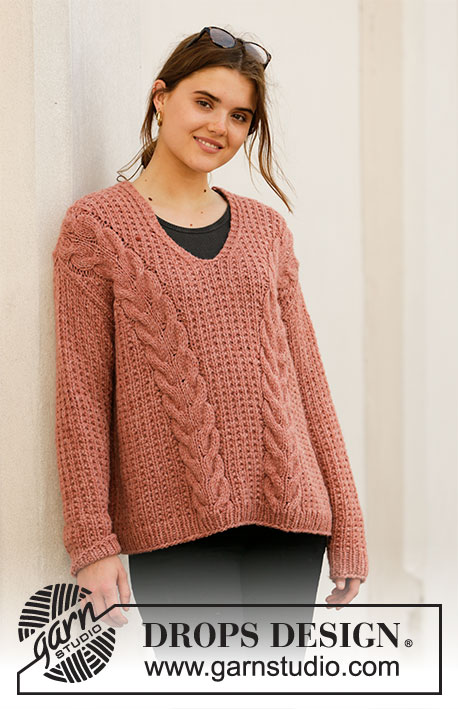
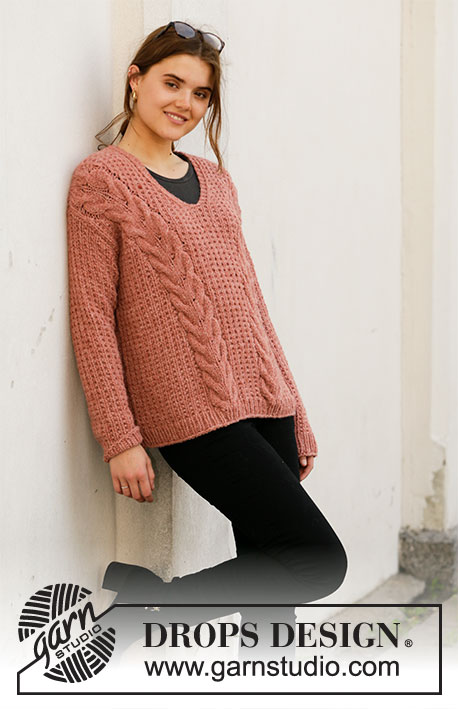
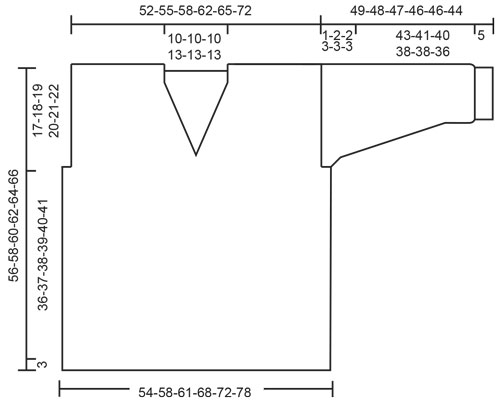
Knitted sweater in 2 strands DROPS Sky. Piece is knitted top down with V-neck, cables and texture pattern. Size: S - XXXL
DROPS 205-10 |
||||||||||||||||||||||
|
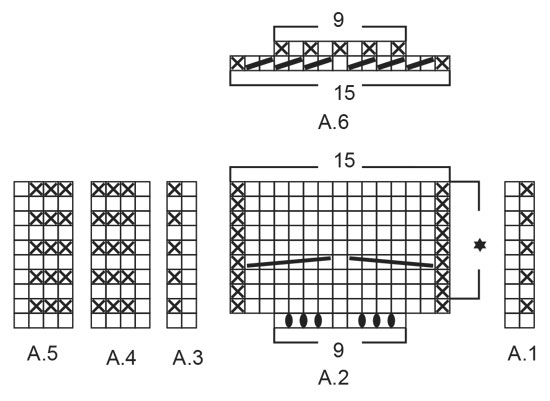
---------------------------------------------------------- EXPLANATION FOR THE PATTERN: ---------------------------------------------------------- PATTERN: See diagrams A.1 to A.6. DISPLACEMENT: All decreases/increases are done from the right side. Displace towards the left as follows: Work until A.2, make 1 yarn over (= 1 stitch in increased), work A.2, slip 1 stitch knitwise, knit 1, pass slipped stitch over stitch worked (= 1 stitch decreased), work the rest of row as before. Displace towards the right as follows: Work until 2 stitches remain before A.2, knit 2 together (= 1 stitch decreased), work A.2, make 1 yarn over (= 1 stitch increased), work the rest of row as before. On next row work yarn overs twisted to avoid holes. Then work the new stitches in pattern A.1/A.3. V-NECK: All increases are done from the right side. Increase as follows before A.4: Work until A.4, make 1 yarn over (= 1 stitch increased), work A.4. Increase as follows after A.5: Work A.5, make 1 yarn over (= 1 stitch increased), work the rest of row as before, On next row work yarn overs twisted to avoid holes. Then work the new stitches in pattern A.3/A.1. BIND OFF TIP: To avoid a tight bind-off edge you may use a needle ½ size larger. GARTER STITCH (back and forth): Knit all rows. 1 ridge vertically = knit 2 rows. DECREASE TIP (applies to mid under sleeve): Work 1 stitch in garter stitch, slip 1 stitch knitwise, knit 1, pass slipped stitch over stitch worked, work until 3 stitches remain, knit 2 together, 1 stitch in garter stitch. ---------------------------------------------------------- START THE PIECE HERE: ---------------------------------------------------------- SWEATER - SHORT OVERVIEW OF THE PIECE: Piece is worked back and forth in parts, top down. Sew together when finished. RIGHT SHOULDER FRONT (when garment is worn): Cast on 27-29-31-33-35-39 stitches on circular needle size 7 mm = US 10,75 with 2 strands Sky. Purl 1 row from wrong side. Work next row as follows: A.1 over 2-2-2-4-4-4 stitches, A.2 (= 9 stitches), A.3 over 12-14-16-16-18-22 stitches, and finish with A.4 (= 4 stitches). Work from wrong side = 33-35-37-39-41-45 stitches on row. Continue this pattern (see star in A.2), at the same time displace cable, and increase for V-neck as follows: DISPLACEMENT: On next row displace cable 1 stitch towards the left - read DISPLACEMENT. Displace every other row 11-13-13-12-15-19 times in total, every 4th row 2-2-4-5-4-5 times in total, every 8th row 3-3-4-4-4-3 times in total, and then every 16th row 2-2-1-1-1-1 times in total (= 18-20-22-22-24-28 stitches in total displaced towards mid front). V-NECK: When piece measures 8 cm = 3⅛", increase 1 stitch towards neck - read V-NECK. Increase like this every other row 5-4-3-7-6-5 times in total and then every 4th row total 1-2-3-1-2-3 times (= 6-6-6-8-8-8 stitches in total increased for neck). When increase for V-neck is done, there are 39-41-43-47-49-53 stitches on needle, and piece measures approx. 15-16-17-18-19-20 cm = 6"-6¼"-6¾"-7"-7½"-8" - finish from right side. Put piece aside and work the left shoulder. LEFT SHOULDER FRONT (when garment is worn): Cast on 27-29-31-33-35-39 stitches on circular needle size 7 mm = US 10,75 with 2 strands Sky. Purl 1 row from wrong side. Work next row as follows: A.5 (= 4 stitches), A.1 over 12-14-16-16-18-22 stitches, A.2 (= 9 stitches) and finish with A.3 over the remaining 2-2-2-4-4-4 stitches. Work from wrong side = 33-35-37-39-41-45 stitches on row. Continue this pattern (see star in A.2), at the same time displace cable as on right shoulder at the front, but towards the right instead of the left. Increase for V-neck the same way as on right shoulder but inside A.5 instead of A.4. When increase for V-neck is done, there are 39-41-43-47-49-53 stitches on needle, and piece measures approx. 15-16-17-18-19-20 cm = 6"-6¼"-6¾"-7"-7½"-8" - finish on the same row as pattern on right shoulder (from right side). FRONT PIECE: Work next row from wrong side on left shoulder as before, cast on 1 stitch at the end of row (= mid stitch), work next row from wrong side on right shoulder = 79-83-87-95-99-107 stitches. Continue pattern and displacement of cables as before but work the middle 7 stitches in pattern A.3/A.1. Continue the pattern like this until piece measures 17-18-19-20-21-22 cm = 6¾"-7"-7½"-8"-8¼"-8¾". Insert 1 marker in middle of row. NOW MEASURE THE PIECE FROM HERE! Cast on 2-2-2-4-4-4 new stitches at the end of the next 2 rows for armholes = 83-87-91-103-107-115 stitches. Work the new stitches into A.1/A.3. Work until piece measures 35-36-37-38-39-40 cm = 13¾"-14¼"-14½"-15"-15¼"-15¾" from marker. On next row from right side work A.6 (= 15 stitches) over A.2, continue the remaining stitches as before. When A.6 has been worked, there are 71-75-79-91-95-103 stitches on needle. Switch to circular needle size 6 mm = US 10 and work rib from right side as follows: * purl 1, knit 1 *, repeat from *-* until 1 stitch remains, purl 1 stitch. Work rib like this for 3 cm = 1⅛", then bind off with knit over knit and purl over purl - read BIND OFF TIP. LEFT SHOULDER BACK (when garment is worn): Cast on 27-29-31-33-35-39 stitches on circular needle size 7 mm = US 10,75 with 2 strands Sky. Purl 1 row from wrong side. Work next row as follows: A.1 over 2-2-2-4-4-4 stitches, A.2 (= 9 stitches), A.3 over 12-14-16-16-18-22 stitches, and finish with A.4 (= 4 stitches). Work from wrong side = 33-35-37-39-41-45 stitches on row. Continue this pattern (see star in A.2), at the same time displace cable the same way as on right shoulder at the front, and when piece measures 2 cm = ¾", cast on 1 stitch at the end of next row (from right side) for neck = 34-36-38-40-42-46 stitches on row – finish from right side. Put piece aside and work the right shoulder. RIGHT SHOULDER BACK (when garment is worn): Cast on 27-29-31-33-35-39 stitches on circular needle size 7 mm = US 10,75 with 2 strands Sky. Purl 1 row from wrong side. Work next row as follows: A.5 (= 4 stitches), A.1 over 12-14-16-16-18-22 stitches, A.2 (= 9 stitches) and finish with A.3 over the remaining 2-2-2-4-4-4 stitches. Work from wrong side = 33-35-37-39-41-45 stitches on row. Continue this pattern (see star in A.2), at the same time displace cable the same way as on left shoulder at the back, and when piece measures 2 cm = ¾", cast on 1 stitch at the end of next row (from wrong side) for neck = 34-36-38-40-42-46 stitches on row – finish on the same row in pattern as on left shoulder (from right side). BACK PIECE: Work next row from wrong side on right shoulder as before, cast on 11-11-11-15-15-15 stitches at the end of row for neck, work next row from wrong side on left shoulder = 79-83-87-95-99-107 stitches. Continue pattern and displace both cables as before, but over the middle 17-17-17-21-21-21 stitches work 1 ridge in GARTER STITCH – read explanation above, then work these stitches in pattern A.3/A.1. Continue displacement as before, and work the middle stitches in pattern A.3/A.1, i.e. Work next row as follows from right side: Work A.1 and A.2 as before, work A.3 until 1 stitch before A.2, work 1 stitch in stockinette stitch, work A.1, A.2 and A.3 as before. Continue this pattern like this until piece measures 17-18-19-20-21-22 cm = 6¾"-7"-7½"-8"-8¼"-8¾". Insert 1 marker in middle of row. NOW MEASURE THE PIECE FROM HERE! Cast on 2-2-2-4-4-4 new stitches at the end of the next 2 rows for armholes = 83-87-91-103-107-115 stitches. Work the new stitches in A.1/A.3. Work until piece measures 35-36-37-38-39-40 cm = 13¾"-14¼"-14½"-15"-15¼"-15¾" from marker. On next row from right side work A.6 (= 15 stitches) over A.2, continue the remaining stitches as before. When A.6 has been worked, there are 71-75-79-91-95-103 stitches on needle. Switch to circular needle size 6 mm = US 10 and work rib from right side as follows: * purl 1, knit 1 *, repeat from *-* until 1 stitch remains, purl 1 stitch. Work rib like this for 3 cm = 1⅛", then bind off with knit over knit and purl over purl. SLEEVE: Cast on 45-47-49-53-55-57 stitches on circular needle size 7 mm = US 10,75 with 2 strands Sky. Purl 1 row from wrong side. Work next row from right side as follows: Work A.1 until 1 stitch remains, work 1 stitch in garter stitch. Continue this pattern. When piece measures 1-2-2-3-3-3 cm = ⅜"-¾"-¾"-1⅛"-1⅛"-1⅛", insert 1 marker in each side, markers show where sleeves are sewn to body. When piece measures 4 cm = 1½", decrease 1 stitch inside 1 edge stitch in each side of piece - read DECREASE TIP! Decrease like this every 5-5-5-3½-3½-3½ cm = 2"-2"-2"-1¼"-1¼"-1¼" 8-8-8-10-10-10 times in total = 29-31-33-33-35-37 stitches. Continue until piece measures 44-43-42-41-41-39 cm = 17¼"-17"-16½"-16⅛"-16⅛"-15¼" (shorter measurements in the larger sizes because wider shoulder and longer sleeve cap). Switch to circular needle size 6 mm = US 10. Work next row as follows from right side: 1 stitch in garter stitch, * knit 1, purl 1 *, work from *-* until 4 stitches remain, knit 2 together, purl 1 and 1 stitch in garter stitch = 28-30-32-32-34-36 stitches. Continue back and forth with rib (= knit 1/purl 1) with 1 edge stitch in garter stitch in each side until rib measures 5 cm = 2". Bind off stitches with knit over knit and purl over purl. Sleeve measures approx. 49-48-47-46-46-44 cm = 19¼"-19"-18½"-18"-18"-17¼". Work the other sleeve the same way. ASSEMBLY: Sew shoulder seams inside cast-on edges. Sew side seams - sew in outer loop of edge stitch to avoid a chunky seam. Sew sleeve seams - sew in outer loop of edge stitch to avoid a chunky seam - sew from the bottom up to markers (approx. 1-2-2-3-3-3 cm = ⅜"-¾"-¾"-1⅛"-1⅛"-1⅛") at the top without seam (sew the part not sewn together at the top to bottom of armhole on body). Sew in sleeves and sew bottom of armhole. |
||||||||||||||||||||||
Diagram explanations |
||||||||||||||||||||||
|
||||||||||||||||||||||
 |
||||||||||||||||||||||
 |
||||||||||||||||||||||
Have you finished this pattern?Tag your pictures with #dropspattern #leafpilessweater or submit them to the #dropsfan gallery. Do you need help with this pattern?You'll find 24 tutorial videos, a Comments/Questions area and more by visiting the pattern on garnstudio.com. © 1982-2026 DROPS Design A/S. We reserve all rights. This document, including all its sub-sections, has copyrights. Read more about what you can do with our patterns at the bottom of each pattern on our site. |
||||||||||||||||||||||


With over 40 years in knitting and crochet design, DROPS Design offers one of the most extensive collections of free patterns on the internet - translated to 17 languages. As of today we count 325 catalogs and 12298 patterns - 12288 of which are translated into English (US/in).
We work hard to bring you the best knitting and crochet have to offer, inspiration and advice as well as great quality yarns at incredible prices! Would you like to use our patterns for other than personal use? You can read what you are allowed to do in the Copyright text at the bottom of all our patterns. Happy crafting!
Post a comment to pattern DROPS 205-10
We would love to hear what you have to say about this pattern!
If you want to leave a question, please make sure you select the correct category in the form below, to speed up the answering process. Required fields are marked *.