
Popular categories
Looking for a yarn?


Comments / Questions (98)
![]() Kees wrote:
Kees wrote:
Helemaal in het begin wordt voor naald 2 en 4 expliciet vermeld dat de omslagen averecht gebreid worden om gaatjes te laten ontstaan. Betekent dit dat de omslagen in naald 3 gedraaid recht gebreid worden om gaatjes te voorkomen? Aangezien het er daar niet expliciet bij staat.
07.06.2021 - 22:39
![]() Mimi wrote:
Mimi wrote:
Bonjour, Merci pour votre réponse. Il s'agit donc d'un multiple de 24 mailles ? pour faire le motif feuille. Merci. Cordialement.
27.04.2021 - 14:17DROPS Design answered:
Bonjour Mimi, tout dépend duquel, il faut penser aux mailles lisières et aux mailles centrales. Un forum spécialisé ou votre magasin saura vous aider si nécessaire, merci pour votre compréhension. Bon tricot!
27.04.2021 - 15:33
![]() Mimi wrote:
Mimi wrote:
Bonjour, J'aimerais le réaliser avec une laine qui se tricote en 7/8 et utiliser des aiguilles n° 7 ou 7.5. Pouvez vous me dire si c'est faisable avec ce modèle, est ce que le résultat sera aussi beau ? Si oui, comment puis je faire pour réduire le nombre de maille et de ce fait l'adapter à votre modèle. Merci pour votre réponse. Cordialement.
26.04.2021 - 23:06DROPS Design answered:
Bonjour Mimi, ce châle se tricote avec une tension de 24 m x 32 rangs, donc complètement différente de votre laine; il va vous falloir adapter les explications si vous voulez utiliser cette laine, il peut être plus simple de consulter nos modèles de châles en laine du groupe D par ex ou bien du groupe E, vous y trouverez peut être un modèle qui vous convient. Bon tricot!
27.04.2021 - 07:32
![]() Anette wrote:
Anette wrote:
Hvor mange nøgler skal der bruges til sjalet, hvis man følger opskriften og den foreslåede garntype?
20.02.2021 - 12:36DROPS Design answered:
Hej Anette. Till sjalen går det åt 8 nystan DROPS Alpaca. Mvh DROPS Design
22.02.2021 - 11:26
![]() Paco wrote:
Paco wrote:
BOnjour, je ne comprends pas, vous dites qu'une fois terminé A2 à A6, on a 51 Mailles, mais j'en compte personnellement sur le dernier rang selon le diagramme : 10 à la fin de A2, 9 à la fin de A3 deux fois, 7 à la fin de A4, 7 à la fin de A5 et10 à la fin de A6 = 10+ 9 +9 +7 +7 +10 soit 52 mailles en tout. Pouvez vous m'aider? Merci
15.02.2021 - 07:54DROPS Design answered:
Bonjour Mme Paco, désolée pour la réponse tardive, votre question a malheureusement été oubliée. Je ne suis pas bien sûre de comprendre à quel niveau précis vous en êtes, pouvez-vous être plus précise? Merci pour votre compréhension.
20.05.2021 - 08:59
![]() Tison wrote:
Tison wrote:
Bonjour, Avant les explications du châle il est écrit : CHÂLE - PETIT APERÇU DE L'OUVRAGE: Se tricote de haut en bas, en allers et retours sur aiguille circulaire. Étant donné le nombre important de mailles, on peut diviser l'ouvrage sur plusieurs aiguilles circulaires de la même taille pour avoir suffisamment de place. Je me demande comment faire pour diviser l’ouvrage sur plusieurs aiguilles ?
11.12.2020 - 22:07DROPS Design answered:
Bonjour Mme Tison, tricotez par exemple la moitié des mailles avec une aiguille circulaire, puis, au lieu de continuer avec la même aiguille circulaire, tricotez avec une autre pour qu'ainsi, les mailles se trouvent sur 2 aiguilles circulaires à suivre. Bon tricot!
14.12.2020 - 10:30
![]() Tison Maureen wrote:
Tison Maureen wrote:
Bonjour, comment faire pour diviser le châle s’il vous plaît ? A partir de où ? Merci
10.12.2020 - 12:43DROPS Design answered:
Bonjour Mme Tison, je ne suis pas sûre de bien comprendre votre question, pourquoi voulez-vous diviser le châle? à quel niveau avez-vous compris ceci? Désolée pour ces questions, Merci pour votre compréhension.
10.12.2020 - 16:09
![]() Anita Andersson wrote:
Anita Andersson wrote:
Håller med Katarinas insändare från juli 2020. Jag kommer att repa upp den, för det blev inte snyggt
27.09.2020 - 15:40
![]() Katarina wrote:
Katarina wrote:
Hej! Det måste vara fel i mönster A1och A2. Det står att det ska vara aviga från rätsidan och räta från avigan i början och slutet på mönstren, men det syns ganska tydligt på bilden att det är tvärtom. Jag följde tyvärr mönstret och nu blev det inte alls snyggt, inser jag alldeles för sent.
20.07.2020 - 13:18
![]() Carolin wrote:
Carolin wrote:
Nein, die letzten beiden Reihen müssten glatt rechts gestrickt werden. Schauen Sie sich doch das abgebildete Modell in braun an und das aus der dropsfan-galerie und vergleichen Sie die. Wenn die beiden Mustersätze A.1 und A.2 zweimal in der Höhe gestrickt werden, werden sie von zwei rechten Reihen unterbrochen. Auf Bild 3 trägt die Dame das Tuch verkehrt herum und man sieht deutlich zwei linke Reihen zwischen den Mustern, die auf der Vorderseite natürlich rechts gestrickt wurden.
20.07.2020 - 09:04DROPS Design answered:
Liebe Carolin, danke für Ihre sehr genaue Beobachtung! Sie haben Recht, es sieht so aus, als ob die letzten beiden Reihen von A.1 glatt rechts statt glatt links gestrickt werden müssten, um ein Ergebnis wie auf dem Foto zu bekommen. Letztendlich ist es dann eine Frage der Optik. Es wird ans Design-Team weitergeleitet, da allerdings gerade Urlaubszeit ist, kann es sich etwas verzögern, bis eine Antwort kommt. Viel Spaß beim Weiterstricken!
22.07.2020 - 10:52
|
|||||||||||||||||||||||||||||||
Lacey Laurels#laceylaurelsshawl |
|||||||||||||||||||||||||||||||
 |
 |
||||||||||||||||||||||||||||||
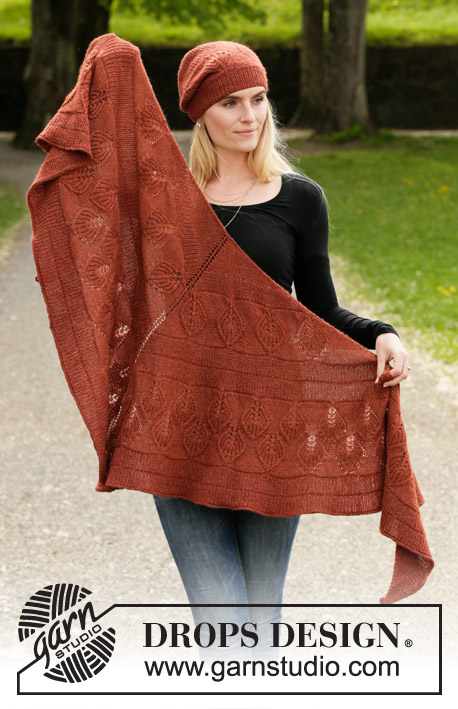
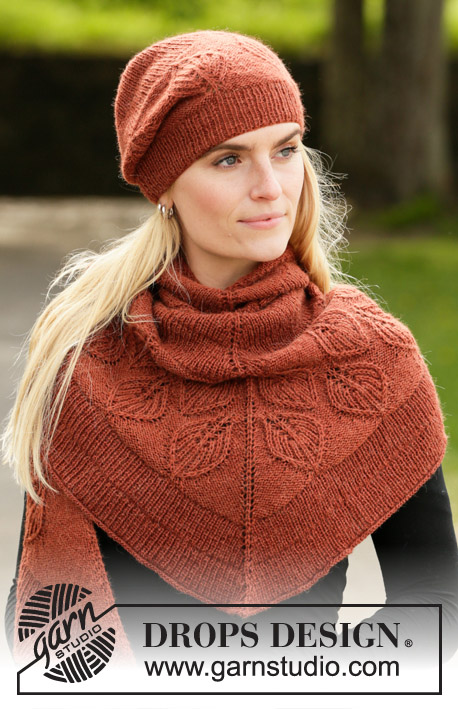
Knitted hat and shawl in DROPS Alpaca. The piece is worked with rib and leaf pattern in Fisherman’s rib.
DROPS 203-14 |
|||||||||||||||||||||||||||||||
|
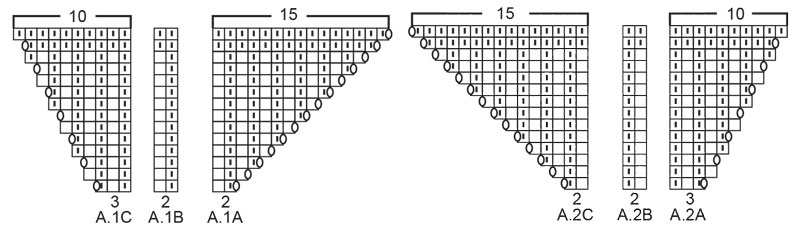
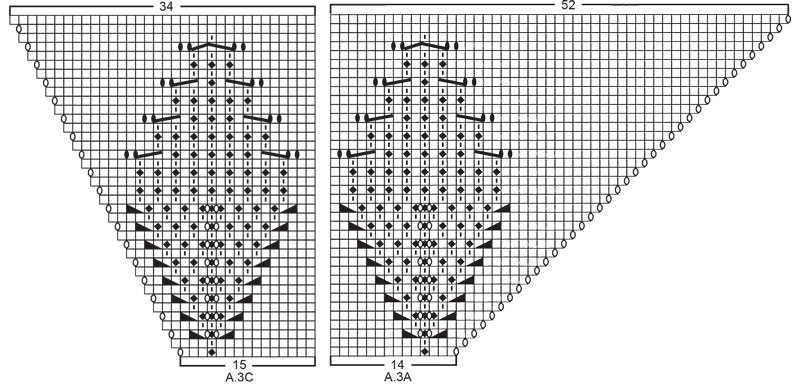
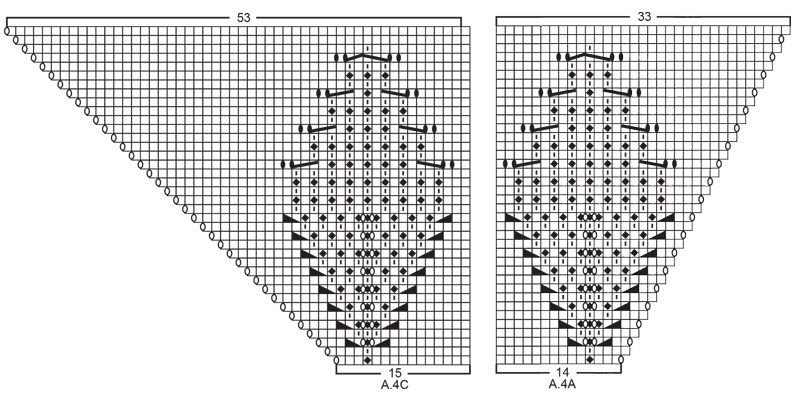
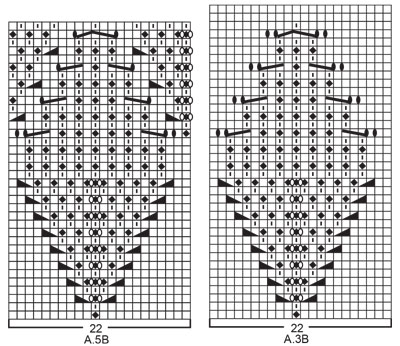
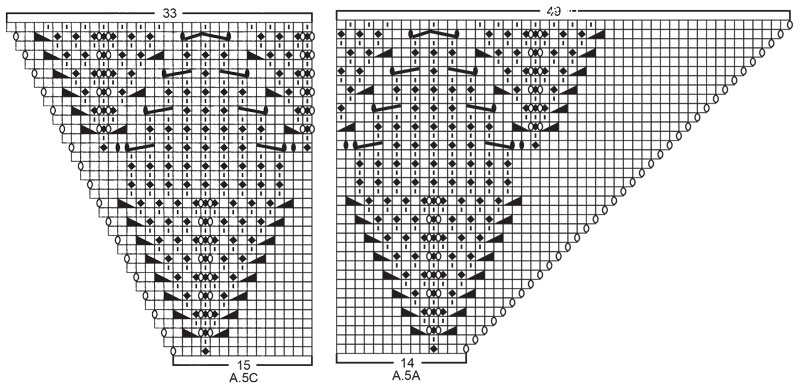
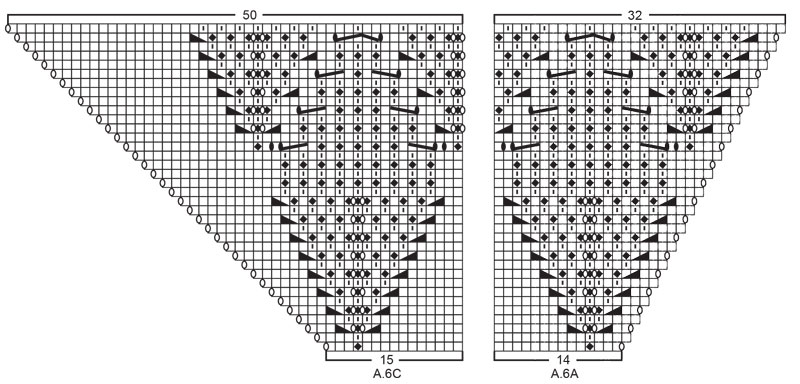
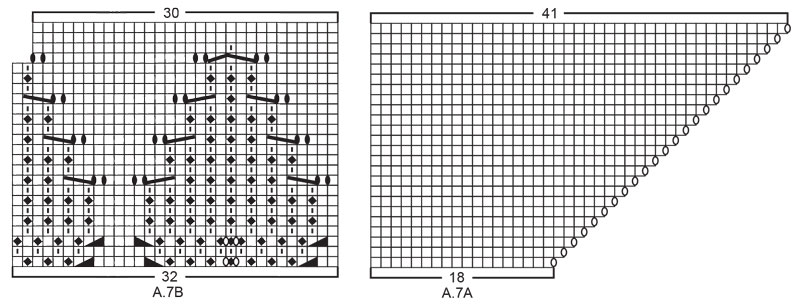
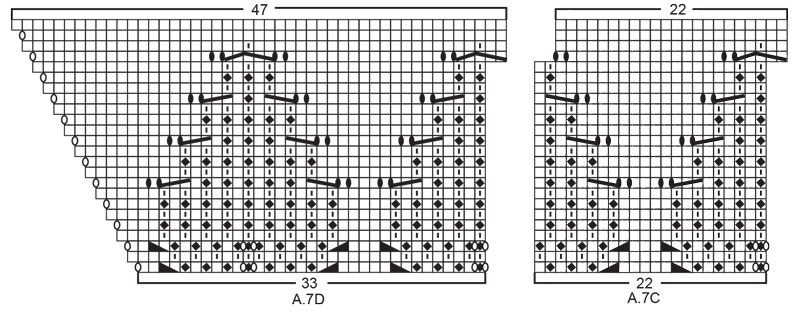
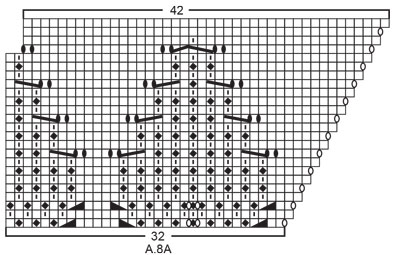
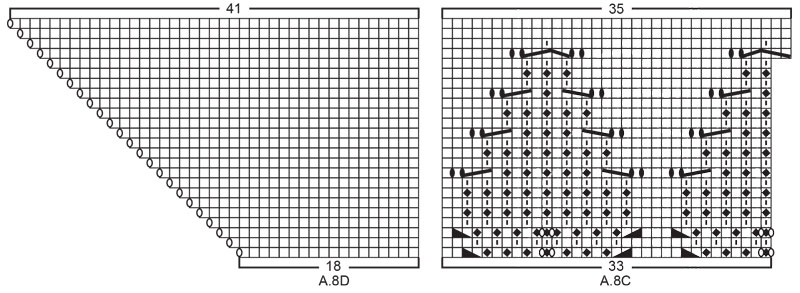
------------------------------------------------------- EXPLANATIONS FOR THE PATTERN: ------------------------------------------------------- RIDGE/GARTER STITCH (worked back and forth): Knit all rows. 1 ridge in height = Knit 2 rows. PATTERN: Hat: See diagrams A.1B and A.3B. Shawl: See diagrams A.1 to A.8. The diagrams show all rows in the pattern seen from the right side. DIAGRAM TIP: This pattern contains many diagrams; it might be a good idea to cut out all the diagrams and arrange them in the right order (see the order given in the text). INCREASE/DECREASE TIP (evenly spaced on hat): To work out how to increase/decrease evenly, count the total number of stitches on needle (e.g. 122 stitches) and divide by the number of increases/decreases to be made (e.g. 10) = 12.2. In this example, increase by making 1 yarn over after approx. each 12th stitch. On the next round work the yarn overs twisted to avoid holes. When decreasing, work together approx. each 11th and 12th stitch. INCREASE/DECREASE TIP (evenly spaced on shawl): To work out how to increase/decrease evenly on each side of the middle stitch, count the total number of stitches on needle (e.g. 81 stitches) minus the edge stitches and middle stitch (5 stitches) and divide the remaining stitches by 2 ( to find the number of stitches on each side of the middle stitch). Then divide these stitches by the number of increases/decreases to be made on each side (e.g. 18) = 2.1. In this example, increase by making 1 yarn over after approx. each 2nd stitch. Do not increase over edge stitches or middle stitch. When decreasing, work approximately all stitches together 2 and 2. ------------------------------------------------------- START THE PIECE HERE: ------------------------------------------------------- HAT – SHORT OVERVIEW OF THE PIECE: The piece is worked in the round with short circular needle, bottom up. Change to double pointed needles when necessary. HAT: Cast on 120-126 stitches with short circular needle size 2.5 mm = US 1,5 and Alpaca. Knit 1 round. Then work rib in the round (= knit 1 / purl 1) for 5-6 cm = 2"-2⅜". Knit 1 round where you increase 12-28 stitches evenly spaced – read INCREASE/DECREASE TIP = 132-154 stitches. Change to circular needle size 3 mm = US 2,5 and work A.3B in the round (= 6-7 repeats of 22 stitches). REMEMBER THE KNITTING GAUGE! When A.3B has been completed the piece measures approx. 16-17 cm = 6¼"-6¾" from the cast-on edge. Knit 1 round where you increase 12-14 stitches evenly spaced = 144-168 stitches. Work A.1B. AT THE SAME TIME on the last round in A.1B decrease 16-24 stitches evenly spaced = 128-144 stitches. Work A.1B one more time in height. AT THE SAME TIME on the last round in A.1B knit all stitches together 2 and 2 = 64-72 stitches. Then work stockinette stitch. AT THE SAME TIME, on every 2nd round, knit all stitches together 2 and 2 until there are 8 stitches left. Cut the strand, pull it through the remaining stitches, tighten and fasten well. The hat measures approx. 26-27 cm = 10¼"-10⅝" from the top down. ------------------------------------------------------- SHAWL - SHORT OVERVIEW OF THE PIECE: The piece is worked back and forth with circular needle, top down. Due to the number of stitches it might be a good idea to divide the piece onto several needles of the same size. SHAWL: Cast on 7 stitches with circular needle size 3 mm = US 2,5 and Alpaca. Knit 1 row (= wrong side). Then work and increase as follows: ROW 1 (= right side): Work 2 edge stitches in GARTER STITCH – read description above, 1 yarn over, work 1 stitch in stockinette stitch, 1 yarn over, 1 stitch in stockinette stitch (= middle stitch), 1 yarn over, 1 stitch in stockinette stitch, 1 yarn over and finish with2 edge stitches in garter stitch (= 4 stitches increased). ROW 2 (= wrong side): Work 2 edge stitches in garter stitch, 1 yarn over, work stockinette stitch until there are 2 stitches left on the row (yarn overs purled to leave holes), 1 yarn over and finish with 2 edge stitches in garter stitch (= 2 stitches increased). ROW 3 (= right side): 2 edge stitches in garter stitch, 1 yarn over, work stockinette stitch as far as the middle stitch, 1 yarn over, 1 stitch in stockinette stitch (= middle stitch), 1 yarn over, work stockinette stitch until there are 2 stitches left on the row, 1 yarn over and finish with 2 edge stitches in garter stitch (= 4 stitches increased). ROW 4 (= wrong side): 2 edge stitches in garter stitch, 1 yarn over, work stockinette stitch until there are 2 stitches left on the row (yarn overs purled to leave holes), 1 yarn over and finish with 2 edge stitches in garter stitch (= 2 stitches increased). Repeat rows 3 and 4 until there are 83 stitches on the needle and the last row was worked from the right side. REMEMBER THE KNITTING GAUGE! Work the next row in the same way as row 4 (= wrong side) and increase at the same time 17 stitches evenly spaced on each side of the middle stitch (34 stitches increased on row in addition to the increase worked inside the 2 edge stitches on each side) – read INCREASE/DECREASE TIP = 119 stitches on the needle. Work diagrams A.1 and A.2 as follows from the right side: Work 2 edge stitches in garter stitch, A.1A over 2 stitches (1 time in width), A.1B over 52 stitches (26 times in width), A.1C over 3 stitches (1 time in width), 1 stitch in stockinette stitch (= middle stitch), work A.2A over 3 stitches, A.2B over 52 stitches (26 times in width), A.2C over 2 stitches and finish with 2 edge stitches in garter stitch. Continue this pattern. When the last row in A.1 and A.2 remains there are 159 stitches on the needle. Work the last row and at the same time decrease 5 stitches evenly spaced on each side of the middle stitch (10 stitches decreased evenly + 2 stitches increased in diagrams) – read INCREASE/DECREASE TIP = 151 stitches. Work diagrams A.3 and A.4 as follows from the right side: Work 2 edge stitches in garter stitch, A.3A over 14 stitches (1 time in width), A.3B over 44 stitches (2 times in width), work A.3C over 15 stitches (1 time in width), 1 stitch in stockinette stitch (= middle stitch), work A.4A over 14 stitches, A.3B over 44 stitches (2 times in width), A.4C over 15 stitches and finish with 2 edge stitches in garter stitch. Continue this pattern. When the last row in A.3 and A.4 remains there are 263 stitches on the needle. Work the last row and, at the same time, increase 43 stitches evenly spaced on each side of the middle stitch (86 stitches increased evenly and 2 stitches increased in diagrams) = 351 stitches. Work diagrams A.1 and A.2 as follows from the right side: Work 2 edge stitches in garter stitch, A.1A over 2 stitches (1 time in width), A.1B over 168 stitches (84 times in width), work A.1C over 3 stitches (1 time in width), 1 stitch in stockinette stitch (= middle stitch), A.2A over 3 stitches, A.2B over 168 stitches (84 times in width), work A.2C over 2 stitches and finish with 2 edge stitches in garter stitch. Continue this pattern. When the last row in A.1 and A.2 remains there are 391 stitches on the needle. Work the last row and increase at the same time 1 stitch on each side of the middle stitch (2 stitches increased evenly and 2 stitches increased in diagrams) = 395 stitches. Now work A.1 and A.2 one more time in height; i.e. work the next row from the right side as follows: 2 edge stitches in garter stitch, A.1A over 2 stitches (1 time in width), A.1B over 190 stitches (95 times in width), work A.1C over 3 stitches (1 time in width), 1 stitch in stockinette stitch (= middle stitch), A.2A over 3 stitches, A.2B over 190 stitches (95 times in width), A.2C over 2 stitches and finish with 2 edge stitches in garter stitch. Continue this pattern. When the last row in A.1 and A.2 remains there are 435 stitches on the needle. Work the last row and decrease at the same time 11 stitches evenly spaced on each side of the middle stitch (22 stitches decreased evenly and 2 stitches increased in diagrams) = 415 stitches. Work diagrams A.5 and A.6 as follows from the right side: 2 edge stitches in garter stitch, A.5A over 14 stitches (1 time in width), work A.5B over 176 stitches (8 times in width), A.5C over 15 stitches (1 time in width), 1 stitch in stockinette stitch (= middle stitch), A.6A over 14 stitches, A.5B over 176 stitches (8 times in width), A.6C over 15 stitches and finish with 2 edge stitches in garter stitch. Continue this pattern. When the last row in A.5 and A.6 is finished there are 523 stitches on the row. Work diagrams A.7 and A.8 as follows from the right side: 2 edge stitches in garter stitch, A.7A over 18 stitches (1 time in width), A.7B over 32 stitches (1 time in width), A.7C over 176 stitches (8 times in width), work A.7D over 33 stitches (1 time in width), 1 stitch in stockinette stitch (= middle stitch), A.8A over 32 stitches, A.7C over 176 stitches (8 times in width), A.8C over 33 stitches, A.8D over 18 stitches and finish with 2 edge stitches in garter stitch. Continue this pattern. When the last row in A.7 and A.8 remain there are 593 stitches on the needle. Work the last row and increase at the same time 72 stitches evenly spaced on each side of the middle stitch (144 stitches increased evenly and 2 stitches increased in diagrams) = 739 stitches. Work diagrams A.1 and A.2 as follows from the right side: 2 edge stitches in garter stitch, A.1A over 2 stitches (1 time in width), A.1B over 362 stitches (181 times in width), A.1C over 3 stitches (1 time in width), 1 stitch in stockinette stitch (= middle stitch), A.2A over 3 stitches, work A.2B over 362 stitches (181 times in width), A.2C over 2 stitches and finish with 2 edge stitches in garter stitch. Continue this pattern. When the last row in A.1 and A.2 remains there are 779 stitches on the row. Work the last row and increase at the same time 1 on each side of the middle stitch (2 stitches increased evenly and 2 stitches increased in diagrams) = 783 stitches. Now work A.1 and A.2 one more time in height; i.e. work as follows from the right side: 2 edge stitches in garter stitch, A.1A over 2 stitches (1 time in width), A.1B over 384 stitches (192 times in width), A.1C over 3 stitches (1 time in width), 1 stitch in stockinette stitch (= middle stitch), A.2A over 3 stitches, work A.2B over 384 stitches (192 times in width), A.2C over 2 stitches and finish with 2 edge stitches in garter stitch. Continue this pattern. When the last row in A.1 and A.2 has been completed there are 825 stitches on the row. The piece measures approx. 65 cm = 25½" measured along the middle stitch. Bind off as described below. ELASTIC BIND-OFF EDGE: To avoid the bind-off edge being tight, bind off with knit from the right side as follows: Knit 2, * insert the left needle in the 2 stitches on the right needle, from left to right and knit them together, knit 1 *, work from *-* until there is 1 stitch left on the row. Cut the strand and pull it through the last stitch. Fasten strands. SHAPING TIP: Moisten the piece and shape to the right measurements. |
|||||||||||||||||||||||||||||||
Diagram explanations |
|||||||||||||||||||||||||||||||
|
|||||||||||||||||||||||||||||||
 |
|||||||||||||||||||||||||||||||
 |
|||||||||||||||||||||||||||||||
 |
|||||||||||||||||||||||||||||||
 |
|||||||||||||||||||||||||||||||
 |
|||||||||||||||||||||||||||||||
 |
|||||||||||||||||||||||||||||||
 |
|||||||||||||||||||||||||||||||
 |
|||||||||||||||||||||||||||||||
 |
|||||||||||||||||||||||||||||||
 |
|||||||||||||||||||||||||||||||
Have you finished this pattern?Tag your pictures with #dropspattern #laceylaurelsshawl or submit them to the #dropsfan gallery. Do you need help with this pattern?You'll find 16 tutorial videos, a Comments/Questions area and more by visiting the pattern on garnstudio.com. © 1982-2026 DROPS Design A/S. We reserve all rights. This document, including all its sub-sections, has copyrights. Read more about what you can do with our patterns at the bottom of each pattern on our site. |
|||||||||||||||||||||||||||||||


With over 40 years in knitting and crochet design, DROPS Design offers one of the most extensive collections of free patterns on the internet - translated to 17 languages. As of today we count 325 catalogs and 12298 patterns - 12288 of which are translated into English (US/in).
We work hard to bring you the best knitting and crochet have to offer, inspiration and advice as well as great quality yarns at incredible prices! Would you like to use our patterns for other than personal use? You can read what you are allowed to do in the Copyright text at the bottom of all our patterns. Happy crafting!
Post a comment to pattern DROPS 203-14
We would love to hear what you have to say about this pattern!
If you want to leave a question, please make sure you select the correct category in the form below, to speed up the answering process. Required fields are marked *.