
Popular categories
Looking for a yarn?


Comments / Questions (98)
![]() Jacobs wrote:
Jacobs wrote:
Est-ce qu’il faut exactement le même nombre de Mailles de chaque côté de la maille centrale ? Merci.
19.09.2025 - 15:40DROPS Design answered:
Bonjour, il y a le même nombre de mailles de chaque côté de la maille centrale. Bon tricot!
19.09.2025 - 17:03
![]() Jacobs wrote:
Jacobs wrote:
Bonjour, j’aimerais savoir au début du châle RANG 3:2 mailles de bordure au point mousse, 1 jeté, tricoter en jersey jusqu'a la maille centrale est-ce que c’est la première masse centrale il y en a deux ? 1 jeté, 1 maille jersey (= maille central )car je ne comprends pasEnsuite 1 jeté, tricoter en jersey je ne trouve pas le le nombre exact. Merci
19.09.2025 - 12:32
![]() Sophie wrote:
Sophie wrote:
I started nitting the hat but I'm stuck at the beginning of A3b. It says on round 3 "purl 2 twisted together" but when I do so, I get a purl stich on the right side, the stockinette stich leaning to the right is on the wrong side. I've watch many videos including yours but the suggested stich on the diagramm doesn't seem appropriate for knitting in the round. Could you please help?
28.12.2024 - 23:38DROPS Design answered:
Dear Sophie, here you can see how a purl 2 twisted together should look like: https://www.garnstudio.com/video.php?id=158&lang=en. Happy knitting!
30.12.2024 - 01:46
![]() Martine wrote:
Martine wrote:
Bonjour, dans l'explication du diagramme symbole n°7= pour augmenter 1 maille, faire 1 jeté; au rang suivant, tricoter le jeté torse à l'endroit ou torse à l'envers comme indiqué dans le diagramme (il doit former un trou). Est-ce bien un trou que cela doit former ? Merci pour votre réponse. Cordialement
23.10.2024 - 22:38DROPS Design answered:
Bonjour Martine, vous avez raison, la légende du 7ème symbole a été corrigée, merci pour votre retour. Le 6ème symbole est un jeté qui forme un trou mais le 7ème symbole est un jeté qui ne doit pas former de trou. Bon tricot!
24.10.2024 - 09:38
![]() Talbot Marie Christine wrote:
Talbot Marie Christine wrote:
Bonjour Je souhaite faire le châle avec une dimension inférieure : 150 cm au lieu de 195 cm comme dans le modèle. Que dois-je faire ? Faire moins d'augmentations ? A quel niveau ? Cordialement
18.10.2024 - 18:32DROPS Design answered:
Bonjour Mme Talbot, il va effectivement devoir modifier les explications pour obtenir les dimensions souhaitées, cela affectera également les différents motifs il vous faudra alors faire les ajustements nécessaires en conséquence, vous pouvez également arrêter le châle aux dimensions souhaitées, il sera quoi qu'il arrive différent de celui sur la photo. Bon tricot!
21.10.2024 - 07:26
![]() Janson wrote:
Janson wrote:
Wie kann man verhindern das der Rand sich kräuselt? .. oder liegt das an der Wolle ?Benutze Drops Alpaca
07.07.2024 - 22:40DROPS Design answered:
Sie können das Tuch nach dem Stricken anfeuchten, auf einer passenden Unterlage mit Stecknadeln feststecken und trocknen lassen, dann sollte es glatt werden. Sie können es auch unter feuchte Tücher legen, die Sie dann trocknen lassen. Vielleicht probieren Sie diese Methoden mit einem Probestück aus. Viel Spaß beim Stricken!
09.07.2024 - 22:35
![]() Italia Barletta wrote:
Italia Barletta wrote:
Das grüne tuch gäffelt mir sehr gut gibt es dazu eine Anleitung Danke
04.07.2024 - 10:16DROPS Design answered:
Liebe Frau Balnetta, meinen Sie das Foto von dem grünen Tuch unter #dropsfan Gallery? Die Anleitung finden Sie auf deutsch hier. Viel Spaß beim Stricken!
05.07.2024 - 07:03
![]() Janson wrote:
Janson wrote:
Strickt man von der spitze des dreieckkstuch aus ?
01.07.2024 - 22:57DROPS Design answered:
Liebe Frau Janson, das Tuch wird von oben nach unten gestrickt, dh von der mittleren Maschen hinten; in diesem Video zeigen wir, wie man so ein Tuch strickt (beachten Sie nur, daß das Muster/Modell ganz anders gestrickt wird, Video gilt als Beispiel). Viel Spaß beim Stricken!
02.07.2024 - 10:13
![]() Janina Janson wrote:
Janina Janson wrote:
Sollen alle Umschläge anfangs links gestrickt werden oder nur die vor und nach der Mittelmasche ? Und die anderen verschränkt stricken ?
30.06.2024 - 11:39DROPS Design answered:
Liebe Frau Janson, bis Sie 119 M auf der Nadel haben, werden alle Umschläge/Zunahmen glatt links gestrickt (Löcher werden enstehen). Viel Spaß beim Stricken!
01.07.2024 - 10:05
![]() Janson wrote:
Janson wrote:
Wie sieht man auf den Diagramm ob man ein Umschlag recht oder links stricken muss ?
28.06.2024 - 21:29DROPS Design answered:
Liebe Frau Janson, Die Diagramme zeigen alle Reihe, so stricken Sie die Umschläge, wie bei der nächsten Reihe gezeigt, so bei der 2. Reihe A.1X stricken Sie die Umschläge rechts, bei der 4. Reihe werden Sie links gestrickt usw. Viel Spaß beim Stricken!
01.07.2024 - 08:12
|
|||||||||||||||||||||||||||||||
Lacey Laurels#laceylaurelsshawl |
|||||||||||||||||||||||||||||||
 |
 |
||||||||||||||||||||||||||||||
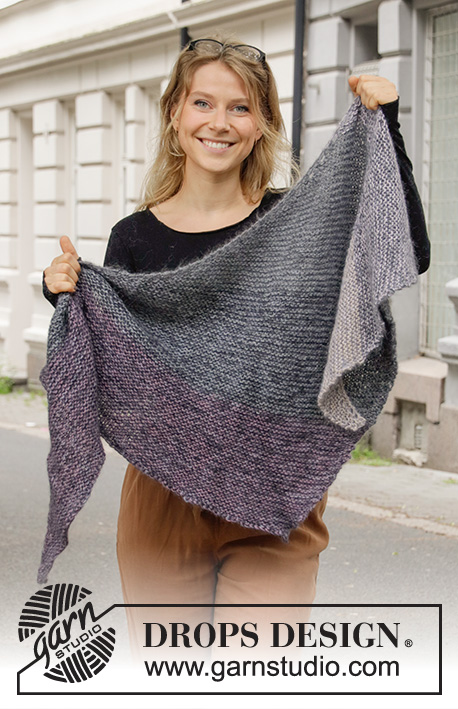
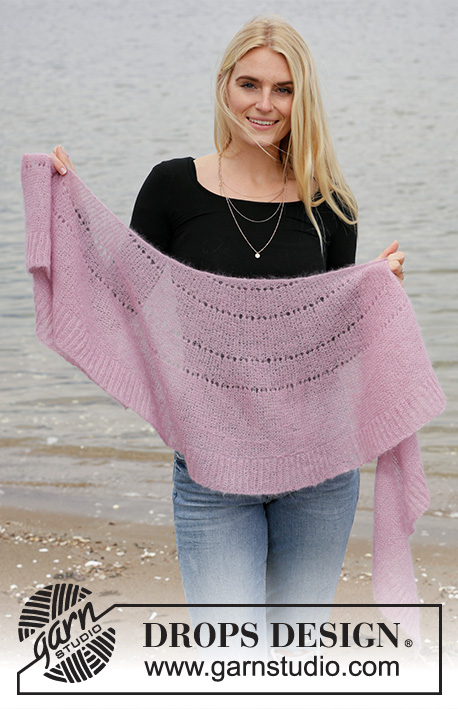
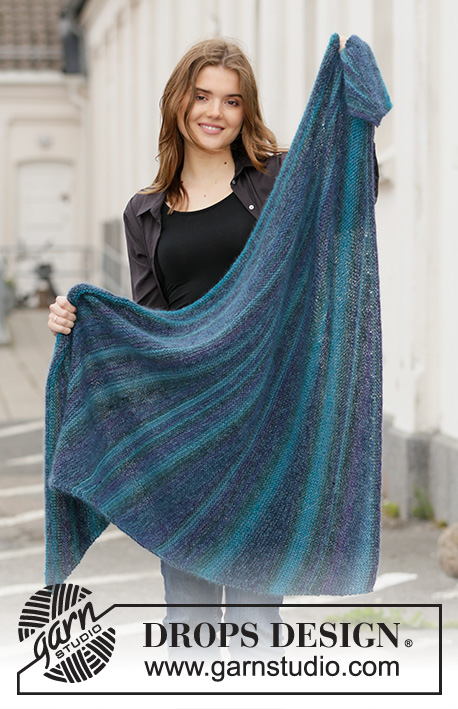
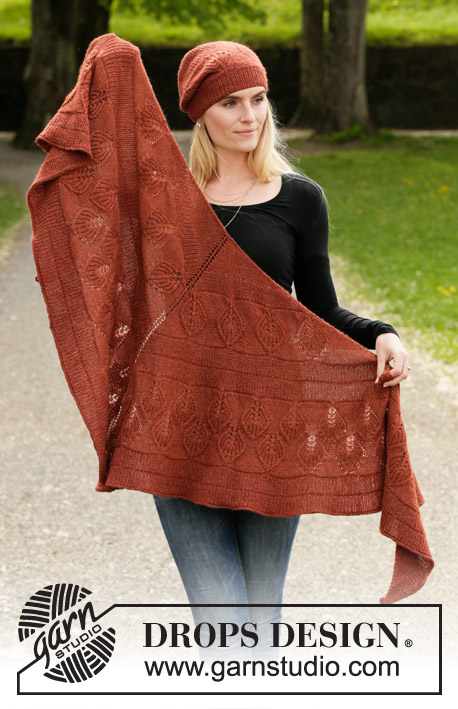
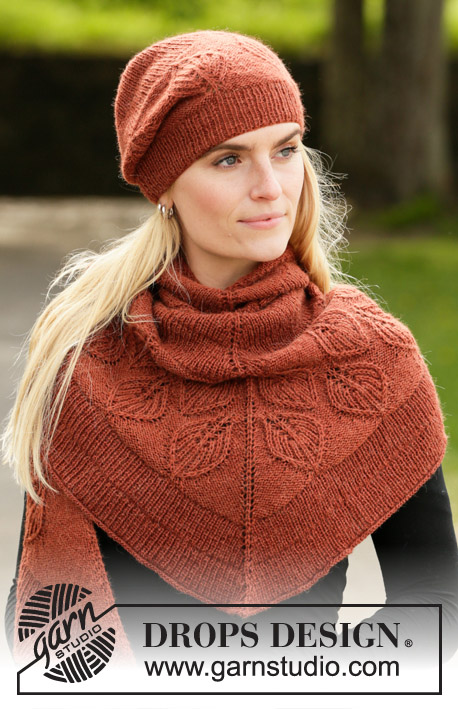
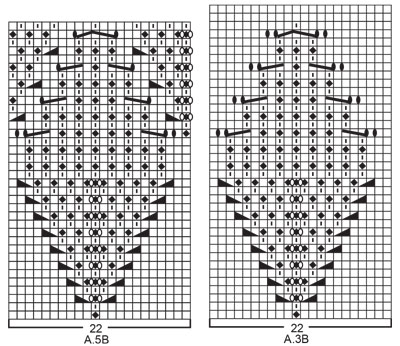
Knitted hat and shawl in DROPS Alpaca. The piece is worked with rib and leaf pattern in Fisherman’s rib.
DROPS 203-14 |
|||||||||||||||||||||||||||||||
|
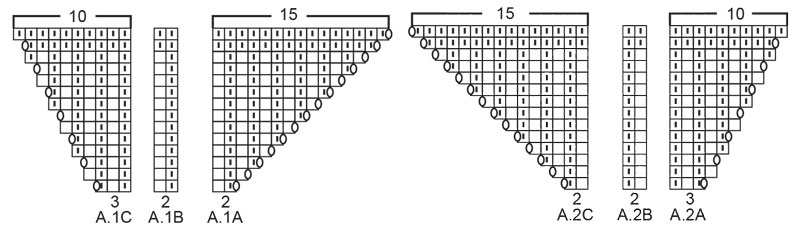
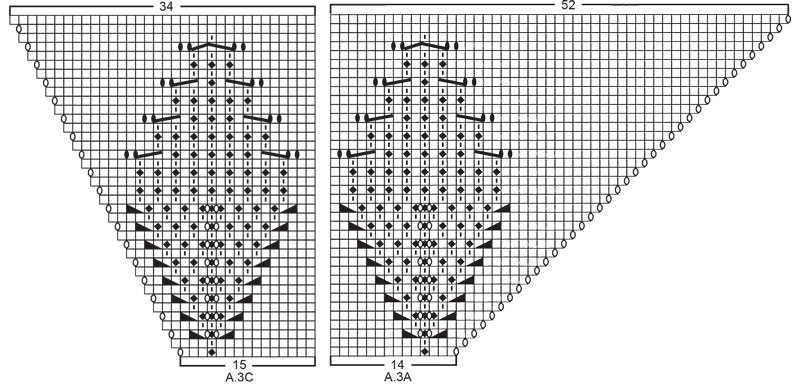
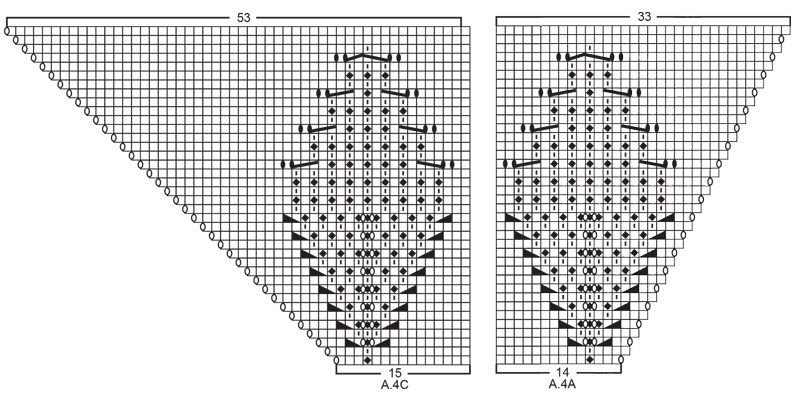
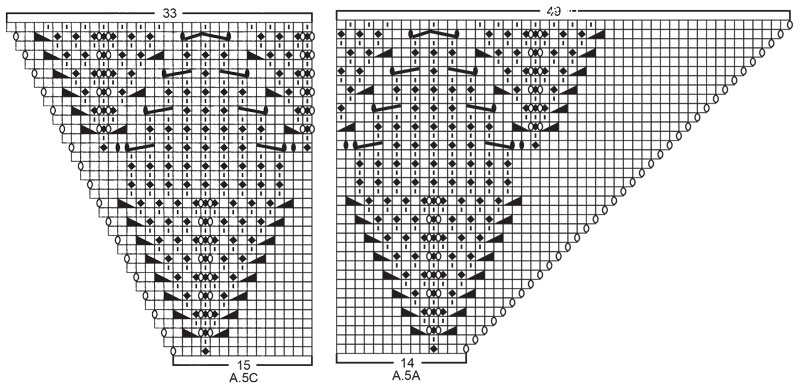
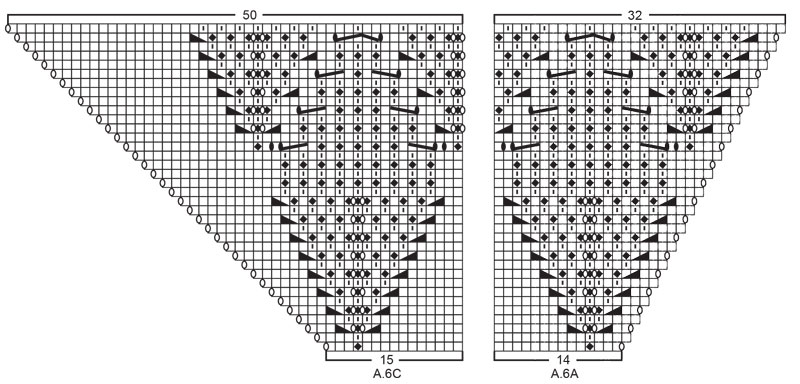
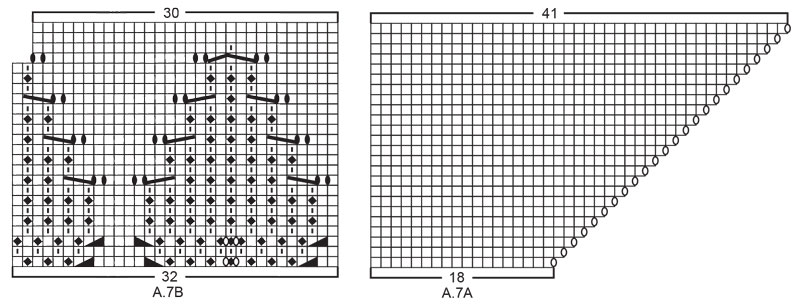
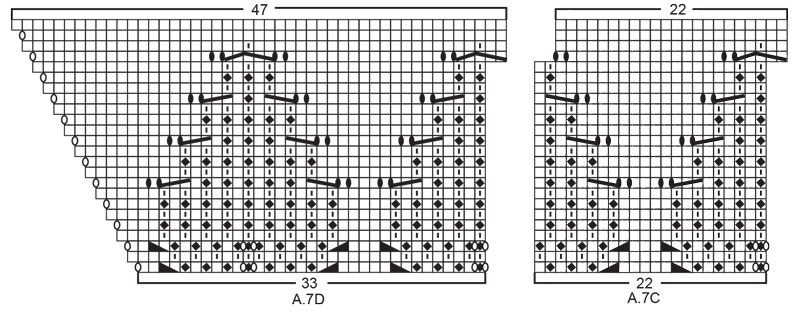
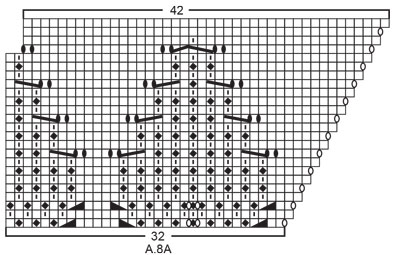
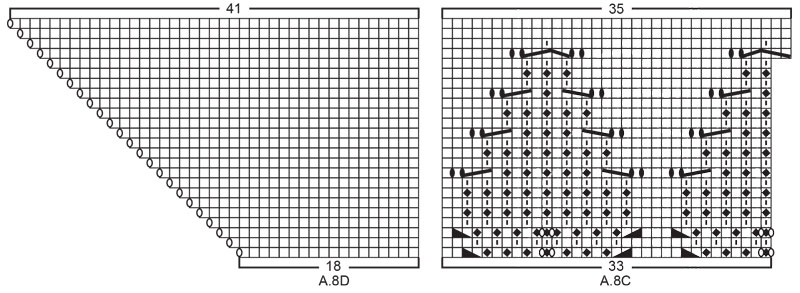
------------------------------------------------------- EXPLANATIONS FOR THE PATTERN: ------------------------------------------------------- RIDGE/GARTER STITCH (worked back and forth): Knit all rows. 1 ridge in height = Knit 2 rows. PATTERN: Hat: See diagrams A.1B and A.3B. Shawl: See diagrams A.1 to A.8. The diagrams show all rows in the pattern seen from the right side. DIAGRAM TIP: This pattern contains many diagrams; it might be a good idea to cut out all the diagrams and arrange them in the right order (see the order given in the text). INCREASE/DECREASE TIP (evenly spaced on hat): To work out how to increase/decrease evenly, count the total number of stitches on needle (e.g. 122 stitches) and divide by the number of increases/decreases to be made (e.g. 10) = 12.2. In this example, increase by making 1 yarn over after approx. each 12th stitch. On the next round work the yarn overs twisted to avoid holes. When decreasing, work together approx. each 11th and 12th stitch. INCREASE/DECREASE TIP (evenly spaced on shawl): To work out how to increase/decrease evenly on each side of the middle stitch, count the total number of stitches on needle (e.g. 81 stitches) minus the edge stitches and middle stitch (5 stitches) and divide the remaining stitches by 2 ( to find the number of stitches on each side of the middle stitch). Then divide these stitches by the number of increases/decreases to be made on each side (e.g. 18) = 2.1. In this example, increase by making 1 yarn over after approx. each 2nd stitch. Do not increase over edge stitches or middle stitch. When decreasing, work approximately all stitches together 2 and 2. ------------------------------------------------------- START THE PIECE HERE: ------------------------------------------------------- HAT – SHORT OVERVIEW OF THE PIECE: The piece is worked in the round with short circular needle, bottom up. Change to double pointed needles when necessary. HAT: Cast on 120-126 stitches with short circular needle size 2.5 mm = US 1,5 and Alpaca. Knit 1 round. Then work rib in the round (= knit 1 / purl 1) for 5-6 cm = 2"-2⅜". Knit 1 round where you increase 12-28 stitches evenly spaced – read INCREASE/DECREASE TIP = 132-154 stitches. Change to circular needle size 3 mm = US 2,5 and work A.3B in the round (= 6-7 repeats of 22 stitches). REMEMBER THE KNITTING GAUGE! When A.3B has been completed the piece measures approx. 16-17 cm = 6¼"-6¾" from the cast-on edge. Knit 1 round where you increase 12-14 stitches evenly spaced = 144-168 stitches. Work A.1B. AT THE SAME TIME on the last round in A.1B decrease 16-24 stitches evenly spaced = 128-144 stitches. Work A.1B one more time in height. AT THE SAME TIME on the last round in A.1B knit all stitches together 2 and 2 = 64-72 stitches. Then work stockinette stitch. AT THE SAME TIME, on every 2nd round, knit all stitches together 2 and 2 until there are 8 stitches left. Cut the strand, pull it through the remaining stitches, tighten and fasten well. The hat measures approx. 26-27 cm = 10¼"-10⅝" from the top down. ------------------------------------------------------- SHAWL - SHORT OVERVIEW OF THE PIECE: The piece is worked back and forth with circular needle, top down. Due to the number of stitches it might be a good idea to divide the piece onto several needles of the same size. SHAWL: Cast on 7 stitches with circular needle size 3 mm = US 2,5 and Alpaca. Knit 1 row (= wrong side). Then work and increase as follows: ROW 1 (= right side): Work 2 edge stitches in GARTER STITCH – read description above, 1 yarn over, work 1 stitch in stockinette stitch, 1 yarn over, 1 stitch in stockinette stitch (= middle stitch), 1 yarn over, 1 stitch in stockinette stitch, 1 yarn over and finish with2 edge stitches in garter stitch (= 4 stitches increased). ROW 2 (= wrong side): Work 2 edge stitches in garter stitch, 1 yarn over, work stockinette stitch until there are 2 stitches left on the row (yarn overs purled to leave holes), 1 yarn over and finish with 2 edge stitches in garter stitch (= 2 stitches increased). ROW 3 (= right side): 2 edge stitches in garter stitch, 1 yarn over, work stockinette stitch as far as the middle stitch, 1 yarn over, 1 stitch in stockinette stitch (= middle stitch), 1 yarn over, work stockinette stitch until there are 2 stitches left on the row, 1 yarn over and finish with 2 edge stitches in garter stitch (= 4 stitches increased). ROW 4 (= wrong side): 2 edge stitches in garter stitch, 1 yarn over, work stockinette stitch until there are 2 stitches left on the row (yarn overs purled to leave holes), 1 yarn over and finish with 2 edge stitches in garter stitch (= 2 stitches increased). Repeat rows 3 and 4 until there are 83 stitches on the needle and the last row was worked from the right side. REMEMBER THE KNITTING GAUGE! Work the next row in the same way as row 4 (= wrong side) and increase at the same time 17 stitches evenly spaced on each side of the middle stitch (34 stitches increased on row in addition to the increase worked inside the 2 edge stitches on each side) – read INCREASE/DECREASE TIP = 119 stitches on the needle. Work diagrams A.1 and A.2 as follows from the right side: Work 2 edge stitches in garter stitch, A.1A over 2 stitches (1 time in width), A.1B over 52 stitches (26 times in width), A.1C over 3 stitches (1 time in width), 1 stitch in stockinette stitch (= middle stitch), work A.2A over 3 stitches, A.2B over 52 stitches (26 times in width), A.2C over 2 stitches and finish with 2 edge stitches in garter stitch. Continue this pattern. When the last row in A.1 and A.2 remains there are 159 stitches on the needle. Work the last row and at the same time decrease 5 stitches evenly spaced on each side of the middle stitch (10 stitches decreased evenly + 2 stitches increased in diagrams) – read INCREASE/DECREASE TIP = 151 stitches. Work diagrams A.3 and A.4 as follows from the right side: Work 2 edge stitches in garter stitch, A.3A over 14 stitches (1 time in width), A.3B over 44 stitches (2 times in width), work A.3C over 15 stitches (1 time in width), 1 stitch in stockinette stitch (= middle stitch), work A.4A over 14 stitches, A.3B over 44 stitches (2 times in width), A.4C over 15 stitches and finish with 2 edge stitches in garter stitch. Continue this pattern. When the last row in A.3 and A.4 remains there are 263 stitches on the needle. Work the last row and, at the same time, increase 43 stitches evenly spaced on each side of the middle stitch (86 stitches increased evenly and 2 stitches increased in diagrams) = 351 stitches. Work diagrams A.1 and A.2 as follows from the right side: Work 2 edge stitches in garter stitch, A.1A over 2 stitches (1 time in width), A.1B over 168 stitches (84 times in width), work A.1C over 3 stitches (1 time in width), 1 stitch in stockinette stitch (= middle stitch), A.2A over 3 stitches, A.2B over 168 stitches (84 times in width), work A.2C over 2 stitches and finish with 2 edge stitches in garter stitch. Continue this pattern. When the last row in A.1 and A.2 remains there are 391 stitches on the needle. Work the last row and increase at the same time 1 stitch on each side of the middle stitch (2 stitches increased evenly and 2 stitches increased in diagrams) = 395 stitches. Now work A.1 and A.2 one more time in height; i.e. work the next row from the right side as follows: 2 edge stitches in garter stitch, A.1A over 2 stitches (1 time in width), A.1B over 190 stitches (95 times in width), work A.1C over 3 stitches (1 time in width), 1 stitch in stockinette stitch (= middle stitch), A.2A over 3 stitches, A.2B over 190 stitches (95 times in width), A.2C over 2 stitches and finish with 2 edge stitches in garter stitch. Continue this pattern. When the last row in A.1 and A.2 remains there are 435 stitches on the needle. Work the last row and decrease at the same time 11 stitches evenly spaced on each side of the middle stitch (22 stitches decreased evenly and 2 stitches increased in diagrams) = 415 stitches. Work diagrams A.5 and A.6 as follows from the right side: 2 edge stitches in garter stitch, A.5A over 14 stitches (1 time in width), work A.5B over 176 stitches (8 times in width), A.5C over 15 stitches (1 time in width), 1 stitch in stockinette stitch (= middle stitch), A.6A over 14 stitches, A.5B over 176 stitches (8 times in width), A.6C over 15 stitches and finish with 2 edge stitches in garter stitch. Continue this pattern. When the last row in A.5 and A.6 is finished there are 523 stitches on the row. Work diagrams A.7 and A.8 as follows from the right side: 2 edge stitches in garter stitch, A.7A over 18 stitches (1 time in width), A.7B over 32 stitches (1 time in width), A.7C over 176 stitches (8 times in width), work A.7D over 33 stitches (1 time in width), 1 stitch in stockinette stitch (= middle stitch), A.8A over 32 stitches, A.7C over 176 stitches (8 times in width), A.8C over 33 stitches, A.8D over 18 stitches and finish with 2 edge stitches in garter stitch. Continue this pattern. When the last row in A.7 and A.8 remain there are 593 stitches on the needle. Work the last row and increase at the same time 72 stitches evenly spaced on each side of the middle stitch (144 stitches increased evenly and 2 stitches increased in diagrams) = 739 stitches. Work diagrams A.1 and A.2 as follows from the right side: 2 edge stitches in garter stitch, A.1A over 2 stitches (1 time in width), A.1B over 362 stitches (181 times in width), A.1C over 3 stitches (1 time in width), 1 stitch in stockinette stitch (= middle stitch), A.2A over 3 stitches, work A.2B over 362 stitches (181 times in width), A.2C over 2 stitches and finish with 2 edge stitches in garter stitch. Continue this pattern. When the last row in A.1 and A.2 remains there are 779 stitches on the row. Work the last row and increase at the same time 1 on each side of the middle stitch (2 stitches increased evenly and 2 stitches increased in diagrams) = 783 stitches. Now work A.1 and A.2 one more time in height; i.e. work as follows from the right side: 2 edge stitches in garter stitch, A.1A over 2 stitches (1 time in width), A.1B over 384 stitches (192 times in width), A.1C over 3 stitches (1 time in width), 1 stitch in stockinette stitch (= middle stitch), A.2A over 3 stitches, work A.2B over 384 stitches (192 times in width), A.2C over 2 stitches and finish with 2 edge stitches in garter stitch. Continue this pattern. When the last row in A.1 and A.2 has been completed there are 825 stitches on the row. The piece measures approx. 65 cm = 25½" measured along the middle stitch. Bind off as described below. ELASTIC BIND-OFF EDGE: To avoid the bind-off edge being tight, bind off with knit from the right side as follows: Knit 2, * insert the left needle in the 2 stitches on the right needle, from left to right and knit them together, knit 1 *, work from *-* until there is 1 stitch left on the row. Cut the strand and pull it through the last stitch. Fasten strands. SHAPING TIP: Moisten the piece and shape to the right measurements. |
|||||||||||||||||||||||||||||||
Diagram explanations |
|||||||||||||||||||||||||||||||
|
|||||||||||||||||||||||||||||||
 |
|||||||||||||||||||||||||||||||
 |
|||||||||||||||||||||||||||||||
 |
|||||||||||||||||||||||||||||||
 |
|||||||||||||||||||||||||||||||
 |
|||||||||||||||||||||||||||||||
 |
|||||||||||||||||||||||||||||||
 |
|||||||||||||||||||||||||||||||
 |
|||||||||||||||||||||||||||||||
 |
|||||||||||||||||||||||||||||||
 |
|||||||||||||||||||||||||||||||
Have you finished this pattern?Tag your pictures with #dropspattern #laceylaurelsshawl or submit them to the #dropsfan gallery. Do you need help with this pattern?You'll find 16 tutorial videos, a Comments/Questions area and more by visiting the pattern on garnstudio.com. © 1982-2026 DROPS Design A/S. We reserve all rights. This document, including all its sub-sections, has copyrights. Read more about what you can do with our patterns at the bottom of each pattern on our site. |
|||||||||||||||||||||||||||||||


With over 40 years in knitting and crochet design, DROPS Design offers one of the most extensive collections of free patterns on the internet - translated to 17 languages. As of today we count 325 catalogs and 12298 patterns - 12288 of which are translated into English (US/in).
We work hard to bring you the best knitting and crochet have to offer, inspiration and advice as well as great quality yarns at incredible prices! Would you like to use our patterns for other than personal use? You can read what you are allowed to do in the Copyright text at the bottom of all our patterns. Happy crafting!
Post a comment to pattern DROPS 203-14
We would love to hear what you have to say about this pattern!
If you want to leave a question, please make sure you select the correct category in the form below, to speed up the answering process. Required fields are marked *.