
Popular categories
Looking for a yarn?


Comments / Questions (34)
![]() Claire wrote:
Claire wrote:
Dans vos explications tordues, vous oubliez de préciser que les mailles du diagramme A1 incluent les jetés des augmentations raglan.... c'est d'une logique...! Vos modèles sont jolis, mais sérieusement, embauchez des professionnels pour les explications, c'est ni fait ni à faire.
05.02.2026 - 01:09
![]() Claire wrote:
Claire wrote:
Un jour peut-être vous vous déciderez à enfin NUMÉROTER les rangs sur vos grilles, et à utiliser les symboles universels que tout le monde utilise ?
05.02.2026 - 01:06
![]() Claire wrote:
Claire wrote:
Encore un modèle Drops aux explications incompréhensibles..... Incroyable. ENCORE obligée de tout réécrire et de refaire la grille. Vous êtes vraiment des calamités pour les explications, sérieux. Vous ne vous demandez pas pourquoi les gens vous posent autant de questions ??? Remettez-vous en question, sérieux !
05.02.2026 - 00:50
![]() Tone wrote:
Tone wrote:
Tusen takk for svar på mitt spørsmål om større halsåpning. Det var det jeg gjorde, det vil si: Jeg startet med 68 masker og droppet første raglanøkning foran, men ikke bak. Det ble veldig bra. Jeg gjorde også min genser smalere rundt hoftene. Nå strikker jeg en ny genser i XS til et barnebarn og her følger jeg mønsteret. Er det riktig at vrangborden ned blir en god del videre enn resten av bolen?
03.02.2026 - 14:51DROPS Design answered:
Hei Tone, Ja, denne oppskriften har en løs vrangbord på bunnen av bolen. Hilsen Drops Team.
06.02.2026 - 07:19
![]() Tone wrote:
Tone wrote:
Jeg har akkurat begynt på denne oppskriften (XL), men jeg får ikke på langt nær den store halsåpningen som bildet viser. Jeg ser også at de to norske som har lagt inn bilder av sine gensere, heller ikke har så store halsåpninger. Jeg vil gjerne ha den store halsåpningen, så hvordan får jeg det?
31.12.2025 - 00:41DROPS Design answered:
Hei Tone. Du kan evnt. legge opp 64 masker og da kutte ut økningen som det egentlig skal gjøres når vrangborden måler 3 cm, da kan plagget sige utover / få en større hals. mvh DROPS Design
12.01.2026 - 11:25
![]() Angela wrote:
Angela wrote:
Ich stricke den Pulli mit Baumwollgarn und Nadelgrösse 3.5. Die Halsblende mit der 3. Meine Maschenprobe ergab 16 M 22 R. Ich brauche Grösse XS. Meine Umrechnung hat ergeben dass wenn ich Grösse L von Pulli Miss Lemon stricken würde, sollte das passen. Das stimmt aber nicht. 56 M Anschlag für die Halsblende können unmöglich passen. Ich stricke mit Katja Concept Esencia. Ganz herzlichen Dank für Ihre Hilfe. Lieber Gruss aus der Schweiz. Angela Christl
17.06.2025 - 15:47DROPS Design answered:
Liebe Angela, hier finden Sie Pullover in XS mit 17-16 M Maschenprobe, von oben nach unten gestrickt; ein davon könnten Ihnen helfen, dieses Modell anzupassen. Viel Spaß beim Stricken!
18.06.2025 - 07:24
![]() Loredana wrote:
Loredana wrote:
Ciao, il filato è usato doppio?
26.01.2025 - 13:49DROPS Design answered:
Ciao, no, il maglione è lavorato con filato singolo.
26.01.2025 - 15:04
![]() Daria wrote:
Daria wrote:
Hello. Is the pattern on the sweater on the front only or back as well? Also, how do you get 54 stitches from 19 stitches on the back when doing the increases in even multiples? I’m doing the small and not sure how I go from 19 stitches and only two increases in that section 17 times and get 54 stitches after the yoke is done.
30.10.2024 - 14:03DROPS Design answered:
Dear Daria, the lace pattern is worked only on front piece, back piece is worked in stocking stitch (as sleeves). The 2 sts for raglan belong to body when dividing so that you will have: 1 raglan stitch + 17 sts increased + 17 sts back piece + 17 sts increased + 2 sts raglan = 54 sts for back piece (and 17 sts increased + 7 sts sleeve + 17 sts increased = 41 sts for sleeve). Happy knitting!
30.10.2024 - 16:17
![]() Ana Orleans wrote:
Ana Orleans wrote:
Hola, acabo de empezar pero tengo una duda, el dibujo del raglan A1 solo se hace en el delantero y la espalda es punto Jersey derecho con lazadas? Muchas gracias
22.03.2024 - 21:34
![]() María wrote:
María wrote:
Hola! Me encanta este jersey y la lana Melody! Lo estoy tejiendo en la talla L. Tengo una duda con el canesú: en el canesú comienzan los aumentos ranglan desde la primera vuelta, es decir: lazada, punto derecho, deslizar marcador, p derecho, lazada y después los puntos de espalda, mangas, etc. Cuando comienza el delantero, pone “trabajar 9 p jersey (=manga), hacer una lazada y trabajar A.1 (=17 puntos), .. “ pero entonces no se hace aquí el aumento ranglan? Gracias!
23.05.2023 - 16:45DROPS Design answered:
Hola María, se trataba de un fallo en el patrón, ya está corregido. Muchas gracias.
28.05.2023 - 18:24
|
||||||||||||||||
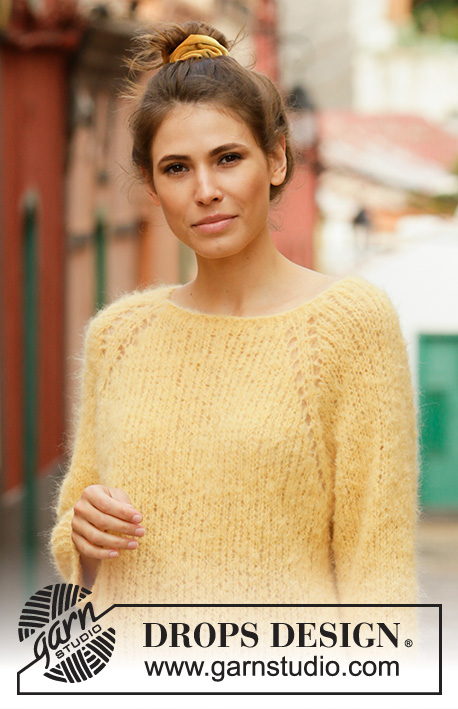
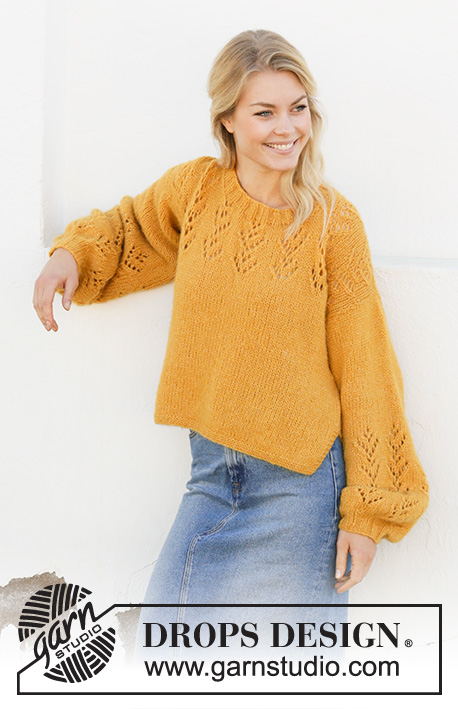
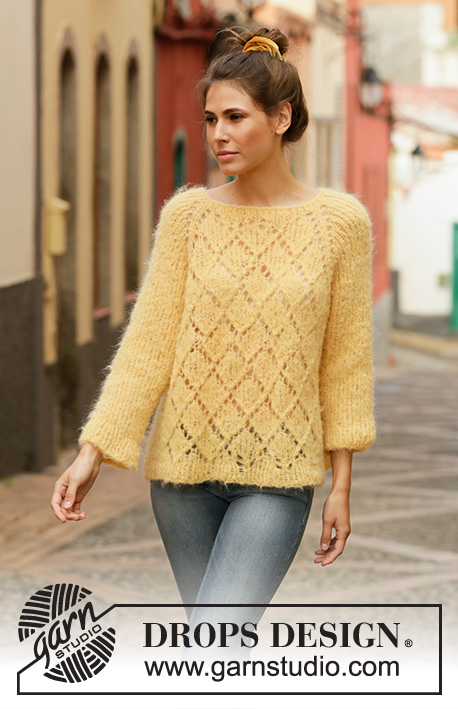
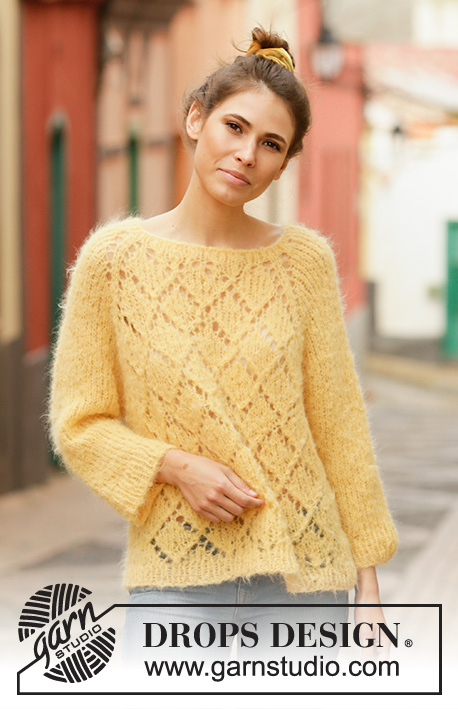
Miss Lemon#misslemonsweater |
||||||||||||||||
 |
 |
|||||||||||||||
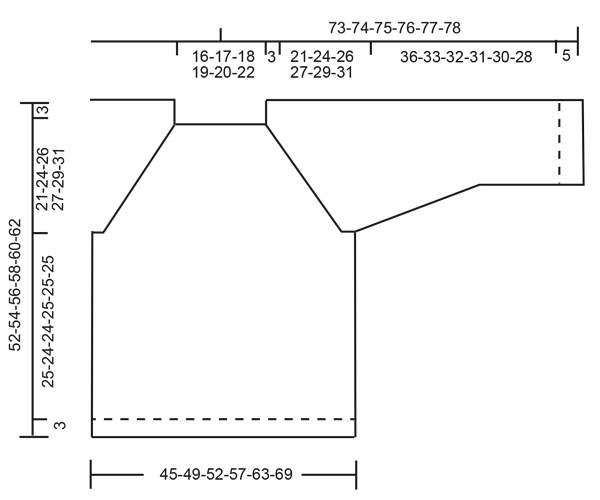
Knitted sweater with raglan in DROPS Melody. Piece is knitted top down with lace pattern. Size XS – XXL.
DROPS 200-28 |
||||||||||||||||
|
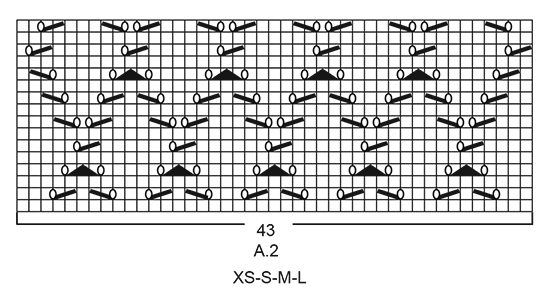
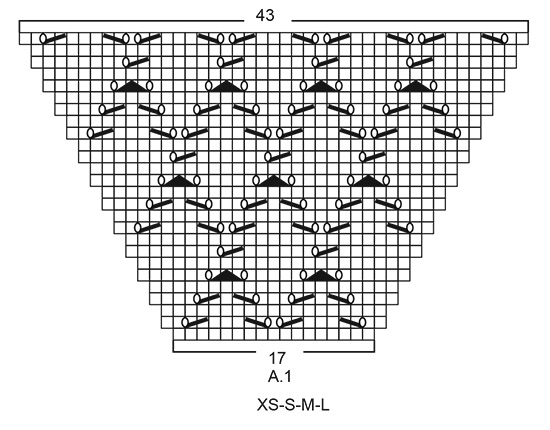
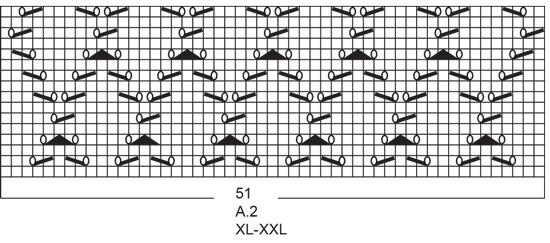
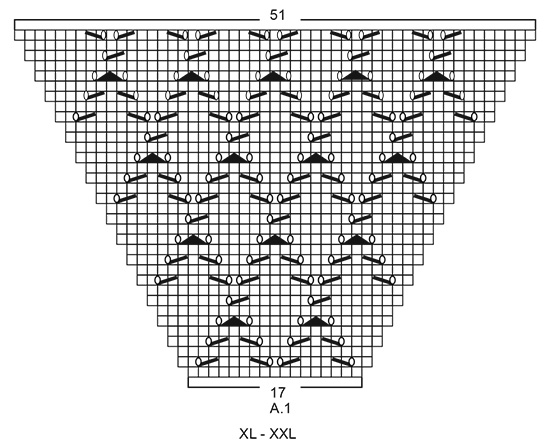
---------------------------------------------------------- EXPLANATION FOR THE PATTERN: ------------------------------------------------------- INCREASE/DECREASE TIP (evenly): To calculate how to increase/decrease evenly, use the total number of stitches on row (e.g. 50 stitches) and divide stitches by number of increases/decreases to be done (e.g. 6) = 8.3. In this example increase by making 1 yarn over after approx. every 8th stitch. On next round work yarn over twisted to avoid hole. To decrease in this example knit approx. every 7th and 8th stitch together. PATTERN: See diagrams A.1 and A.2. Choose diagram for your size. RAGLAN: Increase 1 stitch in each side of 2 knit stitches in every transition between body and sleeves (= 8 stitches increased on round). Increase 1 stitch by making 1 yarn over, on next round knit yarns over to make holes. Then work the new stitches in pattern (in stockinette stitch on sleeve, stockinette stitch on back piece and in pattern/stockinette stitch on front piece). DECREASE TIP (applies to sleeves): Decrease 1 stitch on each side of marker thread as follows: Work until 1 stitch remains before marker thread, knit 3 stitches together = 1 stitch (move the marker thread to before this stitch after every decrease). ------------------------------------------------------- START THE PIECE HERE: ------------------------------------------------------- SWEATER - SHORT OVERVIEW OF THE PIECE: Worked in the round on circular needle, top down. After yoke work body in the round on circular needle. Work sleeves in the round on double pointed needles/a short circular needle. NECK EDGE: Cast on 50-50-52-56-58-60 stitches on circular needle size 7 mm = US 10,75. rib = knit 1/purl 1, for 3 cm = 1⅛", then knit 1 round while increasing 6-6-8-4-6-0 stitches evenly - read INCREASE/DECREASE TIP = 56-56-60-60-64-60 stitches. Switch to circular needle size 8 mm = US 11. YOKE: Insert 1 marker here - NOW MEASURE PIECE FROM HERE! Now insert 4 marker threads in the piece WITHOUT working - insert markers as follows: Insert 1 marker thread at beginning of round (= in transition between sleeve and back piece), insert 1 marker thread after another 19 stitches (= back piece), insert 1 marker thread after another 9-9-11-11-13-11 stitches (= sleeve), insert 1 marker thread after another 19 stitches (= front piece), 9-9-11-11-13-11 stitches now remain until first marker thread (= sleeve). Work next round as follows: Begin round at first marker thread, i.e. on back piece. Knit 1, make 1 yarn over, work 17 stitches in stockinette stitch (= back piece), make 1 yarn over, knit 2 (marker thread is between these 2 stitches), make 1 yarn over, work 7-7-9-9-11-9 stitches in stockinette stitch (= sleeve), make 1 yarn over, knit 2 (marker thread is between these 2 stitches), make 1 yarn over, work A.1 (= 17 stitches front piece – choose diagram for your size), make 1 yarn over, knit 2 (marker thread is between these 2 stitches), make 1 yarn over, work 7-7-9-9-11-9 stitches in stockinette stitch (= sleeve), make 1 yarn over, knit 1. This was first increase for RAGLAN - read explanation above. Continue A.1 and stockinette stitch while increasing every other round 15-17-18-19-20-22 times in total (including first increase explained above). After A.1 work A.2 over the same stitches as for A.1, and work the last increases in stockinette stitch on each side of A.2. Repeat diagram A.2 vertically until finished measurements. REMEMBER THE KNITTING GAUGE! When all increases for raglan are done the piece should measure approx. 21-24-26-27-29-31 cm = 8¼"-9½"-10¼"-10⅝"-11⅜"-12¼" from marker at the beginning of yoke. If necessary, work in pattern as before without increasing until finished measurements. After yoke work next round as follows: Work 50-54-57-60-63-68 stitches in stockinette stitch (= on back piece), slip the next 37-41-43-43-45-45 stitches on 1 stitch holder for sleeve, cast on 4-4-4-6-8-10 new stitches on needle (= in the side under sleeve), work 4-6-8-10-8-11 stitches in stockinette stitch, continue A.2 (= 43-43-43-43-51-51 stitches) and work 4-6-8-10-8-11 stitches in stockinette stitch (= front piece), slip the next 37-41-43-43-45-45 stitches on 1 stitch holder for sleeve, cast on 4-4-4-6-8-10 new stitch on needle (= in the side under sleeve), work the last 1-1-2-3-4-5 stitches (= on back piece). Finish body and sleeves separately. NOW MEASURE PIECE FROM HERE! BODY: = 110-118-126-138-150-166 stitches. Insert 1 marker thread in the middle of the 4-4-4-6-8-10 new stitches that were cast on under sleeve in each side. Begin round at one of the marker threads and move the marker threads when working. Continue with stockinette stitch and pattern A.2. When piece measures 25-25-26-26-27-27 cm = 9¾"-9¾"-10¼"-10¼"-10⅝"-10⅝" from division (approx. 49-51-53-55-57-59 cm = 19¼"-20"-21"-21⅝"-22½"-23¼" from shoulder), knit 1 round while increasing 16-18-18-20-22-24 stitches evenly = 126-136-144-158-172-190 stitches. Switch to circular needle size 7 mm = US 10,75 and work rib = knit 1/purl 1 for 3 cm = 1⅛". Bind off with knit over knit and purl over purl (to avoid a tight bind-off edge use needle size 8 mm = US 11). Sweater measures approx. 52-54-56-58-60-62 cm = 20½"-21¼"-22"-22¾"-23⅝"-24⅜" from shoulder. SLEEVE: Slip the 37-41-43-43-45-45 stitches from stitch holder in one side of piece on circular needle/double pointed needles size 8 mm = US 11 and pick in addition up 1 stitch in each of the 4-4-4-6-8-10 new stitches cast on under sleeve = 41-45-47-49-53-55 stitches. Insert 1 marker thread in the middle of the 4-4-4-6-8-10 stitches and begin round here. Work in stockinette stitch. When piece measures 2 cm = ¾" from division, decrease 2 stitches mid under sleeve - read DECREASE TIP. Decrease like this every 4-3½-2½-2½-2-2 cm = 1½"-1¼"-1"-1"-¾"-¾" 7-8-9-9-11-11 times in total = 27-29-29-31-31-33 stitches. Continue until sleeve measures 36-33-32-31-30-28 cm = 14¼"-13"-12½"-12¼"-11¾"-11" from division (shorter measurements in the larger sizes because of longer yoke). Knit 1 round while increasing 5 stitches evenly = 32-34-34-36-36-38 stitches. Switch to double pointed needles size 7 mm = US 10,75 and work rib = knit 1/purl 1 for 5 cm = 2". Sleeve measures approx. 41-38-37-36-35-33 cm = 16⅛" -15"-14½"-14¼"-13¾"-13" from division. Bind off with knit over knit and purl over purl (to avoid a tight bind-off edge use needle size 8 mm = US 11). Work the other sleeve the same way. |
||||||||||||||||
Diagram explanations |
||||||||||||||||
|
||||||||||||||||
 |
||||||||||||||||
 |
||||||||||||||||
 |
||||||||||||||||
 |
||||||||||||||||
 |
||||||||||||||||
Have you finished this pattern?Tag your pictures with #dropspattern #misslemonsweater or submit them to the #dropsfan gallery. Do you need help with this pattern?You'll find 21 tutorial videos, a Comments/Questions area and more by visiting the pattern on garnstudio.com. © 1982-2026 DROPS Design A/S. We reserve all rights. This document, including all its sub-sections, has copyrights. Read more about what you can do with our patterns at the bottom of each pattern on our site. |
||||||||||||||||


With over 40 years in knitting and crochet design, DROPS Design offers one of the most extensive collections of free patterns on the internet - translated to 17 languages. As of today we count 325 catalogs and 12298 patterns - 12288 of which are translated into English (US/in).
We work hard to bring you the best knitting and crochet have to offer, inspiration and advice as well as great quality yarns at incredible prices! Would you like to use our patterns for other than personal use? You can read what you are allowed to do in the Copyright text at the bottom of all our patterns. Happy crafting!
Post a comment to pattern DROPS 200-28
We would love to hear what you have to say about this pattern!
If you want to leave a question, please make sure you select the correct category in the form below, to speed up the answering process. Required fields are marked *.