
Popular categories
Looking for a yarn?


Comments / Questions (25)
![]() Monika Rock wrote:
Monika Rock wrote:
Hallo liebes Drops-Team, ich verstehe nicht, wie der Fächer geht. Aus welcher Masche soll ich eine rechte Masche stricken? Aus dem Umschlag jeweils 5 Mal oder aus den folgende 5 Maschen? Antworten Sie mir gerne per E-Mail. Vielen Dank MfG Monika Rock
22.12.2025 - 16:20
![]() Veronica Righi wrote:
Veronica Righi wrote:
Ora continuare a maglia rasata in tondo per 1-3-5-7-9-11 cm e allo stesso tempo aumentare 2-14-19-23-24-26 maglie in modo uniforme sul 1° giro – ricordarsi del SUGGERIMENTO PER GLI AUMENTI-1. sprone dopo grafico A4: per la taglia S devo aumentare solo 2 maglie ? Cordiali saluti Veronica
07.04.2025 - 19:28DROPS Design answered:
Buongiorno Veronica, è corretto, può procedere come indicato. Buon lavoro!
10.04.2025 - 16:28
![]() Barbars wrote:
Barbars wrote:
Buongiorno ho bisogno di chiarimenti Manica diminuzioni Taglia L: diminuire ogni cm, 5 volte…… Significa diminuire ad ogni ferro per 5 volte? Grazie
04.10.2024 - 12:55DROPS Design answered:
Buonasera Barbara, deve diminuire ad ogni cm, non su ogni ferro. Buon lavoro!
06.10.2024 - 18:29
![]() Johny wrote:
Johny wrote:
Hello Drops team! I am now knitting the sleeves for this pattern and have noticed that once I reach diagram A.5 for the second set of fans, they do not lie in the center of the first set of fans on the sleeve. Is there a way to alter the pattern here in order for these fans to sit in the center of the previous ones? Thank you in advance!
11.07.2024 - 08:47DROPS Design answered:
Dear Johnny, the fans get aligned when you change the start of the round; After completing pattern A.1 - "Knit 4 stitches, remove the marker thread from the beginning of the round and insert it here (i.e. the beginning of the round has now been moved 4 stitches to the left)." You move it 4 stitches but, if you need to move it differently to align it you can modify these instructions and knit and move it more or less stitches to the left. Happy knitting!
16.07.2024 - 19:46
![]() Stefania Hagen Codraro wrote:
Stefania Hagen Codraro wrote:
Come già segnalato più volte nei commenti (E NON ANCORA CORRETTO!) ci sono degli errori nella spiegazione delle maniche, sul numero di maglie da spostare per poter posizionare i ventagli successivi al centro delle linee di ventagli precedenti. Sarebbe cosa buona procedere con una correzione... Grazie
20.06.2024 - 12:04DROPS Design answered:
Buonasera Stefania, ci può segnalare i commenti a cui fa riferimento? Al momento non sono segnalate correzioni per questo modello. Il segnapuntiva spostato dopo aver lavorato le 4 maglie diritto. Buon lavoro!
23.06.2024 - 11:44
![]() Anja wrote:
Anja wrote:
Hier ist ein Fehler in der deutschen Anleitung: ABNAHMETIPP (gilt für die Ärmel): Je 1 Masche beidseitig des Markierungsfadens wie folgt abnehmen: Stricken bis noch 2 Maschen vor dem Markierungsfaden übrig sind, ... Es muss heißen: Stricken bis noch 3 Maschen vor dem Markierungsfaden übrig sind
25.04.2024 - 20:55
![]() Anette Schwarz wrote:
Anette Schwarz wrote:
Hallo liebes Drops-Team, Ich stricke gerade die ersten Fächer, so, wie ich die Strickschrift A1 lese, sind die Fächer 5 Maschen auseinander. Das Bild oben links zeigt aber deutlich mehr Maschen dazwischen. Können Sie mir bitte dazu was sagen! Lg
19.07.2021 - 10:01DROPS Design answered:
Liebe Frau Schwarz, ja genau, wenn Sie die Fächer stricken (= bei der 5. Reihe in A.1, sind es 5 Maschen zwischen den Fächern, aber Sie die Fächer stricken, stechen Sie die Nadel in die markierte Masche unten (= 1. Reihe in A.1 = "Grund" von dem Fächer), sind es dann 9 Maschen zwischen jedem Fächern. Viel Spaß beim stricken!
19.07.2021 - 10:13
![]() Martine wrote:
Martine wrote:
Bonjour, Depuis un certain temps je ne peux plus voir vos vidéos explicatives. Lorsque je lance la lecture, un cercle se met à tourner indéfiniment. Pouvez-vous me dire ce qui pourrait bien occasionner ce problème ? Par avance, merci.
16.07.2020 - 17:22DROPS Design answered:
Bonjour Martine, les vidéos devraient être lisibles, pensez à vérifier votre connexion internet tout autant que les paramètres de votre navigateur (mises à jour etc...) - Et rappelez-vous que vous pouvez aussi retrouver toutes nos vidéos sur YouTube. Bon tricot!
16.07.2020 - 17:35
![]() Camilla Lenita wrote:
Camilla Lenita wrote:
Jag stickar ena ärmen nu men jag hittar inget minskningstips i beskrivningen?
19.05.2020 - 20:25DROPS Design answered:
Hej Camilla. Tack för info, detta har nu lagts till längst upp på mönstret under förklaring till beskrivningen. Mvh DROPS Design
20.05.2020 - 10:30
![]() Zanne wrote:
Zanne wrote:
Jeg er pt i gang med denne skønne model, men har desværre erfaret der er fejl i opskriften, også kommenteret allerede tilbage i sommeren 2019,men er stadig ikke rettet, hvilket jeg finder rigtig træls. Fejlen ligger i, at der i opskriften på ærmedelen skrives, at omgangstråden skal flyttes 4 masker til venstre, - det er ikke korrekt! Den skal flyttes 8 masker, for at viften kommer i midten af den foregående rækkes vifter. Det ville være rigtig rart, at I fik rettet dette.
15.01.2020 - 22:45
|
||||||||||||||||||||||||||||
Spring Song#springsongsweater |
||||||||||||||||||||||||||||
 |
 |
|||||||||||||||||||||||||||
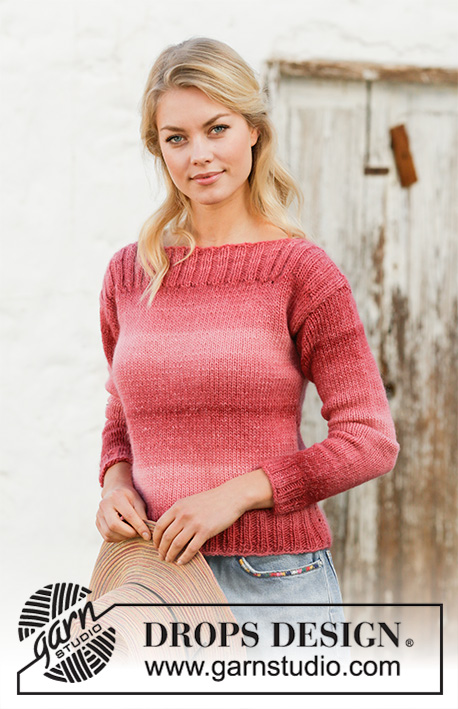
Knitted sweater with round yoke in DROPS Belle. The piece is worked top down with fan pattern and trumpet sleeves. Sizes S - XXXL.
DROPS 202-23 |
||||||||||||||||||||||||||||
|
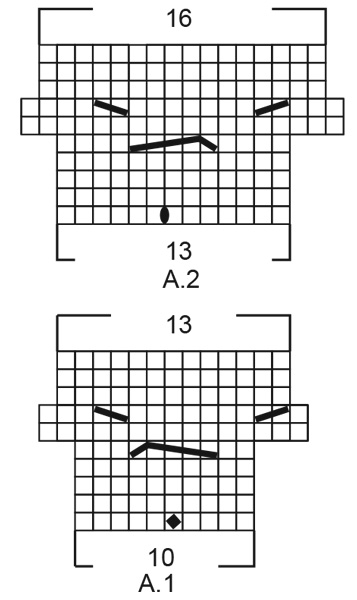
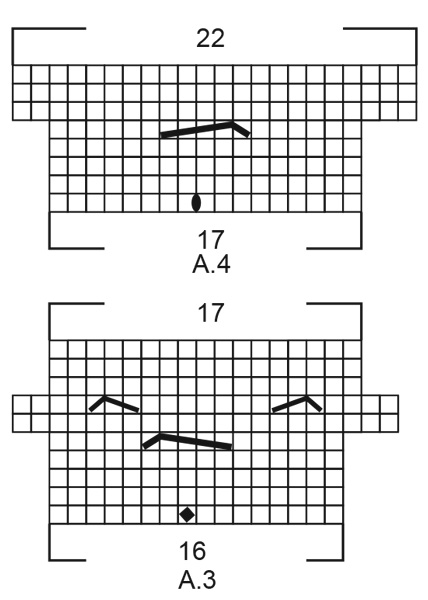
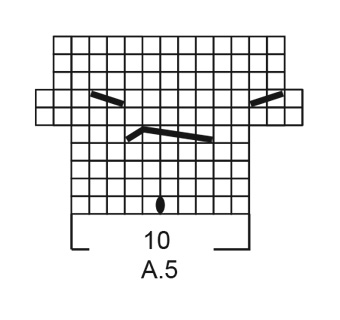
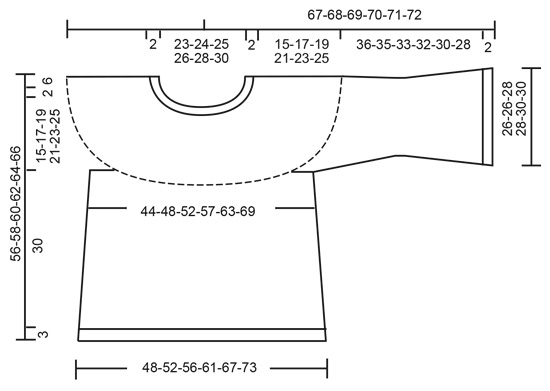
------------------------------------------------------- EXPLANATIONS FOR THE PATTERN: ------------------------------------------------------- PATTERN: See diagrams A.1 to A.5. INCREASE TIP-1 (evenly spaced): To work out how to increase evenly, count the total number of stitches on the needle (e.g. 123 stitches) and divide by the number of increases to be made (e.g. 7) = 17.6. In this example, increase by making 1 yarn over after alternately each 17th and 18th stitch. On the next round knit the yarn overs twisted to avoid holes. INCREASE TIP-2 (for sides of body): Work until there are 2 stitches left before marker thread, 1 yarn over, knit 4 (marker thread sits in middle of these 4 stitches), 1 yarn over (= 2 stitches increased). On the next round knit the yarn overs twisted to avoid holes. Then work the new stitches in stockinette stitch. DECREASE TIP (for sleeves): Decrease 1 stitch on each side of the marker thread as follows: Work until there are 3 stitches left before the marker thread, knit 2 together, knit 2 (marker thread sits between these 2 stitches), slip 1 stitch as if to knit, knit 1 and pass the slipped stitch over the knitted stitch. ------------------------------------------------------- START THE PIECE HERE: ------------------------------------------------------- SWEATER – SHORT OVERVIEW OF THE PIECE: The piece is worked in the round, top down. The sleeves are worked in the round with double pointed needles/short circular needle. NECK: Cast on 123-126-129-135-144-150 stitches with circular needle size 3 mm = US 2,5 and Belle. Knit 1 round, then work rib (= knit 1/ purl 2) for 4 rounds. Knit 1 round. Knit 1 more round where you increase 7-14-11-15-16-20 stitches evenly spaced – read INCREASE TIP-1 = 130-140-140-150-160-170 stitches. YOKE: Change to circular needle size 4 mm = US 6. Insert a marker thread at the beginning of the round and allow it to follow your work onwards. Now work pattern A.1 (= 10 stitches) a total of 13-14-14-15-16-17 times in width on the round. When A.1 has been completed in height there are 169-182-182-195-208-221 stitches on the round (and a marker thread in each repeat of A.1). Knit 5 stitches, remove the marker thread from the beginning of the round and insert it here (i.e. the beginning of the round has now been moved 5 stitches to the left). Remove the other marker threads from the piece. Now work pattern A.2 (= 13 stitches) a total of 13-14-14-15-16-17 times on the round. NOTE: the fans should be in between the fans from the previous round. When A.2 has been completed in height there are 208-224-224-240-256-272 stitches on the round (and 1 marker thread in each repeat of A.2). Knit 7 stitches, remove the marker thread from the beginning of the round and insert it here (i.e. the beginning of the round has now been moved 7 stitches to the left). Remove the other marker threads from the piece. REMEMBER THE KNITTING GAUGE! Now work pattern A.3 (= 16 stitches) a total of 13-14-14-15-16-17 times on the round. NOTE: the fans should be in between the fans from the previous round. When A.3 has been completed in height there are 221-238-238-255-272-289 stitches on the round (and 1 marker thread in each repeat of A.3). Knit 8 stitches, remove the marker thread from the beginning of the round and insert it here (i.e. the beginning of the round has now been moved 8 stitches to the left). Remove the other marker threads from the piece. Now work pattern A.4 (= 17 stitches) a total of 13-14-14-15-16-17 times on the round. NOTE: the fans should be in between the fans from the previous round. When A.4 has been completed in height there are 286-308-308-330-352-374 stitches on the round (and 1 marker thread in each repeat of A.4). The piece measures approx. 16 cm = 6¼" from the cast-on edge down. Now continue with stockinette stitch in the round for 1-3-5-7-9-11 cm = ⅜"-1⅛"-2"-2¾"-3½"-4⅜" and at the same time increase 2-14-19-23-24-26 stitches evenly spaced on the first round – remember INCREASE TIP-1. Increase like this every 1-2-2-3-4-5 cm = ⅜"-¾"-¾"-1⅛"-1½"-2" a total of 1-1-2-2-2-2 times = 288-322-346-376-400-426 stitches. When the piece measures 17-19-21-23-25-27 cm = 6¾"-7½"-8¼"-9"-9¾"-10⅝", work the next round as follows: Work the first 42-46-49-55-60-65 stitches (= half back piece), place the next 60-68-74-78-80-82 stitches on a thread for sleeve, cast on 8-8-10-10-12-14 new stitches on the needle (= in side under sleeve), work the next 84-93-99-110-120-131 stitches (= front piece), place the next 60-68-74-78-80-82 stitches on a thread for sleeve, cast on 8-8-10-10-12-14 new stitches on the needle (= in side under sleeve) and work the remaining 42-47-50-55-60-66 stitches (= half back piece). THE PIECE IS NOW MEASURED FROM HERE! BODY: = 184-202-218-240-264-290 stitches. Insert a marker thread in each side, in the middle of the 8-8-10-10-12-14 stitches cast on under each sleeve (= 4-4-5-5-6-7 new stitches on each side of marker threads). Work stockinette stitch in the round. When the piece measures 4 cm = 1½" from the division, increase 1 stitch on each side of both marker threads – read INCREASE TIP-2. Increase like this every 7 cm = 2¾" a total of 4 times = 200-218-234-256-280-306 stitches. When the piece measures 30 cm = 11¾" from the division, increase 31-31-36-38-41-45 stitches evenly spaced = 231-249-270-294-321-351 stitches. Change to circular needle size 3 mm = US 2,5 and work rib (= knit 1/ purl 2) for 3 cm = 1⅛". Bind off. Make sure the bind-off edge is not tight; you can increase a needle size when binding off if necessary. The sweater measures approx. 56-58-60-62-64-66 cm = 22"-22¾"-23⅝"-24⅜"-25¼"-26" from the shoulder down. SLEEVE: Place the 60-68-74-78-80-82 stitches from the thread on the one side of the piece on double pointed needles/short circular needle size 4 mm = US 6 and knit up 1 stitch in each of the 8-8-10-10-12-14 stitches cast on under the sleeve = 68-76-84-88-92-96 stitches. Insert 1 marker thread in the middle of the 8-8-10-10-12-14 stitches under the sleeve. The thread marks the beginning of the round and it follows your work onwards. Work stockinette stitch in the round. When the sleeve measures 4 cm = 1½", decrease 1 stitch on each side of the marker thread – read DECREASE TIP! Decrease in the different sizes as follows: Size S: Decrease every 4 cm = 1½" a total of 5 times. Size M: Decrease every 2 cm = ¾" a total of 8 times. Size L: Decrease every cm = ⅜", 5 times and every 2 cm = ¾" 4 times. Size XL: Decrease every cm = ⅜", 5 times and every 2 cm = ¾" 4 times. Size XXL: Decrease every cm = ⅜", 6 times and every 2 cm = ¾" 3 times. Size XXXL: Decrease every cm = ⅜" a total of 9 times. When all the decreases are finished there are 58-60-66-70-74-78 stitches on the needles. Continue with stockinette stitch until the sleeve measures 22-21-19-18-16-14 cm = 5½". Knit 1 round where the number of stitches is adjusted to 60-60-68-68-76-76 stitches. Now work pattern as follows: * Knit 5-5-7-7-9-9 stitches, work A.1 *, work from *-* a total of 4 times on the round. When A.1 has been completed in height there are 72-72-80-80-88-88 stitches on the round (and a marker thread in each repeat of A.1). Knit 4 stitches, remove the marker thread from the beginning of the round and insert it here (i.e. the beginning of the round has now been moved 4 stitches to the left). Remove the other marker threads. Now work pattern as follows: * Knit 8-8-10-10-12-12 stitches, work A.5 (= 10 stitches) *, work from *-* a total of 4 times on the round. NOTE: the fans should be in between the fans from the previous round. When A.5 has been completed in height there are 84-84-92-92-100-100 stitches on the round (and a marker thread in each repeat of A.5). Knit 5 stitches, remove the marker thread from the beginning of the round and insert it here (i.e. the beginning of the round has now been moved 5 stitches to the left). Remove the other marker threads. Now work pattern as follows: * Knit 11-11-13-13-15-15 stitches, work A.1 *, work from *-* a total of 4 times on the round. NOTE: the fans should be in between the fans from the previous round. When A.1 has been completed in height there are 96-96-104-104-112-112 stitches on the round (and a marker thread in each repeat of A.1). Knit 4 stitches, remove the marker thread from the beginning of the round and insert it here (i.e. the beginning of the round has now been moved 4 stitches to the left). Remove the other marker threads. Now work pattern as follows: * Knit 14-14-16-16-18-18 stitches, work A.5 *, work from *-* a total of 4 times on the round. NOTE: the fans should be in between the fans from the previous round. When A.5 has been completed in height there are 108-108-116-116-124-124 stitches on the round (and a marker thread in each repeat of A.5). Knit 1 round where you increase 6-6-7-7-8-8 stitches evenly spaced = 114-114-123-123-132-132 stitches. Change to circular needle size 3 mm = US 2,5. Work rib (= knit 1/ purl 2) for 2 cm = ¾". Bind off with knit over knit and purl over purl. The sleeve measures approx. 38-37-35-34-32-30 cm = 15"-14½"-13¾"-13⅜"-12½"-11¾". Cut and fasten the strand. Work the other sleeve in the same way. |
||||||||||||||||||||||||||||
Diagram explanations |
||||||||||||||||||||||||||||
|
||||||||||||||||||||||||||||
 |
||||||||||||||||||||||||||||
 |
||||||||||||||||||||||||||||
 |
||||||||||||||||||||||||||||
 |
||||||||||||||||||||||||||||
Have you finished this pattern?Tag your pictures with #dropspattern #springsongsweater or submit them to the #dropsfan gallery. Do you need help with this pattern?You'll find 25 tutorial videos, a Comments/Questions area and more by visiting the pattern on garnstudio.com. © 1982-2026 DROPS Design A/S. We reserve all rights. This document, including all its sub-sections, has copyrights. Read more about what you can do with our patterns at the bottom of each pattern on our site. |
||||||||||||||||||||||||||||


With over 40 years in knitting and crochet design, DROPS Design offers one of the most extensive collections of free patterns on the internet - translated to 17 languages. As of today we count 325 catalogs and 12298 patterns - 12288 of which are translated into English (US/in).
We work hard to bring you the best knitting and crochet have to offer, inspiration and advice as well as great quality yarns at incredible prices! Would you like to use our patterns for other than personal use? You can read what you are allowed to do in the Copyright text at the bottom of all our patterns. Happy crafting!
Post a comment to pattern DROPS 202-23
We would love to hear what you have to say about this pattern!
If you want to leave a question, please make sure you select the correct category in the form below, to speed up the answering process. Required fields are marked *.