
Popular categories
Looking for a yarn?


Comments / Questions (74)
![]() Edith wrote:
Edith wrote:
Wie kann es sein, dass ich beim Dominoquadrat 4 bei den Annahmen für die Raglannaht stricke bis nur noch 3 Maschen übrig sind? Dann läuft das Quadrat ja spitz zusammen. Die Zeichnung zeigt aber eindeutig einen Halsausschnitt. Ein spitz zusammenlaufendes Quadrat macht meines Erachtens keinen Sinn.
01.01.2026 - 11:29DROPS Design answered:
Liebe Edith, die gerade Kante ergibt sich dadurch, dass Sie am Beginn des Halsausschnitts in jeder 2. Reihe am Anfang und am Ende der Reihe auch noch jeweils 2 Maschen zusammenstricken, zusätzlich zu den Abnahmen in der Mitte. Viel Spaß beim Stricken!
24.02.2026 - 20:11
![]() Sylvie wrote:
Sylvie wrote:
Bonjour. Est il possible de faire ce modèle avec un autre point par exemple au point jersey ou au point de riz ou de blé. Merci pour votre réponse
07.07.2025 - 21:02DROPS Design answered:
Bonjour Sylvie, l'echantillon pour le point mousse est different en hauteur, donc dans ce genre de pull le changement de point va etre assez complique. Bon tricot!
09.07.2025 - 08:28
![]() Angelika Becker wrote:
Angelika Becker wrote:
Habe die Tunika nachgestrickt und bin super begeistert. Die Anleitung ist präzise und gut verständlich und das Ergebnis sensationell. Werde die Tunika auch noch in anderer Farbe stricken.
15.05.2025 - 22:05
![]() Anne Berit Friberg wrote:
Anne Berit Friberg wrote:
Jeg finner ikke antall striper/riller som er benyttet av de ulike garnfargene
24.01.2025 - 15:35
![]() Anne Berit Friberg wrote:
Anne Berit Friberg wrote:
Hvor finner jeg riktig antall riller/striper av de ulike garnfargene?
24.01.2025 - 15:30DROPS Design answered:
Hei Anne Berit. Øverst i oppskriften under Forklaring til Oppskriften er det beskrevet forklaring til STRIPER-1, STRIPER-2 og STRIPER ERMER. Og i selve oppskriften står det når du skal strikke etter disse forklaringene. mvh DROPS Design
27.01.2025 - 10:00
![]() Adelheid wrote:
Adelheid wrote:
Wie viele Maschen muss man anschlagen für Größer 4Xl?
22.11.2024 - 11:59
![]() Joantine Berghuijs wrote:
Joantine Berghuijs wrote:
Goedemiddag! Ik ben bijna klaar met dit prachtige patroon. Klopt het dat er een flinke split aan de zijkanten zit? Er staat dat je vanaf de afkantrand onderaan de mouwen moet dichtdraaien, maar niet tot de onder-zijkant. Op de foto's kan ik niet zien of er een split zit.
14.11.2024 - 12:16DROPS Design answered:
Dag Joantine,
Ja, dat klopt, er zitten grote splitten aan de zijkanten.
01.12.2024 - 14:10
![]() Elizabeth Hinkson wrote:
Elizabeth Hinkson wrote:
Is there a size chart for this pattern to know which size to make?
10.09.2024 - 19:05DROPS Design answered:
Hi Elizabeth, There is a size chart at the bottom of the pattern. Happy crafting!
11.09.2024 - 07:05
![]() Ann Kristine Lindgren Pedersen wrote:
Ann Kristine Lindgren Pedersen wrote:
Hvilken enhed er målene på størrelsesguiden angivet i?
06.07.2024 - 17:29DROPS Design answered:
Hei Ann Kristine. Målskissen nederst viser målene i cm. Målene nederst på genseren viser cm på en side, trenger du cm på omkretsen må du gange tallet i den str. du strikker etter med 2. Les gjerne mer under TIPS & HJELP - Les en oppskrift - Slik leser du en målskisse. mvh DROPS Design
09.07.2024 - 10:19
![]() Inger Sørensen wrote:
Inger Sørensen wrote:
Kan modellen strikkes i kun 2 farver og hvor mange nøgler af hver farve skal man så bruge?
19.02.2024 - 22:31DROPS Design answered:
Hej Inger, ja det bestemmer du selv, og du skal nok bruge samme antal nøgler (muligvis 1 mindre, men det vil være synd at få for lidt) :)
22.02.2024 - 12:03
|
|||||||
Diamond Cut#diamondcuttunic |
|||||||
 |
 |
||||||
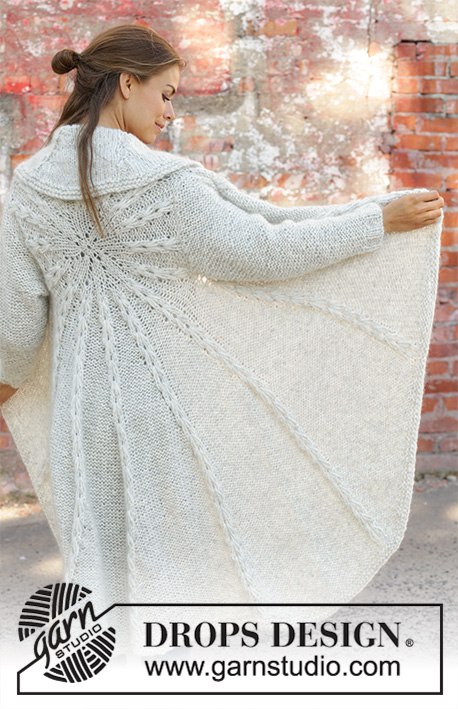
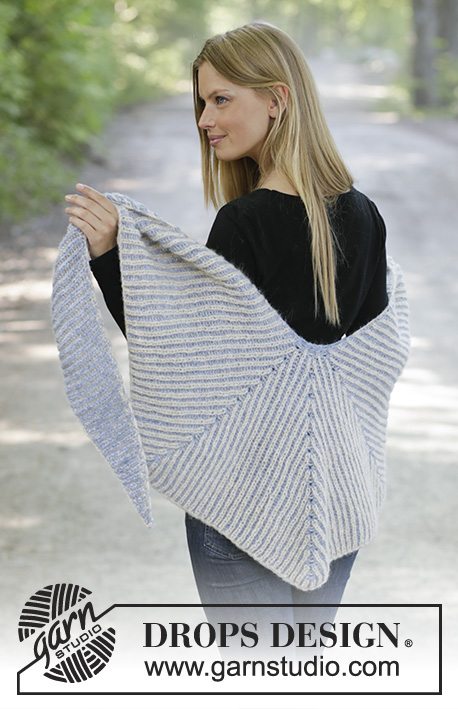
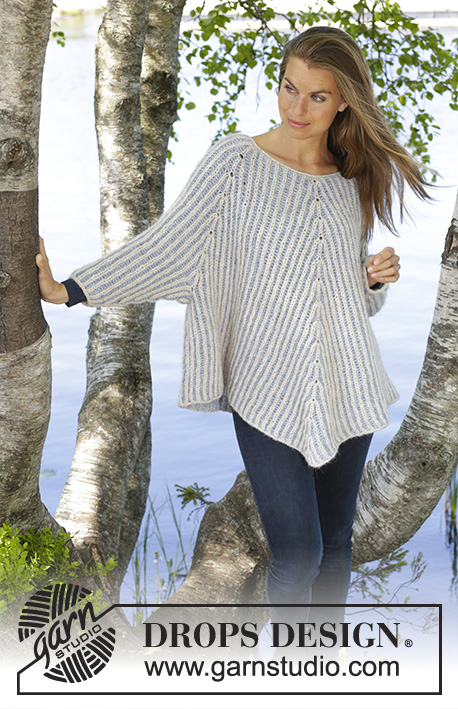
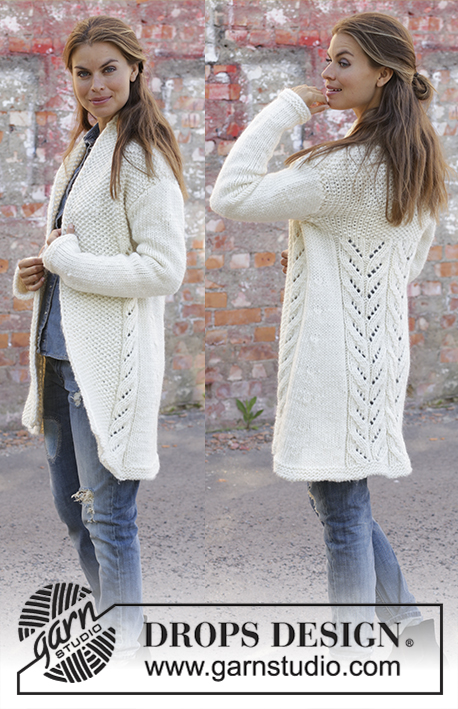
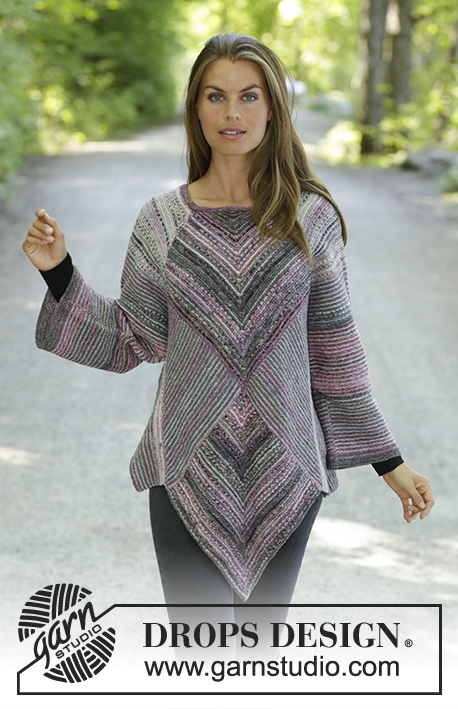
Knitted tunic in DROPS Fabel. The piece is worked back and forth with garter stitch, domino squares and stripes. Sizes S - XXXL.
DROPS 194-27 |
|||||||
|
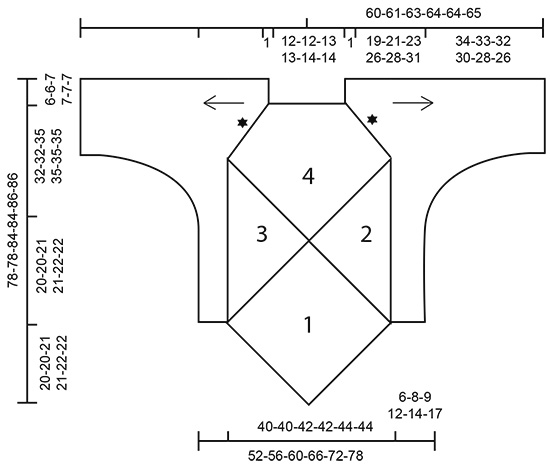
------------------------------------------------------- EXPLANATIONS FOR THE PIECE: ------------------------------------------------------- RIDGE/GARTER STITCH (worked in the round): 1 ridge = 2 rounds. Knit 1 round and purl 1 round. RIDGE/GARTER STITCH (worked back and forth): 1 ridge = Knit 2 rows. STRIPES-1: * 1 ridge wooden rose, 1 ridge salt and pepper *, work from *-*. STRIPES-2: * 1 ridge rose mist, 1 ridge gray *, work from *-*. STRIPES SLEEVES: Work 15-15-16-16-17-17 cm / 5⅞"-5⅞"-6 ¼"-6 ¼"-6⅝"-6⅝" with * 1 ridge rose mist, 1 ridge salt and pepper *, work from *-*. Work 5 cm / 2" with * 1 ridge rose mist, 1 ridge gray *, work from *-*. Work 3 cm / 1" with * 1 ridge salt and pepper, 1 ridge gray *, work from *-*. Work 15 cm / 6" with * 1 ridge wooden rose, 1 ridge rose mist *, work from *-*. Work 1 cm / ⅜" with * 1 ridge gray, 1 ridge salt and pepper *, work from *-*. Work 8 cm / 3⅛" with * 1 ridge rose mist, 1 ridge gray *, work from *-*. Work 4 cm / 1½" with * 1 ridge wooden rose, 1 ridge rose mist *, work from *-*. Continue to finished length with * 1 ridge gray, 1 ridge wooden rose *, work from *-*. ------------------------------------------------------- START THE PIECE HERE: ------------------------------------------------------- TUNIC - SHORT OVERVIEW OF THE PIECE: The piece is worked back and forth with circular needle. You first work whole and half domino squares. Then work the shoulder and pick up stitches down the edge of the section with domino squares before working garter stitch and stripes out to the side for body and sleeves. FRONT PIECE: WHOLE DOMINO SQUARE (1): Cast on 129-129-137-137-145-145 stitches with circular needle size 3.5 mm / US 4 and wooden rose. Insert a marker in the middle stitch of the row (= 64-64-68-68-72-72 stitches on each side of the stitch with marker). Work GARTER STITCH and STRIPES-1 – read description above and work domino square as follows: ROW 1 (= wrong side): Knit. ROW 2 (= right side): Knit until there is 1 stitch left before the marker, slip 1 stitch as if to knit, knit 2 together and pass the slipped stitch over the knitted together stitches, knit to end of row. Repeat rows 1 and 2, i.e. decrease 2 stitches in middle of square every 2nd row until there is stitch left on the row. Cut the strand and pull it through the stitch. The domino square measures approx. 28-28-30-30-31-31 x 28-28-30-30-31-31 cm / 11"-11"-11 ¾"-11 ¾"-12⅛"-12⅛". HALF DOMINO SQUARE (2): Start from the right side with circular needle size 3.5 mm / US 4 and rose mist and knit up 65-65-69-69-73-73 stitches (= 2 stitches in first ridge and 1 stitch in each of the next ridges) along the right side of the first domino square. Work STRIPES-2 – read description above and work a half domino square as follows: ROW 1 (= wrong side): Knit. ROW 2 (= right side): Knit 2 together, knit to end of row. Repeat rows 1 and 2, i.e. decrease 1 stitch every 2nd row until there is 1 stitch left on the row. Cut the strand and pull it through the stitch. HALF DOMINO SQUARE (3): Start from the right side with circular needle size 3.5 mm / US 4 and rose mist and knit up 65-65-69-69-73-73- stitches (= 1 stitch in each ridge until there is 1 ridge left and 2 stitches in last ridge) along the left side of the first domino square. Work STRIPES-2 and work a half domino square as follows: ROW 1 (= wrong side): Knit. ROW 2 (= right side): Knit until there are 2 stitches left on row, slip 1 stitch as if to knit, knit 1 and pass the slipped stitch over the knitted stitch. Repeat rows 1 and 2, i.e. decrease 1 stitch every 2nd row until there is 1 stitch left. Cut strand and pull it through the stitch. WHOLE DOMINO SQUARE WITH DECREASE FOR NECK (4): Start from right side with circular needle size 3.5 mm / US 4 and wooden rose and knit up 64-64-68-68-72-72 stitches (= 1 stitch in each ridge) along the side of half domino square (2), knit up 1 stitch in the transition between the 3 domino squares and continue by knitting up 64-64-68-68-72-72 stitches (= 1 stitch in each ridge) along the side of half domino square (3) = 129-129-137-137-145-145 stitches. Insert a marker in the middle stitch of the row (= 64-64-68-68-72-72 stitches on each side of the stitch with marker). Work STRIPES-1 and work domino square as follows: ROW 1 (= wrong side): Knit. ROW 2 (= right side): Knit until there is 1 stitch left before the marker, slip 1 stitch as if to knit, knit 2 together and pass the slipped stitch over the knitted together stitches, knit to end of row. Repeat rows 1 and 2, i.e. decrease 2 stitches in middle of square every 2nd row until there are 47-47-51-51-51-51 stitches left on the row (i.e. after you have worked 41-41-43-43-47-47 ridges). Now work as follows: ROW 83-83-87-87-95-95 (= wrong side): Knit. ROW 84-84-88-88-96-96 (= right side): Knit 2 together, knit until there is 1 stitch left before the marker, slip 1 stitch as if to knit, knit 2 together and pass the slipped stitch over the knitted together stitches, knit until there are 2 stitches left on row, slip 1 stitch as if to knit, knit 1 and pass the slipped stitch over the knitted stitch. Repeat these last 2 rows, i.e. you decrease 2 stitches middle of square and 1 stitch in each side (= 4 stitches decreased) every 2nd row until there are 3 stitches left on row. Knit 1 row over all stitches, then work the last row as follows: Slip 1 stitch as if to knit, knit 2 together and pass the slipped stitch over the knitted together stitches = 1 stitch left. Cut strand and pull it through stitch. BACK PIECE: Cast on and work in same way as front piece. LEFT SHOULDER, SIDE OF BODY AND SLEEVE: Now work left shoulder, side of body and sleeve back and forth in garter stitch and work STRIPES SLEEVES - read description above: Cast on 27-27-31-31-33-33 stitches with circular needle size 3.5 mm / US 4 and rose mist. Work garter stitch back and forth, AT THE SAME TIME at the end of each row cast on 1 new stitch. Work like this until you have worked 29-29-31-31-31-31 ridges and increased 29-29-31-31-31-31 stitches in each side of the piece = 85-85-93-93-95-95 stitches on needle. After the last row from the wrong side cut the strand. Leave the stitches on a circular needle or thread and work with circular needle size 3.5 mm / US 4 as follows: Knit up from right side 92-92-97-97-101-101 stitches along the side of square (2) (see sketch) and use the next color in the stripe you are currently working. Continue from the right side over the 85-85-93-93-95-95 stitches on needle/thread, knit up 92-92-97-97-101-101 stitches along side of domino square on the other side = 269-269-287-287-297-297 stitches on row. Continue back and forth with garter stitch and stripes until piece measures 6-8-9-12-14-17 cm / 2⅜"-3⅛"-3 ½"-4⅝"-5 ½"-6⅝" from where you knitted up stitches along the half domino squares. At the beginning of the next 2 rows bind off 46-46-48-48-51-51 stitches (= sides of tunic) = 177-177-191-191-195-195 stitches on needle. Insert a marker in each side of the piece (they mark the splits in sides and are used later in assembly). Continue with garter stitch and stripes and on the next row begin to bind off in each side for sleeve: bind off stitches at beginning of every 4th row (every 2nd ridge) in each side as follows: bind off 5 stitches 4-4-5-5-5-5 times, 2 stitches 7-7-8-8-9-9 times and 1 stitch 14-13-12-11-10-9 times = 81-83-85-87-89-91 stitches. Continue until the sleeve measures 53-54-55-56-56-57 cm / 20⅞"-21 ¼"-21⅝"-22"-22"-22⅜" from the cast-on edge. Bind off. Make sure that the bind-off edge is not tight. RIGHT SHOULDER, SIDE OF BODY AND SLEEVE: Work in the same way as left shoulder, side of body (i.e., knit up stitches along the side of square (3)) and sleeve. ASSEMBLY: Sew seam in raglan line – see black star in illustration. Sew with rose mist and sew in the outermost stitch space so that the seam is flat. Make sure that the seam is not tight. Sew sleeve seam from the bind-off edge at bottom of sleeve and upwards to the marker which was inserted before binding off 46-46-48-48-51-51 stitches for side in tunic. Repeat in other side. NECK: Start in the one raglan seam from the right side and knit up 118-140 stitches in each stitch/ ridge with short circular needle size 3.5 mm / US 4 and wooden rose. Work 3 RIDGES in the round - read description above. Bind off with knit. Cut and |
|||||||
Diagram explanations |
|||||||
|
|||||||
 |
|||||||
Have you finished this pattern?Tag your pictures with #dropspattern #diamondcuttunic or submit them to the #dropsfan gallery. Do you need help with this pattern?You'll find 15 tutorial videos, a Comments/Questions area and more by visiting the pattern on garnstudio.com. © 1982-2026 DROPS Design A/S. We reserve all rights. This document, including all its sub-sections, has copyrights. Read more about what you can do with our patterns at the bottom of each pattern on our site. |
|||||||


With over 40 years in knitting and crochet design, DROPS Design offers one of the most extensive collections of free patterns on the internet - translated to 17 languages. As of today we count 325 catalogs and 12298 patterns - 12288 of which are translated into English (US/in).
We work hard to bring you the best knitting and crochet have to offer, inspiration and advice as well as great quality yarns at incredible prices! Would you like to use our patterns for other than personal use? You can read what you are allowed to do in the Copyright text at the bottom of all our patterns. Happy crafting!
Post a comment to pattern DROPS 194-27
We would love to hear what you have to say about this pattern!
If you want to leave a question, please make sure you select the correct category in the form below, to speed up the answering process. Required fields are marked *.