DROPS Air
DROPS Air
65% Alpaca, 28% Polyamide, 7% Wool
from 6.45 $ /50g
DROPS Brushed Alpaca Silk
77% Alpaca, 23% Silk
from 3.95 $ /25g
Get the yarn to make this pattern from 93.60$.

The yarn cost is calculated from the pattern’s smallest size and the yarn’s cheapest product type. Looking for an even better price? You might find it on the DROPS Deals!

DROPS Super Sale

Empress

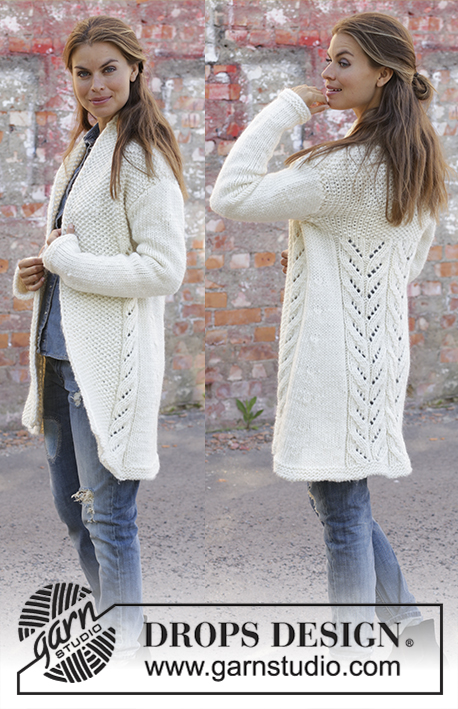
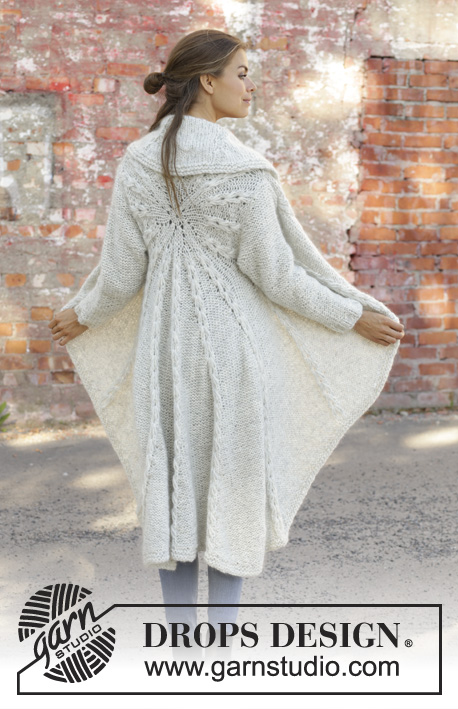
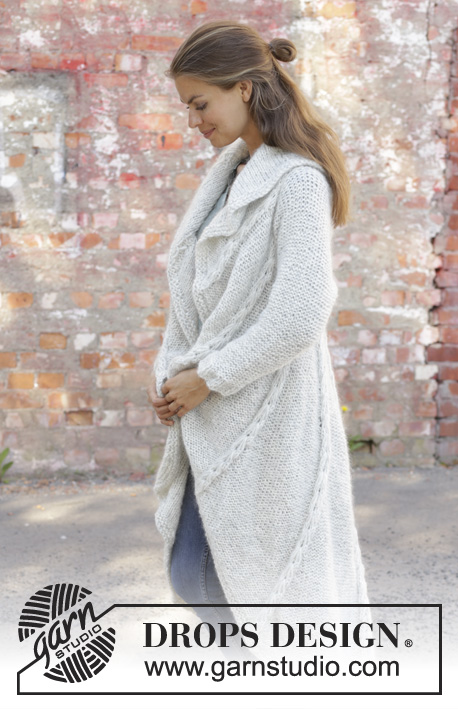
Knitted long circle jacket in 1 strand DROPS Air and 1 strand DROPS Brushed Alpaca Silk. The piece is worked in the round in a circle with texture. Sizes S - XXXL.

DROPS 194-17
DROPS Design: Pattern no ai-134
Yarn group C + C or E
-------------------------------------------------------

Sizes: S - M - L - XL - XXL – XXXL

Finished measurements:
Chest measurements: 64-64-76-76-82-82 cm = 25 1/4”-25 1/4”-30”-30”-32 1/4”-32 1/4”
Full length: 121-121-131-131-145-145 cm = 47 1/4”-47 1/4”-51 1/2”-51 1/2”-57”-57”

All measurements in charts are in cm.

Materials:
DROPS AIR from Garnstudio (belongs to yarn group C)
450-450-500-550-600-700 g color 03, pearl grey
And use:
DROPS BRUSHED ALPACA SILK from Garnstudio (belongs to yarn group C)
225-250-275-300-325-375 g color 01, off white

-------------------------------------------------------
ACCESSORIES FOR THE PIECE:

KNITTING GAUGE:
11 stitches in width and 15 rows in height with stockinette stitch and 1 strand of each quality = 10 x 10 cm = 4” x 4”.

NEEDLES:
DROPS DOUBLE POINTED NEEDLES SIZE 8 MM = US 11.
DROPS CIRCULAR NEEDLE SIZE 8 MM = US 11: length 40 cm, 60 cm and 80 cm = 16”, 24” and 32” for stockinette stitch.
DROPS CIRCULAR NEEDLE SIZE 7 MM = US 10,75: length 40 cm = 16” for rib on sleeves.
The needle size is only a guide. If you have too many stitches on 10 cm = 4”, change to a larger needle size. If you have too few stitches on 10 cm = 4”, change to a smaller needle size.

-------------------------------------------------------

Alternative Yarn – See how to change yarns here
Yarn Groups A to F – Use the same pattern and change the yarn here
Yarn usage using an alternative yarn – Use our yarn converter here

-------------------------------------------------------

DROPS Air
DROPS Air
65% Alpaca, 28% Polyamide, 7% Wool
from 6.45 $ /50g
DROPS Brushed Alpaca Silk
77% Alpaca, 23% Silk
from 3.95 $ /25g
Get the yarn to make this pattern from 93.60$.

The yarn cost is calculated from the pattern’s smallest size and the yarn’s cheapest product type. Looking for an even better price? You might find it on the DROPS Deals!

DROPS Super Sale

SAVE 30% on 6 cotton favorites!
Valid until 04.12.2024

Pattern instructions

NOTE: This pattern is written in American English. All measurements in charts are in cm. For conversion from inches to cm - click here. There are different terms for crocheting in American and British English. If this pattern includes crochet, click for "crochet terms" here. For this pattern in British English, please click here.
-------------------------------------------------------

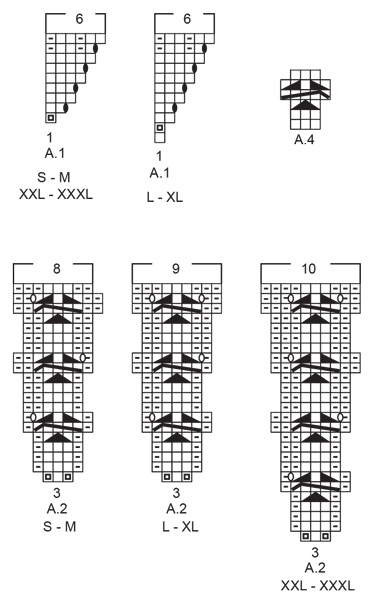
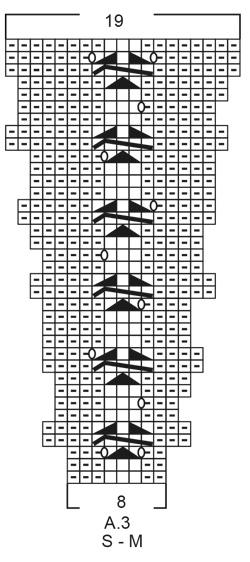
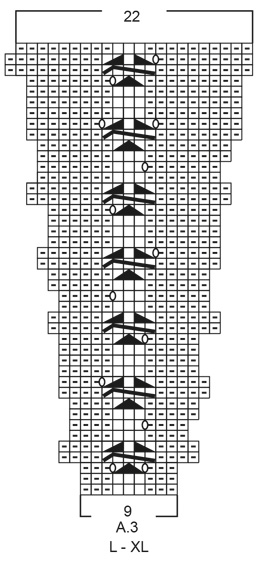
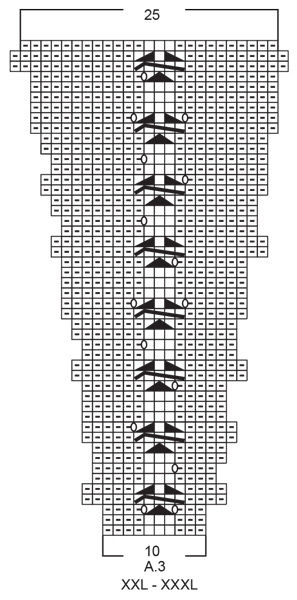
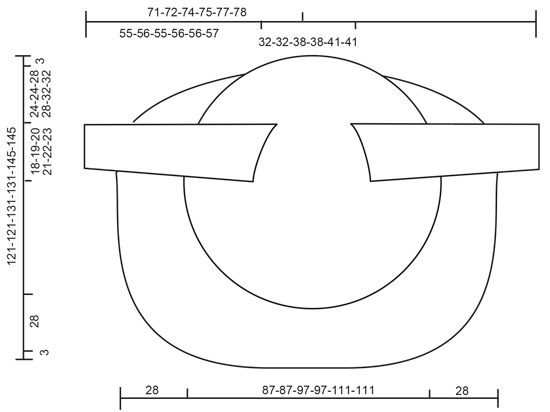
EXPLANATIONS FOR THE PATTERN:

-------------------------------------------------------

RIDGE/GARTER STITCH (worked in the round):
1 ridge = 2 rounds. Knit 1 round and purl 1 round.

RIDGE/GARTER STITCH (worked back and forth):
1 ridge = knit 2 rows.

PATTERN:
See diagrams A.1 to A.4. Choose diagram for your size.
The diagrams show all the rows in the pattern seen from the right side!

DECREASE TIP (for sleeves):
All decreases are made from the side in purl!
Decrease 1 stitch by purling 2 stitches together

-------------------------------------------------------

START THE PIECE HERE:

-------------------------------------------------------

CIRCLE JACKET - SHORT OVERVIEW OF THE PIECE:
The piece is worked in the round in a circle from the middle of the back outwards. Change to circular needle(s) when necessary. Then work back and forth with short rows for the front pieces and down the back. The sleeves are worked top down in stockinette stitch with the wrong side out. Because of the weight of the yarn, the garment will stretch somewhat after use.

CIRCLE JACKET:
CIRCLE:
Cast on 8 stitches with double pointed needles size 8 mm = US 11 and 1 strand Air and 1 strand Brushed Alpaca Silk (= 2 strands). Divide the stitches between 4 needles so that there are 2 stitches on each. Insert a marker thread at the beginning of the round. Allow the marker thread to follow your work onwards. Work pattern in the round according to A.1 – choose diagram for your size, a total of 8 times on the round. REMEMBER THE KNITTING GAUGE! When A.1 is finished, there are 48 stitches on the round. Now work pattern as follows: Work A.2 – choose diagram for your size, a total of 16 times on the round. After the next-to-last round in A.2 there are 128-128-144-144-160-160 stitches on the round. The last round in A.2 is worked as follows: Work the first 39-39-45-45-49-49 stitches (there is now 1-1-0-0-1-1 stitch left in the last repeat of A.2 worked), insert a new marker thread here (follows your work onwards and is later used when you work short rows from the front pieces and down the body on the back piece), bind off the next 20-21-22-23-24-25 stitches (= armhole), work the next 49-47-55-53-63-61 stitches, bind off the last 20-21-22-23-24-25 stitches (= armhole). The piece measures approx. 39-39-41-41-47-47 cm = 15 1/4”-15 1/4”-16 1/8”-16 1/8”-18 1/2”-18 1/2” in diameter. The next round is worked as follows: Work A.3 – choose diagram for your size (= 8-8-9-9-10-10 stitches on the first round in the diagram) a total of 16 times on the round and at the same time cast on 20-21-22-23-24-25 new stitches on the needle where the stitches were bind off for the armholes = 128-128-144-144-160-160 stitches. Continue in the round with A.3 until the whole diagram has been completed in height. There are now 304-304-352-352-400-400 stitches on the round. The piece measures approx. 87-87-97-97-111-111 cm = 34 1/4”-34 1/4”-38 1/4”-38 1/4”-43 3/4”-43 3/4” in diameter. Cut the strand. Place the first 94-94-110-110-124-124 stitches on the round (= stitches between the 2 marker threads) on a thread.

FRONT PIECES AND DOWN THE BODY:
There are now 210-210-242-242-276-276 stitches for the front pieces and down the body on the back piece.
Start from the right side after the second marker thread and work short rows back and forth for the front pieces and down the body on the back piece as follows:
ROW 1 (right side): Purl over purl and work A.4 (= 3 stitches) over each cable until there are 3 stitches left before the next marker thread (i.e. start of round), turn.
ROW 2 (wrong side): Work back until there are 3 stitches left before the marker thread, turn.
ROW 3: Purl over purl and work A.4 over each of the cables until there are 6 stitches left before the marker thread, AT THE SAME TIME increase 1 purled stitch after each cable/A.4, turn.
ROW 4: Work back until there are 6 stitches left before the marker thread, turn.
Continue back and forth like this by working 3 fewer stitches than the previous row and increase 1 stitch after each cable/A.4 every 4th row until you have worked 7 repeats of A.4 in height (= 42 rows). The piece measures approx. 72-72-77-77-84-84 cm = 28 3/8”-28 3/8”-30 3/8”-30 3/8”-33”-33” from the middle of the circle and down mid back. The last row is worked from the wrong side. Do not cut the strand. Insert a marker thread in the middle cable/A.4 mid back of jacket. Continue back and forth with pattern as before over the bottom of the left front piece as follows:
ROW 1 (right side): Work until there are 4 stitches left before the cable/A.4 with the marker thread mid back, turn.
ROW 2 (wrong side): Work until there are 3 more stitches left before the marker thread than the previous row (start of round), AT THE SAME TIME increase 1 purled stitch after each cable/A.4, turn.
ROW 3 (right side): Work until there are 4 more stitches than last time left before the cable/A.4 with the marker thread mid back, turn.
ROW 4 (wrong side): Work until there are 3 more stitches before the marker thread than the previous row, turn.
Continue back and forth with pattern and increase after each cable/A.4 every 4th row until you have worked 3 repeats of A.4 in height (= 18 rows). Cut the strand. Start from the right side and after A.4/mid back and work short rows back and forth over the bottom of the right front piece in the same way, but reversed, i.e. each row from the wrong side is turned when there are 4 more stitches before the cable/A.4 with the marker thread mid back than the previous time and on each row from the right side is turned when there are 3 more stitches left than the previous time.

EDGE:
Place all stitches on the circle back on circular needle and work 2 RIDGES – read description above, around the whole circle. Bind off, but to avoid the bind-off edge being tight you can make 1 yarn over after approx. each 5th stitch - the yarn overs are bind off as normal stitches.

SLEEVE:
The sleeve is worked in stockinette stitch with the wrong side out (reversed stockinette stitch).
Cast on 11-11-12-12-14-14 stitches with circular needle size 8 mm = US 11 and 1 strand Air and 1 strand Brushed Alpaca Silk (= 2 strands). Work stockinette stitch back and forth, AT THE SAME TIME cast on new stitches at the end of each row in each side as follows: Cast on 2 stitches 2 times, 1 stitch 3-4-5-6-6-7 times, 2 stitches 1 time and 4 stitches 1 time = 37-39-42-44-46-48 stitches. THE PIECE IS NOW MEASURED FROM HERE. Continue back and forth with stockinette stitch and 1 edge stitch in GARTER STITCH – read description above, in each side. When the piece measures 4 cm decrease 1 stitch inside the 1 edge stitch in garter stitch in each side – read DECREASE TIP. Decrease like this every 7-6-6-5-5-4 cm = 2 3/4”-2 3/8”-2 3/8”-2”-2”-1 1/2” a total of 6-7-7-8-8-9 times = 25-25-28-28-30-30 stitches. When the piece measures 42-42-40-40-39-39 cm = 16 1/2”-16 1/2”-15 3/4”-15 3/4”-15 1/4”-15 1/4” increase 7-7-4-9-7-7 stitches evenly on row = 32-32-32-37-37-37 stitches. Change to circular needle size 7 mm = US 10,75. Work rib, starting from the side with purl (reversed stockinette stitch/the wrong side out) as follows: 1 edge stitch in garter stitch (knit 2, purl 3) until there is 1 stitch left, 1 edge stitch in garter stitch. When the rib measures 5 cm = 2” bind off with knit over knit and purl over purl. The sleeve measures approx. 55-56-55-56-56-57 cm = 21 5/8”-22”-21 5/8”-22”-22”-22 1/2” from the sleeve cap down. Work the other sleeve in the same way.

ASSEMBLY:
Sew sleeves to body inside the bind-off/cast-on edge. Sew sleeve seams. Make sure that the seam is not tight.

This pattern has been corrected.

Updated online: 28.11.2018
Correction - FRONT PIECE AND DOWN THE BODY: ROW 3 (right side): Work until there are 4 more stitches than last time left before the cable/A.4 with the marker thread mid back, turn.
Updated online: 28.03.2019
Correction: diagram A.2 for size S-M and XXL-XXXL has been corrected. 1 purl stitch has been removed from row 14 (S-M) and rows 14 and 20 (XXL-XXXL)
Updated online: 07.05.2019
Correction - YARN AMOUNT: DROPS AIR from Garnstudio (belongs to yarn group C) 450-450-500-550-600-700 g color 03, pearl grey And use: DROPS BRUSHED ALPACA SILK from Garnstudio (belongs to yarn group C) 225-250-275-300-325-350 g color 01, off white
Updated online: 23.02.2024
The diagrams A.2 and A.3 has been updated in size XXL-XXXL.

Diagram

All measurements in charts are in cm.

symbols = knit
symbols = purl
symbols = make 1 yarn over. On the next round knit the yarn over twisted to avoid a hole
symbols = make 1 yarn over. On the next round purl the yarn over twisted to avoid a hole.
symbols = work 2 stitches in 1 stitch (= 1 stitch increased)
symbols = insert the right needle through the middle of the 3 knitted stitches 4 rounds below, make 1 yarn over and pull the strand back to the right side so that the yarn over is 4½ cm = 1 3/4" long (the yarn over must not be too tight - the knitting tension will then be too tight in height), knit 3, insert the right needle through the same stitch, make 1 yarn over and pull the strand back to the right side so that the yarn over is 4½ cm = 1 3/4" long
symbols = slip 1 stitch (= yarn over made on previous round) as if to knit, knit 3, slip the next stitch (= yarn over made on previous round) as if to purl
symbols = lay the strand over the piece so that it is towards you, slip the yarn over as if to purl, purl 3, lay the strand over the piece so that it is still towards you, slip the yarn over as if to knit
symbols = knit 2 twisted together
symbols = knit 2 together
diagram
diagram
diagram
diagram
diagram

Each of our patterns has specific tutorial videos to help you.

Do you have a question? See a list of frequently asked questions (FAQ)

Knitting tension is what determines the final measurements of your work, and is usually measured per 10 x 10 cm. It is provided like so: number of stitches in width x number of rows in height - eg: 19 stitches x 26 rows = 10 x 10 cm.

The knitting tension is very individual; some people knit/crochet loosely while others work tightly. You adjust the knitting tension with the needle size, which is why the suggested needle size only serve as a guide! You need to adjust this (up or down) to ensure that YOUR knitting tension matches the knitting tension provided in the pattern. If you work with a different knitting tension than provided you will have a different yarn consumption, and your work will have different measurements than what the pattern suggests.

The knitting tension also determines which yarns can replace each other. As long as you achieve the same knitting tension you can replace one yarn with another.

See DROPS lesson: How to measure your tension/gauge

See DROPS video: How to make a gauge tension swatch

The required amount of yarn is provided in grams, eg: 450 g. To calculate how many balls you’ll need you first need to know how many grams are in 1 ball (25g, 50g or 100g). This information is available if you click on the individual yarn quality on our pages. Divide the amount required with the amount of each ball. For example, if each ball is 50g (the most common amount), the calculation will be as follows: 450 / 50 = 9 balls.

The important thing when changing from one yarn to another is that the knitting/crochet tension remains the same. This is so that the measurements of the finished piece will be the same as on the sketch provided. It is easier to achieve the same knitting tension using yarns from the same yarn group. It is also possible to work with multiple strands of a thinner yarn to achieve the knitting tension of a thicker one. Please try our yarn converter. We recommend you to always work a test swatch.

Please NOTE: when changing yarn the garment might have a different look and feel to the garment in the photo, due to individual properties and qualities of each yarn.

See DROPS lesson: Can I use a different yarn than the one mentioned in the pattern?

All our yarns are categorised into yarn groups (from A to F) according to thickness and knitting tension – group A contains the thinnest yarns and group F the thickest. This makes it easier for you to find alternative yarns to our patterns, should you wish to switch yarn. All yarns within the same group have a similar knitting tension and can easily replace each other. However, different yarn qualities have different structures and properties which will give the finished work a unique look and feel.

Click here for an overview of the yarns in each yarn group

At the top of all our patterns you’ll find a link to our yarn converter, which is a helpful tool should you wish to use a different yarn than suggested. By filling in the yarn quality you wish to replace, the amount (in your size) and number of strands, the converter will present good alternative yarns with the same knitting tension. Additionally it will tell you how much you’ll require in the new qualities and whether you’ll need to work with multiple strands. Most skeins are 50g (some are 25g or 100g).

If the pattern is worked with multiple colours, every colour will have to be converted separately. Similarly, if the pattern is worked with several strands of different yarns (for example 1 strand Alpaca and 1 strand Kid-Silk) you will have to find alternatives for each, individually.

Click here to see our yarn converter

Since different yarns have different qualities and textures we have chosen to keep the original yarn in our patterns. However, you can easily find options among our available qualities by using our yarn converter, or simply pick a yarn from the same yarn group.

It is possible that some retailers still have discontinued yarns in stock, or that someone has a few skeins at home that they would like to find patterns for.

The yarn converter will provide both alternative yarn as well as required amount in the new quality.

If you think it's hard to decide what size to make, it can be a good idea to measure a garment you own already and like the size of. Then you can pick the size by comparing those measures with the ones available in the pattern's size chart.

You'll find the size chart at the bottom of the pattern.

See DROPS lesson: How to read size chart

The needle size provided in the pattern serves only as a guide, the important thing is to follow the knitting tension. And since knitting tension is very individual, you will have to adjust the needle size to ensure that YOUR tension is the same as in the pattern – maybe you’ll have to adjust 1, or even 2 needle sizes, up or down to achieve the correct tension. For this, we recommend that you work test swatches.

Should you work with a different knitting tension than the one provided, the measurements of the finished garment might deviate from the measurement sketch.

See DROPS lesson: How to measure your tension/gauge

See DROPS video: How to make a gauge tension swatch

Working a garment top-down provides more flexibility and room for personal adjustment. For example it is easier to try the garment on while working, as well as making adjustments to length of yoke and shoulder caps.

The instructions are carefully explaining every step, in the correct order. Diagrams are adjusted to the knitting direction and are worked as usual.

The diagram depicts all rows/rounds, and every stitch seen from the right side. It is read from bottom to top, from right to left. 1 square = 1 stitch.

When working back and forth, every other row is worked from the right side and every other row is worked from the wrong side. When working from the wrong side, the diagram will have to be worked reversed: from left to right, knit stitches are purled, purl stitches are knit etc.

When working in the round every round is worked from the right side and the diagram are worked from right to left on all rounds.

See DROPS lesson: How to read knitting diagrams

The diagram depicts all rows/rounds, and every stitch seen from the right side. It is worked from bottom to top, from right to left.

When working back and forth every other row is worked from the right side: from right to left and every other row is worked from the wrong side: from left to right.

When working in the round, every row in the diagram are worked from the right side, from right to left.

When working a circular diagram you start in the middle and work your way outwards, counter clockwise, row by row.

The rows usually start with a given number of chain stitches (equivalent to the height of the following stitch), this will either be depicted in the diagram or explained in the pattern.

See DROPS lesson: How to read crochet diagrams

Instructions for working several diagrams after each other on the same row/round, will often be written like so: “work A.1, A.2, A.3 a total of 0-0-2-3-4 times". This means you work A.1 once, then A.2 is worked once, and A.3 is repeated (in width) the number of times provided for your size – in this case like so: S = 0 times, M = 0 times, L=2 times, XL= 3 times and XXL = 4 times.

The diagrams are worked as usual: begin with the first row in A.1, then work the first row in A.2 etc.

See DROPS lesson: How to read knitting diagrams

See DROPS lesson: How to read crochet diagrams

The total width of the garment (from wrist-to-wrist) will be larger in the larger sizes, despite the actual sleeves being shorter. The larger sizes have longer sleeve caps and wider shoulders, so there will be a good fit in all sizes.

The measurement sketch/schematic drawing provides information regarding the full length of the garment. If it’s a jumper or a jacket the length is measured from the highest point on the shoulder (usually closest to the neckline), and straight down to the bottom of the garment. It is NOT measured from the tip of shoulder. Similarly, the length of yoke is measured from the highest point on the shoulder and down to where yoke is split into body and sleeves.

See DROPS lesson: How to read a schematic drawing

Diagrams are often repeated on the round or in height. 1 repeat is the diagram the way it appears in the pattern. If it says to work 5 repeats of A.1 in the round, then you work A.1 a total of 5 times after/next to each other in the round. If it says to work 2 repeats of A.1 vertically/in height you work the entire diagram once, then begin again at the start and work the entire diagram one more time.

Chain stitches are slightly narrower than other stitches and to avoid working the cast-on edge too tight, we simply chain more stitches to begin with. The stitch count will be adjusted on the following row to fit the pattern and measurement sketch.

The rib edge is more elastic and will contract slightly compared to, for example, stocking stitch. By increasing before the rib edge, you avoid a visible difference in width between the rib edge and the rest of the body.

It’s very easy to cast off too tightly, and by making yarn overs while casting off (and simultaneously casting these off) you avoid a too tight cast off edge.

See DROPS video: How to bind off with yarn overs (yo)

To achieve an even increase (or decrease) you can increase on, for example: every 3rd and 4th row alternately, like so: work 2 rows and increase on the 3rd row, work 3 rows and increase on the 4th. Repeat this until the increase is complete.

See DROPS lesson: Increase or decrease 1 st on every 3rd and 4th row alternately

Should you prefer to work in the round instead of back and forth, you may of course adjust the pattern. You’ll need to add steeks mid-front (usually 5 stitches), and follow the instructions. When you would normally turn and work from the wrong side, simply work across the steek and continue in the round. At the end you’ll cut the piece open, pick up stitches to work bands, and cover the cut edges.

See DROPS video: How to knit steeks and cut open

Should you prefer to work back and forth instead of in the round, you may of course adjust the pattern so you work the pieces separately and then assemble them at the end. Divide the stitches for the body in 2, add 1 edge stitch in each side (for sewing) and work the front and back pieces separately.

See DROPS lesson: Can I adapt a pattern for circular needles into straight needles?

Pattern repeats can vary slightly in the different sizes, in order to get the correct proportions. If you’re not working the exact same size as the garment in the photo, yours might deviate slightly. This has been carefully developed and adjusted so that the complete impression of the garment is the same in all sizes.

Make sure to follow instructions and diagrams for your size!

If you have found a pattern you like which is available in women’s size it’s not very difficult to convert it to men’s size. The biggest difference will be the length of sleeves and body. Start working on the women size that you think would fit across the chest. The additional length will be worked right before you cast off for the armhole/sleeve cap. If the pattern is worked top-down you can add the length right after the armhole or before the first decrease on sleeve.

Regarding additional yarn amount, this will depend on how much length you add, but it is better with a skein too many than too few.

All yarns will have excess fibres (from production) that might come off as lint or shedding. Brushed yarns (ie hairier yarns) have more of these loose, excess fibres, causing more shedding.

Shedding also depends on what is worn under or over the garment, and whether this pulls at the yarn fibres. It’s therefore not possible to guarantee that there will be no shedding

Below are some tips on how to get the best result when working with hairier yarns:

1. When the garment is finished (before you wash it) shake it vigorously so the looser hairs come off. NOTE: do NOT use a lint roller, brush or any method that pulls at the yarn.

2. Place the garment in a plastic bag and put it in your freezer - the temperature will cause the fibres to become less attached to each other, and excess fibres will come off easier.

3. Leave in the freezer for a few hours before taking it out and shaking it again.

4. Wash the garment according to the instructions on the yarn label.

Pilling is a natural process that happens to even the most exclusive of fibers. It's a natural sign of wear and tear that is hard to avoid, and that is most visible in high friction areas of your garment like a sweater's arms and cuffs.

You can make your garment look as new by removing the pilling, using a fabric comb or a pill/lint remover.

Still can't find the answer you need? Then scroll down and leave your question so one of our experts can try to help you. This will be done normally within 5 to 10 working days.
In the meantime, you can read the questions and answers that others have left to this pattern or join the DROPS Workshop on Facebook to get help from fellow knitters/crocheters!

You might also like...

Drops Empress 194-17

Rachael, New Zealand

Empress

Simone, Netherlands

Post a comment to pattern DROPS 194-17

We would love to hear what you have to say about this pattern!

If you want to leave a question, please make sure you select the correct category in the form below, to speed up the answering process. Required fields are marked *.

Comments / Questions (174)

country flag Ilse wrote:

Hi, Kan het zijn dat er een foutje zit in het patroon A2 voor de XXXL? Van naald 23 naar naald 24 komt er slechts 1 steek bij terwijl hetzelfde patroon van naald 17 naar naald 18 er 2 steken bijkomen. Ik zie niet waar ik het fout zie, tenzij het patroon het fout stelt. bedankt om na te kijken Ilse

07.02.2024 - 08:49

DROPS Design answered:

Dag Ilse,

Dag Ilse, waarschijnlijk heb je gelijk een moet er 1 omslag minder gemaakt worden in de een na laatste naald van A.2, dus de eerste omslag zou je dan niet moeten maken. Ik zal het doorgeven aan de ontwerpafdeling om na te kijken.

07.02.2024 - 19:06

country flag Barbara Dobbs wrote:

Thank you so much for this pattern I knitted it in red Aran with a couple of changes, I added a flower to the back centre circle, and I used the sleeves stocking stitch out. I would add a picture but not sure where I can do that, but very happy with the end result

26.01.2024 - 15:10

country flag Barbara D wrote:

What do I do with the 124 stitches I’ve put on a thread please?

20.01.2024 - 19:54

DROPS Design answered:

Hi Barbara D., these sts you use again when working the Edge - these stitches on a thread are at the top of the sweater, behind the neck. Happy knitting!

21.01.2024 - 11:11

country flag Ingrid Hens wrote:

Maat moet je berekenen met een vergelijkbaar kledingstuk in je bezit. Ik heb geen vergelijkbaar kledingstuk. Graag een echte matentabel. S komt overeen met werkelijke borstomtrek van x cm, etc. Dat maakt het voor iedereen duidelijker. Nu kan ik moeilijk een maat kiezen.

06.01.2024 - 11:17

DROPS Design answered:

Dag Ingrid,

De maten komen redelijk goed overeen met de confectiematen zoals je kledingstukken in de winkel koopt, dus als je normaal bijvoorbeeld altijd een shirt in maat M koopt, zou je dat nu ook aan kunnen houden.

07.01.2024 - 14:00

country flag Helen Sundkvist wrote:

Hej, jag har sett att det beror på löplängd, så jag behöver inte svar på min tidigare fråga men har en ny. Om jag byter garn till garngrupp E står att jag ska använda stickor 9 i stället för stickor 8 till det garnet. Vilket ska jag använda?

03.01.2024 - 17:58

DROPS Design answered:

Hej Helen, det som er vigtigt er at du har 11 masker på 10 cm for at få målene som står i mönsteret :)

09.01.2024 - 14:50

country flag Helen Sundkvist wrote:

Hej, Jag är lite fundersam på garnåtgången. Varför går det åt mindre av alpacka silk än av drops air? Jag kan inte se någonstans att man bara ska använda det ena garnet?

03.01.2024 - 17:15

DROPS Design answered:

Hei Helen. Når du strikker med disse 2 trådene bruker man like mange meter, men DROPS Air nøste er på 50 gram og har en løpelengde på 150 meter, mens et DROPS Brushed Alpaca Silk nøste er på 25 gram og har en løpelengde på 140 meter. Altså du trenger 2 nøster / 100 gram DROPS Air for å ha ca like mange løpemeter som 1 nøste / 25 gram DROPS Brushed Alpaca Silk. mvh DROPS Design

08.01.2024 - 14:44

country flag Pablo wrote:

Hello, I have two questions about FRONT PIECES AND DOWN THE BODY: - "increase 1 stitch after each cable/A.4 every 4th row": This is every 4th row after the increase in ROW 3 (ROW 3, ROW 7, ROW 11,...) or in each row 4 of the A.4 diagram? - If I increase always after the A.4 diagram in the right side, the jacket will be asymetric. Should the increases be done at different sides of A.4 like in diagram A.3?

21.12.2023 - 21:13

DROPS Design answered:

Dear Pablo, increase on every 4th row as explained under ROW 3, this means, in this section: row 3, row 7, row 11, etc. Happy knitting!

22.12.2023 - 08:40

country flag Manuela Liener wrote:

Hallo Liebes Team es geht mir um die Maschenprobe. Mache ich diese mit Beiden Garnen zusammen, oder mit jedem Garn einzeln? Bei einem anderen Modell mit 2 Garnen steht "1 Faden von Fabel + 1 Faden Flora (=2 Fäden)" Hier steht "mit 1 Faden von jeder Garnqualität" Ich danke für eine rasche Antwort, denn ich würde schon gerne beginnen. Lg Manu

27.11.2023 - 17:10

DROPS Design answered:

Liebe Manu, diese Jacke wird mit 2 Fäden von der Garngruppe C gestrickt: Air und Brushed Alpaca Silk, gerne können Sie mit Fabel und Flora stricken aber am besten mit insgesamt 4 Fäden der Garngruppe A und nicht nur 2, sonnst können Sie die Maschenprobe nicht erreichen. Viel Spaß beim stricken!

28.11.2023 - 08:32

country flag Sabine wrote:

Ich habe den unteren Rücken gestrickt und den Markierungsfaden an der hinteren Rückenmitte angebracht. Laut Anleitung soll ich den Faden nicht abschneiden. Aber ich soll doch eine Hinreihe über den unteren Teil des linken Vorderteils stricken, da ist der Faden doch an der falschen Stelle. Soll ich eine Rückreihe bis zum Anfang des linken Vorderteils stricken oder soll ich den Faden abschneiden?

06.11.2023 - 15:50

DROPS Design answered:

Liebe Sabine, die letzte Reihe von Vorderteile und unterer Rücken ist eine Rückreihe; das linke Vorderteil beginnt dann mit einer Hinreihe nach unten bis die Markierung in der Mitte vom Rückenteil (also 4 Maschen vor dieser Markierung), und bei den Rückreihen stricken Sie 3 Maschen weniger, so stricken Sie diese verkürzten Reihen weiter, dann wird der Faden abgeschnitten und das rechte Vorderteil genauso gestrickt. Viel Spaß beim stricken!

07.11.2023 - 08:00

country flag Susanna Nilsson wrote:

Det står att omtaget skall vara 4,5 cm Är det hela omtaget el bara på en sida??? Om det bara är på en sida så blir hela omtaget 9 cm

10.10.2023 - 20:54

DROPS Design answered:

Hej Susanna, jeg forstår ikke hvad det er som skal være 4,5 cm. Hvor er du i opskriften og hvilken størrelse strikker du?

17.10.2023 - 13:26