
Popular categories
Looking for a yarn?


|
|||||||
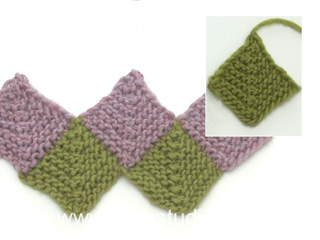
Diamond Cut |
|||||||
 |
 |
||||||
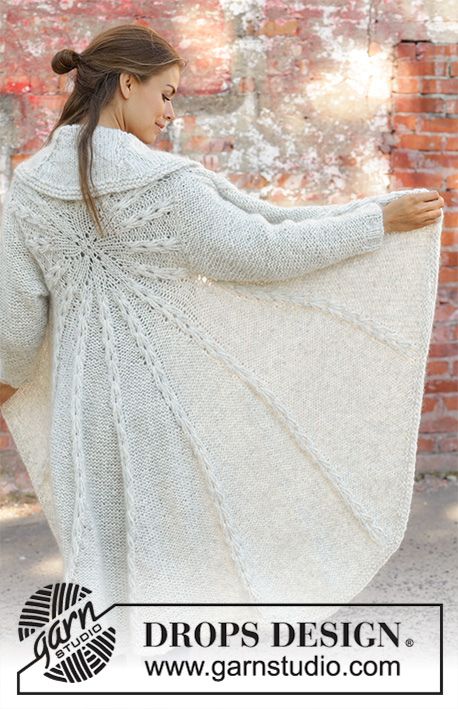
Knitted tunic in DROPS Fabel. The piece is worked back and forth with garter stitch, domino squares and stripes. Sizes S - XXXL.
DROPS 194-27 |
|||||||
|
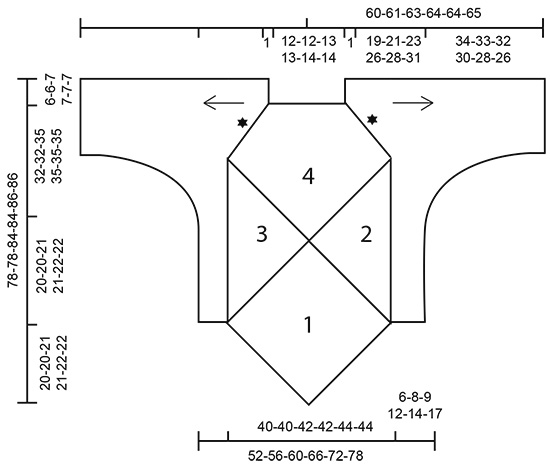
------------------------------------------------------- EXPLANATIONS FOR THE PIECE: ------------------------------------------------------- RIDGE/GARTER STITCH (worked in the round): 1 ridge = 2 rounds. Knit 1 round and purl 1 round. RIDGE/GARTER STITCH (worked back and forth): 1 ridge = Knit 2 rows. STRIPES-1: * 1 ridge wooden rose, 1 ridge salt and pepper *, work from *-*. STRIPES-2: * 1 ridge rose mist, 1 ridge gray *, work from *-*. STRIPES SLEEVES: Work 15-15-16-16-17-17 cm / 5⅞"-5⅞"-6 ¼"-6 ¼"-6⅝"-6⅝" with * 1 ridge rose mist, 1 ridge salt and pepper *, work from *-*. Work 5 cm / 2" with * 1 ridge rose mist, 1 ridge gray *, work from *-*. Work 3 cm / 1" with * 1 ridge salt and pepper, 1 ridge gray *, work from *-*. Work 15 cm / 6" with * 1 ridge wooden rose, 1 ridge rose mist *, work from *-*. Work 1 cm / ⅜" with * 1 ridge gray, 1 ridge salt and pepper *, work from *-*. Work 8 cm / 3⅛" with * 1 ridge rose mist, 1 ridge gray *, work from *-*. Work 4 cm / 1½" with * 1 ridge wooden rose, 1 ridge rose mist *, work from *-*. Continue to finished length with * 1 ridge gray, 1 ridge wooden rose *, work from *-*. ------------------------------------------------------- START THE PIECE HERE: ------------------------------------------------------- TUNIC - SHORT OVERVIEW OF THE PIECE: The piece is worked back and forth with circular needle. You first work whole and half domino squares. Then work the shoulder and pick up stitches down the edge of the section with domino squares before working garter stitch and stripes out to the side for body and sleeves. FRONT PIECE: WHOLE DOMINO SQUARE (1): Cast on 129-129-137-137-145-145 stitches with circular needle size 3.5 mm / US 4 and wooden rose. Insert a marker in the middle stitch of the row (= 64-64-68-68-72-72 stitches on each side of the stitch with marker). Work GARTER STITCH and STRIPES-1 – read description above and work domino square as follows: ROW 1 (= wrong side): Knit. ROW 2 (= right side): Knit until there is 1 stitch left before the marker, slip 1 stitch as if to knit, knit 2 together and pass the slipped stitch over the knitted together stitches, knit to end of row. Repeat rows 1 and 2, i.e. decrease 2 stitches in middle of square every 2nd row until there is stitch left on the row. Cut the strand and pull it through the stitch. The domino square measures approx. 28-28-30-30-31-31 x 28-28-30-30-31-31 cm / 11"-11"-11 ¾"-11 ¾"-12⅛"-12⅛". HALF DOMINO SQUARE (2): Start from the right side with circular needle size 3.5 mm / US 4 and rose mist and knit up 65-65-69-69-73-73 stitches (= 2 stitches in first ridge and 1 stitch in each of the next ridges) along the right side of the first domino square. Work STRIPES-2 – read description above and work a half domino square as follows: ROW 1 (= wrong side): Knit. ROW 2 (= right side): Knit 2 together, knit to end of row. Repeat rows 1 and 2, i.e. decrease 1 stitch every 2nd row until there is 1 stitch left on the row. Cut the strand and pull it through the stitch. HALF DOMINO SQUARE (3): Start from the right side with circular needle size 3.5 mm / US 4 and rose mist and knit up 65-65-69-69-73-73- stitches (= 1 stitch in each ridge until there is 1 ridge left and 2 stitches in last ridge) along the left side of the first domino square. Work STRIPES-2 and work a half domino square as follows: ROW 1 (= wrong side): Knit. ROW 2 (= right side): Knit until there are 2 stitches left on row, slip 1 stitch as if to knit, knit 1 and pass the slipped stitch over the knitted stitch. Repeat rows 1 and 2, i.e. decrease 1 stitch every 2nd row until there is 1 stitch left. Cut strand and pull it through the stitch. WHOLE DOMINO SQUARE WITH DECREASE FOR NECK (4): Start from right side with circular needle size 3.5 mm / US 4 and wooden rose and knit up 64-64-68-68-72-72 stitches (= 1 stitch in each ridge) along the side of half domino square (2), knit up 1 stitch in the transition between the 3 domino squares and continue by knitting up 64-64-68-68-72-72 stitches (= 1 stitch in each ridge) along the side of half domino square (3) = 129-129-137-137-145-145 stitches. Insert a marker in the middle stitch of the row (= 64-64-68-68-72-72 stitches on each side of the stitch with marker). Work STRIPES-1 and work domino square as follows: ROW 1 (= wrong side): Knit. ROW 2 (= right side): Knit until there is 1 stitch left before the marker, slip 1 stitch as if to knit, knit 2 together and pass the slipped stitch over the knitted together stitches, knit to end of row. Repeat rows 1 and 2, i.e. decrease 2 stitches in middle of square every 2nd row until there are 47-47-51-51-51-51 stitches left on the row (i.e. after you have worked 41-41-43-43-47-47 ridges). Now work as follows: ROW 83-83-87-87-95-95 (= wrong side): Knit. ROW 84-84-88-88-96-96 (= right side): Knit 2 together, knit until there is 1 stitch left before the marker, slip 1 stitch as if to knit, knit 2 together and pass the slipped stitch over the knitted together stitches, knit until there are 2 stitches left on row, slip 1 stitch as if to knit, knit 1 and pass the slipped stitch over the knitted stitch. Repeat these last 2 rows, i.e. you decrease 2 stitches middle of square and 1 stitch in each side (= 4 stitches decreased) every 2nd row until there are 3 stitches left on row. Knit 1 row over all stitches, then work the last row as follows: Slip 1 stitch as if to knit, knit 2 together and pass the slipped stitch over the knitted together stitches = 1 stitch left. Cut strand and pull it through stitch. BACK PIECE: Cast on and work in same way as front piece. LEFT SHOULDER, SIDE OF BODY AND SLEEVE: Now work left shoulder, side of body and sleeve back and forth in garter stitch and work STRIPES SLEEVES - read description above: Cast on 27-27-31-31-33-33 stitches with circular needle size 3.5 mm / US 4 and rose mist. Work garter stitch back and forth, AT THE SAME TIME at the end of each row cast on 1 new stitch. Work like this until you have worked 29-29-31-31-31-31 ridges and increased 29-29-31-31-31-31 stitches in each side of the piece = 85-85-93-93-95-95 stitches on needle. After the last row from the wrong side cut the strand. Leave the stitches on a circular needle or thread and work with circular needle size 3.5 mm / US 4 as follows: Knit up from right side 92-92-97-97-101-101 stitches along the side of square (2) (see sketch) and use the next color in the stripe you are currently working. Continue from the right side over the 85-85-93-93-95-95 stitches on needle/thread, knit up 92-92-97-97-101-101 stitches along side of domino square on the other side = 269-269-287-287-297-297 stitches on row. Continue back and forth with garter stitch and stripes until piece measures 6-8-9-12-14-17 cm / 2⅜"-3⅛"-3 ½"-4⅝"-5 ½"-6⅝" from where you knitted up stitches along the half domino squares. At the beginning of the next 2 rows bind off 46-46-48-48-51-51 stitches (= sides of tunic) = 177-177-191-191-195-195 stitches on needle. Insert a marker in each side of the piece (they mark the splits in sides and are used later in assembly). Continue with garter stitch and stripes and on the next row begin to bind off in each side for sleeve: bind off stitches at beginning of every 4th row (every 2nd ridge) in each side as follows: bind off 5 stitches 4-4-5-5-5-5 times, 2 stitches 7-7-8-8-9-9 times and 1 stitch 14-13-12-11-10-9 times = 81-83-85-87-89-91 stitches. Continue until the sleeve measures 53-54-55-56-56-57 cm / 20⅞"-21 ¼"-21⅝"-22"-22"-22⅜" from the cast-on edge. Bind off. Make sure that the bind-off edge is not tight. RIGHT SHOULDER, SIDE OF BODY AND SLEEVE: Work in the same way as left shoulder, side of body (i.e., knit up stitches along the side of square (3)) and sleeve. ASSEMBLY: Sew seam in raglan line – see black star in illustration. Sew with rose mist and sew in the outermost stitch space so that the seam is flat. Make sure that the seam is not tight. Sew sleeve seam from the bind-off edge at bottom of sleeve and upwards to the marker which was inserted before binding off 46-46-48-48-51-51 stitches for side in tunic. Repeat in other side. NECK: Start in the one raglan seam from the right side and knit up 118-140 stitches in each stitch/ ridge with short circular needle size 3.5 mm / US 4 and wooden rose. Work 3 RIDGES in the round - read description above. Bind off with knit. Cut and |
|||||||
Diagram explanations |
|||||||
|
|||||||
|
|||||||
|
Have you made this or any other of our designs? Tag your pictures in social media with #dropsdesign so we can see them! Do you need help with this pattern?You'll find tutorial videos, a Comments/Questions area and more by visiting the pattern on garnstudio.com. © 1982-2024 DROPS Design A/S. We reserve all rights. This document, including all its sub-sections, has copyrights. Read more about what you can do with our patterns at the bottom of each pattern on our site. |
|||||||


With over 40 years in knitting and crochet design, DROPS Design offers one of the most extensive collections of free patterns on the internet - translated to 17 languages. As of today we count 304 catalogs and 11422 patterns - 11417 of which are translated into English (US/in).
We work hard to bring you the best knitting and crochet have to offer, inspiration and advice as well as great quality yarns at incredible prices! Would you like to use our patterns for other than personal use? You can read what you are allowed to do in the Copyright text at the bottom of all our patterns. Happy crafting!
Comments / Questions (65)
Det som jeg og andre sliter med er sidestrikking og skuldrene,ermer. Når jeg har strikket skulder og lagt på tråd så strikker jeg opp langs siden på retten 92 m. Så tar jeg med skulder maskene fra retten. Så tar jeg bakstykket og strikker opp 92 masker på sidestikket der. Slik at alt blir strikket på den ene siden i riller fram og tilbake.
16.03.2020 - 14:49Hei. Jeg lurer på . når man strikker opp langs sidene og skulder. skal jeg strikke opp 92 m langs siden, de 85 skulder og 82 m langs siden på bakstykket ? Eller på samme stykke .
16.03.2020 - 11:24DROPS Design answered:
Hei Lisbeth. Du strikkes opp 92 masker langs den ene siden, se målskissen, fortsett videre over de 85 maskene du har på pinnen/tråden, deretter strikk opp 92 masker langs den andre siden. Nå begynner du på den ene siden av jakken, skuldrene og ermet. God Fornøyelse!
23.03.2020 - 09:11Bonjour. Je ne comprends pas les explications du domino 4 (domino entier avec encolure) à partir du moment où il reste 51 mailles. D'après les explications, le domino se termine en pointe ! Merci de votre aide.
19.01.2020 - 16:17DROPS Design answered:
Bonjour Claudine, tout à fait, il se termine en pointe comme on le voit sur la photo et comme le montre le schéma. Répétez les 2 derniers rangs comme expliqué (= 1 rang à l'endroit sur l'envers, 1 rang sur l'endroit en diminuant 4 m: 1 m en début de rang, 2 m au milieu du rang et 1 m à la fin du rang). Bon tricot!
20.01.2020 - 09:53Jeg strikker diamond CUT. Skjønner ikke hvordan ermene strikkes. Min søster, som er er kjempeflink til å strikke, skjønte heller ikke dette. Det skal bli «trompetermer», men maskene felles jo? Blir smale armer! Skjønner heller ikke hvordan man skal strikke den delen på ermet, som man først strikker for å «legge vekk» mens man tar opp på siden til «halsdelen»
28.11.2019 - 16:33DROPS Design answered:
Hei Eva! Det skal felles masker når man strikker ermet fordi skulder og siden på tunikaen strikkes først, for å få riktig bredde på ermet må en del masker felles langs siden. Etter fellingen er ermene fortsatt brede nok til at det blir trumpetermer. Skulder, side og erme strikkes sidelengs i èn del. Først strikkes skulder, deretter settes skuldermaskene på en tråd når det skal strikkes opp masker langs siden av rute 2, deretter strikkes skuldermaskene, så strikkes det masker opp fra rute 2 på forsiden. Når det er gjort skal det strikkes frem og tilbake deretter felles det masker i hver side og ermet skal strikkes videre (med fellinger). Lykke til!
29.11.2019 - 08:35If I do get it to turn into a cape, maybe i will sell the pattern.
12.10.2019 - 02:32I was just asking if you had suggestions as to how i would turn this pattern into a cape. Whether to do sleeves and not sew them, or maybe leave the sleeves off and do another front and back and add to sides. I am going to try it and if it does turn out, i won't be sending you a photo of how i did it. Thought your comment back to me was very rude.
12.10.2019 - 02:31I love this sweater pattern. I was wondering if it would be easy to convert it to a cape pattern? What would be the best way to go about this?
10.10.2019 - 22:15DROPS Design answered:
Dear Mrs Laberge, we are unfortunately not able to adjust every pattern to every single request, for any individual assistance please contact your DROPS store or any knitting forum. Happy knitting!
11.10.2019 - 09:02Malli fa-413 Kuinka neulon dominoruudun nro 4 niin, että pääntie muodostuu; ohje on tässä tältä osin virheellinen - eli kuinka monta kerrosta/ silmukkaa työssä siinä kohdassa missä pitää muodostua pääntie toisin sanoen ruudun neule päätetään?
02.10.2019 - 17:01DROPS Design answered:
Hei, ohje on oikein. Pääntien silmukat kavennetaan pois työstä, eli niitä ei päätetä kerralla.
07.01.2020 - 18:57What are the sizes on cm's? e.g haw many cm's is XXL which I think is my size. But what each are would be good. thankyou
30.09.2019 - 08:14DROPS Design answered:
Dear Mrs Nicholls, you will find all finished measurements for each size in the chart - compare a similar garment you have and like the shape to find out the matching size - read more about sizing here. Happy knitting!
30.09.2019 - 11:47Ohje fa-413; ohje virheellinen sillä dominoruutu, jossa pitäisi olla pääntie käsketään kaventaa loppuun saakka (kuten dominoruutu 1 eli pääntietä ei muodostu; yritän nyt päätellä olka/hihakappaleen ohjeen silmukka/kerroslukujen pohjalta mihin saakka pitäisi ruutua 4 purkaa, että pääntie muodostuisi. Jos tähän saisin teiltä tiedon, olisi helpompaa...ja kannattaa korjata tuo ohje.
28.09.2019 - 14:30