Comments / Questions (54)
![]() Francesca wrote:
Francesca wrote:
Buongiorno ho visto questo modello e ne sono innamorata , ho comprato l’occorrente ed ho lavorato una taglia S . Le domande sono 2 . Come mai la parte dei bottoni ,lavorata a coste ,arriva a malapena sulle scapole e non scende come nel modello sul braccio? (Nonostante le misure siano corrette)E poi ,con che filo cucire i bottoni ? Scusate ma è la prima vota che faccio un modello così. Grazie saluti
23.09.2022 - 09:09DROPS Design answered:
Buonasera Francesca, il suo campione corrispondeva a quello indicato prima di iniziare il lavoro? Per attaccare i bottoni può utilizzare del filo da cucito. Buon lavoro!
27.09.2022 - 22:36
![]() Sara wrote:
Sara wrote:
Dos : Je suis au moment de rabattre avec la Boucle, je comprends bien que je fais la jeté mais je dois rabattre la jeté ? Avez vous une video explicative ??
10.01.2022 - 22:19DROPS Design answered:
Bonjour Sara, faites simplement 1 jeté sur l'aiguille droite, passez la maille sur l'aiguille droite par-dessus ce jeté comme pour rabattre 1 maille, et continuez ainsi, faites de nouveau 1 jeté sur l'aiguille droite et passez la maille sur l'aiguille droite par-dessus ce jeté, répétez l'opération jusqu'à ce que votre boucle mesure 2 cm. Bon tricot!
11.01.2022 - 09:07
![]() Sara wrote:
Sara wrote:
Bonjour, Puis je exécuter ce modèle avec la laine Air ? Dois je faire 2 fils ?
06.01.2022 - 07:39DROPS Design answered:
Bonjour Sara, dans la mesure où les 2 laines sont du même groupe, vous pouvez utiliser 2 fils Air au lieu de 2 fils Brushed Alpaca Silk, rappelez-vous juste que la texture sera différente car les 2 laines sont différentes; et pensez à bien vérifier votre tension également (comme pour tout autre projet). Utilisez le convertisseur pour calculer la nouvelle quantité nécessaire. Bon tricot!
06.01.2022 - 08:01
![]() Jytte Therkildsen wrote:
Jytte Therkildsen wrote:
Forstår simpelthen ikke hvordan man laver de stropper til knaphul? Har ledt og ledt og kan ikke finde det nogen steder
05.10.2021 - 20:19DROPS Design answered:
Hej Jytte. Vi har dessvärre ingen video på detta. Det är kanske lite otydligt skrivet men du lägger opp en ny maska som du sedan lukker av och detta upprepas till stroppen måler ca 2 cm. Mvh DROPS Design
06.10.2021 - 10:20
![]() Rikke Rechnagel wrote:
Rikke Rechnagel wrote:
Jeg har efter flere strikkeprøver forsøgt at ramme 11 masker på cm. Det svarer reelt til lidt under 1 cm pr. maske. Synes ikke maskerne på billedet ser så brede/ store ud. Det vil betyde jeg skal op i en pind 10. Og så store huller er jeg ikke interesseret i at blusen får. Alternativt skal jeg omregne og med mine 13 - 14 masker pr. 10 cm. Vil jeg skulle slå 122 masker op svarende til XL Synes bare det lyder voldsomt og fuldstændigt umuligt med 11 masker på 10 cm.
26.07.2021 - 19:55DROPS Design answered:
Hej Rikke, Hvis du strikker med 2 tråde DROPS Brushed Alpaca Silk så kommer 11 masker på 10 cm til at se ud som på billedet. Det er muligt at du skal bruge et tykkere pindenummer, det er individuelt hvor stramt/løst man strikker :)
05.08.2021 - 13:35
![]() Liberacy wrote:
Liberacy wrote:
Amo os modelos, passo horas curtindo, obrigada por deixar meus dias mas alegre
16.05.2021 - 03:43
![]() Liliana Salazar wrote:
Liliana Salazar wrote:
Amo esta página es lo máximo, gracias por compartir estos proyectos tan fantásticos...
29.04.2021 - 02:23
![]() Veerle wrote:
Veerle wrote:
De boordsteek bovenaan voor- en achterpand staat alleen uitgelegd voor de goede kant. Hoe brei je de verkeerde kant? 1 av gedraaid - 1 r?
11.02.2021 - 04:22DROPS Design answered:
Dag Veerle,
Ja je hebt gelijk, bovenaan brei je immers heen en weer en moet je dus ook aan de verkeerde kant breien. Het klopt zoals je het zegt: de gedraaid rechte steek is aan de verkeerde kant een gedraaid averechte steek en de averechte steek is aan de verkeerde kant een rechte steek.
11.02.2021 - 13:59
![]() Lot wrote:
Lot wrote:
Beste, ik zie in het voorbeeld geen aanduiding in cm voor de boord van de mouw. Ik brei in een andere naalddikte, dus ik zou het aantal steken moeten berekenen. Wat is de breedte van de boord van de mouw in cm? Alvast bedankt!
01.02.2021 - 16:52DROPS Design answered:
Dag Lot,
Er is inderdaad geen manchetbreedte bekend. Je zou de naalddikte voor de boord door kunnen berekenen op basis van de naalddikte die je voor de trui gebruikt. Waarschijnlijk komt het dan wel goed.
23.02.2021 - 13:34
![]() Vickie Nielsen wrote:
Vickie Nielsen wrote:
Hej Der er en ting jeg ikke forstår i opskriften. Skal jeg strikke en lige så bred rib kant øverst på ryggen som jeg har lavet foran oppe ved halsen?
31.01.2021 - 18:41DROPS Design answered:
Hei Vickie. Ja, strikk på samme måte som forstykket til arbeidet måler 56-58-60-62-64-66 cm – men ikke fell av. På neste pinne fra retten felles det av med rett over rett og vrang over vrang – SAMTIDIG som det lages hemper slik, les i oppskriften hvordan. mvh DROPS design
01.02.2021 - 15:11
Raspberry Flirt#raspberryflirtsweater |
|
 |
 |
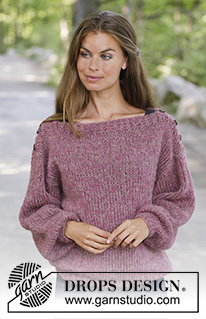
Knitted sweater in 2 strands DROPS Brushed Alpaca Silk. The piece is worked in stockinette stitch and rib with boat neck. Sizes S - XXXL.
DROPS 196-34 |
|
|
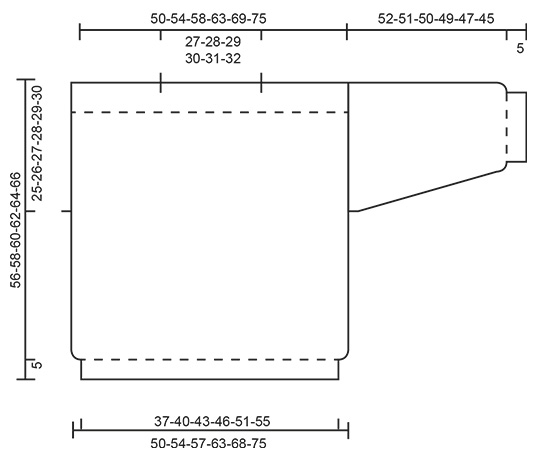
------------------------------------------------------- EXPLANATIONS FOR THE PATTERN: ------------------------------------------------------- INCREASE TIP-1 (evenly spaced): To work out how to increase evenly, count the total number of stitches on the needle (e.g. 96 stitches) and divide by the number of increases to be made (e.g. 14) = 6.9. In this example, increase by making 1 yarn over after approx. each 7th stitch. On the next round knit the yarn overs twisted to avoid holes. RIDGE/GARTER STITCH (worked back and forth): 1 ridge = Knit 2 rows. LOOP: 1 loop: * make 1 yarn over, bind off the yarn over *, repeat from *-* until the loop measures 2 cm / ¾". INCREASE TIP-2 (for mid under sleeve): Work until there is 1 stitch left before the marker thread, 1 yarn over, knit 2 stitches (marker thread sits in the middle of these 2 stitches), 1 yarn over. On the next round, knit the yarns over twisted to avoid holes. Then work the new stitches in stockinette stitch. ------------------------------------------------------- START THE PIECE HERE: ------------------------------------------------------- SWEATER - SHORT OVERVIEW OF THE PIECE: The piece is worked in the round with circular needle as far as the armholes, then the front and back pieces are finished separately back and forth on the needle. The sleeves are worked in the round with double pointed needles/short circular needle. BODY: Cast on 96-104-112-120-132-144 stitches with circular needle SIZE 5.5 mm/US 9 and 1 strand heather + 1 strand beige (= 2 strands). Knit 1 round. Then work rib (= knit 1 twisted / purl 1) for 5 cm / 2". Change to circular needle size 8 mm / US 11 and knit 1 round where you increase 14-14-14-18-18-22 stitches evenly on round – read INCREASE TIP = 110-118-126-138-150-166 stitches. Then work stockinette stitch – REMEMBER THE GAUGE! When the piece measures 31-32-33-34-35-36 cm / 12¼"-12½"-13"-13⅜"-13¾"-14¼", work only the first 55-59-63-69-75-83 stitches on the needle, the last 55-59-63-69-75-83 are placed on a thread. FRONT PIECE: = 55-59-63-69-75-83 stitches. Continue with stockinette stitch and cast on 1 stitch at the end of the next 2 rows = 57-61-65-71-77-85 stitches. The new stitches are worked in GARTER STITCH – see description above. When the piece measures 52-54-56-58-60-62 cm / 20½"-21¼"-22"-22¾"-23⅝"-24⅜" work the next row as follows – from the right side: 1 stitch in garter stitch, * knit 1 twisted / purl 1 *, work from *-* until there are 2 stitches left, knit 1 twisted and 1 stitch in garter stitch. Continue this rib until the piece measures 56-58-60-62-64-66 cm / 22"-22¾"-23⅝"-24⅜"-25¼"-26". Bind off with knit over knit and purl over purl. BACK PIECE: Place the 55-59-63-69-75-83 stitches on circular needle size 8 mm / US 11 and work in the same way as for front piece until the piece measures 56-58-60-62-64-66 cm / 22"-22¾"-23⅝"-24⅜"-25¼"-26" – but do not bind off! On the next row from the right side bind off with knit over knit and purl over purl – AT THE SAME TIME as you work loops as follows: bind off 4-5-5-4-6-7 stitches, make 1 LOOP – read description above, * bind off the next 5-5-6-5-5-6 stitches, make 1 loop * work from *-* a total of 2-2-2-3-3-3 times, bind off 29-31-31-33-35-35 stitches (= neck), * make 1 loop, bind off the next 5-5-6-5-5-6 stitches *, work from *-* a total of 2-2-2-3-3-3 times, make 1 loop, bind off the last 4-5-5-4-6-7 stitches. SLEEVE: Cast on 26-28-28-30-32-32 stitches with double pointed needles SIZE 5.5 mm/US 9 /and 1 strand heather + 1 strand beige (= 2 strands). Knit 1 round. Then work rib (= knit 1 twisted /purl 1) for 5 cm / 2". Change to double pointed needles size 8 mm / US 11 and knit 1 round where you increase 9-7-8-8-6-8 stitches evenly on round = 35-35-36-38-38-40 stitches. Insert 1 marker thread at the beginning of the round = mid under sleeve. Then work stockinette stitch. When the piece measures 8-8-8-8-8-7 cm / 3⅛"-3⅛"-3⅛"-3⅛"-3⅛"-2 ¾" increase 2 stitches mid under sleeve – read INCREASE TIP. Increase like this every 4½-4-3½-3½-3-3 cm a total of 10-11-12-12-13-13 times = 55-57-60-62-64-66 stitches. Continue working until the sleeve measures 52-51-50-49-47-45 cm / 20⅜"-20"-19⅝"-19 ¼"-18 ½"-17⅝" and then bind off loosely – make sure the bind-off edge is not tight! Work the other sleeve. ASSEMBLY: Sew in sleeves inside the 1 edge stitch in garter stitch. Sew buttons onto front piece. |
|
 |
|
Have you finished this pattern?Tag your pictures with #dropspattern #raspberryflirtsweater or submit them to the #dropsfan gallery. Do you need help with this pattern?You'll find 22 tutorial videos, a Comments/Questions area and more by visiting the pattern on garnstudio.com. © 1982-2025 DROPS Design A/S. We reserve all rights. This document, including all its sub-sections, has copyrights. Read more about what you can do with our patterns at the bottom of each pattern on our site. |
|




Post a comment to pattern DROPS 196-34
We would love to hear what you have to say about this pattern!
If you want to leave a question, please make sure you select the correct category in the form below, to speed up the answering process. Required fields are marked *.