
Popular categories
Looking for a yarn?


Comments / Questions (9)
![]() Rosemary Newton wrote:
Rosemary Newton wrote:
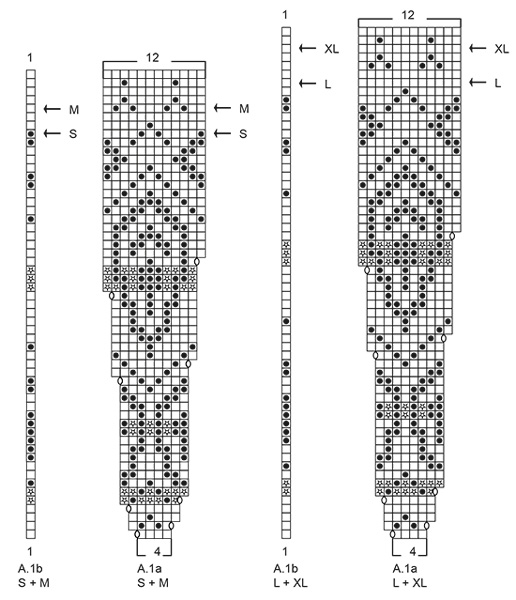
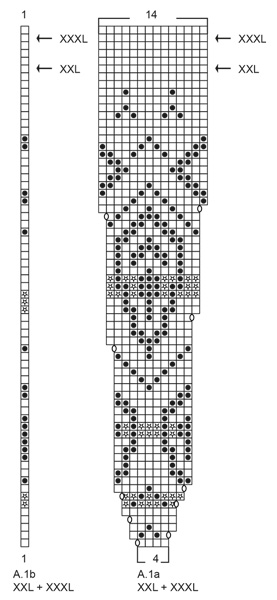
Re:194-7, I notice a difference in the photo of the pattern and the diagram: The photo shows an early introduction of light grey, but it doesn’t show until line 20 on the diagram. Also is there a written chart for the pattern? I have started this twice and am using Drops Air. When I increase the pattern of 12 stitches to 13 in the row each time it’s repeated, how do I maintain the pattern’s integrity?
22.08.2020 - 22:51DROPS Design answered:
Dear Mrs Newton, read diagrams bottom up from the right towards the left from RS and from the left towards the left from WS, this means the rows with light grey will be worked on 5th + 6th rows in size S+M - 6th+7th in size L+XL + XXL + XXXL. The increases (= yarn overs in diagrams) are worked as shown on next row in diagram. You can add a marker after each diagram, this can help you to check your number of sts (from 4 sts on 1st row to 12 or 14 sts depending on your size). Read more about diagrams here. Happy knitting!
24.08.2020 - 08:29
![]() Elvia McCormack wrote:
Elvia McCormack wrote:
Thanks for responding to my earlier question. The pattern says increases are only on the right side. But if the chart is both right/wrong side, then I’ll be making increases on the wrong side which is contrary to what the pattern instructions for increases say. Could you please clarify? Thanks so much.
11.06.2019 - 22:53DROPS Design answered:
Dear Mrs McCormack, when pattern says to increase evenly on a row, you will work increase from right side, but when working diagram, you will increase as shown in diagram, ie both from right side and from wrong side. Happy knitting!
12.06.2019 - 07:29
![]() Elvia McCormack wrote:
Elvia McCormack wrote:
Good morning. Thank you for another beautiful pattern. I’m starting diagrams 1a and b. Is the diagram shown from right side only? What do you do for the purl side? Thanks.
11.06.2019 - 12:26DROPS Design answered:
Dear Mrs McCormack, diagrams show all rows, ie RS as well as WS rows - read more here about diagrams. Happy knitting!
11.06.2019 - 13:01
![]() Tine wrote:
Tine wrote:
Om man skal øke på retten og strikke frm og tilbake så stemmer ikke diagrammet, da skal det økes på 2 omganger etter hverandre. Hva er riktig?
01.01.2019 - 11:49DROPS Design answered:
Hei Tine. Når du strikker etter diagram øker du ikke alltid fra retten, så dette stemmer. Om du sikter til ØKETIPS (der det står man skal øke fra retten) gjelder dette når du skal øke jevnt fordelt (slik du gjør på HALSKANTEN). Når du strikker etter diagram øker du som anvist, både fra retten og vrangen. God fornøyelse
02.01.2019 - 15:40
![]() Hanka wrote:
Hanka wrote:
2.část: .Poté jedu zpět zleva doprava (rubovou stranu),upletu prvních pět ok légy,poté dle vz. A1b, upletu pouze to jedno,tj. šesté oko obrace a dále pokračuji už jen podle vz.A1a a střídám vzor už jen dle tohoto rozpisu?
06.10.2018 - 13:36DROPS Design answered:
Ano, v rubu musíte postupovat v opačném pořadí, než na lícové straně, aby jednotlivé vzory ležely nad sebou. Při pletení jednotlvých úseků vzoru už vás navede schéma. Hodně zdaru! Hana
08.10.2018 - 13:21
![]() Hanka wrote:
Hanka wrote:
1.část: Svetr je nádherný,jsem ale začátečník při vyplétání norského vzoru.Sedlo: Začínám tedy od vz.A1a, zprava doleva,pletu hladce,po každém čtvrtém oku přidávám jedno oko a před šestým okem se řídím vz.A1b,tj. jedno oko upletu hladce (jsem na lícové straně) a posledních pět ok légy vroubkovým vzorem?
06.10.2018 - 13:35DROPS Design answered:
Dobrý den, Hanko, ano je to přesně tak, jak píšete :-) Hodně zdaru! Hana
08.10.2018 - 13:19
![]() Caty wrote:
Caty wrote:
Bonjour, lorsque vous ne précisez pas que l'on peut faire une réhausse pour l'encolure dans vos explications, peut-on en faire une quand même? merci de votre réponse
26.08.2018 - 11:19DROPS Design answered:
Bonjour Caty, si vous souhaitez que l'encolure dos soit légèrement plus haute que celle des devants, vous pouvez tout à fait tricoter une réhausse - elle n'est pas prévue dans ce modèle, mais vous pouvez vous inspirer d'un modèle de même tension qui en propose une. Bon tricot!
05.09.2018 - 13:33Ingunn Hrefnudóttir wrote:
There is no chest size , can u give me an estimate ? And if I only use tvo colors, is 50gr enough for the pattern
28.07.2018 - 18:02DROPS Design answered:
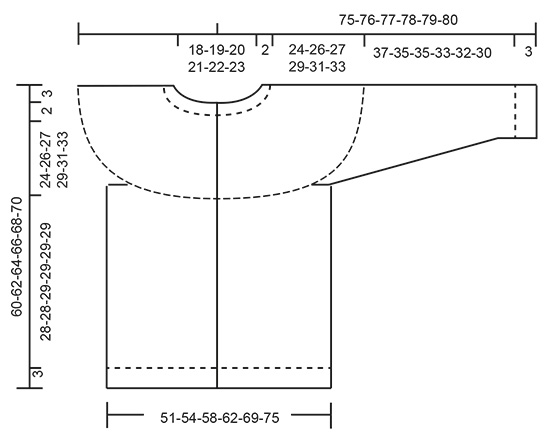
Hi Ingunn, Right at the bottom of the pattern you will find a diagram with all the sizes. Depending on your size, you will need 100g or 150 g of the colour for the pattern. Happy knitting!
30.07.2018 - 07:52
![]() Monique wrote:
Monique wrote:
Bitte Anleitung veröffentlichen! Eine tolle Jacke, die immer geht und die Farbkombination ist schön
13.07.2018 - 08:46
|
|||||||||||||
Morning Rain Jacket#morningrainjacket |
|||||||||||||
 |
 |
||||||||||||
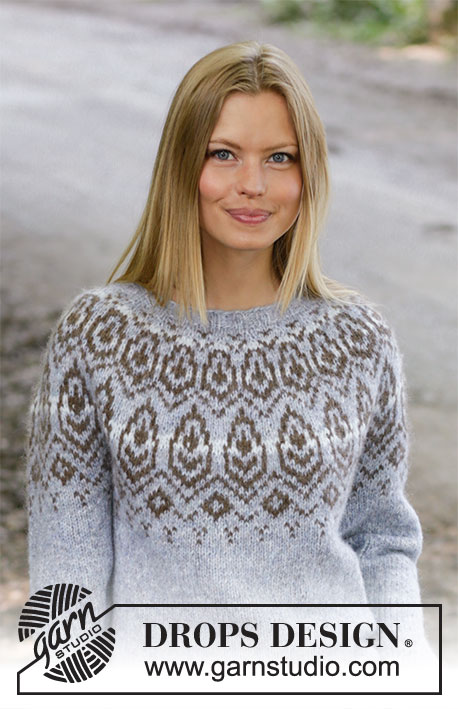
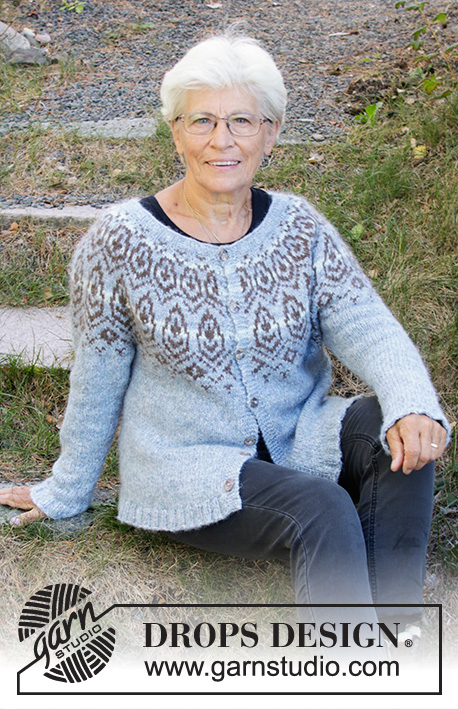
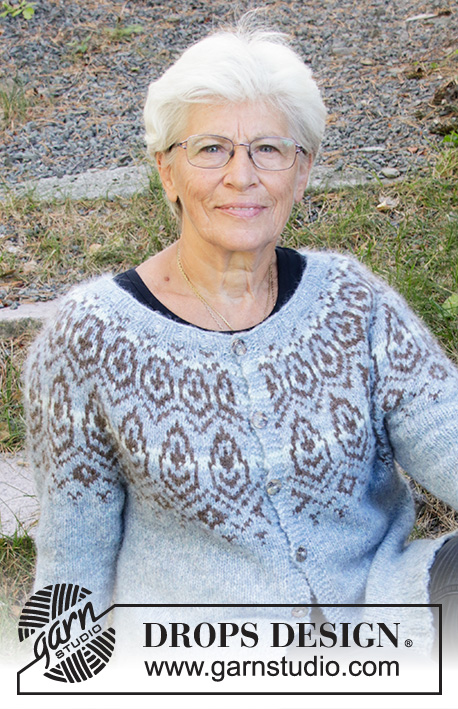
Knitted jacket in DROPS Air or DROPS Nepal. The piece is worked top down with Nordic pattern and round yoke. Sizes S - XXXL.
DROPS 194-7 |
|||||||||||||
|
------------------------------------------------------- EXPLANATIONS FOR THE PATTERN: ------------------------------------------------------- RIDGE/GARTER STITCH (worked back and forth): 1 ridge = Knit 2 rows. INCREASE TIP (evenly spaced): All increases are made from the right side! To work out how to increase evenly, count the total number of stitches on the needle (e.g. 84 stitches), minus the bands (e.g. 10 stitches) and divide the remaining stitches by the number of increases to be made (e.g. 11) = 6.7. In this example, increase by making 1 yarn over after approx. each 7th stitch. On the next row/round work the yarn overs twisted to avoid holes. Do not increase over the bands. PATTERN: See diagram A.1. Choose diagram for your size. The whole pattern is worked in stockinette stitch. NOTE: Work the bands with the background color of the pattern stripe. DECREASE TIP (for sleeves): Decrease 1 stitch on each side of the marker thread as follows: Work until there are 3 stitches left before the marker thread, knit 2 together, knit 2 (the marker thread sits in the middle of these 2 stitches), slip 1 stitch as if to knit, knit 1, pass the slipped stitch over the knitted stitch. BUTTONHOLE: Work buttonholes on the right band (when the garment is worn). Work from the right side when there are 3 stitches left on the row as follows: Make 1 yarn over, knit 2 together and knit the last stitch. On the next row knit the yarn over to leave a hole. The first buttonhole is worked when the rib in the neck measures approx. 1½-2 cm. Then work the next 6-6-6-7-7-7 buttonholes with approx. 8½-8½-9-8-8½-8½ cm between each one. ------------------------------------------------------- START THE PIECE HERE: ------------------------------------------------------- JACKET - SHORT OVERVIEW OF THE PIECE: The jacket is worked back and forth with circular needle from mid front and top down. The sleeves are worked in the round with short circular needle/double pointed needles. NECK: Cast on 84-88-92-96-96-104 stitches (including 5 band stitches in each side towards mid front) with circular needle size 4.5 mm / US 7 and fog. Purl 1 row from the wrong side. The next row is worked as follows – from the right side: 5 band stitches in GARTER STITCH – read description above, * knit 2, purl 2 *, work from *-* until there are 7 stitches left on the row, knit 2 and work 5 band stitches in garter stitch. Work rib like this for 2 cm / ¾". Remember BUTTONHOLES on right band – read description above. Then knit 1 row from the right side where you increase 11-15-19-19-7-7 stitches evenly on row – read INCREASE TIP = 95-103-111-115-103-111 stitches. Then work yoke as described below. YOKE: Change to circular needle SIZE 5.5 mm/ US 9. Now work PATTERN – read description above, as follows – from the right side: 5 band stitches in garter stitch, work A.1a until there are 6 stitches left on the row (= 21-23-25-26-23-25 repeats of 4 stitches), work A.1b (= 1 stitch) and finish with 5 band stitches in garter stitch. Continue the pattern like this and increase as shown in the diagram. REMEMBER THE GAUGE! When A.1a and A.1b have been worked as far as the row marked for your size, there are 263-287-311-323-333-361 stitches on the needle and the piece measures approx. 26-28-29-31-33-35 cm / 10 ¼"-11"-11⅜"-12⅛"-13"-13 ¾" measured mid front from the cast-on edge. You can continue with the diagram if necessary, without more increases, until you reach the right length (after the last row, continue with fog). Then continue with the next row in A.1a and A.1b (or with fog after the last row), the band stitches continued as before to finished length and work the next row as follows from the wrong side: Work the first 43-46-49-52-55-59 stitches (= front piece), place the next 51-57-63-63-62-67 stitches on a thread (= sleeve), cast on 6-6-6-6-12-12 new stitches on the needle (= in side under sleeve), work as before over the next 75-81-87-93-99-109 stitches (= back piece), place the next 51-57-63-63-62-67 stitches on a thread (= sleeve), cast on 6-6-6-6-12-12 new stitches on the needle (= in side under sleeve), work the remaining 43-46-49-52-55-59 stitches (= front piece). Body and sleeves are finished separately. THE PIECE IS NOW MEASURED FROM HERE! BODY: = 173-185-197-209-233-251 stitches. Work until the whole of diagrams A.1a/A.1b are finished in height, then continue with stockinette stitch and fog; the band stitches in each side are worked as before. When the piece measures 28-28-29-29-29-29 cm / 11"-11"-11⅜"-11⅜"-11⅜"-11⅜" from the division, purl 1 row from the wrong side where you increase 35-35-39-39-47-49 stitches evenly on row = 208-220-236-248-280-300 stitches. Change to circular needle size 4.5 mm / US 7 and work the next row as follows – from the right side: 5 band stitches in garter stitch, * knit 2, purl 2 *, work from *-* until there are 7 stitches left on the row, knit 2 and work 5 band stitches in garter stitch. Work the rib like this for 3 cm / 1". Bind off with knit over knit and purl over purl – to avoid the bind-off edge being tight, you can cast of with needle SIZE 5.5 mm/US 9. The jacket measures approx. 60-62-64-66-68-70 cm / 23⅝"-24⅜"-25¼"-26"-26¾"-27½" / 23⅝"-24⅜"-25¼"-26"-26¾"-27½" from the shoulder. SLEEVE: Place the 51-57-63-63-62-67 stitches from the thread on the one side of the piece on short circular needle/double pointed needles SIZE 5.5 mm/US 9 and knit up 1 stitch in each of the 6-6-6-6-12-12 stitches cast on under the sleeve = 57-63-69-69-74-79 stitches. Insert 1 marker thread in the middle of the 6-6-6-6-12-12 stitches under the sleeve and start the round here; allow the marker thread to follow your work onwards. If you still have rounds left to work in A.1 for your size, continue working until both A.1a and A.1b have been completed in height, then work with fog and stockinette stitch. When the piece measures 2 cm / ¾" from the division, decrease 2 stitches mid under sleeve - read DECREASE TIP. Decrease like this every 6th-5th-4th-4th-3rd-3rd round a total of 10-12-15-14-16-17 times = 37-39-39-41-42-45 stitches. Continue working until the piece measures 37-35-35-33-32-30 cm / 14 ½"-13 ¾"-13 ¾"-13"-12 ½"-11 ¾" from the division (shorter measurements in larger sizes due to longer yoke). Knit 1 round where you increase 7-9-9-7-10-7 stitches evenly on round = 44-48-48-48-52-52 stitches. Change to double pointed needles size 4.5 mm / US 7 and work rib (=knit 2/ purl 2) for 3 cm / 1". Bind off with knit over knit and purl over purl - to avoid the bind-off edge being tight, you can bind off with a needle SIZE 5.5 mm/US 9. The sleeve measures approx. 40-38-38-36-35-33 cm / 15 ¾"-14⅞"-14⅞"-14⅛"-13 ¾"-13" from the division. Work the other sleeve in the same way. ASSEMBLY: Sew buttons onto the left band. |
|||||||||||||
Diagram explanations |
|||||||||||||
|
|||||||||||||
 |
|||||||||||||
 |
|||||||||||||
 |
|||||||||||||
Have you finished this pattern?Tag your pictures with #dropspattern #morningrainjacket or submit them to the #dropsfan gallery. Do you need help with this pattern?You'll find 28 tutorial videos, a Comments/Questions area and more by visiting the pattern on garnstudio.com. © 1982-2026 DROPS Design A/S. We reserve all rights. This document, including all its sub-sections, has copyrights. Read more about what you can do with our patterns at the bottom of each pattern on our site. |
|||||||||||||


With over 40 years in knitting and crochet design, DROPS Design offers one of the most extensive collections of free patterns on the internet - translated to 17 languages. As of today we count 324 catalogs and 12291 patterns - 12281 of which are translated into English (US/in).
We work hard to bring you the best knitting and crochet have to offer, inspiration and advice as well as great quality yarns at incredible prices! Would you like to use our patterns for other than personal use? You can read what you are allowed to do in the Copyright text at the bottom of all our patterns. Happy crafting!
Post a comment to pattern DROPS 194-7
We would love to hear what you have to say about this pattern!
If you want to leave a question, please make sure you select the correct category in the form below, to speed up the answering process. Required fields are marked *.