
Popular categories
Looking for a yarn?


Comments / Questions (42)
![]() Claudia Wegener wrote:
Claudia Wegener wrote:
Guten Tag, leider finde ich nirgendwo eine Information dazu, wieviel Spiel (positive/negative ease) eingeplant wird. Welche Größe sollte ich bei einem Brustumfang von etwa 112cm wählen, wenn der Pullover etwa so sitzen soll wie auf dem Foto?
25.05.2025 - 19:07DROPS Design answered:
Liebe Frau Wegener, messen Sie einen ähnlichen Pullover, den Sie haben und gerne tragen und vergleichen Sie diese Maßnahmen mit den in der Skizze, so finden Sie die passende Größe sowie das passende esse. Hier lesen Sie mehr. Viel Spaß beim Stricken!
26.05.2025 - 09:38
![]() Elvira Gustke wrote:
Elvira Gustke wrote:
Ich habe eine Frage,kann es sein das Aster und Autum Sea die gleiche Anleitung haben. Mir kommt sie sehr bekannt vor. Mfg Fr.Gustke
08.01.2025 - 22:28DROPS Design answered:
Liebe Frau Gustke, sie sind ja ähnlich bei dem Muster aber unterschiedlich bei der Maschenrprobe und Form. Viel Spaß beim Stricken!
09.01.2025 - 10:19
![]() Elvira Gustke wrote:
Elvira Gustke wrote:
Ich habe eine Frage!Kann man diesen Pullover auch in runden stricken. Ich nähe nicht gern zusammen. Fg Fr.Gustke
18.01.2024 - 20:10DROPS Design answered:
Liebe Frau Gustke, der Pullover wird von oben nach unten gestrickt, jede Schulter wird zuerst separat gestrickt, dann strickt man beide Schulter zusammen, nimmt man für die Armausschnitt zu und strickt bis zur Ende. So Nahte kann man hier nicht vermeiden, da der Pullover von Schulter bis Armausschnitt separat (Vorder- und Rückenteil) Gestrick wird. Am besten folgen Sie die Anleitung genauso wie beschrieben. Viel Spaß beim stricken!
19.01.2024 - 09:14
![]() Elvira Gustke wrote:
Elvira Gustke wrote:
Ich habe eine Frage zu dem schönen Pullover. Stricke ich die Rückreihe wie sie erscheint oder mit Muster. Mg Elvira
22.11.2023 - 20:48DROPS Design answered:
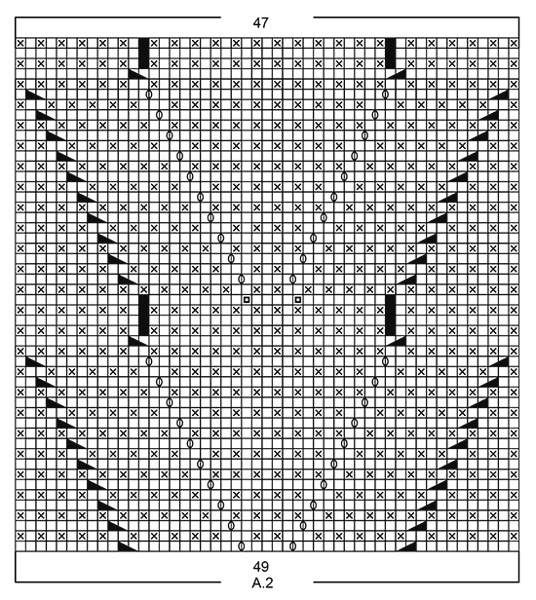
Liebe Frau Gustke, alle Reihe werden im Diagram gezeichnet, dh die Rückreihen lesen Sie links nach rechts je nach der Zeichenerklärung: das leere Kästchen stricken Sie links bei den Rückreihen und die x stricken Sie rechts bei den Rückreihen (Rippenmuster A.1 = 1 Masche glatt rechts, 1 Masche krausrechts). Viel Spaß beim stricken!
23.11.2023 - 08:35
![]() Neirynck Sonia wrote:
Neirynck Sonia wrote:
Patroon 1,hoe moet ik starten met A1 enA2
03.04.2023 - 21:24DROPS Design answered:
Dag Sonia,
Je begint onderaan het telpatroon aan de rechter kant en je leest het patroon van rechts naar links. Als je de eerste rij klaar hebt. Ga je verder met de volgende rij en, omdat je heen en weer breit, lees je de volgende, teruggaande naald, van links naar rechts.
05.04.2023 - 07:47
![]() Nadine PIBRE wrote:
Nadine PIBRE wrote:
Bonsoir, je suis surprise car j\'ai imprimé le modèle et il n\'y a pas de diagramme A1 ???? Pourriez-vous m\'aider svp ? Merci
23.01.2023 - 22:32DROPS Design answered:
Bonjour Mme Pibre, le diagramme A.1 est un petit diagramme de 2 mailles x 4 rangs qui se trouve à droite du schéma des mesures, sous la manche. Bon tricot!
24.01.2023 - 12:06
![]() Marina wrote:
Marina wrote:
Liebes Dropsteam, ich habe Probleme mit den Armausschnitten bei Vorder- u.Rückenteil. Ich stricke Gr.L. Lt. Anleitung beim VT : 1Ma je 2x, 2 Ma je 2 x, 4 Ma je 1 x. Macht nach meiner Rechnung 10 Ma je Seite statt 8 Ma lt. Anleitung. Ebenso komme ich beim RT auf ein anderes Ergebnis. Hab ich einen Denkfehler? Vielen Dank für die Hilfe im Voraus und auch für die vielen tollen Anleitungen, die ich schon nachgestrickt hab.
26.02.2021 - 22:04DROPS Design answered:
Liebe Marina, es soll am Ende nich 4 sondern 2 Maschen angeschlagen werden - deutsche Anleitung wird angepasst, danke für den Hinweis, so sollen Sie so in L aufnehmen: 1 m x 2, 2 M x 2 und 2 M x 1 (= 2 M x 3 Mal ingesamt in L). Viel Spaß beim stricken!
01.03.2021 - 07:50
![]() Guyot wrote:
Guyot wrote:
Si j'ai bien suivi, certaines correstions sont déjà notées dans les explications et d'autre non? Pour les manches çà correspond bien mais il faut corriger les emmenchures dos et devant et l'ordre des épaules dos. Merci de votre précision Salutations et merci pour tous vos très beaux modèles et bons modèles
12.12.2020 - 23:34DROPS Design answered:
Bonjour Mme Guyot, si vous avez imprimé le modèle après les dates des corrections, le modèle est alors complet et correct. Bon tricot!
14.12.2020 - 08:47
![]() Edeltraut wrote:
Edeltraut wrote:
Hallo, ich verstehe nicht ganz wann ich mit den Aufnahmen zu den Armausschnitten beginnen soll. Werden die cm ab dem Halsausschnitt oder von ganz oben gemessen? Vielen Dank für ihre Antwort
06.09.2020 - 19:19DROPS Design answered:
Liebe Edeltraut, die Aufnahmen zu den Armauschnitten fangen je nach der Größe wenn die Arbeit 13 - 15 cm von der Anschlagskante (= ganz oben) misst. Viel Spaß beim stricken!
07.09.2020 - 09:28
![]() Maria Pia wrote:
Maria Pia wrote:
Salve, se volessi realizzare il modello con uno scollo minore, come potrei apportare le modifiche necessarie? grazie
21.02.2020 - 14:36DROPS Design answered:
Buongiorno Maria Pia. Per uno scollo meno profondo, può lavorare il diagramma A1 sul davanti per meno cm prima di unire le due spalle. Per uno scollo meno largo, può avviare più maglie per entrambe le spalle. Buon lavoro!
23.02.2020 - 20:50
|
||||||||||||||||||||||
Aster#astersweater |
||||||||||||||||||||||
 |
 |
|||||||||||||||||||||
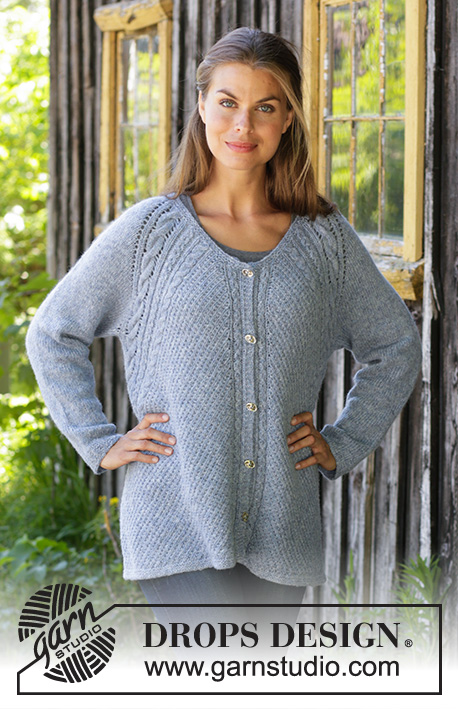
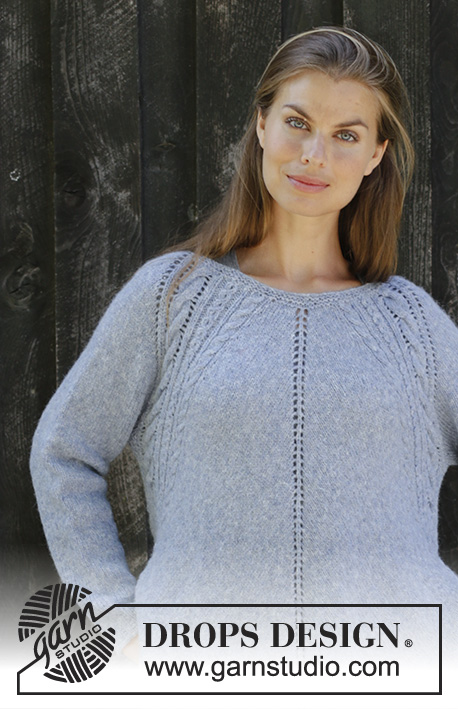
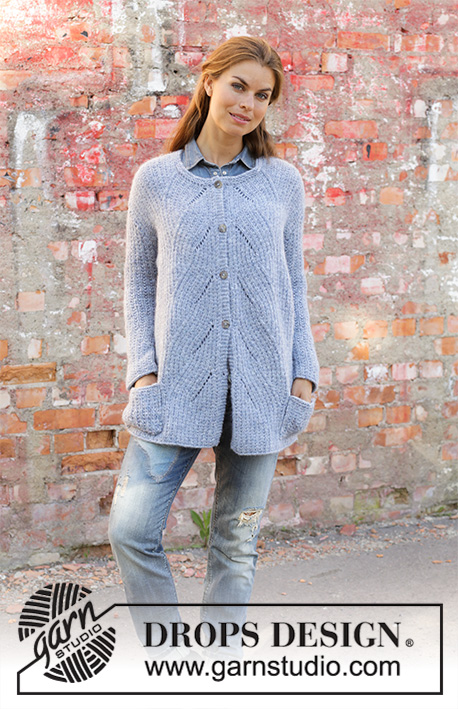
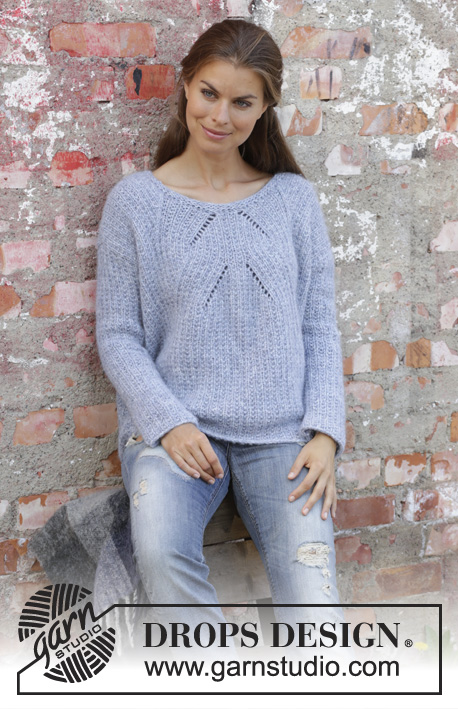
Knitted sweater in DROPS Air. The piece is worked top down with textured pattern and lace pattern. Size S – XXXL.
DROPS 194-4 |
||||||||||||||||||||||
|
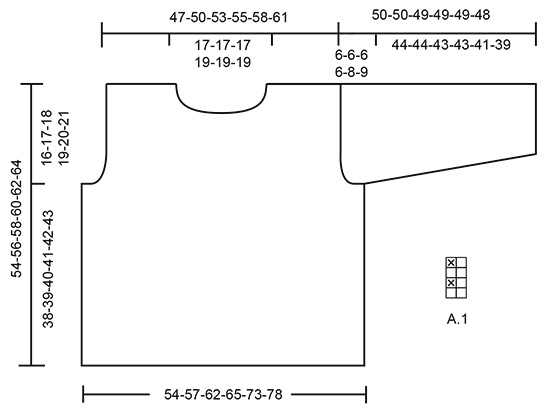
------------------------------------------------------- EXPLANATIONS FOR THE PATTERN: ------------------------------------------------------- RIDGE/GARTER STITCH (worked back and forth): 1 ridge = Knit 2 rows. PATTERN: See diagrams A.1 and A.2. The diagrams show all the rows in the pattern seen from the right side. DECREASE TIP (for sleeves): All decreases are made from the right side! Decrease as follows after the 1 edge stitch in garter stitch: Slip 1 stitch as if to knit, knit 1, pass the slipped stitch over. Decrease as follows before the 1 edge stitch in garter stitch: Work until there are 3 stitches left on the row, knit 2 together, 1 edge stitch in garter stitch. ------------------------------------------------------- START THE PIECE HERE: ------------------------------------------------------- SWEATER - SHORT OVERVIEW OF THE PIECE: The piece is worked back and forth in sections which are sewn together to finish. You work top down with circular needle. FRONT PIECE: Left shoulder: Cast on 25-27-29-29-31-33 stitches with circular needle size 6 mm / US 10 and Air. Purl 1 row from the wrong side. Then work pattern as follows from the right side: 1 edge stitch in GARTER STITCH – read description above, A.1 (= 2 stitches) until there are 2 stitches left on the row, work the first stitch in A.1, 1 edge stitch in garter stitch. Continue like this back and forth until the piece measures 4-4-4-4-5-5 cm / 1 ½"-1 ½"-1 ½"-1 ½"-1⅞"-1⅞" – adjust so that the next row is worked from the wrong side: ROW 1: Work pattern as before over all stitches and cast on 1 new stitch at the end of the row (= towards neck) = 26-28-30-30-32-34 stitches. ROW 2: Work 1 edge stitch in garter stitch, work pattern as before until there is 1 stitch left, 1 edge stitch in garter stitch. ROW 3: Work pattern as before over all stitches. Lay the piece to one side and work right shoulder. Right shoulder: Cast on 25-27-29-29-31-33 stitches with circular needle size 6 mm / US 10 and Air. Purl 1 row from the wrong side. Then work pattern as follows from the right side: 1 edge stitch in garter stitch, A.1 until there are 2 stitches left on the row, work the first stitch in A.1, 1 edge stitch in garter stitch. Continue like this back and forth until the piece measures 4-4-4-4-5-5 cm / 1 ½"-1 ½"-1 ½"-1 ½"-1⅞"-1⅞" – adjust so that the next row is from the right side: ROW 1: Work pattern as before over all stitches and cast on 1 new stitch at the end of the row (= towards neck) = 26-28-30-30-32-34 stitches. ROW 2: Work 1 edge stitch in garter stitch, work pattern as before until there is 1 stitch left on the row, 1 edge stitch in garter stitch. REMEMBER THE GAUGE! Now work the right and left shoulders together from the right side as follows: Work as before over the 26-28-30-30-32-34 stitches on the right shoulder, cast on 21-21-21-25-25-25 new stitches on the needle for neck, work as before over the 26-28-30-30-32-34 stitches on the left shoulder = 73-77-81-85-89-93 stitches on the row. Work back 1 row in this pattern from the wrong side and 1 edge stitch in garter stitch in each side (purl the new neck stitches). Now work pattern as follows: 1 edge stitch in garter stitch, work pattern as before over the next 11-13-15-17-19-21 stitches, A.2 (= 49 stitches), work pattern as before over the next 11-13-15-17-19-21 stitches, 1 edge stitch in garter stitch. Continue like this back and forth. When the piece measures 13-14-13-14-15-15 cm / 5⅛"-5 ½"-5⅛"-5 ½"-5⅞"-5⅞" cast on new stitches for the armholes at the end of each row in each side as follows: Cast on 1 stitch 2-2-2-2-2-2 times, 2 stitches 0-0-2-2-3-4 times and 4-4-2-2-4-4 stitches 1 time (a total of 6-6-8-8-12-14 stitches increased for the armhole in each side of the piece) = 85-89-97-101-113-121 stitches. The new stitches are worked into pattern A.1 as you go. Continue like this back and forth until A.2 has been completed in height. When A.2 has been completed in height you have decreased 2 stitches in the diagram = 83-87-95-99-111-119 stitches. Now continue with pattern A.1 with 1 edge stitch in garter stitch in each side. When the piece measures 54-56-58-60-62-64 cm / 21¼"-22"-22¾"-23⅝"-24⅜"-25¼" / 21¼"-22"-22¾"-23⅝"-24⅜"-25¼" from the shoulder, bind off with knit over knit and purl over purl. BACK PIECE: Right shoulder: Cast on 25-27-29-29-31-33 stitches with circular needle size 6 mm / US 10 and Air. Purl 1 row from the wrong side. Then work pattern as follows from the right side: ROW 1: 1 edge stitch in garter stitch, A.1 (= 2 stitches) until there are 2 stitches left on the row, work the first stitch in A.1, 1 edge stitch in garter stitch. ROW 2: Work pattern as before and cast on 1 new stitch at the end of the row (= towards neck) = 26-28-30-30-32-34 stitches. ROW 3: Work 1 edge stitch in garter stitch, work pattern as before until there is 1 stitch left on the row, 1 edge stitch in garter stitch. ROW 4: Work pattern as before over all stitches. Lay the piece to one side and work left shoulder. Left shoulder: Cast on 25-27-29-29-31-33 stitches with circular needle size 6 mm / US 10 and Air. Purl 1 row from the wrong side. Then work pattern as follows from the right side: ROW 1: 1 edge stitch in garter stitch, A.1 until there are 2 stitches left on the row, work the first stitch in A.1, 1 edge stitch in garter stitch. ROW 2: Work pattern as before over all stitches. ROW 3: Work pattern as before and cast on 1 new stitch at the end of the row = 26-28-30-30-32-34 stitches. ROW 4: Work 1 edge stitch in garter stitch, work pattern as before until there is 1 stitch left, 1 edge stitch in garter stitch. REMEMBER THE GAUGE! Now work the left and right shoulder together from the right side as follows: Work as before over the 26-28-30-30-32-34 stitches on the left shoulder, cast on 21-21-21-25-25-25 new stitches on the needle for neck, work as before over the 26-28-30-30-32-34 stitches on the right shoulder = 73-77-81-85-89-93 stitches on row. Work 1 row back from the wrong side in pattern as before and with 1 edge stitch in garter stitch in each side (purl the new neck stitches). Now work pattern as follows: 1 edge stitch in garter stitch, A.1 until there are 2 stitches left on the row, work the first stitch in A.1, 1 edge stitch in garter stitch. Continue back and forth like this. When the piece measures 13-14-13-14-15-15 cm / 5⅛"-5 ½"-5⅛"-5 ½"-5⅞"-5⅞" cast on new stitches for the armholes at the end of each row in each side as follows: Cast on 1 stitch 2-2-2-2-2-2 times, 2 stitches 0-0-2-2-3-4 times and 3-3-1-1-3-3 stitches 1 time (a total of 5-5-7-7-11-13 stitches increased for the armholes in each side of the piece – NOTE: You cast on 1 less stitch for the armholes on each side of the back piece than on the front piece so that the pattern will fit into the sides of the body = 83-87-95-99-111-119 stitches. The new stitches are worked into pattern A.1 as you go. When the piece measures 54-56-58-60-62-64 cm / 21¼"-22"-22¾"-23⅝"-24⅜"-25¼" / 21¼"-22"-22¾"-23⅝"-24⅜"-25¼" from the shoulder, bind off with knit over knit and purl over purl. SLEEVE: Cast on 19-23-25-27-27-27 stitches with circular needle size 6 mm / US 10 and Air. Work pattern A.1 until there is 1 stitch left, work the first stitch in A.1. Continue like this back and forth, AT THE SAME TIME at the end of each row cast on new stitches in each side for the sleeve cap as follows: Cast on 2 stitches 3-3-3-3-2-2 times, 1 stitch 0-0-0-0-4-5 times, 2 stitches 2-2-2-2-2-2 times and 4 stitches 1 time = 47-51-53-55-59-61 stitches. The new stitches are worked into pattern A.1. When all the stitches are cast on, insert a marker thread in the piece. THE PIECE IS NOW MEASURED FROM HERE! Continue back and forth with pattern A.1 and 1 edge stitch in garter stitch in each side. When the piece measures 4 cm / 1½" decrease 1 stitch in each side – read DECREASE TIP. Decrease like this approx. every 5-5-4-4-3-3 cm / 1⅞"-1⅞"-1 ½"-1 ½"-1⅛"-1⅛" a total of 7-8-8-9-10-10 times = 33-35-37-37-39-41 stitches. Continue until the sleeve measures 44-44-43-43-41-39 cm / 17 ¼"-17 ¼"-16⅞"-16⅞"-16⅛"-15 ¼" from the marker thread (shorter measurements in larger sizes due to wider shoulders). Bind off with knit over knit and purl over purl. Work the other sleeve in the same way. ASSEMBLY: Sew the shoulder seams inside the cast-on edge. Sew the sleeves to the body inside the cast-on edge on the sleeves and inside the 1 edge stitch in garter stitch on the body. Sew the sleeve and side seams inside the 1edge stitch in garter stitch. NECK: Knit up 66-78 stitches from the right side with short circular needle size 6 mm / US 10. Work 2 ridges. Bind off with purl. |
||||||||||||||||||||||
Diagram explanations |
||||||||||||||||||||||
|
||||||||||||||||||||||
 |
||||||||||||||||||||||
 |
||||||||||||||||||||||
Have you finished this pattern?Tag your pictures with #dropspattern #astersweater or submit them to the #dropsfan gallery. Do you need help with this pattern?You'll find 26 tutorial videos, a Comments/Questions area and more by visiting the pattern on garnstudio.com. © 1982-2026 DROPS Design A/S. We reserve all rights. This document, including all its sub-sections, has copyrights. Read more about what you can do with our patterns at the bottom of each pattern on our site. |
||||||||||||||||||||||


With over 40 years in knitting and crochet design, DROPS Design offers one of the most extensive collections of free patterns on the internet - translated to 17 languages. As of today we count 324 catalogs and 12291 patterns - 12281 of which are translated into English (US/in).
We work hard to bring you the best knitting and crochet have to offer, inspiration and advice as well as great quality yarns at incredible prices! Would you like to use our patterns for other than personal use? You can read what you are allowed to do in the Copyright text at the bottom of all our patterns. Happy crafting!
Post a comment to pattern DROPS 194-4
We would love to hear what you have to say about this pattern!
If you want to leave a question, please make sure you select the correct category in the form below, to speed up the answering process. Required fields are marked *.