
Popular categories
Looking for a yarn?


Comments / Questions (193)
![]() Mélanie wrote:
Mélanie wrote:
A.1 est fait avec 5 rangs au total. Comment peut t'on donc faire pour augmenter 3 fois tous les rg puis 5 fois tous les 2 rg. "3 fois tous les rangs" veut dire que dans 1 même ligne on doit faire 3 augmentation ? On ne ferait donc pas 1 augmentation en début et 1 en fin de rang ??Sinon sur combien de rang doit t'on faire ces augmentations ? et les "5 fois tous les 2 rangs" combien de rangs au total ??? Désolé d'insister mais c mon 1er drop
02.02.2019 - 17:25DROPS Design answered:
Bonjour Mélanie, on augmente au début et à la fin des rangs, on aura ainsi plus de mailles avant A.1a et après A.1c. Pour augmenter tous les rangs, crochetez 3 rangs en augmentant 1 maille de chaque côté, puis augmentez 1 rang sur 2 (= 5 rangs d'augmentations = 10 rangs au total). Bon crochet!
04.02.2019 - 11:40
![]() Mélanie wrote:
Mélanie wrote:
A.1 est fait avec 5 rangs au total. Comment peut t'on donc faire pour augmenter 3 fois tous les rg puis 5 fois tous les 2 rg. "3 fois tous les rangs" veut dire que dans 1 même ligne on doit faire 3 augmentation ? On ne ferait donc pas 1 augmentation en début et 1 en fin de rang ??Sinon sur combien de rang doit t'on faire ces augmentations ? et les "5 fois tous les 2 rangs" combien de rangs au total ??? Désolé d'insister mais c mon 1er drop
02.02.2019 - 17:25
![]() Belen Espejo wrote:
Belen Espejo wrote:
Según las instrucciones se teje desde arriba hacia abajo, entonces no entiendo que en las instrucciones hay que hacer bastantes vueltas a punto alto aumentando cuando en la foto el calado empieza en la segunda o tercera vuelta. Por favor me lo pueden aclarar? Gracias.
30.01.2019 - 18:25DROPS Design answered:
Hola Belen. El patrón está correcto. El dibujo se empieza a trabajar a partir de la 3º fila ( sin contar la fila de montaje). El párrafo sobre los aumentos se trabaja al mismo tiempo que el dibujo.
03.02.2019 - 17:49
![]() Mélanie wrote:
Mélanie wrote:
Bonjour, c'est mon premier modèle drop que je souhaite en S et je ne comprend pas quand vous dites "Augmenter ainsi 3 fois au total tous les rangs, puis 5 fois tous les 2 rangs = 65 brides au dernier rang." on fait cela avec les diagrammes ? "Les 65 brides au dernier rangs" c'est ce que l'on doit avoir à la fin de A.3 ? Je ne comprend pas comment faire ces augmentations et à la fin de quel rang doit t'on avoir 65brides ? Aidez-moi svp
27.01.2019 - 18:39DROPS Design answered:
Bonjour Mélanie, vous crochetez en point fantaisie (A.1a, A.1b et A.1c) tout en augmentant 3 fois tous les rangs et 5 fois tous les 2 rangs (quand les augmentations seront finies, vous aurez 65 brides). Quand A.1 est terminé, crochetez A.2c, A.2b et A.2a, puis A.3. Bon crochet!
28.01.2019 - 11:46
![]() Gloria wrote:
Gloria wrote:
Que significan los espacios en blanco entre puntos altos en el diagrama?
22.01.2019 - 15:13DROPS Design answered:
Hola Gloria. Los espacios entre los puntos altos no significan nada, son para que el dibujo quede más claro
24.01.2019 - 15:25
![]() Lynette wrote:
Lynette wrote:
Hi there I just love this pattern but cannot understand the diagrams and am desperate to crochet this pattern is there a tuterial for this pattern please, thanks
21.01.2019 - 19:52DROPS Design answered:
Dear Lynette, there are detailed explanations for each symbol of the diagrams at the bottom of the pattern, and you can find the related turorial videos by clicking the links right below the picture, at the left side of the page. If this is still not enough, you can always ask for help in person in the store you bought your Drops yarn from. Happy Crafting!
22.01.2019 - 02:09
![]() Sylvia Hengelhaupt wrote:
Sylvia Hengelhaupt wrote:
Hallo ich bin eine erfahrene Häklerin. Diese Anleitung ist so kompliziert, dass ich sie nicht nacharbeiten kann, was mich sehr traurig macht, denn das Top ist wirklich sehr hübsch.
16.11.2018 - 20:44DROPS Design answered:
Liebe Frau Hengelhaupt, gerne können Sie Ihre Frage hier stellen, bei individuellen Assistanz wir Ihnen gerne Ihr DROPS Laden - auch telefonisch oder per E-mail - weiterhelfen. Viel Spaß beim häkeln!
19.11.2018 - 09:52Romina wrote:
Hola, me parece o está hecha desde el cuello para abajo??
03.11.2018 - 22:09DROPS Design answered:
Hola Romina. El top se trabaja de arriba abajo, está mencionado en el resumen de la labor.
04.11.2018 - 12:05Paula wrote:
Tienen algun video donde lo hagan completo uds? Para las no expertas cuesta hacerlo leyéndolo. Gracias
19.09.2018 - 16:48DROPS Design answered:
Hola Paula. Tienes algunos vídeos al lado del patrón , que pueden ayudarte con la realización del top.
20.09.2018 - 20:04Ornella wrote:
Hola! Las medidas de los talles S y M, cuáles serían?
11.09.2018 - 13:35DROPS Design answered:
Hola Ornella. Puedes consultar todas las medidas de la prenda en el dibujo bajo el patrón. Los primeros números son para la talla S, los siguientes para la talla M etc.
13.09.2018 - 20:05
|
|||||||||||||||||||||||||||||||||||||||||||
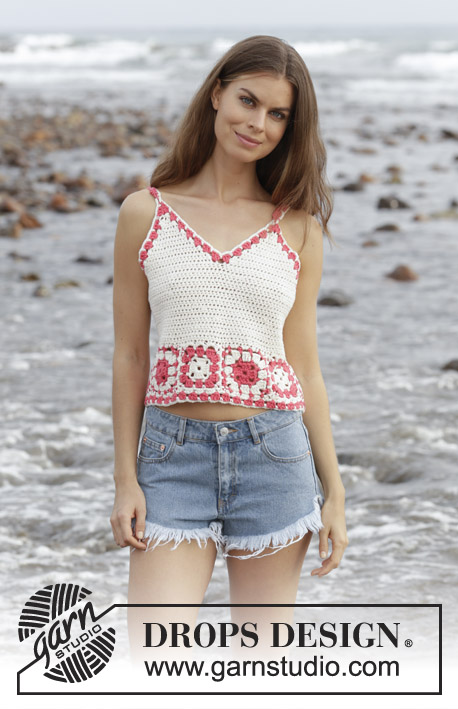
California Dream#californiadreamtop |
|||||||||||||||||||||||||||||||||||||||||||
 |
 |
||||||||||||||||||||||||||||||||||||||||||
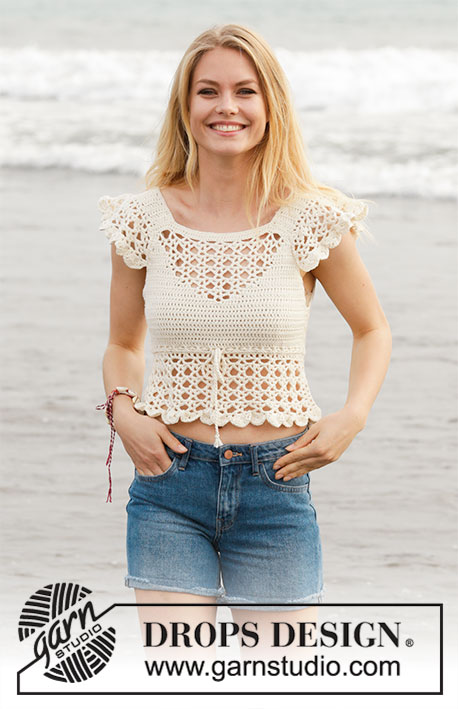
Crocheted top with lace pattern and flounce. Size: S - XXXL Piece is crocheted in DROPS Cotton Merino.
DROPS 190-21 |
|||||||||||||||||||||||||||||||||||||||||||
|
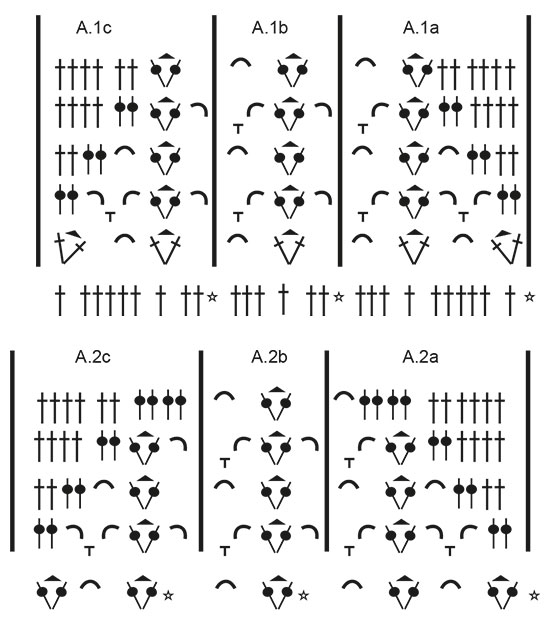
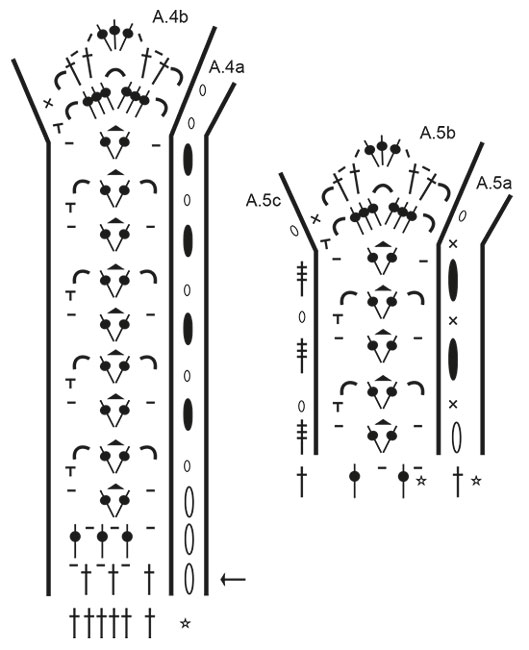
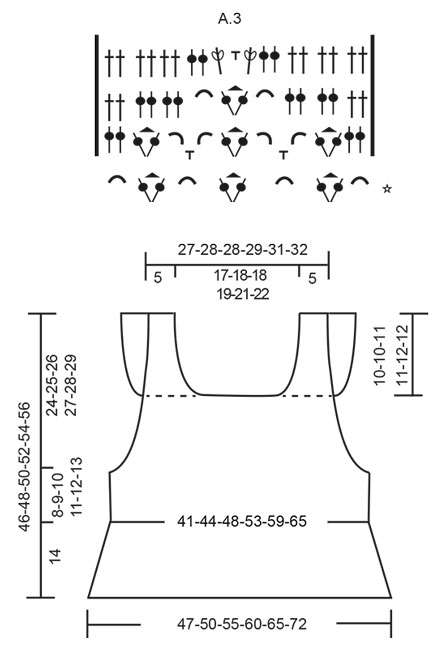
INFORMATION FOR PATTERN: PATTERN: See diagrams A.1 to A.5. INCREASE TIP-1: Increase 1 double crochet by working 2 double crochets in same stitch. CROCHET TIP-1 (applies to body but not diagram): Replace first double crochet at beginning of every row with 3 chain stitches. CROCHET TIP-2 (applies to body but not diagram): When working in the round, replace first treble with 3 chain stitches, finish round with 1 slip stitch in 3rd chain stitch at beginning of round. DECREASE TIP: Decrease by working 2 double crochets together. INCREASE TIP-2 (evenly): To calculate how to increase evenly, use the total number of double crochets on row (e.g. 146 double crochets) and divide double crochets by number of increases to be done (e.g. 22) = 6.6. In this example increase by working 2 double crochets in same double crochet alternately approx. every 6th and 7th double crochet. ---------------------------------------------------------- TOP: Piece is worked back and forth, top down, work front and back piece separately down to armhole, then work in the round over both parts. Then work straps from bottom up and then work flounces back and forth on straps, fasten flounce to front/back piece. FRONT PIECE: Work 51-53-53-55-57-59 chain stitches (including 3 chain stitches to turn with) on hook size 5 mm / H/8 with Cotton Merino. Switch to hook size 4 mm / G/6, turn and work 1 double crochet in 4th chain stitch from hook (= 2 double crochets), work 1 double crochet in each of the next 47-49-49-51-53-55 chain stitches = 49-51-51-53-55-57 double crochets. On next row begin increase in each side of piece AT THE SAME TIME work pattern as follows: Increase 1 double crochet in each side of piece (= 2 double crochets increased) - read INCREASE TIP-1. Increase like this every row 3-5-8-13-14-15 times in total, and then every other row 5-5-3-0-0-0 times in total = 65-71-73-79-83-87 double crochets on last row. Work next row as follows, begin from right side: Read CROCHET TIP-1 – work 1 double crochet in each of the first 0-1-1-2-3-4 double crochets, A.1a over the next 10 double crochets, repeat A.1b over the next 30 double crochets (= 5 times in total in width), A.1c over the next 9 double crochets and 1 double crochet in each of the last 0-1-1-2-3-4 double crochets. Continue until A.1 has been work 1 time vertically. REMEMBER THE CROCHET GAUGE! Then work as follows, begin from wrong side: Work 1 double crochet in every double crochet until 1 double crochet remains before first chain space, work A.2c, repeat A.2b 3 times in total in width, A.2a and 1 double crochet in every double crochet the entire row. Continue until A.2 has been worked vertically. Then work as follows, begin from wrong side: Work 1 double crochet in every double crochet until first chain space, work A.3 and 1 double crochet in every double crochet the rest of row. Continue until A.3 has been worked vertically. Now work 1 double crochet in every stitch until piece measures 14-15-15-16-16-17 cm / 5 ½"-5⅞"-5⅞"-6 ¼"-6 ¼"-6⅝". Fasten off, turn. Put piece aside. BACK PIECE: Work 51-53-53-55-57-59 chain stitches (including 3 chain stitches to turn with) on hook size 5 mm / H/8 with Cotton Merino. Switch to hook size 4 mm / G/6, turn and work 1 double crochet in 4th chain stitch from hook (= 2 double crochets), work 1 double crochet in each of the next 47-49-49-51-53-55 chain stitches = 49-51-51-53-55-57 double crochets. Then work 1 double crochet in every double crochet - AT THE SAME TIME increase 1 double crochet in each side of piece - remember INCREASE TIP-1. Increase like this every row 8-10-11-13-14-15 times in total = 65-71-73-79-83-87 double crochets on last row. When piece measures 14-15-15-16-16-17 cm / 5 ½"-5⅞"-5⅞"-6 ¼"-6 ¼"-6⅝" (adjust according to front piece), fasten off, turn. BODY: Now work the two parts together as follows: Work 4-4-7-8-12-15 chain stitches for armhole, 1 double crochet in each of the 65-71-73-79-83-87 double crochets from back piece, work 8-8-14-16-24-30 chain stitches for armhole, 1 double crochet in each of the 65-71-73-79-83-87 double crochets from front piece, work 4-4-7-8-12-15 chain stitches for armhole and finish with 1 slip stitch in first chain stitch at beginning of round. Then work piece in the round, continue with 1 double in every double/chain stitch = 146-158-174-190-214-234 double crochets. When working in the round, turn after every round to work alternately from right side and wrong side. This is so that the texture is the same on the entire top - read CROCHET TIP-2. Insert 1 marker thread in each side, in the middle of the 8-8-14-16-24-30 chain stitches. NOW MEASURE THE PIECE FROM HERE! Continue like this until piece measures 8-9-10-11-12-13 cm / 3⅛"-3½"-4"-4⅜"-4¾"-5⅛". Now work in the round according to diagram A.4 while at the same time increasing on first round (round marked with arrow in diagram) as follows: Work A.4b 28-30-33-36-39-43 times in total on round – A.4a shows how rounds begin and end and is worked in addition to A.4b – AT THE SAME TIME increase 11-11-12-13-10-12 chain spaces (= 1 double crochet + 1 chain stitch) evenly – read INCREASE TIP-2 = 84-90-99-108-117-129 chain spaces (= 1 double crochet + 1 chain stitch). Continue in the round, i.e. always work pattern from right side. When A.4 is done vertically, fasten off. STRAPS: Now work a strap back and forth in cast-on edge on front piece over the first 8-9-9-9-10-10 double crochets. Work 1 double crochet in every double crochet until strap measures 10-10-11-11-12-12 cm / 4"-4"-4⅜"-4⅜"-4¾"-4¾". Fasten off. Work 1 strap over the first 8-9-9-9-10-10 double crochets in the other side the same way. Work straps the same way on back piece. Sew tog straps on shoulder. FLOUNCE: Work back and forth over every row on strap (= 20-20-22-22-24-24 cm / 7⅞"-7⅞"-8⅝"-8⅝"-9⅜"-9⅜"). Begin from wrong side and work 1 double crochet in first row, * 1 chain stitch, 1 double crochet around row *, work from *-* along the entire strap – adjust so that there are 26-26-28-28-30-30 chain spaces (= 1 chain stitch + 1 double crochet) on this row, finish with 1 double crochet in last row = 1 double crochet in each side and 26-26-28-28-30-30 chain spaces (= 1 chain stitch + 1 double crochet). Turn and work as follows from right side: A.5a, A.5b 13-13-14-14-15-15 times in total in width, finish with A.5c. Continue this pattern until A.5 is done vertically, fasten off. Work flounce on the other strap the same way. NECK EDGE: Work 1 single crochet in every double crochet/2 single crochets along every double crochet row along the entire neck. SLEEVE EDGE: Work 1 single crochet in every double crochet/2 single crochets along every double crochet row along armhole – start right after flounce, work along armhole and to the flounce. Place flounce edge to edge to this sleeve edge (on both front and back piece) and fasten with small, neat stitches. Work the other sleeve edge the same way and fasten flounce. TIE: Cut 3 lengths of 3 metres each with Cotton Merino. Twine the strands tog until they resist, fold them double so that they twine again. Make a knot at each end. Baste the yarn up and down through first row with eyelet holes - start mid front. Tie a bow at the front. |
|||||||||||||||||||||||||||||||||||||||||||
Diagram explanations |
|||||||||||||||||||||||||||||||||||||||||||
|
|||||||||||||||||||||||||||||||||||||||||||
 |
|||||||||||||||||||||||||||||||||||||||||||
 |
|||||||||||||||||||||||||||||||||||||||||||
 |
|||||||||||||||||||||||||||||||||||||||||||
Have you finished this pattern?Tag your pictures with #dropspattern #californiadreamtop or submit them to the #dropsfan gallery. Do you need help with this pattern?You'll find 10 tutorial videos, a Comments/Questions area and more by visiting the pattern on garnstudio.com. © 1982-2026 DROPS Design A/S. We reserve all rights. This document, including all its sub-sections, has copyrights. Read more about what you can do with our patterns at the bottom of each pattern on our site. |
|||||||||||||||||||||||||||||||||||||||||||


With over 40 years in knitting and crochet design, DROPS Design offers one of the most extensive collections of free patterns on the internet - translated to 17 languages. As of today we count 324 catalogs and 12290 patterns - 12280 of which are translated into English (US/in).
We work hard to bring you the best knitting and crochet have to offer, inspiration and advice as well as great quality yarns at incredible prices! Would you like to use our patterns for other than personal use? You can read what you are allowed to do in the Copyright text at the bottom of all our patterns. Happy crafting!
Post a comment to pattern DROPS 190-21
We would love to hear what you have to say about this pattern!
If you want to leave a question, please make sure you select the correct category in the form below, to speed up the answering process. Required fields are marked *.