
Popular categories
Looking for a yarn?


Comments / Questions (193)
![]() Patricia wrote:
Patricia wrote:
Bonjour, ce modèle est très joli mais dommage que les explications ne soit facile à comprendre. Le dos est fait qu'avec le point de bride ou y a t'il des dessins. Le volant de ta taille est crocheté à part et assemble après ?
05.05.2019 - 11:09DROPS Design answered:
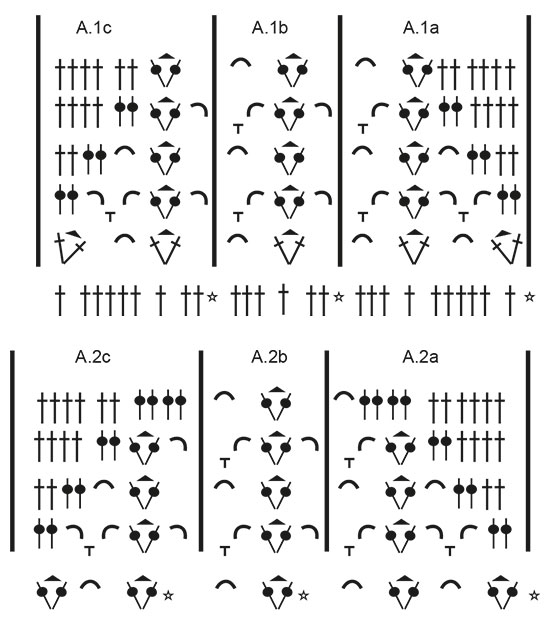
Bonjour Patricia, on ne crochète les diagrammes A.1 et A.2 que sur le devant, le dos se crochète uniquement en brides. Quand l'ouvrage mesure 14-17 cm (cf taille), on continue les 2 pièces en rond (après les emmanchures) = volant de la taille - en crochetant A.4 cf DOS & DEVANT. Bon crochet!
06.05.2019 - 09:53
![]() Irene wrote:
Irene wrote:
Ik heb mijn werk uitgehaald, ik had de uitleg verkeerd begrepen. Ik denk dat ik het nu snap! Ik hoef dus geen antwoord meer op mijn eerdere vraag.
24.04.2019 - 17:04
![]() Irene wrote:
Irene wrote:
Ik heb het voorpand gehaakt; A1 ben ik begonnen vanaf de eerste toer met 49 lossen en zo verder tot en met a3. De punt aan de voorkant op de foto bij a3 zit aan de onderkant terwijl bij mijn haakwerk de punt aan de bovenkant uitkomt. Het lijkt nu net of a1 tot en met a3 los gehaakt moet worden en laten vast moeten worden gemaakt. Ik snap het niet meer, wat doe ik fout? Bedankt voor uw antwoord
24.04.2019 - 15:28DROPS Design answered:
Dag Irene,
Je haakt het werk van boven naar beneden, dus vanaf de hals naar beneden. Kan het zijn dat je hierdoor in de war bent? Je haakt eerst het voor en achterpand apart van elkaar en daarna haak je ze samen verder in de rondte naar beneden. (De telpatronen lees je van onder naar boven.)
25.04.2019 - 11:51
![]() Nubia Vargas wrote:
Nubia Vargas wrote:
Esta hermosa, pero no le logrado entender el diagrama,
23.04.2019 - 03:10DROPS Design answered:
Hola Nubia. En el siguiente link explican cómo leer el diagrama: https://www.garnstudio.com/lesson.php?id=69&cid=23
07.05.2019 - 11:10
![]() Kerre wrote:
Kerre wrote:
For the back piece, do you increase until the piece measures 6.25 inches or just until you have 87 stitches (size xl) and continue without increasing until you get to 6.25 inches?
11.04.2019 - 07:13DROPS Design answered:
Dear Kerre, on back piece, increase 1 stitch on each side every row a total of 15 times (= 30 stitches increased = there are 87 double crochets, continue then without increasing until piece measures 6 5/8" (make sure to finish on same row as on front piece). Happy crocheting!
11.04.2019 - 09:23
![]() Häkelita1 wrote:
Häkelita1 wrote:
Diesen Teil verstehe ich leider nicht. Nach welchem Muster soll man denn häkeln und wie funktionieren die Zunahmen, wenn sie ungerade sind (z.B. 3)?? In der nächsten Reihe mit den Zunahmen beidseitig beginnen und GLEICHZEITIG im Muster häkeln, dafür wie folgt arbeiten: Je 1 Stäbchen beidseitig zunehmen (= 2 Stäbchen zugenommen) – ZUNAHMETIPP-1 lesen. In dieser Weise in jeder Reihe insgesamt 3-5-8-13-14-15 x zunehmen, dann in jeder 2. Reihe insgesamt 5-5-3-0-0-0 x....
13.03.2019 - 13:25DROPS Design answered:
Liebe Häkelita1, Sie häkeln wie im Muster und gleizeitig nehmen Sie 1 Masche beidseitig zu - in der 1. Grösse nehmen Sie 3 x in jeder Reihe (= nach 3 Reihen haben Sie insgesamt 6 Stb zugenommen), und dann in jeder 2. Reihe 5 x (= nach 10 Reihen haben Sie 10 Maschen zugenommen. Viel Spaß beim häkeln!
13.03.2019 - 15:10
![]() Marica wrote:
Marica wrote:
Do you have a picture of the back? I plan on making a continuous straight stitching from the bust down no lower edging. No decrease or increase to body after the bust.
16.02.2019 - 08:44DROPS Design answered:
Dear Marica, we do not have any picture for the back piece, you just crochet with dc increasing on each side, ie without the lace pattern as on the front. Happy crocheting!
18.02.2019 - 09:07
![]() Emilia wrote:
Emilia wrote:
Guten Tag. Ich würde dieses top gerne nach häkeln. Die Anleitung ist für Mich etwas kompliziert. Ich versehe leider nicht was mit beidseitiges Maschen zunehmen gemeint ist. Danke im vorraus LG Emilia
06.02.2019 - 08:15DROPS Design answered:
Liebe Emilia, Sie häkeln im Muster (A.1a, A.1b und A.1c) und gleichzeitig nehmen Sie 1 Masche auf beiden Seiten (= 1 M am Anfang + 1 Maschen am Ende der Reihe) 3-15 x in jeder Reihe (siehe Grösse) und dann in jeder 2. Reihe in die 3 ersten Grösse. Viel Spaß beim häkeln!
06.02.2019 - 09:16
![]() Lucille wrote:
Lucille wrote:
A.1c over the next 9 double crochets and 1 double crochet in each of the last 0-1-1-2-3-4 double crochets. I have finished A. 1c over the 9 double crochets but there 15 extra double crochets after that. So what should I do to end this row? Please help!
03.02.2019 - 17:32DROPS Design answered:
Dear Lucille, you should work in the pattern and increase at the same time, ie you will work first row in pattern increasing at the same time on each side so that your number of sts should match. Happy crocheting!
04.02.2019 - 12:53
![]() Lucille wrote:
Lucille wrote:
After working A. 1a where do you join the chain 2 to begin A. 1b.
03.02.2019 - 16:50DROPS Design answered:
Dear Lucille, at the end of A.1a, you crochet 2 chains and skip next 3 sts, at the beg of A.1B, skip next 2 sts (= a total of 5 sts are now skipped) and crochet A.1b in the next st. Happy crocheting!
04.02.2019 - 12:44
|
|||||||||||||||||||||||||||||||||||||||||||
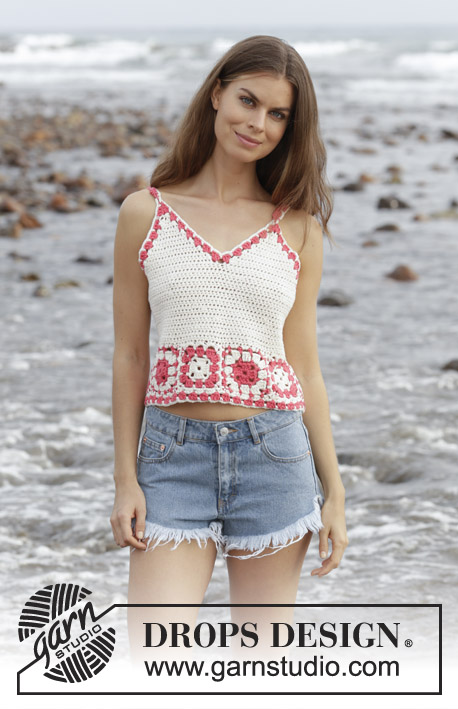
California Dream#californiadreamtop |
|||||||||||||||||||||||||||||||||||||||||||
 |
 |
||||||||||||||||||||||||||||||||||||||||||
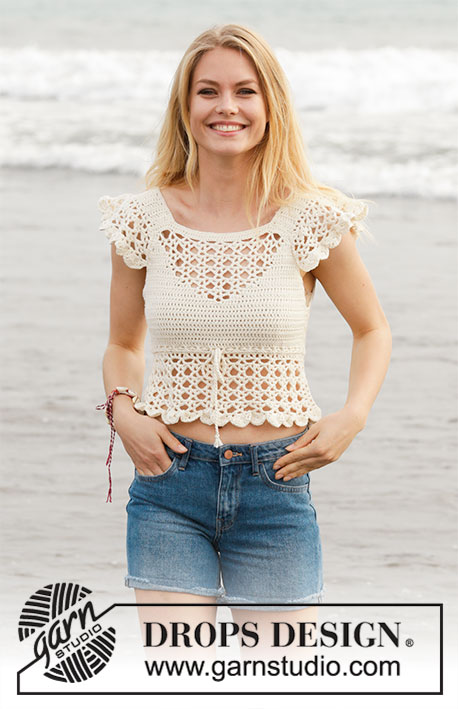
Crocheted top with lace pattern and flounce. Size: S - XXXL Piece is crocheted in DROPS Cotton Merino.
DROPS 190-21 |
|||||||||||||||||||||||||||||||||||||||||||
|
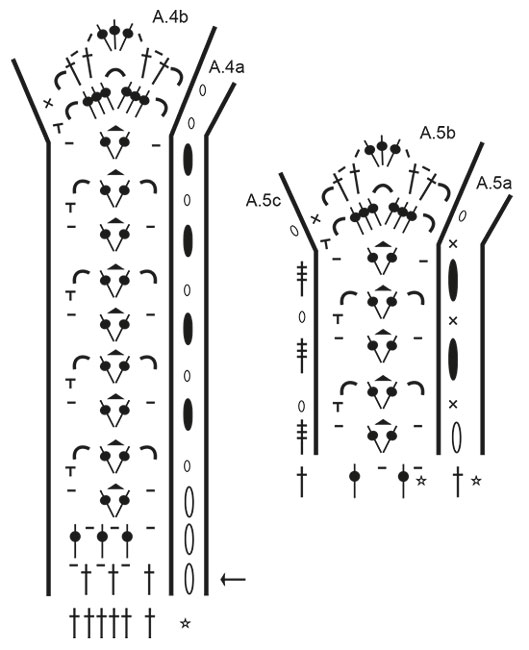
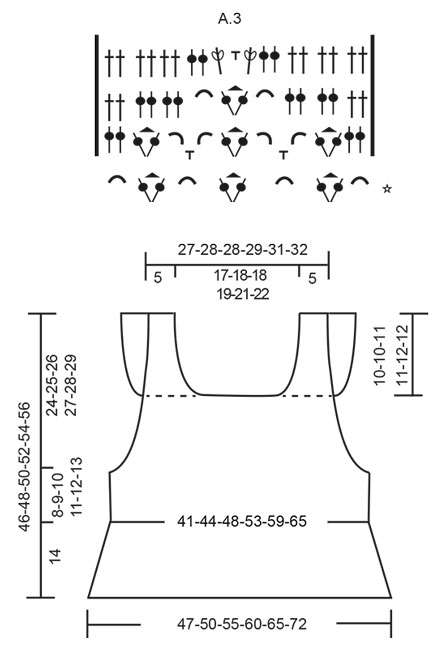
INFORMATION FOR PATTERN: PATTERN: See diagrams A.1 to A.5. INCREASE TIP-1: Increase 1 double crochet by working 2 double crochets in same stitch. CROCHET TIP-1 (applies to body but not diagram): Replace first double crochet at beginning of every row with 3 chain stitches. CROCHET TIP-2 (applies to body but not diagram): When working in the round, replace first treble with 3 chain stitches, finish round with 1 slip stitch in 3rd chain stitch at beginning of round. DECREASE TIP: Decrease by working 2 double crochets together. INCREASE TIP-2 (evenly): To calculate how to increase evenly, use the total number of double crochets on row (e.g. 146 double crochets) and divide double crochets by number of increases to be done (e.g. 22) = 6.6. In this example increase by working 2 double crochets in same double crochet alternately approx. every 6th and 7th double crochet. ---------------------------------------------------------- TOP: Piece is worked back and forth, top down, work front and back piece separately down to armhole, then work in the round over both parts. Then work straps from bottom up and then work flounces back and forth on straps, fasten flounce to front/back piece. FRONT PIECE: Work 51-53-53-55-57-59 chain stitches (including 3 chain stitches to turn with) on hook size 5 mm / H/8 with Cotton Merino. Switch to hook size 4 mm / G/6, turn and work 1 double crochet in 4th chain stitch from hook (= 2 double crochets), work 1 double crochet in each of the next 47-49-49-51-53-55 chain stitches = 49-51-51-53-55-57 double crochets. On next row begin increase in each side of piece AT THE SAME TIME work pattern as follows: Increase 1 double crochet in each side of piece (= 2 double crochets increased) - read INCREASE TIP-1. Increase like this every row 3-5-8-13-14-15 times in total, and then every other row 5-5-3-0-0-0 times in total = 65-71-73-79-83-87 double crochets on last row. Work next row as follows, begin from right side: Read CROCHET TIP-1 – work 1 double crochet in each of the first 0-1-1-2-3-4 double crochets, A.1a over the next 10 double crochets, repeat A.1b over the next 30 double crochets (= 5 times in total in width), A.1c over the next 9 double crochets and 1 double crochet in each of the last 0-1-1-2-3-4 double crochets. Continue until A.1 has been work 1 time vertically. REMEMBER THE CROCHET GAUGE! Then work as follows, begin from wrong side: Work 1 double crochet in every double crochet until 1 double crochet remains before first chain space, work A.2c, repeat A.2b 3 times in total in width, A.2a and 1 double crochet in every double crochet the entire row. Continue until A.2 has been worked vertically. Then work as follows, begin from wrong side: Work 1 double crochet in every double crochet until first chain space, work A.3 and 1 double crochet in every double crochet the rest of row. Continue until A.3 has been worked vertically. Now work 1 double crochet in every stitch until piece measures 14-15-15-16-16-17 cm / 5 ½"-5⅞"-5⅞"-6 ¼"-6 ¼"-6⅝". Fasten off, turn. Put piece aside. BACK PIECE: Work 51-53-53-55-57-59 chain stitches (including 3 chain stitches to turn with) on hook size 5 mm / H/8 with Cotton Merino. Switch to hook size 4 mm / G/6, turn and work 1 double crochet in 4th chain stitch from hook (= 2 double crochets), work 1 double crochet in each of the next 47-49-49-51-53-55 chain stitches = 49-51-51-53-55-57 double crochets. Then work 1 double crochet in every double crochet - AT THE SAME TIME increase 1 double crochet in each side of piece - remember INCREASE TIP-1. Increase like this every row 8-10-11-13-14-15 times in total = 65-71-73-79-83-87 double crochets on last row. When piece measures 14-15-15-16-16-17 cm / 5 ½"-5⅞"-5⅞"-6 ¼"-6 ¼"-6⅝" (adjust according to front piece), fasten off, turn. BODY: Now work the two parts together as follows: Work 4-4-7-8-12-15 chain stitches for armhole, 1 double crochet in each of the 65-71-73-79-83-87 double crochets from back piece, work 8-8-14-16-24-30 chain stitches for armhole, 1 double crochet in each of the 65-71-73-79-83-87 double crochets from front piece, work 4-4-7-8-12-15 chain stitches for armhole and finish with 1 slip stitch in first chain stitch at beginning of round. Then work piece in the round, continue with 1 double in every double/chain stitch = 146-158-174-190-214-234 double crochets. When working in the round, turn after every round to work alternately from right side and wrong side. This is so that the texture is the same on the entire top - read CROCHET TIP-2. Insert 1 marker thread in each side, in the middle of the 8-8-14-16-24-30 chain stitches. NOW MEASURE THE PIECE FROM HERE! Continue like this until piece measures 8-9-10-11-12-13 cm / 3⅛"-3½"-4"-4⅜"-4¾"-5⅛". Now work in the round according to diagram A.4 while at the same time increasing on first round (round marked with arrow in diagram) as follows: Work A.4b 28-30-33-36-39-43 times in total on round – A.4a shows how rounds begin and end and is worked in addition to A.4b – AT THE SAME TIME increase 11-11-12-13-10-12 chain spaces (= 1 double crochet + 1 chain stitch) evenly – read INCREASE TIP-2 = 84-90-99-108-117-129 chain spaces (= 1 double crochet + 1 chain stitch). Continue in the round, i.e. always work pattern from right side. When A.4 is done vertically, fasten off. STRAPS: Now work a strap back and forth in cast-on edge on front piece over the first 8-9-9-9-10-10 double crochets. Work 1 double crochet in every double crochet until strap measures 10-10-11-11-12-12 cm / 4"-4"-4⅜"-4⅜"-4¾"-4¾". Fasten off. Work 1 strap over the first 8-9-9-9-10-10 double crochets in the other side the same way. Work straps the same way on back piece. Sew tog straps on shoulder. FLOUNCE: Work back and forth over every row on strap (= 20-20-22-22-24-24 cm / 7⅞"-7⅞"-8⅝"-8⅝"-9⅜"-9⅜"). Begin from wrong side and work 1 double crochet in first row, * 1 chain stitch, 1 double crochet around row *, work from *-* along the entire strap – adjust so that there are 26-26-28-28-30-30 chain spaces (= 1 chain stitch + 1 double crochet) on this row, finish with 1 double crochet in last row = 1 double crochet in each side and 26-26-28-28-30-30 chain spaces (= 1 chain stitch + 1 double crochet). Turn and work as follows from right side: A.5a, A.5b 13-13-14-14-15-15 times in total in width, finish with A.5c. Continue this pattern until A.5 is done vertically, fasten off. Work flounce on the other strap the same way. NECK EDGE: Work 1 single crochet in every double crochet/2 single crochets along every double crochet row along the entire neck. SLEEVE EDGE: Work 1 single crochet in every double crochet/2 single crochets along every double crochet row along armhole – start right after flounce, work along armhole and to the flounce. Place flounce edge to edge to this sleeve edge (on both front and back piece) and fasten with small, neat stitches. Work the other sleeve edge the same way and fasten flounce. TIE: Cut 3 lengths of 3 metres each with Cotton Merino. Twine the strands tog until they resist, fold them double so that they twine again. Make a knot at each end. Baste the yarn up and down through first row with eyelet holes - start mid front. Tie a bow at the front. |
|||||||||||||||||||||||||||||||||||||||||||
Diagram explanations |
|||||||||||||||||||||||||||||||||||||||||||
|
|||||||||||||||||||||||||||||||||||||||||||
 |
|||||||||||||||||||||||||||||||||||||||||||
 |
|||||||||||||||||||||||||||||||||||||||||||
 |
|||||||||||||||||||||||||||||||||||||||||||
Have you finished this pattern?Tag your pictures with #dropspattern #californiadreamtop or submit them to the #dropsfan gallery. Do you need help with this pattern?You'll find 10 tutorial videos, a Comments/Questions area and more by visiting the pattern on garnstudio.com. © 1982-2026 DROPS Design A/S. We reserve all rights. This document, including all its sub-sections, has copyrights. Read more about what you can do with our patterns at the bottom of each pattern on our site. |
|||||||||||||||||||||||||||||||||||||||||||


With over 40 years in knitting and crochet design, DROPS Design offers one of the most extensive collections of free patterns on the internet - translated to 17 languages. As of today we count 324 catalogs and 12290 patterns - 12280 of which are translated into English (US/in).
We work hard to bring you the best knitting and crochet have to offer, inspiration and advice as well as great quality yarns at incredible prices! Would you like to use our patterns for other than personal use? You can read what you are allowed to do in the Copyright text at the bottom of all our patterns. Happy crafting!
Post a comment to pattern DROPS 190-21
We would love to hear what you have to say about this pattern!
If you want to leave a question, please make sure you select the correct category in the form below, to speed up the answering process. Required fields are marked *.