
Popular categories
Looking for a yarn?


Comments / Questions (194)
![]() Janick DORWLING CARTER wrote:
Janick DORWLING CARTER wrote:
Bonjour, je viens d'arriver aux 71 mailles avant de commencer les diagrammes Si, je suis les explications, il me reste 3 mailles en fin de rangs pouvez vous m'aider je vous remercie sincèrement
28.06.2019 - 15:29DROPS Design answered:
Bonjour Mme Dorwling Carter, vous devez augmenter en même temps que vous crochetez en point fantaisie, vous allez donc, dès le 1er rang crocheter ainsi en taille M: 1 augm, A.1a (= 10 brides), A.1b (= 3 0 brides), A.1c (= 9brides), 1 augm = 51 brides + 2 augmentations = 53 brides. Continuez A.1 en augmentant encore 4 fois tous les rangs et 5 fois tous les 2 rangs = 71 brides quand toutes les augmentations sont faites, continuez A.1 s'il n'est pas fini. Bon crochet!
28.06.2019 - 15:42
![]() Nicole Vena wrote:
Nicole Vena wrote:
I just worked the straps and you say to work them until they measure 10 cm. Then to start the flounce it says to start working on the side of the strap and it should be 20 cm. I don't understand how it should measure 20 cm to start crocheting into the side to start the flounce.
02.06.2019 - 18:40DROPS Design answered:
Dear Mrs Vena, you work the straps in 4 parts (1 on each side of the front piece + 1 on each side of the back piece), so that you will have for each strap: 10 cm from front/back piece + 10 cm from back/front piece = 20 cm for the total length of each strap. Happy crocheting!
03.06.2019 - 10:23
![]() Helena wrote:
Helena wrote:
Este patrón ni concuerda con la imagen, es imposible hacerlo.
23.05.2019 - 19:59
![]() Debora wrote:
Debora wrote:
Buonasera, sempre Debora...... Ora devo lavorare il diagramma A.4 . Come si eseguono gli aumenti lavorando il diagramma? Devo lavorare 2 (maglia alta + catenella ) nella stessa maglia di base? Così facendo ci creano però degli archi nei quadrati della riga....sbaglio?
13.05.2019 - 17:22DROPS Design answered:
Buongiorno Debora. Per aumentare deve lavorare, a intervalli regolari, 1 m.alta e 1 cat in più. Può provare a lavorare questa maglia alta aggiuntiva nella maglia del giro precedente che andrebbe saltata. In questa riga traforata andrà poi infilato il cordino, quindi eventuali irregolarità dovrebbero essere meno visibili. Buon lavoro!
14.05.2019 - 08:29
![]() Debora wrote:
Debora wrote:
Grazie!! Siete sempre cortesi e tempestivi. Credo che vi dovrò interpellare spesso....Grazie di nuovo
09.05.2019 - 09:18
![]() Debora wrote:
Debora wrote:
Buongiorno, sono di nuovo Debora. Grazie per la risposta precedente, ma continuo ad avere difficoltà....Come faccio a seguire lo schema se il numero delle maglie aumenta ad ogni riga visto che ai due lati man mano devo aggiungere maglie? Mi potreste spiegare più precisamente come fare gli aumenti lavorando lo schema? Chiedo perdono, ma sono agli inizi.....Grazie
09.05.2019 - 08:19DROPS Design answered:
Buongiorno Debora. Aumenta 1 maglia alta all'inizio e alla fine della riga. Le maglie aumentate vengono poi lavorate come maglie alte. Quindi aumenta il numero di maglie alte lavorate prima e dopo i diagrammi. I diagrammi continua a lavorarli sulle stesse maglie. Ci riscriva se non è chiaro. Buon lavoro!
09.05.2019 - 08:59
![]() Debora wrote:
Debora wrote:
Buongiorno, ho appena iniziato a lavorare il davanti ed ho realizzato le prime 14 righe di maglia alte ottenendo 65 maglie. Ora devo iniziare con A.1a,A.1b, A, 1c che però va lavorato su 40 maglie (10+30+9+1). Potreste spiegarmi meglio come procedere? Sto lavorando una S. Grazie!
08.05.2019 - 07:26DROPS Design answered:
Buongiorno Debora. Deve iniziare a lavorare i diagrammi quando ha 49 maglie; quindi gli aumenti vengono fatti mentre lavora i diagrammi. Buon lavoro!
08.05.2019 - 08:45
![]() Patricia wrote:
Patricia wrote:
Super, merci pour vos réponses, maintenant j ai compris . Bonne journée.
06.05.2019 - 12:32
![]() Patricia wrote:
Patricia wrote:
Pouvez simplifier la partie dos & devant. Merci
05.05.2019 - 18:16DROPS Design answered:
Bonjour Patricia, si les réponses précédentes ne vous ont pas aidées, merci de bien vouloir préciser votre demande. Rappelez-vous que votre magasin pourra vous apporter toute l'aide et l'assistance nécessaire (même par mail ou téléphone) à la réalisation de ce modèle. Bon crochet!
06.05.2019 - 10:09
![]() Patricia wrote:
Patricia wrote:
Dommage que les explication soit pas claire pour quel modele que ce soit
05.05.2019 - 11:18
|
|||||||||||||||||||||||||||||||||||||||||||
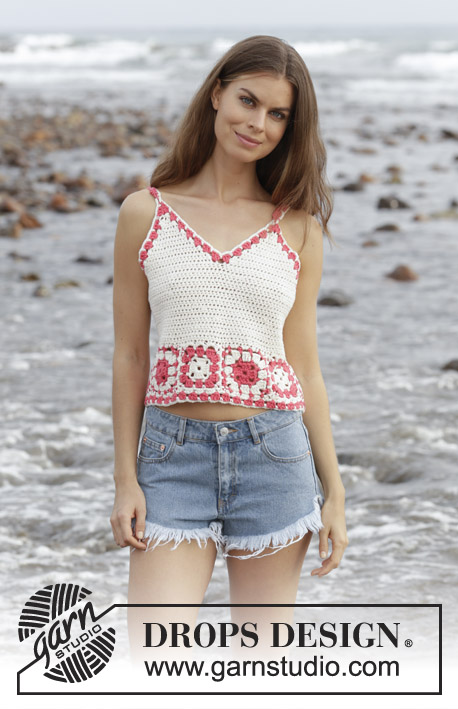
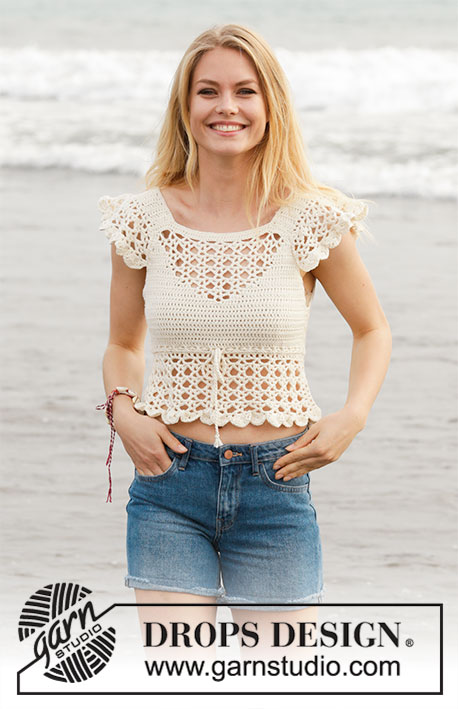
California Dream#californiadreamtop |
|||||||||||||||||||||||||||||||||||||||||||
 |
 |
||||||||||||||||||||||||||||||||||||||||||
Crocheted top with lace pattern and flounce. Size: S - XXXL Piece is crocheted in DROPS Cotton Merino.
DROPS 190-21 |
|||||||||||||||||||||||||||||||||||||||||||
|
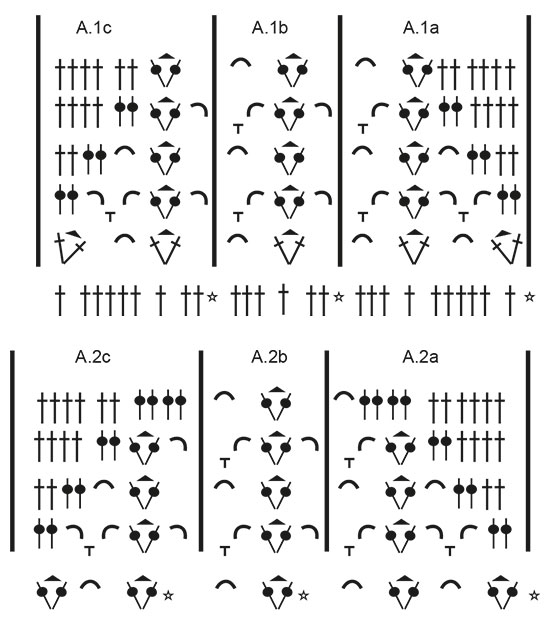
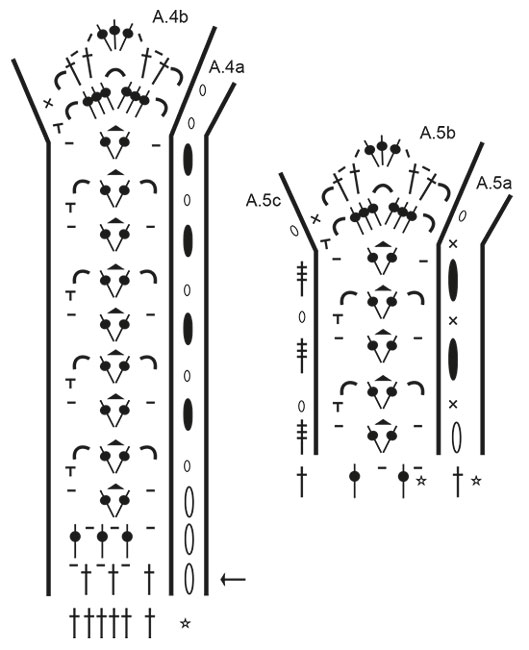
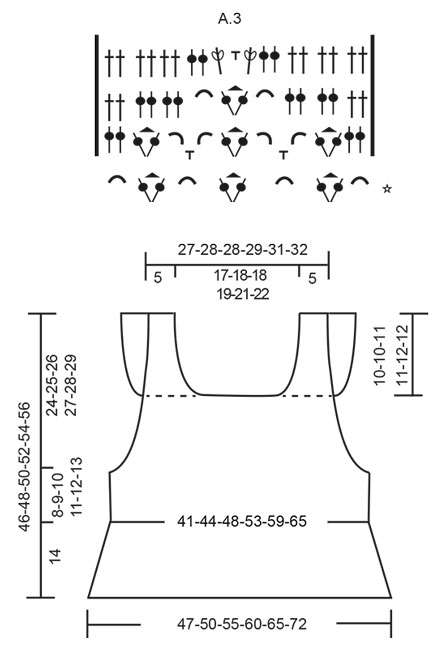
INFORMATION FOR PATTERN: PATTERN: See diagrams A.1 to A.5. INCREASE TIP-1: Increase 1 double crochet by working 2 double crochets in same stitch. CROCHET TIP-1 (applies to body but not diagram): Replace first double crochet at beginning of every row with 3 chain stitches. CROCHET TIP-2 (applies to body but not diagram): When working in the round, replace first treble with 3 chain stitches, finish round with 1 slip stitch in 3rd chain stitch at beginning of round. DECREASE TIP: Decrease by working 2 double crochets together. INCREASE TIP-2 (evenly): To calculate how to increase evenly, use the total number of double crochets on row (e.g. 146 double crochets) and divide double crochets by number of increases to be done (e.g. 22) = 6.6. In this example increase by working 2 double crochets in same double crochet alternately approx. every 6th and 7th double crochet. ---------------------------------------------------------- TOP: Piece is worked back and forth, top down, work front and back piece separately down to armhole, then work in the round over both parts. Then work straps from bottom up and then work flounces back and forth on straps, fasten flounce to front/back piece. FRONT PIECE: Work 51-53-53-55-57-59 chain stitches (including 3 chain stitches to turn with) on hook size 5 mm / H/8 with Cotton Merino. Switch to hook size 4 mm / G/6, turn and work 1 double crochet in 4th chain stitch from hook (= 2 double crochets), work 1 double crochet in each of the next 47-49-49-51-53-55 chain stitches = 49-51-51-53-55-57 double crochets. On next row begin increase in each side of piece AT THE SAME TIME work pattern as follows: Increase 1 double crochet in each side of piece (= 2 double crochets increased) - read INCREASE TIP-1. Increase like this every row 3-5-8-13-14-15 times in total, and then every other row 5-5-3-0-0-0 times in total = 65-71-73-79-83-87 double crochets on last row. Work next row as follows, begin from right side: Read CROCHET TIP-1 – work 1 double crochet in each of the first 0-1-1-2-3-4 double crochets, A.1a over the next 10 double crochets, repeat A.1b over the next 30 double crochets (= 5 times in total in width), A.1c over the next 9 double crochets and 1 double crochet in each of the last 0-1-1-2-3-4 double crochets. Continue until A.1 has been work 1 time vertically. REMEMBER THE CROCHET GAUGE! Then work as follows, begin from wrong side: Work 1 double crochet in every double crochet until 1 double crochet remains before first chain space, work A.2c, repeat A.2b 3 times in total in width, A.2a and 1 double crochet in every double crochet the entire row. Continue until A.2 has been worked vertically. Then work as follows, begin from wrong side: Work 1 double crochet in every double crochet until first chain space, work A.3 and 1 double crochet in every double crochet the rest of row. Continue until A.3 has been worked vertically. Now work 1 double crochet in every stitch until piece measures 14-15-15-16-16-17 cm / 5 ½"-5⅞"-5⅞"-6 ¼"-6 ¼"-6⅝". Fasten off, turn. Put piece aside. BACK PIECE: Work 51-53-53-55-57-59 chain stitches (including 3 chain stitches to turn with) on hook size 5 mm / H/8 with Cotton Merino. Switch to hook size 4 mm / G/6, turn and work 1 double crochet in 4th chain stitch from hook (= 2 double crochets), work 1 double crochet in each of the next 47-49-49-51-53-55 chain stitches = 49-51-51-53-55-57 double crochets. Then work 1 double crochet in every double crochet - AT THE SAME TIME increase 1 double crochet in each side of piece - remember INCREASE TIP-1. Increase like this every row 8-10-11-13-14-15 times in total = 65-71-73-79-83-87 double crochets on last row. When piece measures 14-15-15-16-16-17 cm / 5 ½"-5⅞"-5⅞"-6 ¼"-6 ¼"-6⅝" (adjust according to front piece), fasten off, turn. BODY: Now work the two parts together as follows: Work 4-4-7-8-12-15 chain stitches for armhole, 1 double crochet in each of the 65-71-73-79-83-87 double crochets from back piece, work 8-8-14-16-24-30 chain stitches for armhole, 1 double crochet in each of the 65-71-73-79-83-87 double crochets from front piece, work 4-4-7-8-12-15 chain stitches for armhole and finish with 1 slip stitch in first chain stitch at beginning of round. Then work piece in the round, continue with 1 double in every double/chain stitch = 146-158-174-190-214-234 double crochets. When working in the round, turn after every round to work alternately from right side and wrong side. This is so that the texture is the same on the entire top - read CROCHET TIP-2. Insert 1 marker thread in each side, in the middle of the 8-8-14-16-24-30 chain stitches. NOW MEASURE THE PIECE FROM HERE! Continue like this until piece measures 8-9-10-11-12-13 cm / 3⅛"-3½"-4"-4⅜"-4¾"-5⅛". Now work in the round according to diagram A.4 while at the same time increasing on first round (round marked with arrow in diagram) as follows: Work A.4b 28-30-33-36-39-43 times in total on round – A.4a shows how rounds begin and end and is worked in addition to A.4b – AT THE SAME TIME increase 11-11-12-13-10-12 chain spaces (= 1 double crochet + 1 chain stitch) evenly – read INCREASE TIP-2 = 84-90-99-108-117-129 chain spaces (= 1 double crochet + 1 chain stitch). Continue in the round, i.e. always work pattern from right side. When A.4 is done vertically, fasten off. STRAPS: Now work a strap back and forth in cast-on edge on front piece over the first 8-9-9-9-10-10 double crochets. Work 1 double crochet in every double crochet until strap measures 10-10-11-11-12-12 cm / 4"-4"-4⅜"-4⅜"-4¾"-4¾". Fasten off. Work 1 strap over the first 8-9-9-9-10-10 double crochets in the other side the same way. Work straps the same way on back piece. Sew tog straps on shoulder. FLOUNCE: Work back and forth over every row on strap (= 20-20-22-22-24-24 cm / 7⅞"-7⅞"-8⅝"-8⅝"-9⅜"-9⅜"). Begin from wrong side and work 1 double crochet in first row, * 1 chain stitch, 1 double crochet around row *, work from *-* along the entire strap – adjust so that there are 26-26-28-28-30-30 chain spaces (= 1 chain stitch + 1 double crochet) on this row, finish with 1 double crochet in last row = 1 double crochet in each side and 26-26-28-28-30-30 chain spaces (= 1 chain stitch + 1 double crochet). Turn and work as follows from right side: A.5a, A.5b 13-13-14-14-15-15 times in total in width, finish with A.5c. Continue this pattern until A.5 is done vertically, fasten off. Work flounce on the other strap the same way. NECK EDGE: Work 1 single crochet in every double crochet/2 single crochets along every double crochet row along the entire neck. SLEEVE EDGE: Work 1 single crochet in every double crochet/2 single crochets along every double crochet row along armhole – start right after flounce, work along armhole and to the flounce. Place flounce edge to edge to this sleeve edge (on both front and back piece) and fasten with small, neat stitches. Work the other sleeve edge the same way and fasten flounce. TIE: Cut 3 lengths of 3 metres each with Cotton Merino. Twine the strands tog until they resist, fold them double so that they twine again. Make a knot at each end. Baste the yarn up and down through first row with eyelet holes - start mid front. Tie a bow at the front. |
|||||||||||||||||||||||||||||||||||||||||||
Diagram explanations |
|||||||||||||||||||||||||||||||||||||||||||
|
|||||||||||||||||||||||||||||||||||||||||||
 |
|||||||||||||||||||||||||||||||||||||||||||
 |
|||||||||||||||||||||||||||||||||||||||||||
 |
|||||||||||||||||||||||||||||||||||||||||||
Have you finished this pattern?Tag your pictures with #dropspattern #californiadreamtop or submit them to the #dropsfan gallery. Do you need help with this pattern?You'll find 10 tutorial videos, a Comments/Questions area and more by visiting the pattern on garnstudio.com. © 1982-2026 DROPS Design A/S. We reserve all rights. This document, including all its sub-sections, has copyrights. Read more about what you can do with our patterns at the bottom of each pattern on our site. |
|||||||||||||||||||||||||||||||||||||||||||


With over 40 years in knitting and crochet design, DROPS Design offers one of the most extensive collections of free patterns on the internet - translated to 17 languages. As of today we count 324 catalogs and 12290 patterns - 12280 of which are translated into English (US/in).
We work hard to bring you the best knitting and crochet have to offer, inspiration and advice as well as great quality yarns at incredible prices! Would you like to use our patterns for other than personal use? You can read what you are allowed to do in the Copyright text at the bottom of all our patterns. Happy crafting!
Post a comment to pattern DROPS 190-21
We would love to hear what you have to say about this pattern!
If you want to leave a question, please make sure you select the correct category in the form below, to speed up the answering process. Required fields are marked *.