
Popular categories
Looking for a yarn?


Comments / Questions (20)
![]() Joane wrote:
Joane wrote:
Is het patroon aan de achterzijde hetzelfde als bij het voorpand? Of worden de 10 naalden steeds herhaald?
25.06.2018 - 10:49DROPS Design answered:
Dag Joane, Het patroon is op het voor- en achterpand hetzelfde. Dus nadat je de 10 naalden vanaf de ster hebt gedaan, herhaal je het patroon vanaf de eerste naald van het telpatroon. (Je start dus alleen bij de ster, maar daarna pak je wel steeds het hele telpatroon in de hoogte)
25.06.2018 - 10:59
![]() Ann wrote:
Ann wrote:
Ik begin net met de trui en in de beschrijving van het achterpand staan 4 naalden beschreven voor de schouder. Na deze 4 naalden staat dat het werk 4 cm zou zijn? En bij de andere schouder zijn er ineens 9 naalden ipv 4. Hier is iets vergeten...
24.06.2018 - 21:31DROPS Design answered:
Dan Ann, Er stond inderdaad een foutje in de Nederlandse vertaling. Het is nu gecorrigeerd en deze zin is toegevoegd na naald 2: Herhaal de 1e en 2e naald nog 3 keer (= 4 keer in totaal) = 8 naalden.
25.06.2018 - 11:06
![]() Maria Elisdotter wrote:
Maria Elisdotter wrote:
Hej! Jag ser varken beskrivningen till tröjan eller förklaring till diagrammet. Kan ni vara så snälla och lägga upp det på nytt! Tack ! Mia
21.03.2018 - 11:13DROPS Design answered:
Hei Maria. Oppskriften og diagramteksten er nå lagt ut. God Fornøyelse!
21.03.2018 - 12:08
![]() Pia Sanne Pedersen wrote:
Pia Sanne Pedersen wrote:
På 186-14 er der da ikke en fejl i beskrivelse på Hvad den sorte "prik" på linie 13 betyder. Det passer slet ikke med masketal og øvrigt samme beskrivelse som den med "trekanten" betyder?
09.03.2018 - 17:32DROPS Design answered:
Hej Pia, så er diagramforklaringen lagt ud. Tak for info og god fornøjelse!
14.03.2018 - 16:35
![]() Corbel Jocelyne wrote:
Corbel Jocelyne wrote:
Peut on avoir les explications j ai achete la laine pour le faire merci
26.02.2018 - 12:03DROPS Design answered:
Bonjour Mme Corbel, les explications seront bientôt disponibles, revenez vite! Bon tricot!
26.02.2018 - 12:58
![]() Corbel wrote:
Corbel wrote:
Peut on avoir les explications
10.02.2018 - 15:51
![]() Ledien Dominique wrote:
Ledien Dominique wrote:
Très belle encolure!
30.01.2018 - 18:44
![]() Anne Savage wrote:
Anne Savage wrote:
Beautiful design. Can't wait to make this! 😊
26.01.2018 - 18:49
![]() Tanja wrote:
Tanja wrote:
Apart model
30.12.2017 - 12:06
![]() Lisa wrote:
Lisa wrote:
Beautiful neckline contour.
19.12.2017 - 22:11
|
||||||||||||||||||||||
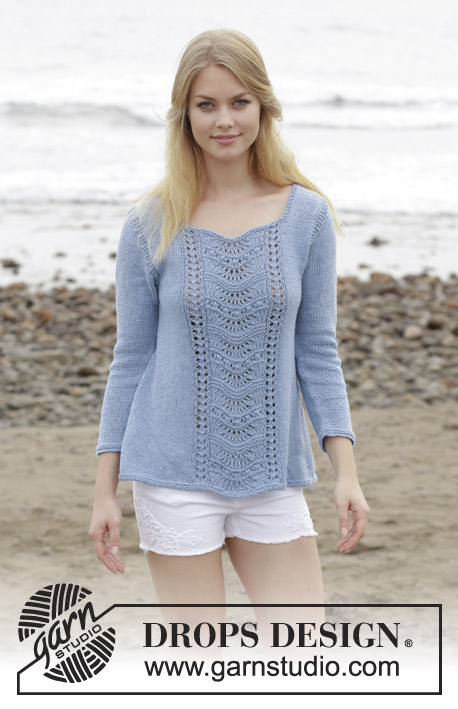
Key West Sweater#keywestsweater |
||||||||||||||||||||||
 |
 |
|||||||||||||||||||||
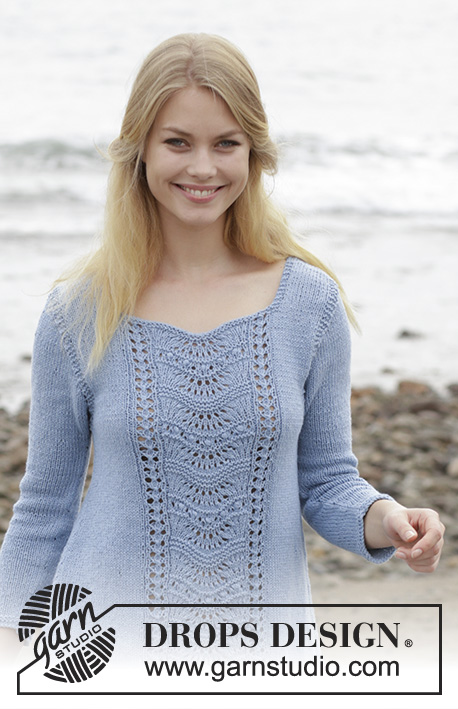
Sweater with lace pattern and A-shape, knitted top down. Size: S - XXXL Piece is knitted in DROPS Belle.
DROPS 186-14 |
||||||||||||||||||||||
|
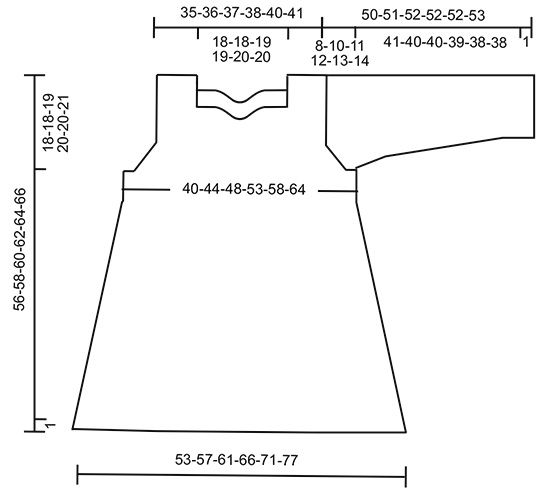
INFORMATION FOR PATTERN: GARTER STITCH (worked in the round): 1 ridge = 2 rounds. Knit 1 round and purl 1 round. GARTER STITCH (back and forth): 1 ridge = knit 2 rows. PATTERN: See diagrams A.1 and A.2. Diagrams show all rows in pattern seen from the right side. INCREASE TIP-1: All increases are done from right side. Increase 1 stitch by making 1 yarn over. On next row purl yarn over twisted to avoid hole. Work the new stitches in stockinette stitch. INCREASE TIP-2: Work until 1 stitch remains before marker in the side, make 1 yarn over, knit 2, make 1 yarn over. Repeat in the other side. On next round knit yarns over twisted to avoid holes. Work the new stitches in stockinette stitch. ---------------------------------------------------------- SWEATER: Worked top down. Work first front and back piece separately, back and forth down to armholes, then work body in the round. Work sleeves back and forth on circular needle. BACK PIECE: Work right shoulder as follows: Cast on 16-17-17-18-19-20 stitches on circular needle size 4.5 mm / US 7 with Belle. ROW 1 (= right side): 3 stitches in GARTER STITCH - see explanation above (= towards the neck), knit 10-11-11-12-13-14, 3 stitches in garter stitch (= towards armhole). ROW 2: 3 edge stitches in garter stitch, purl until 3 stitches remain, 3 edge stitches in garter stitch. Repeat 1st and 2nd row 3 more times (= 4 times in total) = 8 rows. On next row increase 1 stitch inside the 3 stitches in garter stitch towards the neck - read INCREASE TIP-1 = 17-18-18-19-20-21 stitches. Work 1 row from wrong side and put piece aside. Piece measures approx. 4 cm / 1½" from cast-on edge and down. Work left shoulder as follows: Cast on and work as right shoulder but reversed. I.e. when increasing 1 stitch towards the neck increase 1 stitch before the 3 stitches in garter stitch towards the neck on 9th row. Work 1 row from wrong side. Now work left and right shoulder together as follows: Turn piece (= left shoulder) and work as before over all stitches and cast on 35-35-37-37-39-39 new stitches for neck at the end of row, then work the 17-18-18-19-20-21 stitches from right shoulder on to needle = 69-71-73-75-79-81 stitches. REMEMBER THE GAUGE! Work the new stitches cast on for neck mid front in garter stitch, work the other stitches on back piece in stockinette stitch and garter stitch as before. When 2 ridges have been worked over the new stitches for neck, work pattern while at the same time increasing for armhole as follows: READ ALL OF THE FOLLOWING SECTION BEFORE CONTINUING! Begin from right side and work pattern as follows: 3 stitches in garter stitch, 13-14-15-16-18-19 stitches in stockinette stitch, A.1 (= 7 stitches), work from row with star in A.2 (= 23 stitches), A.1, 13-14-15-16-18-19 stitches in stockinette stitch, 3 stitches in garter stitch. Continue pattern back and forth like this (when diagrams have been worked vertically, repeat them vertically until finished measurements). AT THE SAME TIME when piece measures 16-14-14-12-11-9 cm / 6¼"-5½"-5½"-4⅝"-4¼"-3½" from cast-on edge on shoulder, increase 1 stitch inside the 3 stitches in garter stitch in each side for armhole. Increase like this on every row from right side 3-5-7-10-12-16 times in total = 75-81-87-95-103-113 stitches. Work 1 row from wrong side after last increase and put piece aside. Piece measures 18-18-19-20-20-21 cm / 7"-7"-7⅜"-7⅞"-7⅞"-8 ¼" from shoulder and down. Put piece aside and work the front piece. FRONT PIECE: Work left shoulder as follows: Cast on 16-17-17-18-19-20 stitches on circular needle size 4.5 mm / US 7 with Belle. ROW 1 (= right side): 3 stitches in GARTER STITCH - see explanation above (= towards the neck), knit 10-11-11-12-13-14, 3 stitches in garter stitch (= towards armhole). ROW 2: 3 edge stitches in garter stitch, purl until 3 stitches remain, 3 edge stitches in garter stitch. Repeat 1st and 2nd row 8 more times (= 9 times in total) = 18 rows. On next row increase 1 stitch inside the 3 stitches in garter stitch towards the neck as on back piece = 17-18-18-19-20-21 stitches. Work 1 row from wrong side and put piece aside. Piece measures approx. 8 cm / 3⅛" from cast-on edge and down. Work right shoulder as follows: Cast on and work as left shoulder but reversed. I.e. when increasing 1 stitch towards the neck increase 1 stitch before the 3 stitches in garter stitch towards the neck on 19th row. Work 1 row from wrong side. Now work right and left shoulder together as follows: Turn piece (= right shoulder) and work as before over all stitches and cast on 35-35-37-37-39-39 new stitches for neck at the end of row, then work the 17-18-18-19-20-21 stitches from left shoulder on to needle = 69-71-73-75-79-81 stitches. Work the new stitches cast on for neck mid front in garter stitch, work the other stitches on front piece in stockinette stitch and garter stitch as before. When 2 ridges have been worked over the new stitches for neck, work pattern while at the same time increasing for armhole as follows: READ ALL OF THE FOLLOWING SECTION BEFORE CONTINUING! Begin from right side and work pattern as follows: 3 stitches in garter stitch, 13-14-15-16-18-19 stitches in stockinette stitch, A.1 (= 7 stitches), work from 1st row in A.2 (= 23 stitches), A.1, 13-14-15-16-18-19 stitches in stockinette stitch, 3 stitches in garter stitch. Continue pattern back and forth like this (when diagrams have been worked vertically, repeat them vertically until finished measurements). AT THE SAME TIME when piece measures 16-14-14-12-11-9 cm / 6¼"-5½"-5½"-4⅝"-4¼"-3½" from cast-on edge on shoulder, increase 1 stitch inside the 3 stitches in garter stitch in each side for armhole. Increase like this on every row from right side 3-5-7-10-12-16 times in total = 75-81-87-95-103-113 stitches. Work 1 row from wrong side after last increase and put piece aside. Piece measures 18-18-19-20-20-21 cm / 7"-7"-7⅜"-7⅞"-7⅞"-8 ¼" from shoulder and down. Now work as follows from right side: Turn and work over all stitches on front piece, cast on 4-6-8-10-12-14 new stitches for armhole, insert a marker thread in the middle of these new stitches (= 2-3-4-5-6-7 stitches on each side of marker thread), work the 75-81-87-95-103-113 stitches from back piece on to same circular needle, and cast on 4-6-8-10-12-14 new stitches for armhole, insert a marker thread in the middle of these new stitches (= 2-3-4-5-6-7 stitches on each side of marker thread). BODY: = 158-174-190-210-230-254 stitches. NOW MEASURE PIECE FROM HERE! Then work in the round on circular needle. Work pattern and stockinette stitch as before, but over the middle 10-12-14-16-18-20 stitches in each side (i.e. 5-6-7-8-9-10 stitches on each side of marker thread in each side) work in garter stitch. When 2 ridges have been worked over stitches in each side, continue in stockinette stitch, A.1 and A.2 as before. When piece measures 4 cm / 1½", increase 2 stitches in each side of piece - read INCREASE TIP-2! Increase like this every 7th-7th-7th-7th-8th-8th round 13 times in total = 210-226-242-262-282-306 stitches. Continue until piece measures 37-39-40-41-43-44 cm / 14½"-15¼"-15¾"-16⅛"-16⅞"-17¼" (56-58-60-62-64-66 cm / 22"-22¾"-23⅝"-24⅜"-25¼"-26" in total from shoulder). Work 2 ridges. Bind off by knitting. To avoid a tight bind-off edge make 1 yarn over after approx. every 6th stitch. Bind off yarn overs as stitches. SLEEVES: Cast on 48-50-52-54-56-60 stitches on circular needle size 4.5 mm / US 7. Work 2 ridges back and forth. Then work in stockinette stitch with 1 edge stitch in garter stitch in each side. When piece measures 6-9-9-7-11-9 cm / 2⅜"-3½"-3½"-2¾"-4¼"-3½", increase 1 stitch inside 1 edge stitch in garter stitch in each side - remember INCREASE TIP-1. Increase like this every 20th-14th-10th-8th-6th-6th row 5-6-8-10-11-12 times, then when piece measures 37-36-36-35-34-34 cm / 14½"-14⅛"-14⅛"-13¾"-13⅜"-13⅜" (= after last increase) increase every other row 6 times = 70-74-80-86-90-96 stitches. Sleeve measures approx. 42-41-41-40-39-39 cm / 16½"-16⅛"-16⅛"-15¾"-15¼"-15¼". Now bind off for sleeve cap at beginning of every row in each side as follows: bind off 4-4-4-5-5-6 stitches 1 time, 2 stitches 5 times, 1 stitch 0-1-2-3-5-6 times, 2 stitches 4-5-5-5-5-5 times and 4 stitches 1 time = 18-16-20-22-22-24 stitches. Bind off the remaining stitches. Sleeve measures approx. 50-51-52-52-52-53 cm / 19⅝"-20"-20⅜"-20⅜"-20⅜"-20⅞". Work another sleeve the same way. ASSEMBLY: Sew the shoulder seams with grafting stitches. Sew sleeve to body under edge in garter stitch. Sew the seam under the sleeves. Make sure to avoid a tight seam. |
||||||||||||||||||||||
Diagram explanations |
||||||||||||||||||||||
|
||||||||||||||||||||||
 |
||||||||||||||||||||||
 |
||||||||||||||||||||||
Have you finished this pattern?Tag your pictures with #dropspattern #keywestsweater or submit them to the #dropsfan gallery. Do you need help with this pattern?You'll find 27 tutorial videos, a Comments/Questions area and more by visiting the pattern on garnstudio.com. © 1982-2026 DROPS Design A/S. We reserve all rights. This document, including all its sub-sections, has copyrights. Read more about what you can do with our patterns at the bottom of each pattern on our site. |
||||||||||||||||||||||


With over 40 years in knitting and crochet design, DROPS Design offers one of the most extensive collections of free patterns on the internet - translated to 17 languages. As of today we count 324 catalogs and 12290 patterns - 12280 of which are translated into English (US/in).
We work hard to bring you the best knitting and crochet have to offer, inspiration and advice as well as great quality yarns at incredible prices! Would you like to use our patterns for other than personal use? You can read what you are allowed to do in the Copyright text at the bottom of all our patterns. Happy crafting!
Post a comment to pattern DROPS 186-14
We would love to hear what you have to say about this pattern!
If you want to leave a question, please make sure you select the correct category in the form below, to speed up the answering process. Required fields are marked *.