
Popular categories
Looking for a yarn?


Comments / Questions (20)
![]() Ute Rudolf wrote:
Ute Rudolf wrote:
Hallo, ich habe Schultern zusammengesetzt und soll nun nach 10 cm am Ende der Reihen je 2 neue Maschen für den Armauschnitt anschlagen. Ab wo wird hier für die 10 cm gemessen? Ab der Stelle wo die Schultern zusammengesetzt werden, oder ab Markierer an der linken Schulter?
21.01.2025 - 14:40DROPS Design answered:
Liebe Frau Rudolf, messen Sie ab den Markierer beim linken /rechten Schulter, dh 2 cm mit beiden Schulter stricken, schlagen Sie die 2 Maschen am Ende der 2 nächsten Reihen. Viel Spaß beim Stricken!
21.01.2025 - 17:08
![]() Saadia Hamid wrote:
Saadia Hamid wrote:
Very beautiful paatern and comes out very well
27.02.2022 - 12:23
![]() Elisa wrote:
Elisa wrote:
Bonjour, J'ai réalisé l'échantillon comme conseillé, pour obtenir 10cm en largeur pour 24 mailles, j'ai dû utiliser des aiguilles 4,5 (j'ai vu dans les commentaires que vous conseillé d'augmenter de tailles d'aiguilles jusqu'à obtenir le bon nombre de centimètres) seulement, du coup, avec 34 rangs, je me retrouve avec 12cm de longueur... Comment faire s'il vous plaît ? Merci par avance, Elisa
27.11.2021 - 16:47DROPS Design answered:
Bonjour Elisa, vous tricotez Baby Merino? Tricotez un peu plus serré (cf nuancier) puis lavez et faites sécher votre échantillon (= bloquez-le), puis mesurez- le à nouveau. Si vos mesures en hauteur/largeur ne sont pas juste, ajustez la taille des aiguilles et essayez à nouveau. Dans ce type de modèle, il est important que la hauteur soit tout aussi juste que la largeur. Votre magasin pourra vous conseiller et aura des astuces pour vous - n'hésitez pas à le contacter, même par mail ou téléphone. Bon tricot!
29.11.2021 - 07:42
![]() Henna wrote:
Henna wrote:
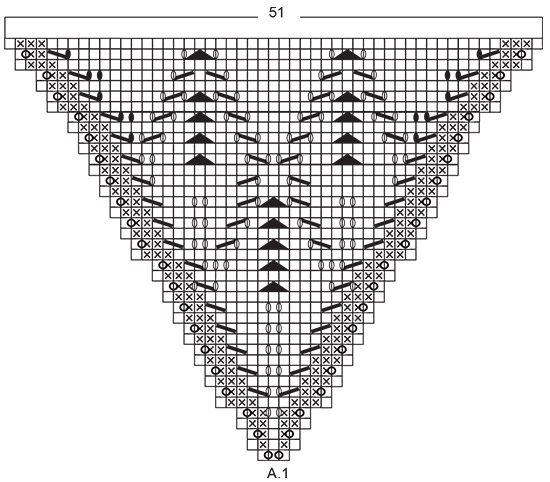
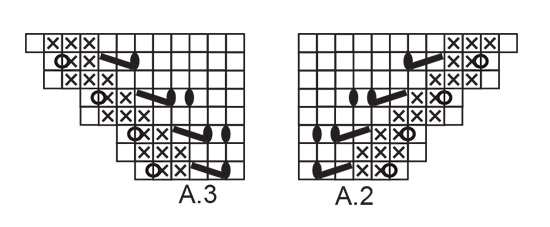
Hei! Olen neulomassa tätä paitaa kohdassa jossa pääntien silmukat on päätelty ja työtä jatketaan tasona. En kuitenkaan ymmärrä kuinka neulotaan 10 kerrosta mallikertoja A2 ja A3, sillä näiden kuvioiden ohjeissa on vain 8 kerrosta ruutupiirrosta.
24.03.2021 - 15:18DROPS Design answered:
Piirrosten A.2 ja A.3 mallikertoja jatketaan kuten aiemmin, eli pitsikuvio siirtyy koko ajan kohti reunoja kuten aiemmin.
24.03.2021 - 16:34
![]() Mariacristina wrote:
Mariacristina wrote:
Schema bellissimo lo sto realizzando per la mia bimba di sei mesi. è disponibile un disegno simile anche per adulti? Grazie mille
07.01.2021 - 17:12
![]() Anna wrote:
Anna wrote:
Hallo. Die Frage gab es schon auf Englisch , aber ich konnte die Antwort nicht komplett übersetzen. Ich habe das Quadrat gestrickt. Habe abgekettet und bin einmal rum. Ich verstehe das gerade an der Stelle nicht wo ich A.3 gestrickt habe und dann den Faden abschneiden soll. Warum schneide ich den Faden ab? Und soll ich dann an der Ecke umdrehen oder soll ich noch A.2 und die Maschen bis zum angeketteten Stück stricken und dann umdrehen? Danke für sie Antwort im Vorraus
21.05.2020 - 23:31DROPS Design answered:
Liebe Anna, am Anfang der vorrigen Runden haben Sie einige Maschen gestrickt, bevor Sie die Maschen abgekettet haben. Wenn diese Runde bis zur Ende gestrickt ist muss der Faden geschnitten sein, und jetzt in Reihen stricken, dh die Reihen beginnen jetzt links von den abgeketteten Maschen (Rückreihe), damit Sie alle Maschen von der Rückseite stricken können. Viel Spaß beim stricken!
22.05.2020 - 10:06
![]() Josie Jestis wrote:
Josie Jestis wrote:
I knit the initial square, bound off for the neck, & reattached the yarn. Do I start the first back and forth row by knitting the 7 stockinette stitches or the A.2 diagram? When I have completed the 10 rows for the smallest size, do I then work the A.2 & A.3 diagrams again? It seems like at this point I will have already worked the diagrams on the outermost 6 stitches of the corners of the square. Thanks for the clarification.
01.08.2019 - 21:39DROPS Design answered:
Dear Mrs Jestis, after you have worked the rows casting off the stitches for neck, cut the yarn, then turn (= next row will be worked from WS) and join yarn after the stitches cast off for neck, starting with the 7 sts in stocking st, then A.3, A.2 and so on to the 7 sts in stocking st at the end of the row. this means you are now working along the 4 sides of the square but starting from one side of neck to the other side of neck. Work a total of 10 rows inA.2/A.3. Happy knitting!
07.08.2019 - 09:31
![]() Helen - Knitter wrote:
Helen - Knitter wrote:
I would like to congratulate you on your site.I knit continuously, and I would like you to know that yours is the the most professional, friendly, easy and generous site I have used.You have lots of interesting patterns, but more than that, I am able to download them.So many sites demand signup before you can even look at patterns.You cater to language and size change between countries...Thank you.I am VERY happy to recommend you to other knitters.Keep up the great site...and be proud.
13.07.2019 - 05:47
![]() Josie Jestis wrote:
Josie Jestis wrote:
Hi, I am making the DROPS Baby31-13 sweater with the drops baby merino yarn. I’ve made several swatches & my gauge is wrong. I swatched with US size 4 (3.5mm) & 5 (3.75mm). My gauges are 27 st x 36.75 rows(size 4) and 26.25 st x 32.5 rows (size 5) after washing & blocking a 6” square. You are calling for 24 st x 34 rows. For this, I’ll need to go up to size 6 or 7 and then my row gauge will be all wrong. Is the pattern gauge correct? How can I figure out what I am doing wrong?
14.06.2019 - 17:13DROPS Design answered:
Dear Mrs Jestis, you should try with larger needles, you might work somewhat tight - read more about tension here. Happy knitting!
17.06.2019 - 09:25
![]() Renate wrote:
Renate wrote:
Die Anleitung lässt sich nicht vollständig ausdrucken, es wird nur eine Seite gedruckt.
30.03.2019 - 09:53DROPS Design answered:
Liebe Renate, alle Seiten sollten ausgedruckt werden, prüfen Sie mal die Druckeinstellungen, damit alle Seiten gedruckt werden. Viel Spaß beim stricken!
01.04.2019 - 12:07
|
||||||||||||||||||||||||||||
Spring Princess#springprincesssweater |
||||||||||||||||||||||||||||
 |
 |
|||||||||||||||||||||||||||
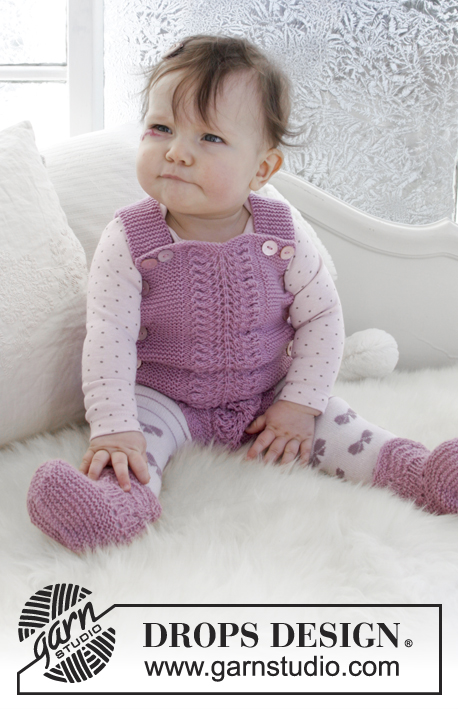
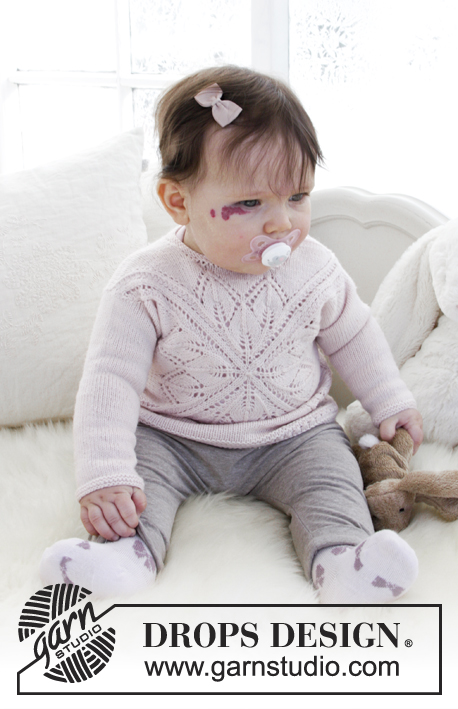
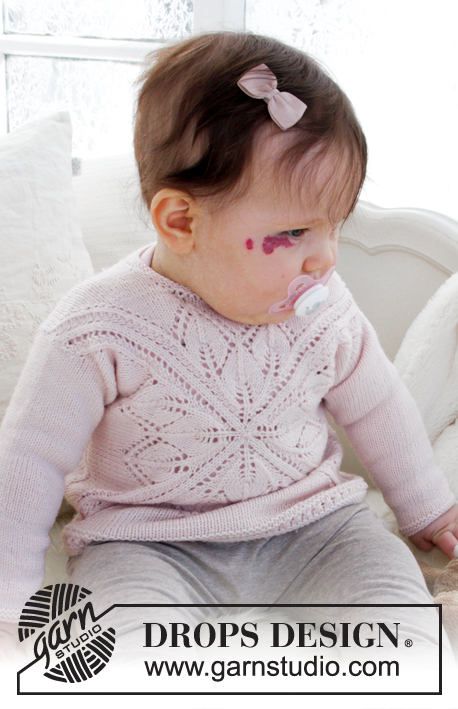
Knitted sweater in a square with lace pattern for baby. Size 1 month - 4 years Piece is knitted in DROPS BabyMerino.
DROPS Baby 31-13 |
||||||||||||||||||||||||||||
|
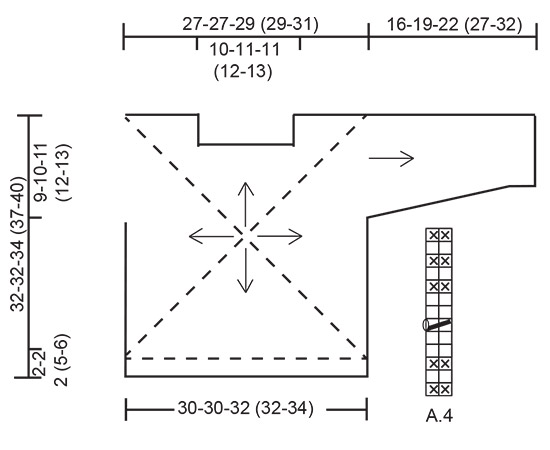
INFORMATION FOR PATTERN: GARTER STITCH (back and forth): 1 ridge = knit 2 rows. GARTER STITCH (worked in the round): 1 ridge = 2 rounds. Knit 1 round and purl 1 round. PATTERN: See diagrams A.1 to A.4. Diagrams show all rows in pattern seen from the right side. DECREASE TIP (applies to sleeves): Decrease 1 stitch on each side of marker as follows: Decrease 1 stitch after marker as follows: Knit 1, slip 1 stitch knitwise, knit 1, pass slipped stitch over (= 1 stitch decreased). Decrease 1 stitch before marker as follows: Work until 3 stitches remain before marker, knit the next 2 stitches together (= 1 stitch decreased = 2 stitches decreased in total). ---------------------------------------------------------- SWEATER: Piece is first worked in the round in a square from middle of front piece and out towards neck and sides, then continue back and forth. Work over to back piece, slip shoulder together and work down back piece. Finish with an edge at the bottom of sweater in the round on circular needle. For sleeves pick up stitches, work them top down, in the round on double pointed needles. FRONT PIECE: Worked in the round. Cast on 6 stitches on double pointed needles size 3 mm / US 2.5 with BabyMerino, switch to circular needle when needed. Knit 1 round. On next round increase as follows: * Knit 1, 1 yarn over *, work from *-* = 12 stitches, knit yarn overs twisted on next round, they should not make holes. Then work A.1 4 times in total, insert 1 marker between every A.1 (= 4 markers). REMEMBER THE GAUGE! When diagram A.1 has been worked 1 time vertically, there are 204 stitches on needle (= 51 stitches on each of the sides). Piece now measures approx. 24 cm at the widest. Now bind off for neck as follows: Work A.2 (= 6 stitches), work 7-6-6 (5-4) stitches in stockinette stitch, bind off the next 25-27-27 (29-31) stitches for neck, work 7-6-6 (5-4) stitches in stockinette stitch, work A.3 (= 6 stitches), A.2 over the next 6 stitches, * work in stockinette stitch until 6 stitches remain before next marker, A.3 over the next 6 stitches, A.2 over the next 6 stitches *, work from *-* 2 times in total, work in stockinette stitch until 6 stitches remain before last marker, A.3 over the last 6 stitches, cut the yarn. Displace the round so that next row will start from the neck. Work A.2 as before and in stockinette stitch over the remaining 7-6-6 (5-4) stitches for neck decrease. Now work back and forth. Work 10-10-12 (12-16) row in total of A.2, A.3 and stockinette stitch. Repeat diagram A.2 and A.3 vertically over the outermost 6 stitches on each side of markers in each corner = 235-233-249 (247-269) stitches. Piece measures approx. approx. 30-30-32 (32-34) cm on the widest. Now work next row as follows from right side: Knit 20-19-21 (20-22) (= until 1st marker = right shoulder), knit the next 22-24-26 (29-31) stitches, slip them on a stitch holder (= stitches for right sleeve), bind off the next 43-41-43 (40-44) stitches (= until 2nd marker = right side), knit 65-65-69 (69-75), slip them on a stitch holder (= until 3rd marker = bottom edge. Slip these stitches together with stitch from back piece later and work a lace pattern over these), bind off the next 43-41-43 (40-44) stitches (= left side), knit the next 22-24-26 (29-31) stitches, slip them on a stitch holder (= until 4th marker = stitches for left sleeve), knit the remaining 20-19-21 (20-22) stitches (= left shoulder). Now work back piece over stitches as follows: BACK PIECE: LEFT SHOULDER: Insert 1 marker in piece, NOW MEASURE PIECE FROM HERE! Cast on 1 stitch on next row from wrong side = 21-20-22 (21-23) stitches. Work the new stitch in GARTER STITCH – see explanation above, (pick up stitches for sleeve inside this stitch later). Work 2 cm / ¾" in stockinette stitch with 1 edge stitch in garter stitch towards shoulder, then cast on 13-14-14 (15-16) stitches for neck at the end of next row from right side = 34-34-36 (36-39) stitches. Then work in stockinette stitch with 1 edge stitch in garter stitch in each side of piece. When piece measures 8 cm / 3⅛" (= 6 cm / 2⅜" vent), adjust to finish with 1 row from right side, put piece aside and work right shoulder as follows: RIGHT SHOULDER: Work as left shoulder but reversed, i.e. cast on 1 stitch towards sleeve at the end of first row from right side and cast on 13-14-14 (15-16) stitches for neck at the end of row from wrong side. When piece measures 8 cm / 3⅛", adjust to finish with 1 row from right side, work shoulder together as follows: First work over stitches from right shoulder as follows: Work 1 edge stitch in garter stitch, purl 32-32-34 (34-37), 1 stitch in garter stitch, then work over stitches from left shoulder as follows, 1 stitch in garter stitch, purl 32-32-34 (34-37), 1 edge stitch in garter stitch = 68-68-72 (72-78) stitches. Then work piece in stockinette stitch with 1 edge stitch in garter stitch in each side of piece. When piece measures 9-10-11 (12-13) cm cast on 2 new stitch for armholes at the end of the next 2 rows = 72-72-76 (76-82) stitches. Then work piece in stockinette stitch over all stitches. Work until back piece measures 30-30-32 (32-34) cm at the longest, adjust measurement according to front piece, back piece and front piece should now be the same length. Keep stitches on needle. ASSEMBLY: Sew side seams in outer loops of edge stitches. Then work an edge at the bottom of sweater over stitches from both front and back piece as follows: BOTTOM EDGE: Slip stitches from stitch holder at the bottom of front piece onto same circular needle as stitches from back piece = 137-137-145 (145-157) stitches. Now continue in the round. Knit 1 round and increase 7 stitches evenly over front piece = 144-144-152 (152-164) stitches. Work 0-0-0 (3-4) cm/0"-0"-0" (1"-1½") in stockinette stitch. Then work A.4 over all stitches. Bind off by knitting when A.4 has been worked 1 time vertically. Edge measures approx. 2-2-2 (5-6) cm. Piece measures approx. 32-32-34 (37-40) / 12½"-12½"-13½" (14½"-15¾") cm in total from shoulder. SLEEVE: Work sleeves in the round on double pointed needles, top down. Slip stitches from stitch holder on front piece in one side on double pointed needles size 3 mm / US 2.5 (= 22-24-26 (29-31) stitches) and pick up from right side 22-24-26 (29-31) stitches evenly over back piece inside 1 edge stitch, from shoulder and down to and with where the 2 new stitches were cast on (i.e. pick up approx. 1 stitch in each of the 2 stitches cast on for armhole on back piece) = 44-48-52 (58-62) stitches. Insert 1 marker mid under sleeve. Work in stockinette stitch. When sleeve measures 2 cm / ¾", decrease 1 stitch on each side of marker - READ DECREASE TIP! Decrease like this every 4-3-2½ (2½-3) cm/1½"-1"-⅞" (⅞"-1") , 3-5-6 (8-9) times in total = 38-38-40 (42-44) stitches. When piece measures 15-18-21 (26-31) cm, work 3 ridges over all stitches. Bind off by knitting. Make sure to avoid a tight bind-off edge, bind off with 1 larger needle size if needed. Sleeve measures approx. 16-19-22 (27-32) cm/ 6¼"-7½"-8¾" (10½"-12½"). Work the other sleeve the same way. NECK EDGE: Work piece back and forth from mid back. I.e. pick up stitch from right side from right shoulder on back piece, over front piece and over left shoulder on back piece. Pick up approx. 55 to 74 stitches. Work 3 ridges. Bind off by knitting. Make sure to avoid a tight bind-off edge, bind off with 1 larger needle size if needed. STRAP: Now work a strap for buttoning button at the top of neck on back piece. Work 1 slip stitch on left shoulder in last stitch cast on in neck, work 6 chain stitch and finish with 1 slip stitch in same stitch as the first. Fasten off. Sew on button inside 1 edge stitch in garter stitch at the top of neck on back piece on right shoulder. |
||||||||||||||||||||||||||||
Diagram explanations |
||||||||||||||||||||||||||||
|
||||||||||||||||||||||||||||
 |
||||||||||||||||||||||||||||
 |
||||||||||||||||||||||||||||
 |
||||||||||||||||||||||||||||
Have you finished this pattern?Tag your pictures with #dropspattern #springprincesssweater or submit them to the #dropsfan gallery. Do you need help with this pattern?You'll find 34 tutorial videos, a Comments/Questions area and more by visiting the pattern on garnstudio.com. © 1982-2026 DROPS Design A/S. We reserve all rights. This document, including all its sub-sections, has copyrights. Read more about what you can do with our patterns at the bottom of each pattern on our site. |
||||||||||||||||||||||||||||


With over 40 years in knitting and crochet design, DROPS Design offers one of the most extensive collections of free patterns on the internet - translated to 17 languages. As of today we count 324 catalogs and 12290 patterns - 12280 of which are translated into English (US/in).
We work hard to bring you the best knitting and crochet have to offer, inspiration and advice as well as great quality yarns at incredible prices! Would you like to use our patterns for other than personal use? You can read what you are allowed to do in the Copyright text at the bottom of all our patterns. Happy crafting!
Post a comment to pattern DROPS Baby 31-13
We would love to hear what you have to say about this pattern!
If you want to leave a question, please make sure you select the correct category in the form below, to speed up the answering process. Required fields are marked *.