
Popular categories
Looking for a yarn?


Comments / Questions (93)
![]() Netty Van Der Burgt wrote:
Netty Van Der Burgt wrote:
Ik kom echt niet uit het telpatroon. Te beginnen bij telpatroon A.1b. Waar loopt toer 1 door naar toer 2 enz. Ik moet eerlijk zeggen dat ik al vaker een van jullie patronen geprobeerd heb maar er echt niet uitkom. Ik ben toch al een redelijk ervaren haakster.
21.06.2018 - 14:02DROPS Design answered:
Dag Netty, Je haakt A.1b 4 keer in de rondte (de eerste toer haak je in de lossnlus), zodat je weer aan het begin uitkomt. Op de tweede toer begin je met 3 lossen (het zwartegkleurde ovale symbool van A.1a) en dan haak je 2 stokjes om de lossenlus, 2 stokjes om de volgende lossenlus, enz.
25.06.2018 - 10:41
![]() Cilla wrote:
Cilla wrote:
Hej! I diagram A.1b förstår jag inte hur varvet ovanför varv 8, den med en 14-luftmaskbåge, ska vara. Är varv 9: ... stolpgrupp, 3 luftmaskor, stolpgrupp, 5 luftmaskor? Hur ser i så fall varv 10 ut? Om jag följer varven i diagrammet uppifrån (för att förstå dem) ser 3-luftmaskbågen ovanför 14-luftmaskbågen (mellan de två nedersta stolpgrupperna) inte ut att tillhöra något varv alls.
20.06.2018 - 16:56
![]() Cilla wrote:
Cilla wrote:
Hej! I diagram A.1b förstår jag inte hur varvet ovanför varv 8, den med en 14-luftmaskbåge, ska vara. Är varv 9: ... stolpgrupp, 3 luftmaskor, stolpgrupp, 5 luftmaskor? Hur ser i så fall varv 10 ut? Om jag följer varven i diagrammet uppifrån (för att förstå dem) ser 3-luftmaskbågen ovanför 14-luftmaskbågen (mellan de två nedersta stolpgrupperna) inte ut att tillhöra något varv alls.
20.06.2018 - 16:40DROPS Design answered:
Hei Cilla. Vi har nå sett over dette diagrammet, og du har rett i at noe ikke stemmer. Det var en rad for mye ytterst i A.1b, denne er nå blitt fjernet. På 9 omgang over de 14 lm hekler du slik: stavgruppe (3 staver, 4 lm, 3 staver), 3 lm, stavgruppe (3 staver, 4 lm, 3 staver). Altså den omvendte V-en (3 lm) tilhører omgang 9. Den første omgangen med 6 lm, 1 fm om luftmaskebuen, 6 lm er omgang 10. Når A.1 er ferdig heklet og du hekler A.2, vær obs på at A.2c hekles totalt 6 ganger (ikke 7) som et resultat av korrigeringen i diagrammet til A.1. Oppskriftsteksten er oppdatert med denne informasjonen. Takk for beskjed og god fornøyelse.
27.06.2018 - 08:50
![]() Evelyn wrote:
Evelyn wrote:
Guten Tag, es heißt beim Beenden des Rumpfteils: "A.3 in Runden weiterhäkeln (d.h. die 9 Runde in der Höhe wiederholen), ....daran angepasst, dass nach einer Runde mit Stäbchengruppen geendet wird. " Ist die letze Runde nun eine Stäbchenbruppenrunde oder folgt noch eine mit Luftmaschenbögen....bei A4 ist die die Vorrunde nämlich mit Luftmaschenbögen dargestellt. Vielen Dank im Voraus!
18.06.2018 - 08:38
![]() Jacqueline wrote:
Jacqueline wrote:
Jammer, als ik dit allemaal lees, ik begin er niet aan..sorry.
09.06.2018 - 19:16
![]() Sandra wrote:
Sandra wrote:
Ik kom ook maar tot 8 boogjes in de laatste toer van patroon A1b. Er zitten 3 losse tussen de eerste twee stokjesgroepen,maar het lijkt wel of het daar niet goed gaat .
02.06.2018 - 00:16DROPS Design answered:
Dag Sandra, Bij natellen lijkt het er inderdaad op dat er te veel boogjes getekend zijn in het telpatroon. Ik heb het doorgegeven aan de designafdeling zodat het gecontroleerd kan worden.
03.06.2018 - 19:49
![]() JoAnnah wrote:
JoAnnah wrote:
In de 16e toer eindig ik met 8 boogjes van 6 lossen en niet met 9 zoals het patroon laat zien, ondanks steeds weer tellen en opnieuw haken. Waar kan de fout zitten?
31.05.2018 - 23:08DROPS Design answered:
Dag JoAnnah, Waarschijnlijk zit er een foutje in het telpatroon. Ik heb het doorgegeven aan de designafdeling zodat het gecontroleerd kan worden. Hopelijk wordt het spoedig gecorrigeerd.
03.06.2018 - 19:51
![]() JoAnnah wrote:
JoAnnah wrote:
Het is mij niet duidelijk of de steek in A.1a de eerste steek van de toer vervangt, de laatste steek vervangt of wellicht extra gehaakt wordt.
30.05.2018 - 17:23DROPS Design answered:
Hoi JoAnnah, A1.a laat het begin en einde van de toer zien en wordt aanvullend op de rest van het telpatroon gehaakt, Dus je haakt A1.a dan 3 keer A1.b en sluit weer zoals beschreven staat bij de symbolen van A1.a (bij de beschrijving van de symbolen van A1.a staat zowel hoe je dit aan het begin als aan het einde van de toer doet)
31.05.2018 - 16:18
![]() Brigitta wrote:
Brigitta wrote:
Betreft butterfly Queen/ drops 186-11, \\r\\nMijn vraag is waar te beginnen, staat niet duidelijk aangegeven, symbolen niet allemaal beschreven, jammer want wil graag dit vest maken!
29.05.2018 - 23:09
![]() Emiliep wrote:
Emiliep wrote:
Bonjour, pardon d'insister mais regardez bien si comme vous dites il n'y a que 16 rangs on finis avec 8 arceaux de 6 mailles en l'air et non 9 !
22.05.2018 - 09:44DROPS Design answered:
Bonjour Emiliep, il y a bien 16 rangs dans A.1b et on a 9 arceaux dans A.1b au 16ème rang. Essayez de surligner chaque rang du diagramme dans une couleur différente pour bien suivre chacun des rangs. Votre magasin DROPS saura vous aider si besoin, même par mail ou téléphone. Bon crochet!
22.05.2018 - 10:00
|
|||||||||||||||||||||||||||||||||||||||||||||||||||||||||||||||||||||||||||||||||||||
Butterfly Queen#butterflyqueenjacket |
|||||||||||||||||||||||||||||||||||||||||||||||||||||||||||||||||||||||||||||||||||||
 |
 |
||||||||||||||||||||||||||||||||||||||||||||||||||||||||||||||||||||||||||||||||||||
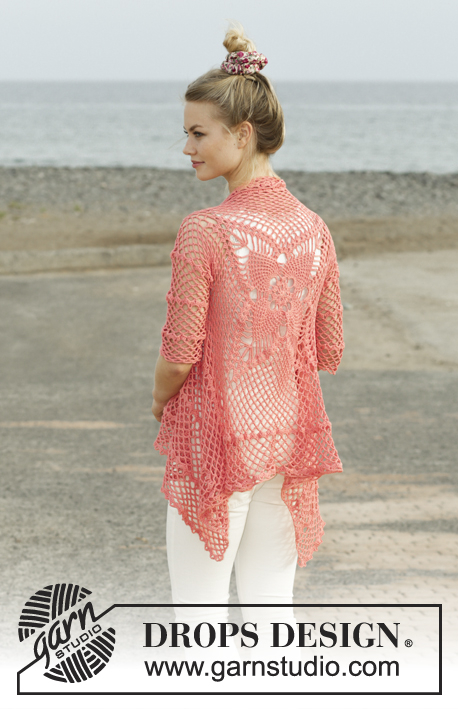
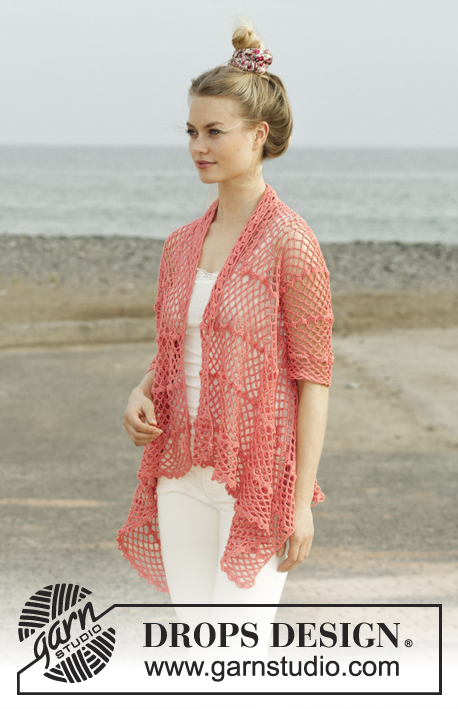
Crocheted jacket worked in a square with lace pattern. Size: S - XXXL Piece is crocheted in DROPS Flora.
DROPS 186-11 |
|||||||||||||||||||||||||||||||||||||||||||||||||||||||||||||||||||||||||||||||||||||
|
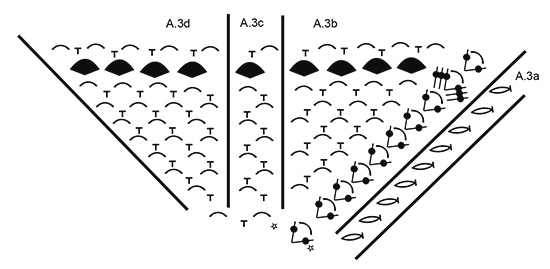
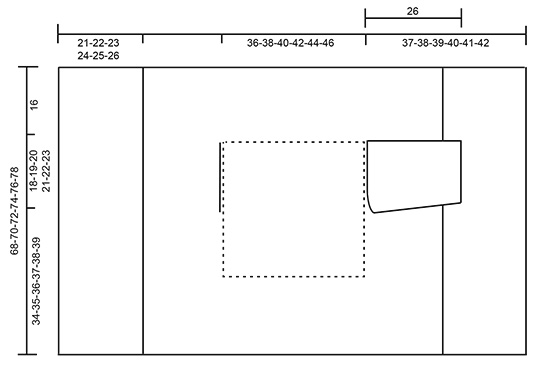
INFORMATION FOR PATTERN: PATTERN: See diagrams A.1 to A.4. CROCHET INFO (applies A.4): Replace first single crochet at beginning of row with 1 chain stitch. Replace first double treble crochet at beginning of row with 5 chain stitches. DECREASE TIP (applies to mid under sleeve): Work 5 chain stitches, skip 1 single crochet + 1 chain space, work 1 single crochet around next chain space + 1 chain space (= 1 repetition decreased), continue pattern as before until 1 chain space remains + 1 single crochet on previous row, skip these stitches and finish with 1 treble crochet in first chain stitch at beginning of previous row (= 1 repetition decreased). ---------------------------------------------------------- JACKET: Worked in the round from mid back on back and outwards as a square, then work back and forth on front pieces. Work sleeves back and forth from body, then sew them together under sleeve. Work 4 chain stitches on hook size 3.5 mm/E/4 with Flora and form a ring with 1 slip stitch in first chain stitch. Then work pattern in the round according to diagram A.1b 4 times in total on round - diagram A.1a shows how rounds begin and end and is worked in addition to A.1b. REMEMBER THE CROCHET GAUGE! When entire diagram A.1a and A.1b is cut the tread, and begin next round around chain space between last treble group worked and fasten thread with 1 slip stitch in this chain space. Now work in the round according to diagram A.2 as follows: * Work A.2b, repeat A.2c 6 times in total in width, A.2d *, repeat from *-* 4 times in total on round – diagram A.2a shows how rounds begin and end and are worked in addition to A.2b/c/d. When entire diagram A.2a and A.2b have been worked, square measures approx. 36 x 36 cm / 14¼" x 14¼". There are now 4 corner chain spaces (1 double crochet + 6 chain stitches + 1 double crochet) and 14 chain spaces along each of the sides on square. READ THE REST OF BODY BEFORE CONTINUING! Continue to work as follows: * Work A.3b around corner space, repeat A.3c until 1 chain space remains before corner, work A.3d around next chain space *, repeat from *-* 4 times in total on round – diagram A.3a shows how rounds begin and end and are worked in addition to A.3b/c/d. AT THE SAME TIME when piece measures approx. 36-38-40-42-44-46 cm / 14¼"-15"-15¾"-16½"-17¼"-18" x 36-38-40-42-44-46 cm / 14¼"-15"-15¾"-16½"-17¼"-18" work armholes as follows: Work A.3 as before until first corner, work around chain space as before. Now work chain stitches until middle of next side (i.e. in the middle between first and second corner) as follows: Work 1 chain stitch for every chain stitch/single crochet skipped. Then work pattern as before until the middle between 3rd and 4th corner. Now work chain stitches until 4th corner as follows: Work 1 chain stitch for every chain stitch/single crochet skipped, work around chain space in corner and the rest of round as before. On next round work A.3 as before over all stitches again (i.e. adjust pattern over armholes so that round is correct). Continue A.3 in the round (repeat the 9 rounds vertically) until square measures 68-70-72-74-76-78 cm / 26¾"-27½"-28⅜"-29⅛"-30"-30¾" x 68-70-72-74-76-78 cm / 26¾"-27½"-28⅜"-29⅛"-30"-30¾" (i.e. approx. 16 cm / 6¼" from armhole in all sizes) – adjust to finish after a round with treble groups. Cut the yarn and insert 1 marker in piece (between first and second corner). FRONT PIECE: Now work back and forth between first and second corner. NOTE! Work front pieces without increases. Read CROCHET INFO! Work A.4a around corner, repeat A.4b until 1 chain space remains before corner, work A.4c around this chain space and around corner. Continue pattern as shown in diagram and repeat A.4 vertically until row with treble groups has been worked 2 times in total vertically, then repeat only rows with chain spaces until piece measures approx. 19-20-21-22-23-24 cm / 7½"-8"-8¼"-8¾"-9"-9½" from marker, then work row with treble groups 1 time in all sizes. Piece now measures 21-22-23-24-25-26 cm / 8¼"-8¾"-9"-9½"-9¾"-10¼" from marker. Fasten off. Work the same way on the other side (i.e. work back and forth between third and fourth corner). SLEEVE: Work sleeve directly out from armhole on body. Work back and forth, top down and sew together when finished. Begin mid under sleeve and work as follows: Remember CROCHET INFO! Work A.4a around first chain space, repeat A.4b 15-16-17-18-19-20 times in total in width (adjust to distribute A.4b evenly along armhole, i.e. either 2 chain spaces must be worked around same chain space or skip 1 chain space), work A.4c around the last 2 chain spaces. Continue A.4 back and forth – AT THE SAME TIME when piece measures 4 cm / 1½" (adjust to work next row with chain stitches/single crochets) decrease 1 repetition in each side – read DECREASE TIP. Decrease like this approx. every 8-8-8-6-6-6 cm / 3"-3"-3"-2½"-2½"-2½" 3-3-3-4-4-4 times in total = 12-13-14-15-16-17 chain spaces of 6 stitches after last decrease. Continue until piece measures approx. 28 cm / 11" in all sizes - finish after a row with chain spaces. Fasten off. Work the other sleeve the same way in the other side of piece. ASSEMBLY: Sew the seems under the sleeves, sew in the outermost stitches and make sure that the seam does not tighten the piece. |
|||||||||||||||||||||||||||||||||||||||||||||||||||||||||||||||||||||||||||||||||||||
Diagram explanations |
|||||||||||||||||||||||||||||||||||||||||||||||||||||||||||||||||||||||||||||||||||||
|
|||||||||||||||||||||||||||||||||||||||||||||||||||||||||||||||||||||||||||||||||||||
 |
|||||||||||||||||||||||||||||||||||||||||||||||||||||||||||||||||||||||||||||||||||||
 |
|||||||||||||||||||||||||||||||||||||||||||||||||||||||||||||||||||||||||||||||||||||
 |
|||||||||||||||||||||||||||||||||||||||||||||||||||||||||||||||||||||||||||||||||||||
 |
|||||||||||||||||||||||||||||||||||||||||||||||||||||||||||||||||||||||||||||||||||||
Have you finished this pattern?Tag your pictures with #dropspattern #butterflyqueenjacket or submit them to the #dropsfan gallery. Do you need help with this pattern?You'll find 12 tutorial videos, a Comments/Questions area and more by visiting the pattern on garnstudio.com. © 1982-2026 DROPS Design A/S. We reserve all rights. This document, including all its sub-sections, has copyrights. Read more about what you can do with our patterns at the bottom of each pattern on our site. |
|||||||||||||||||||||||||||||||||||||||||||||||||||||||||||||||||||||||||||||||||||||


With over 40 years in knitting and crochet design, DROPS Design offers one of the most extensive collections of free patterns on the internet - translated to 17 languages. As of today we count 324 catalogs and 12290 patterns - 12280 of which are translated into English (US/in).
We work hard to bring you the best knitting and crochet have to offer, inspiration and advice as well as great quality yarns at incredible prices! Would you like to use our patterns for other than personal use? You can read what you are allowed to do in the Copyright text at the bottom of all our patterns. Happy crafting!
Post a comment to pattern DROPS 186-11
We would love to hear what you have to say about this pattern!
If you want to leave a question, please make sure you select the correct category in the form below, to speed up the answering process. Required fields are marked *.