
Popular categories
Looking for a yarn?


Comments / Questions (93)
![]() Greer Hayden wrote:
Greer Hayden wrote:
Jacket: after 3rd paragraph ending with...to A.3b/c/d. It says AT THE SAME TIME when piece measures approx................ How do you get the different sizes? The square would turn out the same size??
18.03.2019 - 21:00DROPS Design answered:
Dear Mrs Hayden, you continue w orkinjg with A.3b/c/d until piece measures 36-38-40-42-44-46 cm x 36-38-40-42-44-46 cm, ie depending on your size you will stop when piece measures eg 36 x 36 cm in first size, 38 x 38 cm in 2nd size and so on. Happy crocheting!
19.03.2019 - 10:27
![]() Laurent wrote:
Laurent wrote:
Pour le 3 ème tour il y a bien 5 mailles en l air entre chaque groupes de 11 brides ?
08.02.2019 - 13:46DROPS Design answered:
Bonjour Laurent, tout à fait! Bon crochet!
08.02.2019 - 14:07
![]() Laurent wrote:
Laurent wrote:
Bonjour pour le 2 éme tour de A1b , je fait bien 4 brides dans les arceaux de 5 mailles en l air du rang précédant et 2 brides , 14 mailles en l air et 2 brides dans les arceaux de 4 mailles en l air du rang précédant
08.02.2019 - 10:57DROPS Design answered:
Bonjour Laurent, tout à fait, mais au début du tour, vous commencez par 3 ml (vous avez crocheté des mailles coulées jusqu'au milieu de cet arceau à la fin du tour précédent), 2 brides dans le 1er arceau (= celui de 5 ml), et vous terminez le tour par 2 brides dans le même arceau que les 3 ml et 2 brides du début du tour. Bon crochet!
08.02.2019 - 12:02
![]() Bonita Colley wrote:
Bonita Colley wrote:
Is there a youtube that shows how to make this? I am advanced and can't make heads or tails out of this!
12.11.2018 - 01:25DROPS Design answered:
Dear Bonita, you can find the videos, related to this pattern at the left of the page, below the pictures. Also there are detailed explanation of the symbos of the pattern chart. If you need further help you can also ask for it in person in the store where you bought your DROPS yarn from. Happy Crafting!
12.11.2018 - 01:49
![]() Kat Arnett wrote:
Kat Arnett wrote:
Thanks for the reply. In the diagram < symbol was used for three chain stitches. You may want to change that on the chart
08.10.2018 - 18:09
![]() Kathryn wrote:
Kathryn wrote:
I'm confused about the symbol (3 dashes) when starting the front piece of Butterfly Queen in the beginning and end section A.4a & c. When I worked it as 3 times 6 chains or 18 chains after or before the double treble it didn't seem to work. What stitch should be used after or before the double treble in A.4 a & c?
08.10.2018 - 01:34DROPS Design answered:
Dear Kathryn, at the beg of row in A.4a you work 3 chains (= 3 dashes) after the first dtr on row, then 1 sc in same ch space, and 6 chains (= 5th symbol from diagram key) then repeat A.4b = 1 sc in next ch-space, 6 ch and finish with A.4c: 1 sc in next ch-space, 6 ch, 1 sc in next ch-space, 3 chains (= 3 dashes), 1 double treble in same ch-space. Happy crocheting!
08.10.2018 - 09:52
![]() Enap wrote:
Enap wrote:
Sg Team von drops design, ich habe eine Frage zum Diagramm A1a bzw. A1b: wieso werden in der 4. Runde nach den Anfangsluftmaschen nur vor den 11 Stäbchen 5 Luftmaschen gehäkelt und danach (vor den 3 Stäbchen) nicht? Das sieht total ungleichmässig aus! Ist das ein Fehler?
13.08.2018 - 10:24DROPS Design answered:
Liebe Frau Enap, so wurde das Muster gezeichnet und gehäkelt. Viel Spaß beim häkeln!
14.08.2018 - 07:38Nourhan Osama wrote:
Can you make video show us how we can make the front piece and the armholes sleeves beacuse i am getting hard to understand how i can make it and i want to finish it please i am crochet beginner can you help me please with a video on your youtube channel please help me :(
10.08.2018 - 03:59DROPS Design answered:
Dear Mrs Osama, you will start the sleeve from RS mid under sleeve and crochet around the chain-spaces skipped for armhole and around the chain-spaces from the front side after armhole (right sleeve). Work then A.4b around adjusting the number of ch-spaces for your size crocheting 2 ch-space in 1 or skipping 1 ch-space depending on your size. Happy crocheting!
10.08.2018 - 08:46
![]() Manon Cloutier wrote:
Manon Cloutier wrote:
Bonjour;-) Je voudrais faire ce modèle mais j'aurais besoin d'explications détaillées pour le premier tour, je suis un peu perdue avec lui mais si j'ai une version écrites du diagrammes pour ce premier tour, je devrais être capable de me débrouiller ensuite;-)! Merci d'avance pour votre précieuse aide! Bonne journée
17.07.2018 - 16:16DROPS Design answered:
Bonjour Mme Cloutier, crochetez d'abord A.1a (= au 1er tour on fait 3 mailles en l'air pour commencer et on terminera le tour par 1 mc dans la 3ème de ces ml ) puis répétez A.1b 4 fois en largeur (soit au 1er tour: *5 ml, 2 brides écoulées ensemble, 4 mailles en l'air, 2 brides écoulées ensemble*, répétez de *-* 4 fois au total et terminez le tour comme indiqué ci-dessus. Bon crochet!
17.07.2018 - 16:54
![]() Netty wrote:
Netty wrote:
Jammer dat ik op mijn vraag geen antwoord krijg.
23.06.2018 - 12:19
|
|||||||||||||||||||||||||||||||||||||||||||||||||||||||||||||||||||||||||||||||||||||
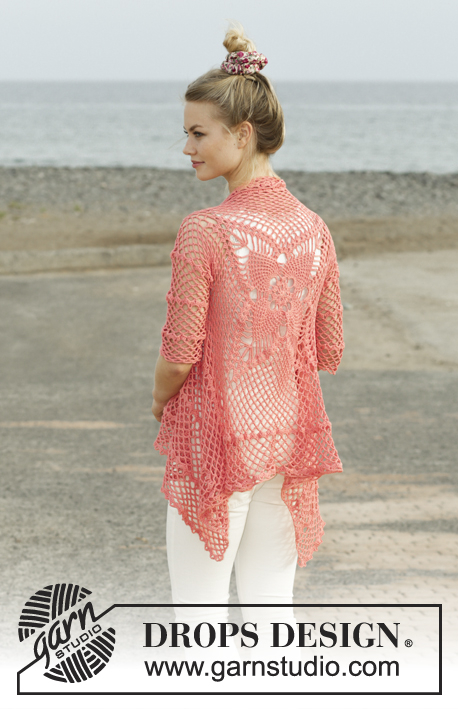
Butterfly Queen#butterflyqueenjacket |
|||||||||||||||||||||||||||||||||||||||||||||||||||||||||||||||||||||||||||||||||||||
 |
 |
||||||||||||||||||||||||||||||||||||||||||||||||||||||||||||||||||||||||||||||||||||
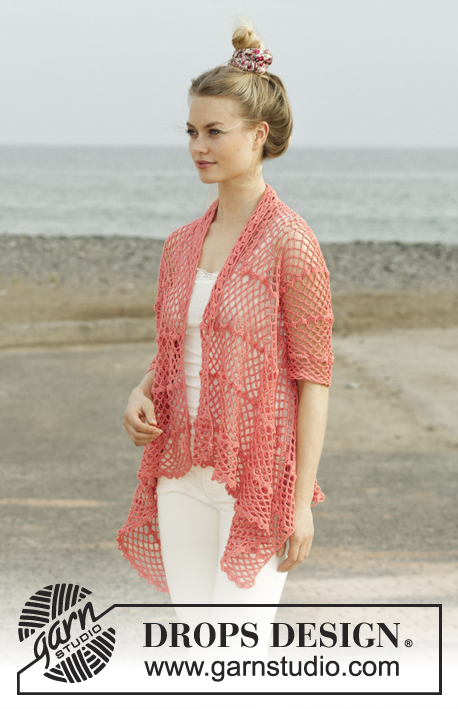
Crocheted jacket worked in a square with lace pattern. Size: S - XXXL Piece is crocheted in DROPS Flora.
DROPS 186-11 |
|||||||||||||||||||||||||||||||||||||||||||||||||||||||||||||||||||||||||||||||||||||
|
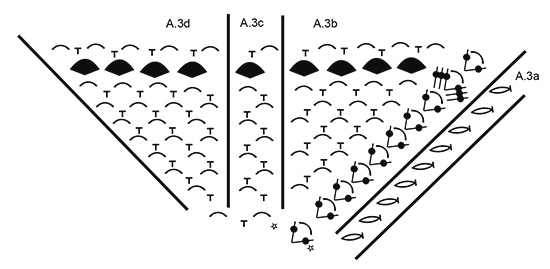
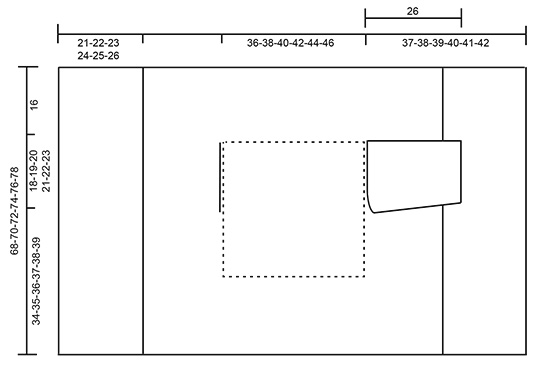
INFORMATION FOR PATTERN: PATTERN: See diagrams A.1 to A.4. CROCHET INFO (applies A.4): Replace first single crochet at beginning of row with 1 chain stitch. Replace first double treble crochet at beginning of row with 5 chain stitches. DECREASE TIP (applies to mid under sleeve): Work 5 chain stitches, skip 1 single crochet + 1 chain space, work 1 single crochet around next chain space + 1 chain space (= 1 repetition decreased), continue pattern as before until 1 chain space remains + 1 single crochet on previous row, skip these stitches and finish with 1 treble crochet in first chain stitch at beginning of previous row (= 1 repetition decreased). ---------------------------------------------------------- JACKET: Worked in the round from mid back on back and outwards as a square, then work back and forth on front pieces. Work sleeves back and forth from body, then sew them together under sleeve. Work 4 chain stitches on hook size 3.5 mm/E/4 with Flora and form a ring with 1 slip stitch in first chain stitch. Then work pattern in the round according to diagram A.1b 4 times in total on round - diagram A.1a shows how rounds begin and end and is worked in addition to A.1b. REMEMBER THE CROCHET GAUGE! When entire diagram A.1a and A.1b is cut the tread, and begin next round around chain space between last treble group worked and fasten thread with 1 slip stitch in this chain space. Now work in the round according to diagram A.2 as follows: * Work A.2b, repeat A.2c 6 times in total in width, A.2d *, repeat from *-* 4 times in total on round – diagram A.2a shows how rounds begin and end and are worked in addition to A.2b/c/d. When entire diagram A.2a and A.2b have been worked, square measures approx. 36 x 36 cm / 14¼" x 14¼". There are now 4 corner chain spaces (1 double crochet + 6 chain stitches + 1 double crochet) and 14 chain spaces along each of the sides on square. READ THE REST OF BODY BEFORE CONTINUING! Continue to work as follows: * Work A.3b around corner space, repeat A.3c until 1 chain space remains before corner, work A.3d around next chain space *, repeat from *-* 4 times in total on round – diagram A.3a shows how rounds begin and end and are worked in addition to A.3b/c/d. AT THE SAME TIME when piece measures approx. 36-38-40-42-44-46 cm / 14¼"-15"-15¾"-16½"-17¼"-18" x 36-38-40-42-44-46 cm / 14¼"-15"-15¾"-16½"-17¼"-18" work armholes as follows: Work A.3 as before until first corner, work around chain space as before. Now work chain stitches until middle of next side (i.e. in the middle between first and second corner) as follows: Work 1 chain stitch for every chain stitch/single crochet skipped. Then work pattern as before until the middle between 3rd and 4th corner. Now work chain stitches until 4th corner as follows: Work 1 chain stitch for every chain stitch/single crochet skipped, work around chain space in corner and the rest of round as before. On next round work A.3 as before over all stitches again (i.e. adjust pattern over armholes so that round is correct). Continue A.3 in the round (repeat the 9 rounds vertically) until square measures 68-70-72-74-76-78 cm / 26¾"-27½"-28⅜"-29⅛"-30"-30¾" x 68-70-72-74-76-78 cm / 26¾"-27½"-28⅜"-29⅛"-30"-30¾" (i.e. approx. 16 cm / 6¼" from armhole in all sizes) – adjust to finish after a round with treble groups. Cut the yarn and insert 1 marker in piece (between first and second corner). FRONT PIECE: Now work back and forth between first and second corner. NOTE! Work front pieces without increases. Read CROCHET INFO! Work A.4a around corner, repeat A.4b until 1 chain space remains before corner, work A.4c around this chain space and around corner. Continue pattern as shown in diagram and repeat A.4 vertically until row with treble groups has been worked 2 times in total vertically, then repeat only rows with chain spaces until piece measures approx. 19-20-21-22-23-24 cm / 7½"-8"-8¼"-8¾"-9"-9½" from marker, then work row with treble groups 1 time in all sizes. Piece now measures 21-22-23-24-25-26 cm / 8¼"-8¾"-9"-9½"-9¾"-10¼" from marker. Fasten off. Work the same way on the other side (i.e. work back and forth between third and fourth corner). SLEEVE: Work sleeve directly out from armhole on body. Work back and forth, top down and sew together when finished. Begin mid under sleeve and work as follows: Remember CROCHET INFO! Work A.4a around first chain space, repeat A.4b 15-16-17-18-19-20 times in total in width (adjust to distribute A.4b evenly along armhole, i.e. either 2 chain spaces must be worked around same chain space or skip 1 chain space), work A.4c around the last 2 chain spaces. Continue A.4 back and forth – AT THE SAME TIME when piece measures 4 cm / 1½" (adjust to work next row with chain stitches/single crochets) decrease 1 repetition in each side – read DECREASE TIP. Decrease like this approx. every 8-8-8-6-6-6 cm / 3"-3"-3"-2½"-2½"-2½" 3-3-3-4-4-4 times in total = 12-13-14-15-16-17 chain spaces of 6 stitches after last decrease. Continue until piece measures approx. 28 cm / 11" in all sizes - finish after a row with chain spaces. Fasten off. Work the other sleeve the same way in the other side of piece. ASSEMBLY: Sew the seems under the sleeves, sew in the outermost stitches and make sure that the seam does not tighten the piece. |
|||||||||||||||||||||||||||||||||||||||||||||||||||||||||||||||||||||||||||||||||||||
Diagram explanations |
|||||||||||||||||||||||||||||||||||||||||||||||||||||||||||||||||||||||||||||||||||||
|
|||||||||||||||||||||||||||||||||||||||||||||||||||||||||||||||||||||||||||||||||||||
 |
|||||||||||||||||||||||||||||||||||||||||||||||||||||||||||||||||||||||||||||||||||||
 |
|||||||||||||||||||||||||||||||||||||||||||||||||||||||||||||||||||||||||||||||||||||
 |
|||||||||||||||||||||||||||||||||||||||||||||||||||||||||||||||||||||||||||||||||||||
 |
|||||||||||||||||||||||||||||||||||||||||||||||||||||||||||||||||||||||||||||||||||||
Have you finished this pattern?Tag your pictures with #dropspattern #butterflyqueenjacket or submit them to the #dropsfan gallery. Do you need help with this pattern?You'll find 12 tutorial videos, a Comments/Questions area and more by visiting the pattern on garnstudio.com. © 1982-2026 DROPS Design A/S. We reserve all rights. This document, including all its sub-sections, has copyrights. Read more about what you can do with our patterns at the bottom of each pattern on our site. |
|||||||||||||||||||||||||||||||||||||||||||||||||||||||||||||||||||||||||||||||||||||


With over 40 years in knitting and crochet design, DROPS Design offers one of the most extensive collections of free patterns on the internet - translated to 17 languages. As of today we count 324 catalogs and 12290 patterns - 12280 of which are translated into English (US/in).
We work hard to bring you the best knitting and crochet have to offer, inspiration and advice as well as great quality yarns at incredible prices! Would you like to use our patterns for other than personal use? You can read what you are allowed to do in the Copyright text at the bottom of all our patterns. Happy crafting!
Post a comment to pattern DROPS 186-11
We would love to hear what you have to say about this pattern!
If you want to leave a question, please make sure you select the correct category in the form below, to speed up the answering process. Required fields are marked *.