
Popular categories
Looking for a yarn?


Comments / Questions (93)
![]() Magdolna wrote:
Magdolna wrote:
The diagrams are disappeared from english (US) and hungarian version. I found them in norvegian version, but I dont speak norvegian :-( Last week , when I ordered the yarn, diagramms were visible. I can't crochet this beautiful jacket :-( Please help !
12.02.2020 - 18:10DROPS Design answered:
Dear Magdolna, diagram text should be updated and visible soon in US-English, thanks in advance for your comprehension. Happy crocheting!
13.02.2020 - 11:46
![]() Szasz wrote:
Szasz wrote:
Hej! Hur kan man tolka de små strecken i mönstret till Butterfly queen i A4 ? Hur kan man tolka diagram A4? Jag kan tyvärr inte fortsätta min virkning eftersom jag har ingen aning om hur många maskor ska jag virka, ska jag börja med avigsidan eller ej, och vilket hörn kallar ni för hörn 1 respektive hörn 2. Väldigt dålig beskrivning! Tack i förhand för svaret!
24.01.2020 - 21:05DROPS Design answered:
Hi Szasz. Her manglet det forklaring på (-) = 1 luftmaske / (--- = 3 luftmasker i diagram A.4). Det er nå lagt til i oppskriften/lagt til en rettelse. Takk for at du gjorde oss oppmerksom på dette. mvh DROPS design
10.02.2020 - 12:08
![]() Edwige Mahiat wrote:
Edwige Mahiat wrote:
Bonjour, ce modèle est superbe. J'en suis au niveau des manches mais je ne trouve pas les infos crochet pour les diminutions. Merci de votre réponse
13.09.2019 - 20:37DROPS Design answered:
Bonjour Mme Mahiat, merci pour votre retour, ces informations ont été ajoutées. Bon crochet!
16.09.2019 - 08:32
![]() Helene wrote:
Helene wrote:
Bonjour. JE suis rendue au 2e diagramme et je comprend pas pas du tout le deuxième tour . On commence par 3 ml puis 2 brides, 4ml, 3 brides. Ca va jusque là mais le problème est avec le diagramme suivant qui indique qu’on doit faire 8ml et.une demi bride dans le 1e ml . C’est la ou je ne comprend pas ou je dois faire cette demi bride. Mercii
30.08.2019 - 13:52DROPS Design answered:
Bonjour Hélène, je suppose que vous parlez de A.2a/A.2b? Les tours commencent par A.2a (= 3 ml) puis on répète A.2b (= 3 brides, 4 ml, 3 brides), puis 2 mailles en l'air, 1 maille serrée autour de l'arceau de 18 mailles en l'air, 2 mailles en l'air, 3 brides, 2 ml, 3 brides etc... on termine le rang par 1 mc dans la 3ème ml du début du tour (= A.2a), au 3ème tour, on va crocheter 3 ml, puis 3 b, 2 ml, 3b 1 double-bride dans la maille serrée, 3 b, 2 ml, 3 b etc... La demi-bride se fait au 5ème tour en piquant dans la 1ère des 8 ml que l'on fait juste avant cette demi-bride. Bon crochet!
30.08.2019 - 15:09
![]() Caroline K wrote:
Caroline K wrote:
Bonjour, Je commence le modèle et je comprends pas le 1er symbole après le cercle magique. Dans les explications il est note 2 bridés coulés ensemble. Est ce que ça veut dire que je devrais avoir 16 Brides. Parce qu'il y a 4 brides dans le schéma 1b. Concernant chaque fin de tout. Faut il les finir par une maille coulée? Merci par avance pour vos reponses
31.07.2019 - 21:06DROPS Design answered:
Bonjour Caroline K, vous crochetez d'abord A.1a = 15ème symbole soit 3 mailles en l'air, puis répétez 4x A.1b en largeur, vous aurez donc: 3 ml (= A.1a) puis 4 fois (5 mailles en l'air, 2 brides écoulées ensemble, 4 mailles en l'air, 2 brides écoulées ensemble), et vous terminez par 1 maille coulée dans la 3ème ml du début du tour (= cf A.1a et 15ème symbole). Bon crochet!
06.08.2019 - 16:13
![]() Janell Hendershot wrote:
Janell Hendershot wrote:
Beautiful pattern and I would love to have it; however I don't know how to read charts. Any chance of getting a written pattern? 😢
21.07.2019 - 22:39
![]() Jennie Van Der Worp wrote:
Jennie Van Der Worp wrote:
Ik ben een ervaren haakster maar hier kom ik al niet eens uit het begin. Zie ik het goed dat ik de eerste toer begin met 3 lossen, dan 5 lossen en dan samengehaakte, dan herhalen vanaf 5 lossen. Wat ik dan 4 keer herhaal?
13.06.2019 - 20:33DROPS Design answered:
Dag Jennie,
Je haakt eerst 4 lossen en deze vorm je tot een ring met een halve vaste in de eerste losse op de haaknaald. Dan inderdaad zoals je beschrijft: 5 lossen (=accolade symbool) 2 stokjes samen haken en dat 4 keer herhalen.
17.06.2019 - 15:11
![]() Annmarie Lindley wrote:
Annmarie Lindley wrote:
Ok, I think I just figured it out my boo boo, regarding the arms. I'm supposed to do A3. that is the ch 6, 1 sc around the ch sts I made for the arms so that there is an actual arm hole. I need to do 7 repeats into the ch. Which, at this moment I don't have. I have 49 chs hanging out on the back of my sweater. Silly me. I was baffled by the arms. So, I'll have to frog a few rows. Thank you for this fun, challenging sweater. I'm having a wonderful time. Its also quite beautiful.
19.04.2019 - 19:13
![]() Annmarie Lindley wrote:
Annmarie Lindley wrote:
After you do the chain spaces for the arms and continue with section A3 are the ch spaces supposed to be above (on the right side) or below (on the wrong side) of the pattern? In other words, do you work over the arm chains or under them? Should the arm chains lay on top of the stitches or be on the underside? I hope I'm explaining myself well enough.
19.04.2019 - 15:17
![]() Cheryl Wieger wrote:
Cheryl Wieger wrote:
Could you please tell me in the pattern (after doing the chain stitches for armholes) it states working A3 again in all stitches. Do I work these same stitches I skipped for the armholes? Or do I work these stitches along the chain for the sleeve. Iam confused. Love this pattern by the way. Thank you.
16.04.2019 - 03:48DROPS Design answered:
Dear Mrs Wieger, on the round after skipping sts for the armhole you replaced with chain stitches, continue working in the chains for the armholes = there should be 2 holes for the sleeves. Happy crocheting!
23.04.2019 - 10:25
|
|||||||||||||||||||||||||||||||||||||||||||||||||||||||||||||||||||||||||||||||||||||
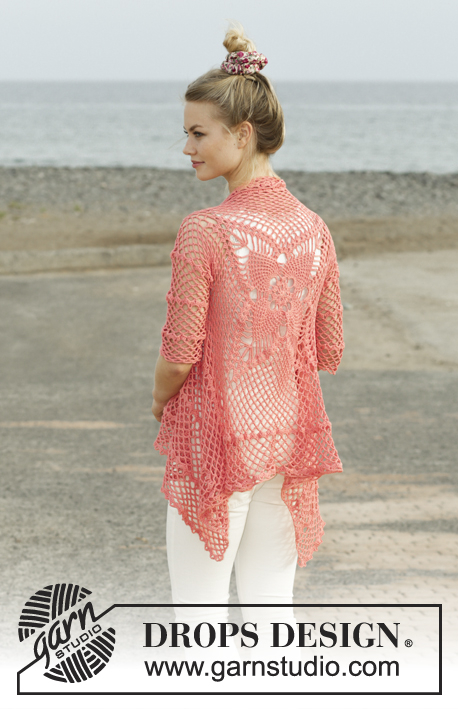
Butterfly Queen#butterflyqueenjacket |
|||||||||||||||||||||||||||||||||||||||||||||||||||||||||||||||||||||||||||||||||||||
 |
 |
||||||||||||||||||||||||||||||||||||||||||||||||||||||||||||||||||||||||||||||||||||
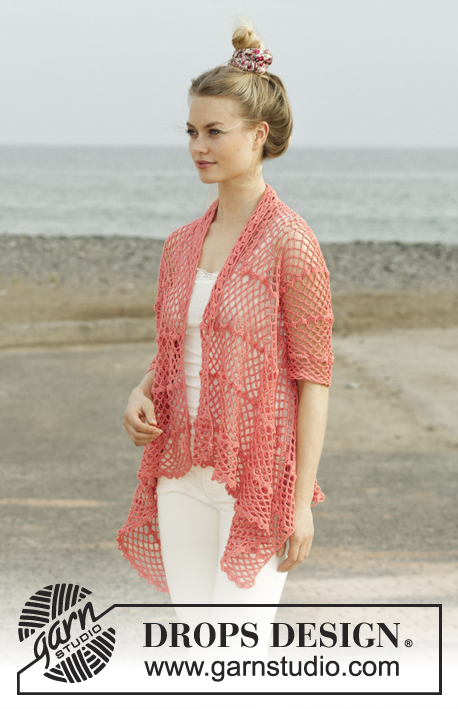
Crocheted jacket worked in a square with lace pattern. Size: S - XXXL Piece is crocheted in DROPS Flora.
DROPS 186-11 |
|||||||||||||||||||||||||||||||||||||||||||||||||||||||||||||||||||||||||||||||||||||
|
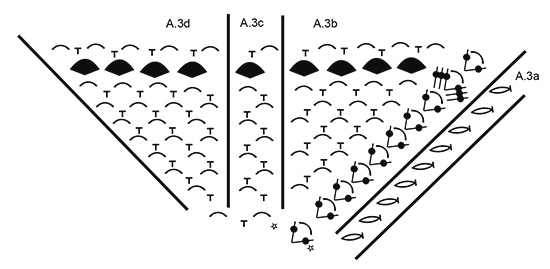
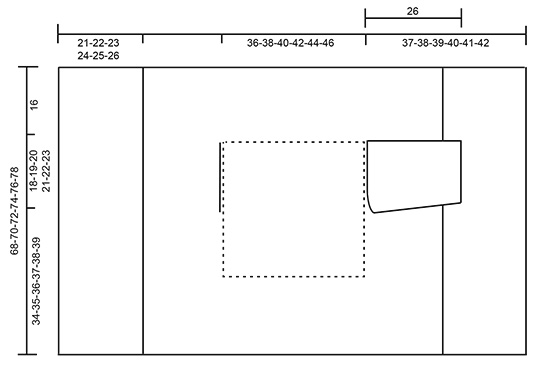
INFORMATION FOR PATTERN: PATTERN: See diagrams A.1 to A.4. CROCHET INFO (applies A.4): Replace first single crochet at beginning of row with 1 chain stitch. Replace first double treble crochet at beginning of row with 5 chain stitches. DECREASE TIP (applies to mid under sleeve): Work 5 chain stitches, skip 1 single crochet + 1 chain space, work 1 single crochet around next chain space + 1 chain space (= 1 repetition decreased), continue pattern as before until 1 chain space remains + 1 single crochet on previous row, skip these stitches and finish with 1 treble crochet in first chain stitch at beginning of previous row (= 1 repetition decreased). ---------------------------------------------------------- JACKET: Worked in the round from mid back on back and outwards as a square, then work back and forth on front pieces. Work sleeves back and forth from body, then sew them together under sleeve. Work 4 chain stitches on hook size 3.5 mm/E/4 with Flora and form a ring with 1 slip stitch in first chain stitch. Then work pattern in the round according to diagram A.1b 4 times in total on round - diagram A.1a shows how rounds begin and end and is worked in addition to A.1b. REMEMBER THE CROCHET GAUGE! When entire diagram A.1a and A.1b is cut the tread, and begin next round around chain space between last treble group worked and fasten thread with 1 slip stitch in this chain space. Now work in the round according to diagram A.2 as follows: * Work A.2b, repeat A.2c 6 times in total in width, A.2d *, repeat from *-* 4 times in total on round – diagram A.2a shows how rounds begin and end and are worked in addition to A.2b/c/d. When entire diagram A.2a and A.2b have been worked, square measures approx. 36 x 36 cm / 14¼" x 14¼". There are now 4 corner chain spaces (1 double crochet + 6 chain stitches + 1 double crochet) and 14 chain spaces along each of the sides on square. READ THE REST OF BODY BEFORE CONTINUING! Continue to work as follows: * Work A.3b around corner space, repeat A.3c until 1 chain space remains before corner, work A.3d around next chain space *, repeat from *-* 4 times in total on round – diagram A.3a shows how rounds begin and end and are worked in addition to A.3b/c/d. AT THE SAME TIME when piece measures approx. 36-38-40-42-44-46 cm / 14¼"-15"-15¾"-16½"-17¼"-18" x 36-38-40-42-44-46 cm / 14¼"-15"-15¾"-16½"-17¼"-18" work armholes as follows: Work A.3 as before until first corner, work around chain space as before. Now work chain stitches until middle of next side (i.e. in the middle between first and second corner) as follows: Work 1 chain stitch for every chain stitch/single crochet skipped. Then work pattern as before until the middle between 3rd and 4th corner. Now work chain stitches until 4th corner as follows: Work 1 chain stitch for every chain stitch/single crochet skipped, work around chain space in corner and the rest of round as before. On next round work A.3 as before over all stitches again (i.e. adjust pattern over armholes so that round is correct). Continue A.3 in the round (repeat the 9 rounds vertically) until square measures 68-70-72-74-76-78 cm / 26¾"-27½"-28⅜"-29⅛"-30"-30¾" x 68-70-72-74-76-78 cm / 26¾"-27½"-28⅜"-29⅛"-30"-30¾" (i.e. approx. 16 cm / 6¼" from armhole in all sizes) – adjust to finish after a round with treble groups. Cut the yarn and insert 1 marker in piece (between first and second corner). FRONT PIECE: Now work back and forth between first and second corner. NOTE! Work front pieces without increases. Read CROCHET INFO! Work A.4a around corner, repeat A.4b until 1 chain space remains before corner, work A.4c around this chain space and around corner. Continue pattern as shown in diagram and repeat A.4 vertically until row with treble groups has been worked 2 times in total vertically, then repeat only rows with chain spaces until piece measures approx. 19-20-21-22-23-24 cm / 7½"-8"-8¼"-8¾"-9"-9½" from marker, then work row with treble groups 1 time in all sizes. Piece now measures 21-22-23-24-25-26 cm / 8¼"-8¾"-9"-9½"-9¾"-10¼" from marker. Fasten off. Work the same way on the other side (i.e. work back and forth between third and fourth corner). SLEEVE: Work sleeve directly out from armhole on body. Work back and forth, top down and sew together when finished. Begin mid under sleeve and work as follows: Remember CROCHET INFO! Work A.4a around first chain space, repeat A.4b 15-16-17-18-19-20 times in total in width (adjust to distribute A.4b evenly along armhole, i.e. either 2 chain spaces must be worked around same chain space or skip 1 chain space), work A.4c around the last 2 chain spaces. Continue A.4 back and forth – AT THE SAME TIME when piece measures 4 cm / 1½" (adjust to work next row with chain stitches/single crochets) decrease 1 repetition in each side – read DECREASE TIP. Decrease like this approx. every 8-8-8-6-6-6 cm / 3"-3"-3"-2½"-2½"-2½" 3-3-3-4-4-4 times in total = 12-13-14-15-16-17 chain spaces of 6 stitches after last decrease. Continue until piece measures approx. 28 cm / 11" in all sizes - finish after a row with chain spaces. Fasten off. Work the other sleeve the same way in the other side of piece. ASSEMBLY: Sew the seems under the sleeves, sew in the outermost stitches and make sure that the seam does not tighten the piece. |
|||||||||||||||||||||||||||||||||||||||||||||||||||||||||||||||||||||||||||||||||||||
Diagram explanations |
|||||||||||||||||||||||||||||||||||||||||||||||||||||||||||||||||||||||||||||||||||||
|
|||||||||||||||||||||||||||||||||||||||||||||||||||||||||||||||||||||||||||||||||||||
 |
|||||||||||||||||||||||||||||||||||||||||||||||||||||||||||||||||||||||||||||||||||||
 |
|||||||||||||||||||||||||||||||||||||||||||||||||||||||||||||||||||||||||||||||||||||
 |
|||||||||||||||||||||||||||||||||||||||||||||||||||||||||||||||||||||||||||||||||||||
 |
|||||||||||||||||||||||||||||||||||||||||||||||||||||||||||||||||||||||||||||||||||||
Have you finished this pattern?Tag your pictures with #dropspattern #butterflyqueenjacket or submit them to the #dropsfan gallery. Do you need help with this pattern?You'll find 12 tutorial videos, a Comments/Questions area and more by visiting the pattern on garnstudio.com. © 1982-2026 DROPS Design A/S. We reserve all rights. This document, including all its sub-sections, has copyrights. Read more about what you can do with our patterns at the bottom of each pattern on our site. |
|||||||||||||||||||||||||||||||||||||||||||||||||||||||||||||||||||||||||||||||||||||


With over 40 years in knitting and crochet design, DROPS Design offers one of the most extensive collections of free patterns on the internet - translated to 17 languages. As of today we count 324 catalogs and 12290 patterns - 12280 of which are translated into English (US/in).
We work hard to bring you the best knitting and crochet have to offer, inspiration and advice as well as great quality yarns at incredible prices! Would you like to use our patterns for other than personal use? You can read what you are allowed to do in the Copyright text at the bottom of all our patterns. Happy crafting!
Post a comment to pattern DROPS 186-11
We would love to hear what you have to say about this pattern!
If you want to leave a question, please make sure you select the correct category in the form below, to speed up the answering process. Required fields are marked *.