
Popular categories
Looking for a yarn?


Comments / Questions (34)
![]() Valerie wrote:
Valerie wrote:
Up to joining sleeve into body of jumper One round needle front and back and on separate round needles got sleeves Followed instruction to put sleeve stitches on to round needle but unclear how to join into body of jumper Please advice
06.12.2019 - 22:05DROPS Design answered:
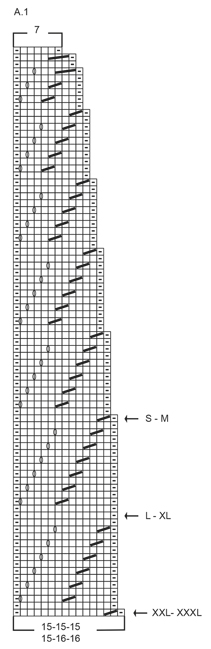
Dear Valerie, you slip the sleeves stitches on the same circular needle as front and back piece, over the 8-10-12-14 (see size) stitches cast off for armholes and knit 1 round decreasing evenly to get 285-315-345-360-400-416 sts, then repeat A.1 (19 to 26 times in width, see size). Happy knitting!
09.12.2019 - 07:54
![]() Hilde Ballière wrote:
Hilde Ballière wrote:
Jeg har omtrent samme spørsmål som Anette 6.12.18, men får ikke opp svaret deres. Derfor: jeg skal nå starte med diagrammet, men antall masker på pinnen etter felling er ikke delbar på verken 15 (nederst S-M) eller 7 (øverst i diagrammet). Hvor oppsto problemet? og hva gjør jeg?
08.03.2019 - 07:17DROPS Design answered:
Hei Hilde. Jeg skjønner at du strikker S eller M. Før du setter ermer og bol sammen skal du ha 60-68 masker på hvert erme, og 168-184 masker på bolen. Hvis dette ikke stemmer er det her feilen ligger. Når du sette ermer og bol på samme pinne får du i S: 60+60+168 = 288 eller i M: 68+68+184=320 masker. Videre felles det 3-5 masker = 285-315 masker, som er delelig med 15 - slik at det strikkes 19-21 rapporter A.1 (Du begynner ved pilen, og strikker oppover). God fornøyelse
08.03.2019 - 08:45
![]() Heidi wrote:
Heidi wrote:
Jeg er netop nået til at strikke bærestykket, men diagrammet A.1 er forsvundet fra opskriften. Hvad gør jeg nu?
02.03.2019 - 18:36DROPS Design answered:
Hei Heidi. Vi har nå dobbelsjekket dette, og diagrammet ligger fortsatt i bunnen av oppskriften, sammen med målskissen. Har du problemer med å se det uansett hvaslags enhet du bruker (mobil, pc, nettbrett)? God fornøyelse
04.03.2019 - 14:16
![]() Katri Puttonen wrote:
Katri Puttonen wrote:
Missä on piirros?
18.12.2018 - 22:20
![]() Anette Due wrote:
Anette Due wrote:
Er det korrekt forstået, at man i størrelsen large ikke tager ind, strikker to sammen, i starten af mønster/bærestykket?
08.12.2018 - 11:18
![]() Anette Due wrote:
Anette Due wrote:
Hej. Jeg er startet på A1. Men med 345 masker passer det ikke i raporten. Jeg har måtte tilføje 4 masker, så med 349 masker har jeg 25 raporter. Hvad gør jeg galt?
06.12.2018 - 22:54
![]() Anette Due wrote:
Anette Due wrote:
Tak for hurtigt svar og rettelse, mvh anette
06.12.2018 - 19:06
![]() Anette Due wrote:
Anette Due wrote:
Tak for svar. Betyder det jeg skal strikke ret, og vrang fra retsiden i firkant med streg.?
06.12.2018 - 11:20
![]() Anette wrote:
Anette wrote:
Hej. Jeg strikke A1 og forstår ikke hvad der menes med ret fra retsiden, vrang fra vrangen. Det er jo en rundpind og ingen vrang... Venlig Hilsen anette
05.12.2018 - 21:16DROPS Design answered:
Hei Anette. Det har du helt rett i: det strikkes rundt etter A.1 og alle omgangeer strikkes fra retten. Vi skal få endret dette i symolforklaringen. Takk for beskjed og god fornøyelse.
06.12.2018 - 11:18
![]() Camilla L. wrote:
Camilla L. wrote:
Hei! Jeg skal begynne med mønster A1 om ikke så lenge, og er ikke så god på å lese mønster. Skal jeg begynne nederste linje der det står «s-m» og strikke det ut pinnen og så fortsette oppover?
07.11.2018 - 09:13DROPS Design answered:
Hei Camilla. Ja, strikkediagrammer leses fra nederst til øverst, fra høyre mot venstre. Begynn ved pilen for din størrelse, strikk den første raden, og gjenta den ut omgangen. Så begynner du på raden over og gjentar den ut omgangen, og sånn fortsetter det. God fornøyelse.
07.11.2018 - 11:12
|
||||||||||||||||
Winter Sea#winterseasweater |
||||||||||||||||
 |
 |
|||||||||||||||
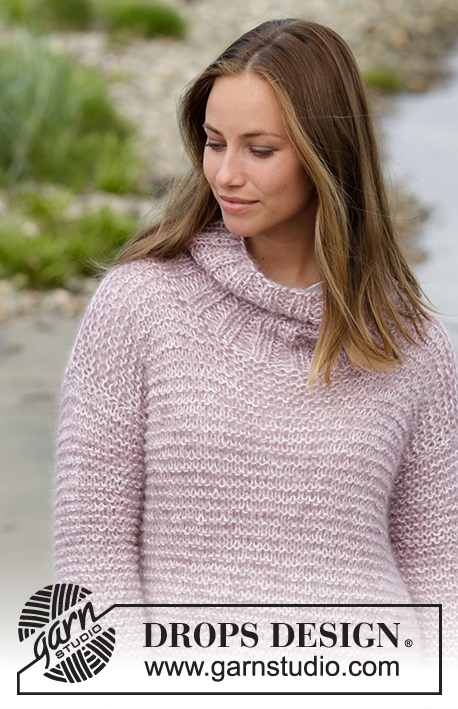
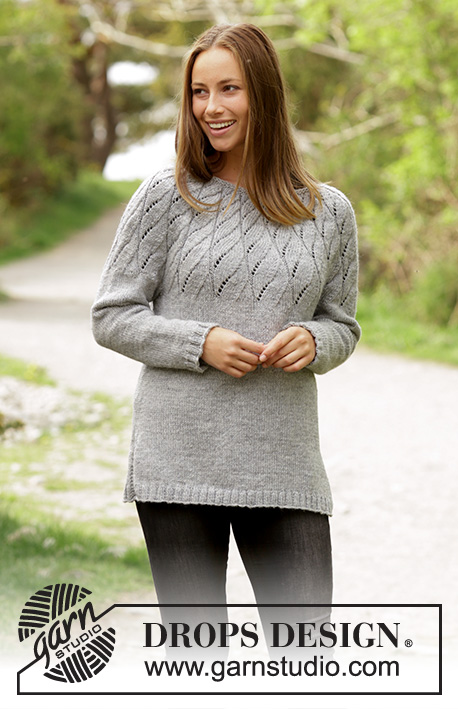
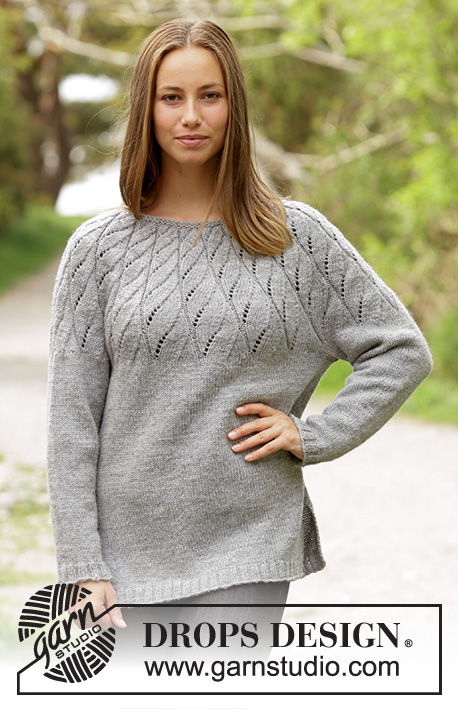
Knitted jumper with round yoke and lace pattern. Size: S - XXXL Piece is knitted in DROPS Karisma.
DROPS 179-6 |
||||||||||||||||
|
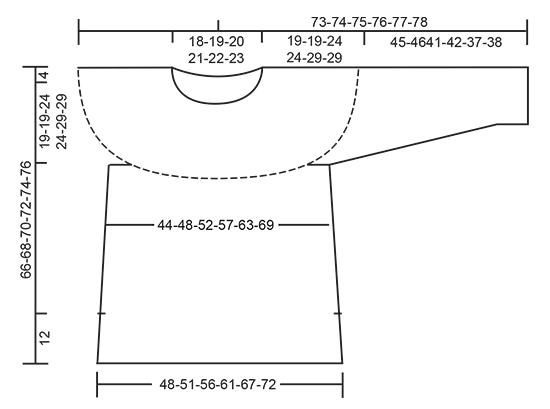
INFORMATION FOR PATTERN: GARTER STITCH (worked in the round): 1 ridge = 2 rounds. Knit 1 round and purl 1 round. PATTERN: See diagram A.1. Diagrams show all rows in pattern seen from the right side. See start arrow for size! DECREASE TIP: Begin 3 stitches before marker thread: Knit 2 stitches together, knit 2 (marker thread is between these stitches), slip 1 stitch knitwise, knit 1, pass slipped stitch over stitch worked. INCREASE TIP: Increase with 1 yarn over on each side of marker thread + 1 stitch. On next round knit yarn over twisted to avoid holes. ---------------------------------------------------------- JUMPER: Work from bottom up. There is a vent at the bottom of jumper, therefore work back piece and front piece back and forth separately, before slipping them on the same circular needle and continue in the round over all stitches. Then work sleeves, put all parts together and work round yoke. BACK PIECE: Cast on 120-132-140-152-168-184 stitches on circular needle size 3.5 mm / US 4 with Karisma. Purl 1 row from wrong side, then work as follows from right side: 3 stitches in GARTER STITCH - see explanation above - * knit 2/purl 2 *, repeat from *-* until 5 stitches remain, knit 2 and 3 stitches in garter stitch. Work rib for 3 cm / 1". Switch to circular needle size 4 mm / US 6, continue in stockinette stitch with 3 stitches in garter stitch in each side, on first row decrease 20-24-22-24-28-32 stitches evenly = 100-108-118-128-140-152 stitches. Work until piece measures 12 cm / 4¾", put piece aside and work front piece. FRONT PIECE: Cast on and work the same way as back piece. BODY: Slip the 2 parts together on same circular needle = 200-216-236-256-280-304 stitches. Continue in the round in stockinette stitch. Insert 1 marker thread in each side; 1 at the beginning of round and 1 after 100-108-118-128-140-152 stitches. When piece measures 13 cm / 5", decrease 1 stitch on each side of every marker thread - see explanation above (= 4 stitches decreased). Decrease like this every 8 cm / 3⅛" 4 times in total = 184-200-220-240-264-288 stitches. REMEMBER THE GAUGE! When piece measures 43-45-42-44-41-43 cm / 17"-17¾"-16½"-17¼"-16"-17", bind off 8-8-10-10-12-14 stitches in each side (= 4-4-5-5-6-7 stitches on each side of marker threads) = 168-184-200-220-240-260 stitches. Put piece aside and work the sleeves. SLEEVES: Work in the round on double pointed needles, switch to short circular needle when needed. Cast on 52-52-56-60-60-64 stitches on double pointed needles size 3.5 mm / US 4 with Karisma. Knit 1 round, then work rib = knit 2/purl 2. When piece measures 4 cm / 1½", switch to double pointed needles size 4 mm / US 6. Continue in stockinette stitch, on first round decrease 8-6-8-10-8-10 stitches evenly = 44-46-48-50-52-54 stitches. Insert 1 marker thread at beginning of round = mid under sleeve. Continue in stockinette stitch. When piece measures 6-6-10-10-6-6 cm / 2½"-2½"-4"-4"-2½"-2½", increase 1 stitch on each side of marker thread - READ INCREASE TIP. Increase every 3-2½-1½-1½-1½-1½ cm / 1⅛"-⅞"-½"-½"-½"-½" 12-15-18-19-20-21 times in total = 68-76-84-88-92-96 stitches. Continue until sleeve measures 45-46-41-42-37-38 cm / 17¾"-18"-16"-16½"-14½"-15". Now bind off 4-4-5-5-6-7 stitches on each side of marker thread = 60-68-74-78-80-82 stitches. Put piece aside and make another sleeve. YOKE: Slip all stitches on to same circular needle size 4 mm / US 6 = 288-320-348-376-400-424 stitches. Knit 1 round while decreasing 3-5-3-16-0-8 stitches evenly = 285-315-345-360-400-416 stitches. Then work A.1 over all stitches (= 19-21-23-24-25-26 repetitions in width). Continue pattern like this. Switch to a shorter circular needle when needed. When entire A.1 has been worked vertically, 133-147-161-168-175-182 stitches remain on round. Work 2 ridges in GARTER STITCH - see explanation above, on first ridge decrease 41-51-61-62-65-68 stitches evenly = 92-96-100-106-110-114 stitches. Then loosely bind off by knitting. ASSEMBLY: Sew the opening under the sleeves. |
||||||||||||||||
Diagram explanations |
||||||||||||||||
|
||||||||||||||||
 |
||||||||||||||||
 |
||||||||||||||||
Have you finished this pattern?Tag your pictures with #dropspattern #winterseasweater or submit them to the #dropsfan gallery. Do you need help with this pattern?You'll find 30 tutorial videos, a Comments/Questions area and more by visiting the pattern on garnstudio.com. © 1982-2026 DROPS Design A/S. We reserve all rights. This document, including all its sub-sections, has copyrights. Read more about what you can do with our patterns at the bottom of each pattern on our site. |
||||||||||||||||


With over 40 years in knitting and crochet design, DROPS Design offers one of the most extensive collections of free patterns on the internet - translated to 17 languages. As of today we count 324 catalogs and 12290 patterns - 12280 of which are translated into English (US/in).
We work hard to bring you the best knitting and crochet have to offer, inspiration and advice as well as great quality yarns at incredible prices! Would you like to use our patterns for other than personal use? You can read what you are allowed to do in the Copyright text at the bottom of all our patterns. Happy crafting!
Post a comment to pattern DROPS 179-6
We would love to hear what you have to say about this pattern!
If you want to leave a question, please make sure you select the correct category in the form below, to speed up the answering process. Required fields are marked *.