
Popular categories
Looking for a yarn?


Comments / Questions (71)
![]() Danièle Berry wrote:
Danièle Berry wrote:
Bonjour, je ne comprends pas les explications pour faire la bordure devant droit et col, si j'augmente comme vous l'indiquer je n'ai plus mes cotes 3 mailles envers et 3 mailles endroit car j'augmente 6 fois tous les deux centimetres est ce normal ?
09.02.2021 - 14:07DROPS Design answered:
Bonjour Mme Berry, effectivement, dans les côtes du col (= les 6 à 8 sections en côtes du haut, selon la taille), vous allez augmenter d'abord à 3 m end/4 m env, puis à 4 m end/4 m env, puis à 4 m end/5 m env, puis à 5 m end/5 m env mais les côtes de la bordure du devant (les autres mailles jusqu'aux 3 m point mousse en bas) se tricotent toujours en côtes 3 m end/3 m env jusqu'à la fin. Bon tricot!
09.02.2021 - 16:06
![]() Veerle wrote:
Veerle wrote:
Moet toer 43 wel gewoon bij het begin beginnen ? Klopt het dan nog wel ?
05.02.2021 - 18:48
![]() Veerle wrote:
Veerle wrote:
Toer 41 bedoel ik !
05.02.2021 - 15:30
![]() Veerle wrote:
Veerle wrote:
Begin van toer 40, wordt er dan bedoeld dat je de toer moet beginnen met een kantsteek en dan twee recht en dan de eerste omslag ?
05.02.2021 - 15:27DROPS Design answered:
Dag Veerle,
Normaal brei je in patroon tot er 2 steken over zijn op de naald en brei je nog 1 steek in A.1/A,2 en nog 1 kantsteek (zie beschrijving bij 'lijf'), maar op de naald van de pijl brei je tot er 1 steek over is en die laatste steek brei je in ribbelsteek (dus de kantsteek.
06.02.2021 - 10:57
![]() Veerle Van Coillie wrote:
Veerle Van Coillie wrote:
Volgens mij klopt het aantal steken niet, ik ben met maat L bezig. Er staat minderen tot 171 en dan met het telpatroon beginnen. 14 keer het telpatroon is 168 steken en twee kanttekeningen is 170 ? Ik houd dus een steek over !
03.02.2021 - 13:28
![]() Veerle Van Coillie wrote:
Veerle Van Coillie wrote:
Moet het proeflapje niet in in fair Ilse gebreid worden ? Er staat tricotsteek.
29.01.2021 - 09:06DROPS Design answered:
Dag Veerle,
Nee hoor, dat kun je in tricotsteek breien.
29.01.2021 - 12:51
![]() Patricia wrote:
Patricia wrote:
Bonjour, Les boutons ronds (acier) n°542 ne sont plus disponibles chez Kalidou. Par quels boutons puis-je les remplacer ? Au moins, pouvez-vous me donner le diamètre ? Merci, Patricia
26.01.2021 - 16:28DROPS Design answered:
Bonjour Patricia, ces boutons font 23 mm - retrouvez-les ici avec tous les autres boutons - n'hésitez pas à leur demander quand ils doivent en recevoir. Bon tricot!
26.01.2021 - 16:38
![]() Beppie Louwerse wrote:
Beppie Louwerse wrote:
Het verschil in minderingen op het lijf voor de mouwen tussen L en XL is erg groot. L: 0x2 st en 2x1st =totaal 2st per kant XL: 2x2 en 4x1st = totaal 8 st per kant Ik brei L, maar het voelt niet goed om naast de 6 st onder de arm, alleen nog maar 2x1 st te minderen per kant. Zou het misschien 1x2st en 2x1st moeten zijn? Alvast bedankt voor uw reactie!
22.11.2020 - 19:48DROPS Design answered:
Dag Beppie,
Je zou iets meer af kunnen kant bij het lijf, maar kijk dan wel even hoe je uitkomt met de mouwkop. Als je namelijk meer steken afkant voor het armsgat bij het lijf, krijg je een smallere schouder en heb je ter compensatie een hogere mouwkop nodig.
14.12.2020 - 11:24
![]() Joanne wrote:
Joanne wrote:
Hi I am having issues with the holes. I’m not understanding the pattern. It’s says 1 yarn over 2 stitches ? Are these stitches to be knitted first or slipped ?
07.11.2019 - 23:17DROPS Design answered:
Hi Joanne, The yarn over is made between 2 stitches, so the stitches either side are worked as before; the yarn over gives an increase of 1 stitch. Happy knitting!
08.11.2019 - 07:16
![]() Sandra wrote:
Sandra wrote:
After each increase in the collar, how are the increased stitches incorporated into the rib?
28.09.2019 - 22:09DROPS Design answered:
Dear Sandra, the increases in collar are worked in the p-sections (seen from RS), the new stitches will be then worked K from WS and P from RS. When you increase in the K-sections (from RS), you will work the new stitches K from RS and P from WS. Happy knitting!
30.09.2019 - 10:31
|
|||||||||||||||||||||||||
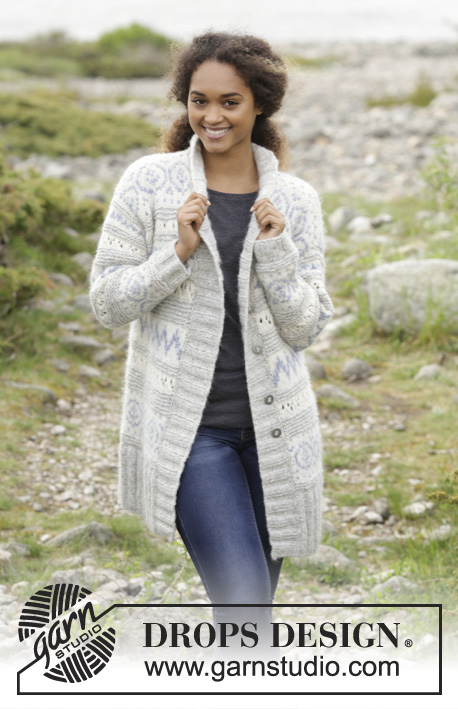
Svalbard#svalbardjacket |
|||||||||||||||||||||||||
 |
 |
||||||||||||||||||||||||
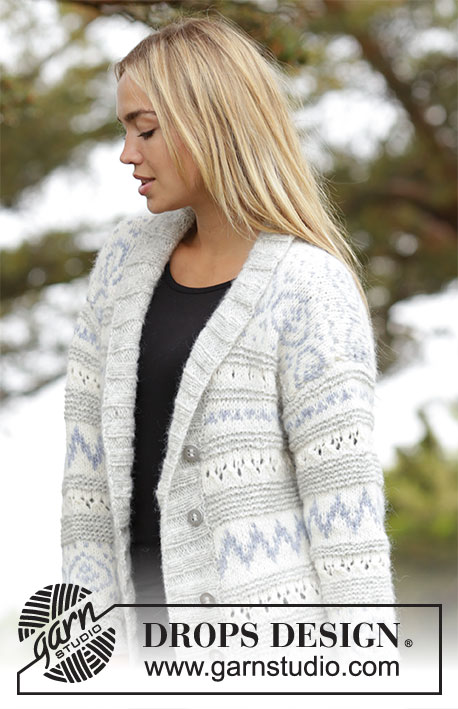
Knitted jacket with multi-colored Norwegian pattern, garter stitch and band collar in rib. Sizes S - XXXL. The piece is worked in DROPS Air.
DROPS 181-17 |
|||||||||||||||||||||||||
|
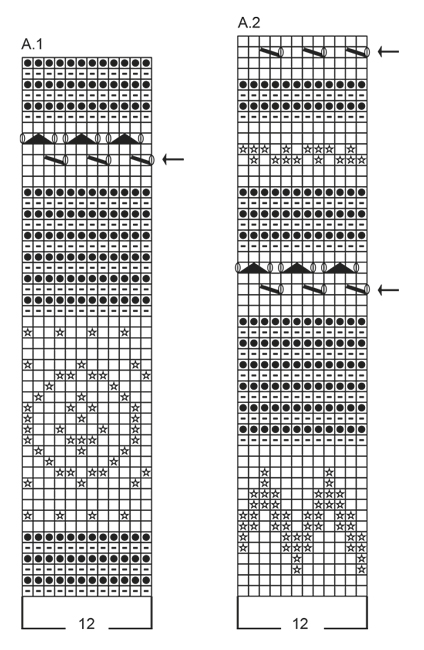
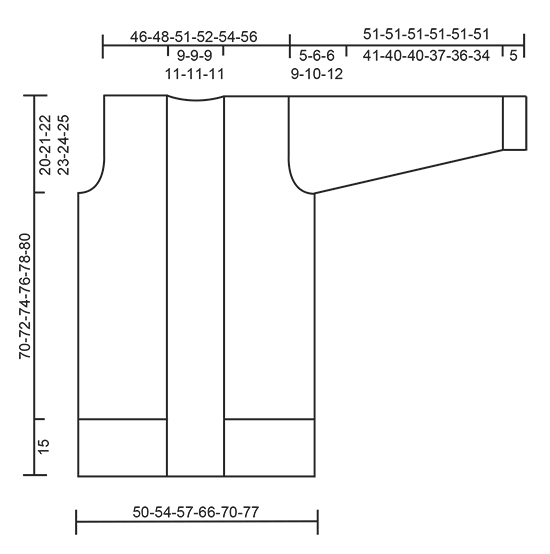
INFORMATION FOR THE PATTERN: RIDGE/GARTER STITCH (worked back and forth): 1 ridge = Knit 2 rows. PATTERN: See diagrams A.1 and A.2. The diagrams show all the rows in the pattern seen from the right side. * Work A.1 once in height, then A.2 once in height *, work from *-* to finished length. A.1 + A.2 together measure approx. 43 cm / 17" in height. DECREASE TIP (for mid front): All decreases are worked from the right side! Decrease on the inside of 1 edge stitch in garter stitch. Decrease as follows after the 1 edge stitch: Slip 1 stitch as if to knit, knit 1, pass the slipped stitch over. Decrease as follows before the 1 edge stitch: Start 2 stitches before the edge stitch and knit 2 together. DECREASE TIP/INCREASE TIP (evenly on row): To work out how to decrease/increase evenly on row, count the total number of stitches on the row (e.g. 185 stitches) and divide by the number of decrease/increases to be made (e.g. 38) = 4.9. In other words, in this example you decrease by knitting together approx. every 4th and 5th stitch. If you are increasing, do this after approx. every 5th stitch. Increase 1 stitch by making 1 yarn over, on the next row, work the yarn overs twisted to prevent holes. INCREASE TIP (for the band): Increase 1 stitch at the end of every purl section (seen from the right side) by picking up the loop between 2 stitches in the transition between purl and knit. Purl the loop twisted to prevent holes. The next time you increase will be at the end of each knit section and the loop is knitted twisted. BUTTONHOLE: Decrease for the buttonhole on the right band collar (when the garment is worn). Decrease from the right side in a purl section. 1 BUTTONHOLE = purl 2 together and make 1 yarn over. On the next row (= wrong side) knit the yarn over so that there is a hole. The top buttonhole should be approx. 18-19-20-21-22-23 cm / 7"-7½"-8"-8¼"-8 ¾"-9" from the shoulder and down, the 3 next in every other purl section (count out from the top buttonhole where the bottom buttonhole should be made). ---------------------------------------------------------- BODY: The piece is worked back and forth with circular needle from mid front. The band collar is worked at the end by knitting up stitches mid front. Cast on 185-197-215-245-257-287 stitches with circular needle size 5 mm / US 8 and pearl gray. Purl 1 row from the wrong side. The next row is worked as follows from the right side: 1 edge stitch in GARTER STITCH – see description above, * knit 3, purl 3 *, work from *-* until there are 4 stitches left on the row, finish with knit 3 and 1 edge stitch in garter stitch. Continue rib in this way, but after every 5th row, purl 1 row from the wrong side with 1 edge stitch in garter stitch in each side (this is done to prevent the rib being tight). When the rib measures 15 cm / 6", knit 1 row from the right side where you decrease 38-38-44-50-50-56 stitches evenly on row – read DECREASE TIP/INCREASE TIP (evenly spaced) = 147-159-171-195-207-231 stitches. Change to circular needle SIZE 5.5 mm/US 9 / US 9. Purl 1 row from the wrong side with 1 edge stitch in garter stitch in each side. The next row is worked as follows from the right side: 1 edge stitch in garter stitch, work PATTERN according to diagram A.1 – see description above, until there are 2 stitches left on the row, work the first stitch in A.1 and finish with 1 edge stitch in garter stitch. Continue the pattern in this way until the piece measures 50-51-52-53-54-55 cm / 19¾"-20"-20½"-21"-21¼"-21⅝" (after A.1 continue with A.2 in the same way). REMEMBER THE GAUGE! The next row is worked as follows: Work 32-35-37-42-44-50 stitches (= front piece), bind off 4-4-6-6-8-8 stitches for armhole, work 75-81-85-99-103-115 stitches (= back piece), bind off 4-4-6-6-8-8 stitches for armhole and work the last 32-35-37-42-44-50 stitches (= front piece). The front and back pieces are now finished separately. BACK PIECE: = 75-81-85-99-103-115 stitches. Continue the pattern back and forth as before and bind off for the armhole at the beginning of each row in each side as follows: bind off 2 stitches 0-0-0-2-2-4 times and 1 stitch 1-2-2-4-4-5 times = 73-77-81-83-87-89 stitches. Continue the pattern with1 edge stitch in garter stitch in each side. When the piece measures 68-70-72-74-76-78 cm / 26¾"-27½"-28⅜"-29⅛"-30"-30¾" bind off the middle 13-13-13-15-15-15 stitches for the neck and each shoulder is finished separately. Continue the pattern and bind off 1 stitch on the next row from the neck = 29-31-33-33-35-36 stitches left on the shoulder. Continue working until the piece measures 70-72-74-76-78-80 cm / 27½"-28⅜"-29⅛"-30"-30¾"-31½. Bind off. Repeat on the other shoulder. RIGHT FRONT PIECE: = 32-35-37-42-44-50 stitches. Continue the pattern and bind off for the armhole at the beginning of each row from the side as for the back piece. AT THE SAME TIME when the piece measures 52-53-54-55-56-57 cm / 20½"-21"-21¼"-21⅝"-22"-22½" decrease 1 stitch for the neck towards mid front – read DECREASE TIP. Repeat the decrease in sizes S + M + L when the piece measures 62-63-64 cm / 24½"-24¾"-25¼" (do not work anymore decreases in the other sizes). After all the decreases for armhole and neck, there are 29-31-33-33-35-36 stitches on the row for the shoulder. Continue working until the piece measures 70-72-74-76-78-80 cm / 27½"-28⅜"-29⅛"-30"-30¾"-31½. Bind off. LEFT FRONT PIECE: Work as for the right but reversed. SLEEVE: The piece is worked in the round with double pointed needles. Change to short circular needle when you have enough stitches. Cast on 36-36-36-48-48-48 stitches with double pointed needles size 5 mm / US 8 and pearl gray. Knit 1 round. Then work rib (= knit 3 / purl 3) for 5 cm / 2". Insert 1 marker thread at the beginning of the round (= mid under the sleeve) and allow the marker thread to follow your work upwards. Change to double pointed needles SIZE 5.5 mm/US 9 / US 9 and work PATTERN in the round according to diagram A.1 – see description above. When the piece measures 6-6-6-8-8-9 cm / 2⅜"-2⅜"-2⅜"-3"-3"-3½" increase 2 stitches mid under the sleeve (increase by working 2 stitches in the first and the last stitch on the round – NOTE: The increased stitches are worked into the pattern as you go). Increase in this way every 3½-3-2½-3-2½-2 cm / 1¼"-1⅛"-⅞"-1⅛"-⅞"-¾" a total of 12-13-15-11-13-14 times = 60-62-66-70-74-76 stitches. When the piece measures 46-45-45-42-41-39 cm / 18"-17¾"-17¾"-16½"-16"-15¼" (NOTE: Shorter measurements in larger sizes because of longer sleeve cap and wider shoulders) bind off the middle 4-4-6-6-8-8 stitches under the sleeve (i.e. Bind off 2-2-3-3-4-4 stitches on each side of the marker thread). Continue by working the sleeve cap back and forth with circular needle. Continue the pattern and bind off for the sleeve cap at the beginning of each row in each side as follows: bind off 3 stitches 1-1-2-2-2-2 times, 2 stitches 1 time and 1 stitch 1-1-1-3-3-6 times. Continue by binding off 2 stitches at the beginning of each row in each side until the piece measures 50 cm / 19¾" in all sizes. Bind off 3 stitches at the beginning of the next 2 rows and then LOOSELY bind off the remaining stitches. Work another sleeve in the same way. ASSEMBLY: Sew the shoulder seams. RIGHT BAND COLLAR: Start from the right side at the bottom of the right front piece and knit up approx. 122 to 140 stitches along the front piece to mid back of the neck with circular needle size 5 mm / US 8 and pearl gray (knit up inside the 1 edge stitch in garter stitch). Knit 1 row from the wrong side where you increase evenly along the row to 149-155-161-167-173-179 stitches. Knit 1 row from the right side. The next row is worked as follows from the wrong side (starting mid back of neck): 2 edge stitches in garter stitch, * knit 3, purl 3 *, work from *-* until there are 3 stitches left on the row and finish with 3 edge stitches in garter stitch (from the right side, this will be 3 stitches garter stitch and knit 3 at the bottom of the front piece and purl 3 and 2 edge stitches in garter stitch mid back of neck). When the band collar measures 2 cm / ¾" insert 1 marker after 38-38-38-44-44-50 stitches counted from mid back of neck and down. On the next row from the right side increase 1 stitch in each purl section over these 38-38-38-44-44-50 stitches (= 6-6-6-7-7-8 stitches increased) - read INCREASE TIP (this is done so that the collar will lie neatly when folded over). When the band collar measures 4 cm / 1½" increase in the same way in each knit section (= 6-6-6-7-7-8 stitches increased). Repeat the increases in each purl section when the band collar measure 6-6-6-7-7-7 cm / 2⅜"-2⅜"-2⅜"-2¾"-2¾"-2¾" and in each knit section when the band collar measures 8-8-8-9-9-9 cm / 3"-3"-3"-3½"-3½"-3½". AT THE SAME TIME when the band collar measures 7-7-7-9-9-9 cm / 2¾"-2¾"-2¾"-3½"-3½"-3½" decrease for 4 BUTTONHOLES – see description above. After all the increases, there are 173-179-185-195-201-211 stitches on the row. When the band collar measures 9-9-9-11-11-11 cm / 3½"-3½"-3½"-4½"-4½"-4½" bind off with garter stitch over garter stitch, knit over knit and purl over purl. LEFT BAND COLLAR: Start from the right side mid back of neck and knit up stitches in the same way as for the right band collar. Work as for the right band collar, but in reverse, i.e. the first row of rib is worked from the wrong side as follows (= from the bottom of the front piece): 3 edge stitches in garter stitch, * purl 3, knit 3 *, work from *-* until there are 2 stitches left and finish with 2 edge stitches in garter stitch. Do not decrease for buttonholes on the left band collar. ASSEBLY: Sew in the sleeves. Sew the collar together mid back – sew in the outermost loop of the outermost stitch. When the collar is turned down, there will be 4 stitches garter stitch mid back with knit 3 on each side of these stitches. Lay the right band over the left band and mark the position of the buttons. Sew the buttons onto the left band. |
|||||||||||||||||||||||||
Diagram explanations |
|||||||||||||||||||||||||
|
|||||||||||||||||||||||||
 |
|||||||||||||||||||||||||
 |
|||||||||||||||||||||||||
Have you finished this pattern?Tag your pictures with #dropspattern #svalbardjacket or submit them to the #dropsfan gallery. Do you need help with this pattern?You'll find 33 tutorial videos, a Comments/Questions area and more by visiting the pattern on garnstudio.com. © 1982-2026 DROPS Design A/S. We reserve all rights. This document, including all its sub-sections, has copyrights. Read more about what you can do with our patterns at the bottom of each pattern on our site. |
|||||||||||||||||||||||||


With over 40 years in knitting and crochet design, DROPS Design offers one of the most extensive collections of free patterns on the internet - translated to 17 languages. As of today we count 324 catalogs and 12290 patterns - 12280 of which are translated into English (US/in).
We work hard to bring you the best knitting and crochet have to offer, inspiration and advice as well as great quality yarns at incredible prices! Would you like to use our patterns for other than personal use? You can read what you are allowed to do in the Copyright text at the bottom of all our patterns. Happy crafting!
Post a comment to pattern DROPS 181-17
We would love to hear what you have to say about this pattern!
If you want to leave a question, please make sure you select the correct category in the form below, to speed up the answering process. Required fields are marked *.