
Popular categories
Looking for a yarn?


Comments / Questions (29)
![]() Elisa wrote:
Elisa wrote:
Mulla on kysymys mallineuleen rivistä 23. Miten sen alku tehdään? Aloitin rivin tekemällä langankierron, nostamalla yhden silmukan neulomatta, seuraavat kaksi neuloin yhteen ja nostin neulomatta nostetun niiden yli. Mutta tällä tavalla mallineule alkaa muodostua vähän väärään kohtaan.
05.05.2026 - 19:22
![]() RAQUEL wrote:
RAQUEL wrote:
Hola estoy con el cuello de la espalda y no lo entiendo si cierro los puntos centrales que son 24 como dejo los de los hombros
11.07.2025 - 17:52DROPS Design answered:
Hola Raquel, cuando cierres los puntos centrales, empezarás esa fila desde un hombro, trabajas sobre los puntos de ese hombro, cierras los 24 pts centrales del cuello y los puntos restantes son del segundo hombro. Ahora trabajas cada hombro por separado; primero dejas los puntos de un hombro en espera y trabajas de ida y vuelta sobre los puntos del otro hombro, cerrando al lado del cuello como se indica. Cuando termines el hombro coges los puntos en espera y trabajas el otro hombro.
16.07.2025 - 10:58
![]() Rgvm wrote:
Rgvm wrote:
Bonjour, je ne comprends pas ce qu'il faut faire à partir des 26cm de haut. Que veut dire 'tricoter 2 côte au point mousse, au dessus des 20 mailles. Et jusqu au bout merci
25.06.2025 - 14:23DROPS Design answered:
Bonjour Mme Rgvm, vous tricotez simplement 20 mailles point mousse de chaque côté du topo, soit 10 mailles point mousse de chaque côté des fils marqueurs (taille XXXL); autrement dit, tricotez ces 20 mailles alternativement 1 tour à l'endroit, 1 tour à l'envers, pendant un total de 4 tours (= 2 côtes mousse) - en même temps, tricotez les autres mailles comme avant. Puis, au tour suivant, rabattez 12 m de chaque côté = 6 m de chaque côté de chacun des fils marqueurs, il reste 4 m point mousse pour les emmanchures de chaque côté du dos/devant. Bon tricot!
25.06.2025 - 15:52
![]() Blanca wrote:
Blanca wrote:
¡Hola!¿ No me queda claro lo que es una hilera? ¿En tejido a 2 agujas ,sería para tejer a punto jersey, la vuelta del derecho más la del revés,o solo la del derecho? Gracias adelantadas!
02.05.2025 - 17:59DROPS Design answered:
Hola Blanca, hilera = fila. Después de trabajar en redondo pasas a trabajar de ida y vuelta, girando después de cada hilera/fila. Por lo tanto, 1 hilera significa trabajar sobre todos los puntos por un lado, antes de girar y puede ser por el lado derecho o por el lado revés.
03.05.2025 - 20:20
![]() Lulu wrote:
Lulu wrote:
Estoy empezando el cuello trasero , se tejen los puntos del hombro y luego se cierran los puntos del cuello y enseguida siguen los otros puntos del otro hombro en qué momento empiezo a disminuir los demás puntos del cuello ??? Sería por el revés ? O como sería
15.08.2024 - 20:07DROPS Design answered:
Hola Lulu, primero cierras los pts centrales y, después, en las filas que comienzan desde el escote, cierras 1 pt para el escote 1 vez en cada hombro.
18.08.2024 - 23:29
![]() Lulu wrote:
Lulu wrote:
La disminución de la sisa se hace sobre los 14 puntos donde hicimos los 2 surcos? Estoy haciendo la talla S me marca que hay que disminuir 6 , es decir 3 de cada lado, se tejen las disminuciones en derecho o revés?
06.08.2024 - 06:27
![]() Lourdes wrote:
Lourdes wrote:
Hola quisera saber cómo se empieza a tejer la vuelta 23 no entiendo porque se ve salido
03.08.2024 - 07:46DROPS Design answered:
Hola Lourdes, el inicio de la fila se mueve un pt hacia atrás. Trabajas la vuelta 22 entera. Comenzar la vuelta 23 deslizando el último pt de la vuelta 22 a la aguja izquierda y comienza trabajando el diagrama como se indica. De esta manera, el inicio de la vuelta se ha movido un pt hacia atrás. En cada repetición, el hueco en el diagrama se correspondería al punto que sobresale del inicio de la repetición. Finalmente, terminas la vuelta como normal y continúas trabajando el diagrama normal; el patrón debería quedar alineado.
05.08.2024 - 23:26
![]() Corrie Kramer wrote:
Corrie Kramer wrote:
Mag ik dit topje ook op gewone breinaalden breien?
11.06.2024 - 16:39DROPS Design answered:
Dag Corrie,
Om een patroon aan te passen om op rechte naalden te breien hebben we een instructie gemaakt. Deze vind je hier. Helaas is dit niet voor alle patronen mogelijk, maar kijk maar even of je hier wat mee kunt.
12.06.2024 - 16:12
![]() Angèle wrote:
Angèle wrote:
Encore moi, désolée. A la fin de ce même rang 23, je termine avec un jeté et une maille endroit où 2 mailles endroit. Merci pour votre réponse. Cordialement. Angèle
13.05.2024 - 16:16DROPS Design answered:
Bonjour Angèle, cf réponse ci-dessous = le 23ème tour se termine en tricotant à l'endroit le jeté fait au tout début du tour. Bon tricot!
14.05.2024 - 07:30
![]() Angèle wrote:
Angèle wrote:
Bonjour, Pour le rang 23, je fais un jeté, puis je glisse une maille, 2 ensembles et je passe la maille glissée sur les 2 tricotées. Où dois je placer le marqueur de début, après ou avant le jeté ? Merci pour votre retour. Cordialement Angèle
13.05.2024 - 16:11DROPS Design answered:
Bonjour Angèle, commencez le 23ème rang quand il reste la dernière maille du 22ème rang sur l'aiguille droite et procédez ainsi: faites 1 jeté (nouvelle dernière maille du tour), glissez la dernière maille du tour, tricotez les 2 premières mailles du tour ensemble à l'endroit et passez la m glissée par-dessus les mailles tricotées ensemble = 1ère maille du tour; faites 1 jeté et continuez A.1 comme indiqué dans le diagramme, tricotez ensuite la dernière maille de A.1 avec les 2 mailles du A.1 suivant (le 1er des 2 jetés est désormais la dernière maille de A.1). Bon tricot!
14.05.2024 - 07:30
|
|||||||||||||||||||
Joyful Jane#joyfuljanetop |
|||||||||||||||||||
 |
 |
||||||||||||||||||
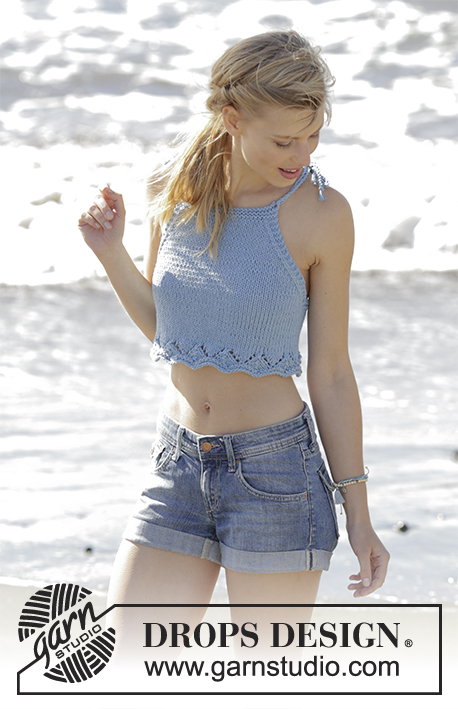
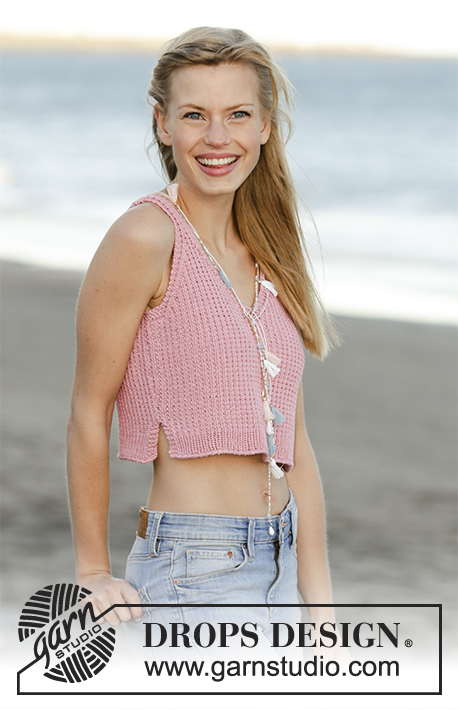
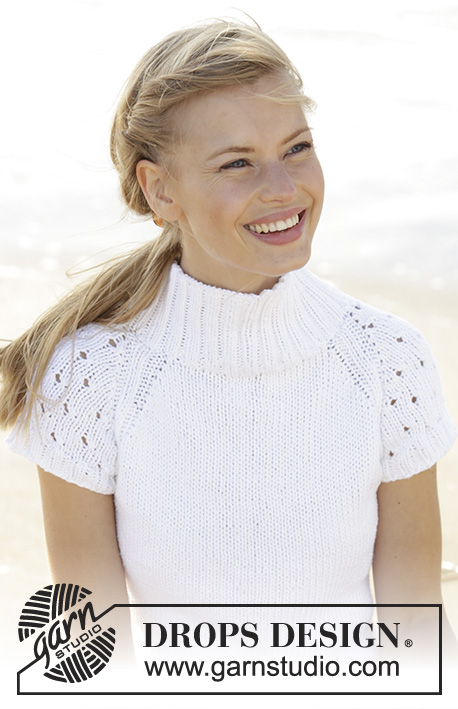
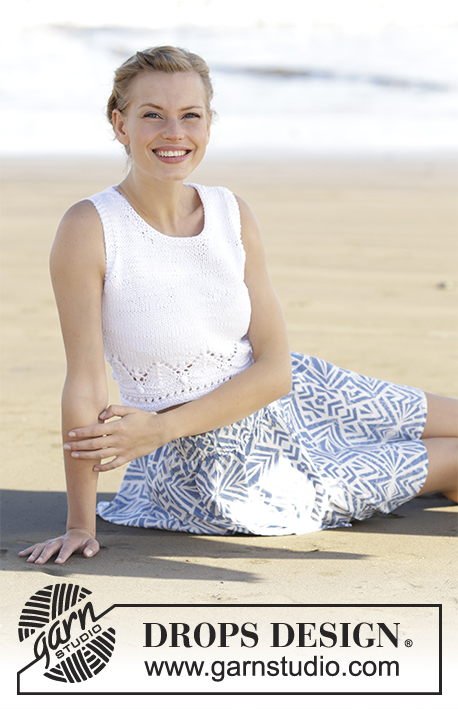
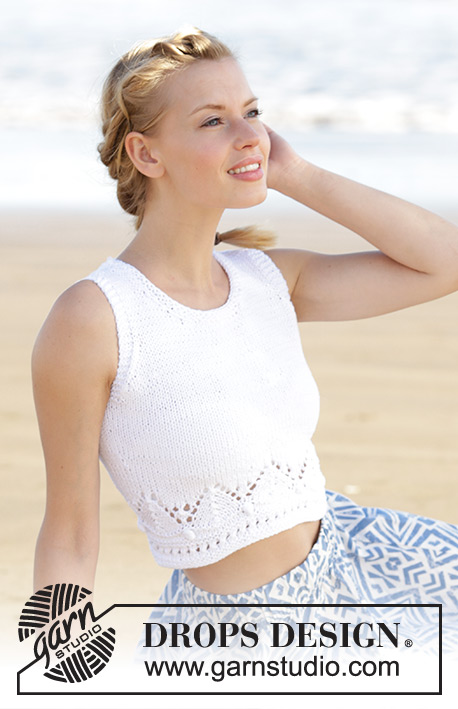
Knitted top with lace pattern in DROPS Paris. Size: S - XXXL
DROPS 178-67 |
|||||||||||||||||||
|
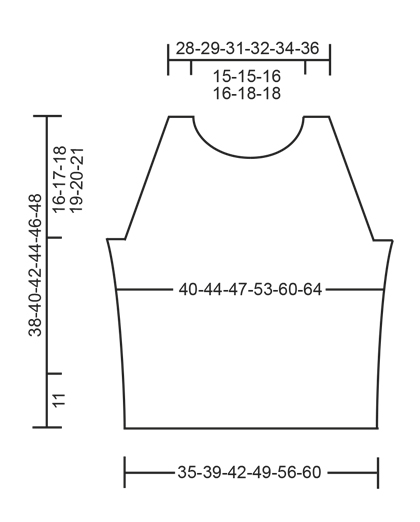
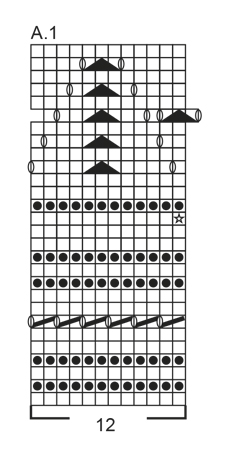
GARTER STITCH (worked in the round): 1 ridge = 2 rounds. Knit 1 round and purl 1 round. GARTER STITCH (back and forth): 1 ridge = knit 2 rows. PATTERN: See diagram A.1. INCREASE TIP (applies to sides of body): Work until 2 stitches remain before marker thread, make 1 yarn over, knit 4 (marker thread is in the middle of these 4 stitches), make 1 yarn over (= 2 stitches increased). On next round knit yarn overs twisted to avoid holes. DECREASE TIP (applies to armholes): Decrease for armholes inside 4 edge stitches in garter stitch. All decreases are done from the right side. Decrease as follows after 4 edge stitches in garter stitch: Slip 1 stitch knitwise, knit 1, pass slipped stitch over stitch worked (= 1 stitch decreased). Decrease as follows before 4 edge stitches in garter stitch: Begin 2 stitches before the 4 edge stitches and knit 2 together (= 1 stitch decreased). ---------------------------------------------------------- TOP: Worked in the round on circular needle up to armholes, then work front and back piece back and forth on circular needle separately. BODY: Cast on 120-132-144-168-192-204 stitches on circular needle size 4.5 mm / US 7 with Paris. Work A.1 (= 10-11-12-14-16-17 repetitions of 12 stitches). When 12 rounds have been worked in A.1, switch to circular needle size 5 mm / US 8 before continuing pattern. When A.1 has been worked, piece measures approx. 11 cm / 4½". Insert 1 marker thread at beginning of round and 1 marker thread after 60-66-72-84-96-102 stitches (= in the sides). Then work in stockinette stitch in the round. REMEMBER THE GAUGE! When piece measures 13-13-14-14-14-15 cm / 5"-5"-5½"-5½"-5½"-6", increase on each side of both marker threads – READ INCREASE TIP (= 4 stitches increased). Increase like this every 2-2-2-4-4-4 cm / ¾"-¾"-¾"-1½"-1½"-1½" a total of 4-4-4-3-3-3 times in each side = 136-148-160-180-204-216 stitches. When piece measures 21-22-23-24-25-26 cm / 8¼"-8¾"-9"-9½"-9¾"-10¼", work 2 ridges in GARTER STITCH - see explanation above, over the middle 14-14-16-18-18-20 stitches in each side (marker threads are in the middle of these stitches - work the other stiches in stockinette stitch as before). On first round after the 2 ridges, bind off the middle 6-6-8-10-10-12 stitches in each side for armholes (bind off 3-3-4-5-5-6 stitches on each side of both marker threads). Finish front and back piece separately. BACK PIECE: = 62-68-72-80-92-96 stitches. Work in stockinette stitch - work the outermost 4 stitches in each side in garter stitch. AT THE SAME TIME on first row from right side, decrease 1 stitch in each side for armholes - Read DECREASE TIP! Decrease like this every other row (i.e. every row from right side) 3-5-6-10-17-17 times in total and then every 4th row (i.e. every other row from right side) 4-4-4-3-0-0 times in total in each side = 48-50-52-54-58-62 stitches remain on row. Continue with stockinette stitch and 4 edge stitches in garter stitch in each side. When piece measures 36-38-40-42-44-46 cm / 14¼"-15"-15¾"-16½"-17¼"-18", bind off the middle 24-24-26-26-28-28 stitches for neck and finish each shoulder separately. Continue as before and bind off 1 stitch on next row from the neck = 11-12-12-13-14-16 stitches remain on shoulder. Continue until piece measures 38-40-42-44-46-48 cm / 15"-15¾"-16½"-17¼"-18"-19" and bind off. Work the other shoulder the same way. FRONT PIECE: = 62-68-72-80-92-96 stitches. Work the same way as on back piece and decrease for armholes in each side as on back piece. AT THE SAME when piece measures 30-32-33-35-36-38 cm / 11¾"-12½"-13"-13½"-14¼"-15", slip the middle 12-12-10-10-10-10 stitches on 1 stitch holder for neck and finish each shoulder separately. Continue as before and bind off for neck at the beginning of every row from neck as follows: bind off 2 stitches 2-2-3-3-3-3 times and 1 stitch 3-3-3-3-4-4 times = 11-12-12-13-14-16 stitches remain on shoulder. Continue until piece measures 38-40-42-44-46-48 cm / 15"-15¾"-16½"-17¼"-18"-19" and bind off. Work the other shoulder the same way. ASSEMBLY: Sew the shoulder seams. NECK: Pick up approx. 70 to 86 stitches around the neck (including stitches on stitch holder at front) on a short circular needle size 4.5 mm / US 7. Purl 1 round, knit 1 round and purl 1 round. Then loosely bind off with K. |
|||||||||||||||||||
Diagram explanations |
|||||||||||||||||||
|
|||||||||||||||||||
 |
|||||||||||||||||||
 |
|||||||||||||||||||
Have you finished this pattern?Tag your pictures with #dropspattern #joyfuljanetop or submit them to the #dropsfan gallery. Do you need help with this pattern?You'll find 32 tutorial videos, a Comments/Questions area and more by visiting the pattern on garnstudio.com. © 1982-2026 DROPS Design A/S. We reserve all rights. This document, including all its sub-sections, has copyrights. Read more about what you can do with our patterns at the bottom of each pattern on our site. |
|||||||||||||||||||


With over 40 years in knitting and crochet design, DROPS Design offers one of the most extensive collections of free patterns on the internet - translated to 17 languages. As of today we count 324 catalogs and 12291 patterns - 12281 of which are translated into English (US/in).
We work hard to bring you the best knitting and crochet have to offer, inspiration and advice as well as great quality yarns at incredible prices! Would you like to use our patterns for other than personal use? You can read what you are allowed to do in the Copyright text at the bottom of all our patterns. Happy crafting!
Post a comment to pattern DROPS 178-67
We would love to hear what you have to say about this pattern!
If you want to leave a question, please make sure you select the correct category in the form below, to speed up the answering process. Required fields are marked *.