
Looking for a yarn?


Comments / Questions (47)
![]() Helle Pedersen wrote:
Helle Pedersen wrote:
Hej! Jeg strikker toppen i str L. Jeg forstår ikke diagrammet A3. Jeg skal som jeg forstår det strikke fra pilen på vrangpinden. Dernæst bliver min næste respons i følge diagrammet en hel retpind, hvilket “ødelægger” mønstret. Der mangler et billede af ryggen på toppen. Vh. Helle
01.05.2025 - 10:51DROPS Design answered:
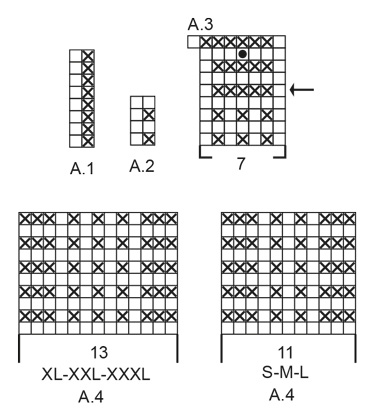
Hej Helle, A.3 skal kun strikkes over de midterste masker som skal blive til retstrik (ret fra retsiden og ret fra vrangen :)
06.05.2025 - 14:31
![]() Sara Andrea wrote:
Sara Andrea wrote:
Hei! Jeg skal strikke A2. Den andre raden på A2 er på vrangen, skal jeg strikke denne rett eller vrang? Skal strukturen på rad en være, rett og vrang og rad to, vrang på rettsiden?
04.04.2024 - 18:09DROPS Design answered:
Hei Sara Andrea, Når du strikker på vrangsiden, er hvite ruter strikket vrang og ruter med kryss strikket rett. Diagrammene leses fra venstre til høyre når man strikker på vrangsiden. God fornøyelse!
05.04.2024 - 06:57
![]() Jyotsna Naik wrote:
Jyotsna Naik wrote:
What I should be doing when I switch to the A.3 chart. It says the row marked by the arrow should be worked from the WS, but to do that, I’d have to work the row below from the RS, meaning I’d be doing a row of knitting. But the A.2 pattern states that for RS rows I should P1 K1. I’m not sure how these two charts fit together. Any help would be great.
02.01.2024 - 17:56DROPS Design answered:
Dear Jyotsna, after reaching the correct measurements, you need to work as shown in A.3 over the middle 7 stitches only (5 stitches in garter stitch and 1 stitch in stocking stitch on each side). The row from the wrong side will be: purl all stitches except the 5 stitches in garter stitch. Then, on the row from the RS, work in rib (p1,k1) until you reach the 7 A.3 stitches, and then, k1,k5,k1. Happy knitting!
07.01.2024 - 17:56
![]() ROSA KIAN wrote:
ROSA KIAN wrote:
I figured out my previous question, but I am confused on the decreases for neck and armhole. It said to do it at the same time. for the neck stars decreasing 1 sts TOG, and then said when measure 21 cm start the 2 ridges of A.2 before decreasing the 7 sts for the armhole, so the decreases don't start at the same time. can you help me please
25.04.2023 - 15:02DROPS Design answered:
Dear Mrs Kian, the decreases for neck and armhole will be worked at the same time, but correct you first start decreasing for neck, then at the same time you will shape armhole (= work garter stitch, then cast off sts towards armhole then decrease for armhole). Happy knitting!
26.04.2023 - 08:33
![]() ROSA KIAN wrote:
ROSA KIAN wrote:
Please in A2 there are 2 ridge, the first one; 1 purl, 1 knit..., the second one, all purl , this is going to be the wrong side right? so when you got in A3, start from the wrong side, this mean the row that is all purl?
24.04.2023 - 22:32DROPS Design answered:
Hi Rosa, A.2 pattern is a textured pattern, not ridges (which would be knitted from both sides). You begin A.2 from the right side and finish from the wrong side after 4 rows. Then you begin A.3 from the right side, bottom row with K1, P1. Happy knitting!
25.04.2023 - 08:07
![]() Francisca wrote:
Francisca wrote:
Hola, al iniciar 3 puntos musgo, 1 d, y a1 , en el centro queda 1 punto reves , y al querer hacerlo coincidir con el punto que se agrega en a3 queda finalmente 1 derecho sobre 1 reves. Para que coincida es necesario iniciar 3 puntos musgo e inmediatamente 1 reves, de esa manera se logra el diagrama . He intentado iniciarlo como explica pero no coincide el punto del medio Saludos
17.11.2022 - 04:40DROPS Design answered:
Hola Francisca, comienzas con 1d para que el elástico quede simétrico (comienza y termina con 1d). Por lo tanto, no es necesario que quede alineado el punto central.
20.11.2022 - 23:12
![]() Kelly wrote:
Kelly wrote:
'When piece measures 5 cm, cast on 1 new stitch at the end of the next 2 rows (marks where vents end) = 83-91-99-109-121-135 stitches. Work pattern as follows: 1 edge stitch in garter stitch, knit 1, A.2 until 1 stitch remains, 1 edge stitch in garter stitch.' I'm very confused after the increase. I followed the pattern, but it doesn't match up with the previous row with the 3 Gartner stitches. I'm getting Gartner, knit, purl, knit, 'knit'. What am I doing wrong?
05.07.2022 - 16:13DROPS Design answered:
Dear Kelly, you previously started with 3 sts garter stitch, K1, then A.1 (P1, K1) - from RS; after the new st cast on work: 1 st in garter st (new stitch), K1 (the first of the 3 garter sts), A.2 (= P1, K1 on first row) -= the 3 sts previously worked in garter stitch, then continue with A.2 over A.1 (= P1, K1 on first row in A.2 over A.1 = P1, K1) - and same at the end of the row. Can this help? Happy knitting!
06.07.2022 - 09:02
![]() Annamaria wrote:
Annamaria wrote:
Buongiorno \r\nNon ho capito quando faccio il primo aumento 83 maglie\r\nNon mi corrispondono le maglie 1/1grazie mille buona giornata
05.07.2022 - 09:58DROPS Design answered:
Buongiorno Annamaria, il primo aumento porta solo 2 maglie di vivagno a maglia legaccio (una per lato) che non impattano sul motivo. Buon lavoro!
06.07.2022 - 08:52
![]() Chantal wrote:
Chantal wrote:
Bonjour Il me semble bizarre que le rang avec flèche de A3 soit tricoté sur l'envers puisque le rang précédent (tricoté selon A2) est sur l'envers. A2 : sur l'endroit, j'alterne mailles endroit et envers. sur l'envers je tricote toutes les mailles à l'envers. Est-ce une erreur ? ou je n'ai pas bien compris ?
09.06.2022 - 10:02DROPS Design answered:
Bonjour Chantal, effectivement, une note a été envoyée à nos stylistes, j'ajusterai A.3 comme il faut pour retomber juste (= pour que les 1ers rangs de A.3 sous la flèche correspondent à A.2), en attendant un retour. Merci d'avance, bonne continuation!
09.06.2022 - 13:23
![]() María Fernanda Yáñez wrote:
María Fernanda Yáñez wrote:
Hola! Para la talla M, los 95 puntos de A2 no encajan con el sentido de los 7 puntos centrales de A3 (para que encajen tendría que tener 43 puntos a un lado y 45 en el otro). Hago el comentario para saber si es que hay un error en el patrón. Gracias por la respuesta.
15.03.2022 - 05:30
|
|||||||||||||
Mazo#mazotop |
|||||||||||||
 |
 |
||||||||||||
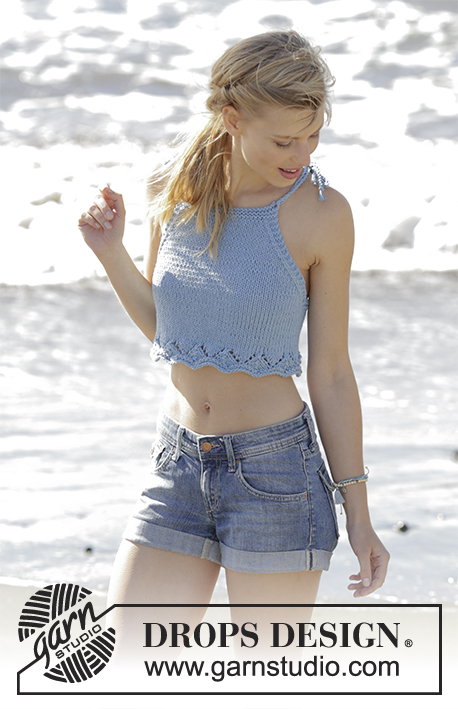
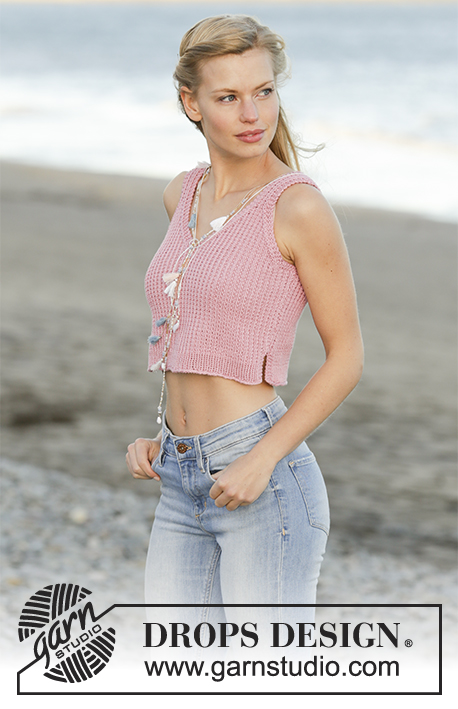
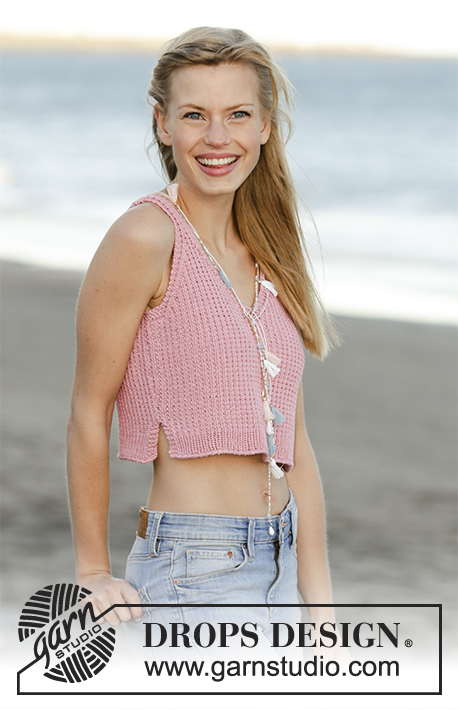
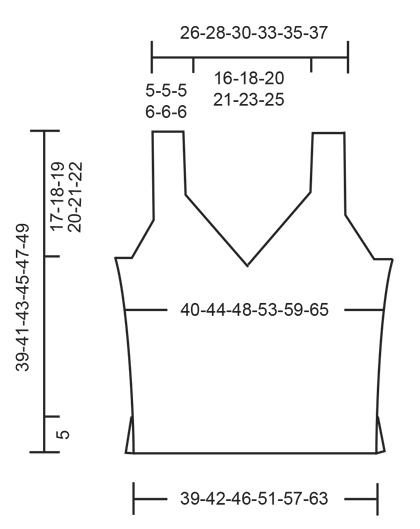
Top with V-neck, textured pattern and vents in the sides, worked bottom up in DROPS Muskat. Size: S - XXXL.
DROPS 178-66 |
|||||||||||||
|
GARTER STITCH (back and forth): Knit all rows. 1 ridge = knit 2 rows. PATTERN: See diagrams A.1 to A.4. Diagrams show all rows in pattern seen from the right side. Choose diagram for your size. INCREASE TIP: Increase 1 stitch by making a yarn over. On next row knit yarn over twisted to avoid hole. NOTE: Work the new stitches gradually in the pattern A.2. DECREASE TIP: Decrease 1 stitch inside 3 edge stitches in garter stitch. All decreases are done from the right side. Decrease as follows after 3 edge stitches in garter stitch: Slip 1 stitch knitwise, knit 1, pass slipped stitch over stitch worked Decrease as follows before 3 edge stitches in garter stitch: Begin 2 stitches before the 3 edge stitches in garter stitch and knit 2 together. ---------------------------------------------------------- TOP: Worked back and forth in 2 parts and sewn together when finished. BACK PIECE: Cast on 81-89-97-107-119-133 stitches with Muskat on circular needle size 4 mm / US 6. Purl 1 row from wrong side. Work rib as follows (1st row = right side): Work 3 stitches in GARTER STITCH - see explanation above, knit 1 stitch, repeat A.1 (= 2 stitches) until 3 stitches remain on row, work 3 stitches in garter stitch. Continue pattern back and forth like this until A.1 has been worked vertically. Then work A.2 (= 2 stitches) over A.1. REMEMBER THE GAUGE! When piece measures 5 cm / 2", cast on 1 new stitch at the end of the next 2 rows (marks where vents end) = 83-91-99-109-121-135 stitches. Work pattern as follows: 1 edge stitch in garter stitch, knit 1, A.2 until 1 stitch remains, 1 edge stitch in garter stitch. When piece measures 7 cm / 2¾", increase 1 stitch inside 1 edge stitches in garter stitch in each side - READ INCREASE TIP! Repeat increase when piece measures 10 cm / 4" = 87-95-103-113-125-139 stitches. When piece measures 19-20-21-22-23-24 cm / 7½"-8"-8¼"-8¾"-9"-9½", work from arrow in A.3 over the middle 7 stitches on row - adjust so that this row marked with arrow is worked from wrong side. On first row from right side after A.3 work over the first 44-48-52-57-63-70 stitches on row and slip the remaining 44-48-52-57-63-70 stitches on 1 stitch holder. RIGHT SIDE AT THE BACK: = 44-48-52-57-63-70 stitches. READ ALL OF THE FOLLOWING SECTION - decrease for neck and armhole at the same time as follows: Work pattern A.2 as before with 3 edge stitches in garter stitch towards neck and 1 edge stitch in garter stitch towards the side. NECK: On first row from right side begin decrease for neck. Decrease 1 stitch inside the 3 edge stitches in garter stitch - READ DECREASE TIP. Decrease like this every other row (i.e. on every row from right side) 16-18-20-22-24-26 times in total. ARMHOLE: When piece measures 21-22-23-24-25-26 cm / 8¼"-8¾"-9"-9½"-9¾"-10¼", work in garter stitch over the outermost 10-10-12-11-11-14 stitches towards the side (including 1 edge stitch in garter stitch). When 4 rows have been worked (= 2 ridges) over these stitches, bind off the first 7-7-9-8-8-11 stitches at beginning of row for armhole. Work the next 3 stitches in garter stitch (= edge towards armhole). Decrease 1 stitch inside the 3 edge stitches in garter stitch towards the armhole. Decrease like this every other row (i.e. on every row from right side) 10-12-12-14-18-20 times in total. After all bind offs and decreases for armhole and neck, 11-11-11-13-13-13 stitches remain on row for strap. Continue the pattern as before with 3 edge stitches in garter stitch in each side. Work strap as shown in A.4 - choose diagram for size. When piece measures 39-41-43-45-47-49 cm / 15¼"-16"-17"-17¾"-18½"-19¼", bind off all stitches. LEFT SIDE AT THE BACK: Slip the 44-48-52-57-63-70 stitches from stitch holder in the other side back on circular needle size 4 mm / US 6 and work the same way as right side at the back but reversed – NOTE: When binding off for armhole in the side, bind off at beginning of row from wrong side (instead of beginning of row from right side). The remaining decreases for armhole and neck are done from right side. FRONT PIECE: Cast on and work as back piece. ASSEMBLY: Sew the two straps together with grafting/kitchener stitches to avoid a chunky seam. Sew side seam inside 1 edge stitch in garter stitch in each side from armhole and down to vent. Repeat in the other side. Fasten off. |
|||||||||||||
Diagram explanations |
|||||||||||||
|
|||||||||||||
|
|||||||||||||
|
|||||||||||||
Have you finished this pattern?Tag your pictures with #dropspattern #mazotop or submit them to the #dropsfan gallery. Do you need help with this pattern?You'll find 23 tutorial videos, a Comments/Questions area and more by visiting the pattern on garnstudio.com. © 1982-2025 DROPS Design A/S. We reserve all rights. This document, including all its sub-sections, has copyrights. Read more about what you can do with our patterns at the bottom of each pattern on our site. |
|||||||||||||


With over 40 years in knitting and crochet design, DROPS Design offers one of the most extensive collections of free patterns on the internet - translated to 17 languages. As of today we count 314 catalogs and 11822 patterns - 11812 of which are translated into English (US/in).
We work hard to bring you the best knitting and crochet have to offer, inspiration and advice as well as great quality yarns at incredible prices! Would you like to use our patterns for other than personal use? You can read what you are allowed to do in the Copyright text at the bottom of all our patterns. Happy crafting!
Post a comment to pattern DROPS 178-66
We would love to hear what you have to say about this pattern!
If you want to leave a question, please make sure you select the correct category in the form below, to speed up the answering process. Required fields are marked *.