
Popular categories
Looking for a yarn?


Comments / Questions (241)
![]() Polixas Christins wrote:
Polixas Christins wrote:
Eine Frage zum Schallkragen:wird nur einmal 1 Krausrippe nur über die ersten 10 Maschen gestrickt,oder 18mal vor jeder Zunahme?
24.10.2022 - 17:40DROPS Design answered:
Liebe Frau Polixas, diese verkürzten Reihen werden nur einmal gestrickt, ie 2 Reihen nach dem letzten Knopfloch. Viel Spaß beim stricken!
25.10.2022 - 08:58
![]() Anitta Kivijärvi wrote:
Anitta Kivijärvi wrote:
Nämä lyhennetyt kerrokset...en oikein ymmärrä, mistä aloitetaan?
02.10.2022 - 14:58
![]() Andrea wrote:
Andrea wrote:
Hallo, ich bin mir bei "Jackson " gerade unschlüssig. Ich stricke mit Karisma in Größe xl. Für die Ärmel sollen nach 77 Maschen von beiden Seite Markierer eingesetzt werden. Zähle ich inklusive der 10 Maschen für die Blende oder ohne ?
21.09.2022 - 19:34DROPS Design answered:
Liebe Andrea, ja genau, die 10 Maschen sind damit gezählt = es sind 131 Maschen für den Rückenteil zwischen den Markierungen. Viel Spaß beim stricken!
22.09.2022 - 09:37
![]() Gaby Meyer wrote:
Gaby Meyer wrote:
Ich kann die Anleitung leider nicht ganz ausdrucken!?!? LG Gaby
04.06.2022 - 16:44DROPS Design answered:
Liebe Gaby, schauen Sie mal die Druckereinstellungen, damit alle Seiten (7 hier) eingedruckt werden. Sie können auch mal versuchen, den Cache zu leeren, das hilft auch manchmal. Viel Spaß beim stricken!
07.06.2022 - 08:18
![]() Suzanne Crosier wrote:
Suzanne Crosier wrote:
Hi I have few questions about this pattern. I'm work on body section and have gotten to point that I need to place 2 markers. I am making xxl so I place markers in stitch 83 it's states in garter stitches I don't believe there ate garter stitches in middle of body section. Then it states to continue pattern. Do I repeat last 2 rows? Knit over knit purl over purl then on next row follow charts A3A , A3B AND A3C and only do this row on right side.
20.04.2022 - 03:28DROPS Design answered:
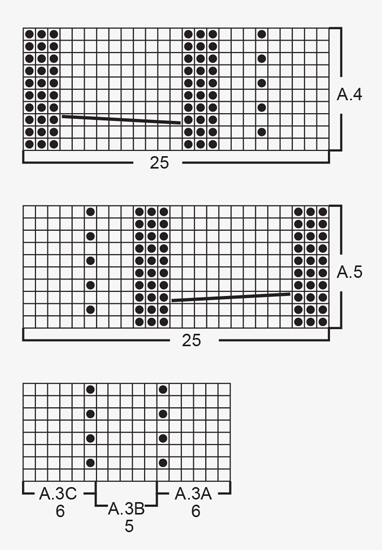
Dear Mrs Crosier, the markers should be in a stitch worked in garter stitch: the last stitch of the 8th repeat of A.3A after A.4 and the first stitch of the last 8th repeat before A.5. Work now following diagrams (with a cable in A.4 and A.5 as shown), when diagrams are done in height, repeat them from first row. Happy knitting!
20.04.2022 - 07:23
![]() Fennie Eefting wrote:
Fennie Eefting wrote:
Ik begrijp de afwerking van de sjaalkraag niet. Welke gedeeltes moet ik aan elkaar naaien en hoe naai ik dit weer langs de hals. Ik heb verschillende mogelijkheden geprobeerd maar kom er niet uit.
04.04.2022 - 14:21DROPS Design answered:
Dag Fennie,
Als het goed is heb je twee 'uitsteeksels' gebreid, eentje op het linker en eentje op het rechter voorpand. De korte kanten (dus de afkantranden) daarvan naai je eerst aan elkaar. Daarna naai je de kraag aan de halslijn vast.
08.04.2022 - 00:02
![]() Christine Lindop wrote:
Christine Lindop wrote:
I'm wondering about sizes for this pattern. Do you have a standard set of sizes for men's patterns? Usually patterns will indicate what chest size a particular instruction relates to, e.g. S = 38in, M = 40 etc. , and how much ease is included.
18.03.2022 - 18:44DROPS Design answered:
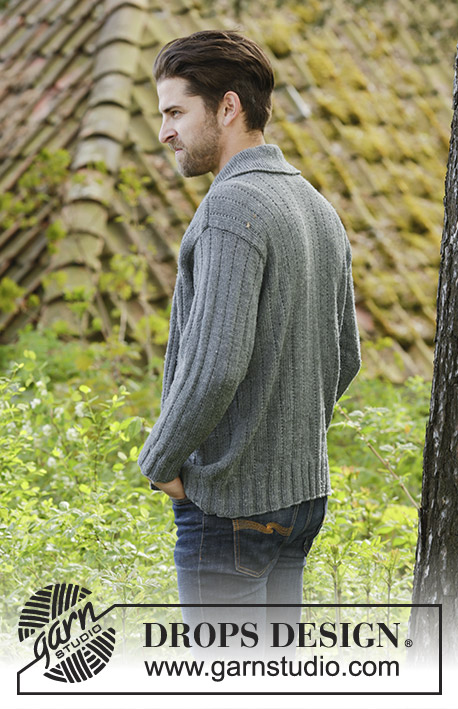
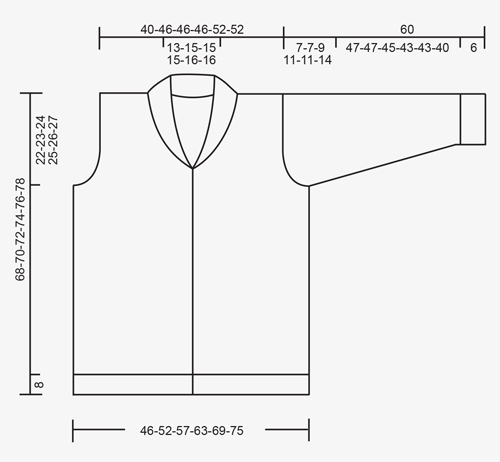
Dear Christine, you can find the measurements in the figure below the pattern. These measurements are in cm; you can transform them into inches for more confort. This model seems to have a bit of ease (but it's not too loose). Happy knitting!
20.03.2022 - 19:47
![]() ANNIE IGLESIAS wrote:
ANNIE IGLESIAS wrote:
Bonjour, Merci de me donner l'explication modèle jackson 174-1 , pas de maille sauter cette case, pour moi cela n'est pas clair, je voudrai savoir en détail le rang endroit ainsi que le rang envers concernant cette case. Merci pour votre aide, Cordialement, Annie
14.01.2022 - 10:48DROPS Design answered:
Bonjour Annie, Lorsque vous tricotez l'avant-dernier rang de A.1B/A.2B, vous diminuez 1 mailles en tricotant 2 mailles ensemble à l'envers, il reste donc 3 mailles envers au dernier rang de A.1B/A.2B (= 3 mailles envers, la case noire = maille diminuée). Bon tricot!
14.01.2022 - 16:34
![]() Debora Reintsema wrote:
Debora Reintsema wrote:
Er zit een fout in het patroon. Ik ben maat xxxl aan het breien. Maar bij de boordsteek moet het patroon 25 x in plaats van 21 keer herhaald worden, anders komt het niet uit met de steken.
04.01.2022 - 16:24
![]() Hanan Salah wrote:
Hanan Salah wrote:
Bonjour madame pour les rangs raccourcis du col les premières 18/20 mailles du côté milieu ou début du rang ?
29.12.2021 - 18:04DROPS Design answered:
Bonjour Hanah, pour les rangs raccourcis du col les premières 18/20 mailles sont tricotees du côté milieu. Cette partie du col sera plus large. Bon tricot!
29.12.2021 - 21:00
|
|||||||||||||||||||
Jackson#jacksoncardigan |
|||||||||||||||||||
 |
 |
||||||||||||||||||
Knitted DROPS men’s jacket with simple cable, textured pattern and shawl collar in Karisma. Size: XS - XXXL.
DROPS 174-1 |
|||||||||||||||||||
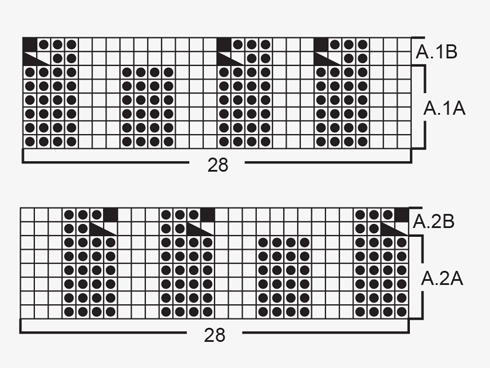
|
GARTER ST (back and forth): K all rows. 1 ridge = K2 rows. PATTERN: See diagrams A.1 to A.5. The diagrams show all rows in pattern seen from RS. KNITTING TIP (applies to bands): To keep the bands from contracting vertically work short rows over bands as follows: * Beg mid front and K the outermost 10 sts (= band), turn piece, slip 1st st as if to K, tighten yarn and K the rest of row *, repeat from *-* after approx. every 10 rows in piece. INCREASE TIP-1 (applies to shawl collar): Inc 1 st in next to last st towards mid front by K in front and back loop of same st. INCREASE TIP-2 (applies to mid under sleeve): Inc 1 st on each side of st with marker mid under sleeve. Inc 1 st by making 1 YO, on next round work YO twisted to avoid holes. Work the inc sts in the pattern A.3. DECREASE TIP (applies to neckline): Dec inside 10 band sts in garter st + inc sts for shawl collar. All dec are done from RS! Dec as follows before band + collar: K 2 tog. Dec as follows after collar + band: Slip 1 st as if to K, K 1, psso. BUTTONHOLES: Dec for buttonholes from RS on left band (when garment is worn). 1 buttonhole = work 6 band sts as before, slip next to last st on right needle over outermost st on right needle, K 1, slip next to last st on right needle over outermost st on right needle (2 sts bind off), K the last 3 sts. On next row cast on 2 new sts over the bind off sts. Dec for buttonholes when piece measures: SIZE XS/S: 2, 12, 21, 31, 40 and 50 cm SIZE M: 2, 12, 21, 31, 41 and 51 cm Size L: 2, 12, 22, 32, 42 and 52 cm SIZE XL: 3, 13, 23, 33, 43 and 53 cm Size XXL: 3, 13, 23, 33, 43 and 54 cm SIZE XXXL: 3, 13, 24, 34, 45 and 55 cm ---------------------------------------------------------- JACKET: Worked back and forth on circular needle from mid front. BODY: Cast on 243-271-299-327-355-383 sts (includes 10 band sts in each side towards mid front) on circular needle size 3 mm / US 2.5 with Karisma. P 1 row from WS. Work next row as follows from RS: 10 band sts in GARTER ST – see explanation above, A.1A (= 28 sts), * K 3, P 4 *, repeat from *-* 11-13-15-17-19-21 times in total, K 3, P 7 (= mid back), * K 3, P 4 *, repeat from *-* 11-13-15-17-19-21 times in total, K 3, A.2A (= 28 sts) and 10 band sts in garter st. Work back from WS with garter st over garter st, P over P, K over K. Continue rib until piece measures 8 cm / 3⅛", remember BUTTONHOLES on left band – see explanation above and KNITTING TIP. Work next row as follows from RS: 10 band sts as before, A.1B (= 28 sts dec to 25 sts), * K 3, P 2, P 2 tog *, repeat from *-* 11-13-15-17-19-21 times in total, K 3, P 2 tog, P 3, P 2 tog, * K 3, P 2, P 2 tog *, repeat from *-* 11-13-15-17-19-21 times in total, K 3, A.2B (= 28 sts dec to 25 sts) and 10 band sts as before = 213-237-261-285-309-333 sts. Work back from WS with garter st over garter st, P over P, K over K, (work A.1B and A.2B as shown in diagram). Switch to circular needle size 4 mm / US 6 and work next row from RS as follows: 10 band sts as before, A.4 (= 25 sts), work A.3A over the next 72-84-96-108-120-132 sts (= 12-14-16-18-20-22 repetitions of 6 sts), work A.3B (= 5 sts), work A.3C over the next 66-78-90-102-114-126 sts (= 11-13-15-17-19-21 repetitions of 6 sts), work A.5 (= 25 sts) and finish with 10 band sts as before. Insert 1 marker in the 59th-65th-71st-77th-83rd-89th st in from each side (markers are in a st in garter st in the sides on body). Continue the pattern like this and move the markers upwards when working. REMEMBER THE KNITTING GAUGE When piece measures 46-47-48-49-50-51 cm / 18"-18½"-19"-19¼"-19¾"-20", bind off 7 sts in each side for armholes (i.e. Bind off st with marker + 3 sts on each side of this). Then finish front and back piece separately. BACK PIECE: = 89-101-113-125-137-149 sts. Continue A.3 on back piece as before and bind off for armholes at beg of every row in each side as follows: bind off 2 sts 0-0-2-5-5-7 times and 1 st 2-2-4-4-4-6 times = 85-97-97-97-109-109 sts. Continue to work until piece measures 66-68-70-72-74-76 cm / 26"-26¾"-27½"-28⅜"-29⅛"-30". Now bind off the middle 23-27-27-27-29-29 sts for neck and finish each shoulder separately. Bind off 2 st on next row from neck = 29-33-33-33-38-38 sts remain on the shoulder. Continue to work until piece measures 68-70-72-74-76-78 cm / 26¾"-27½"-28⅜"-29⅛"-30"-30¾" and loosely bind off. Repeat on the other shoulder. LEFT FRONT PIECE: = 55-61-67-73-79-85 sts. Continue the pattern as before and bind off for armhole at beg of every row from the side as on back piece. AT THE SAME TIME when 2 rows have been worked after last buttonhole on band work 1 ridge (i.e. 2 rows K) over only the outermost 10 band sts towards mid front (do not work the other sts on row). Then work over all sts on row as before. AT THE SAME TIME inc 1 st for shawl collar towards mid front – READ INCREASE TIP-1. Inc like this every other row 18-18-18-20-20-20 times in total. AT THE SAME TIME when piece measures 52-53-54-55-56-57 cm / 20½"-21"-21¼"-21⅝"-22"-22½" (2 cm / ¾" should now be worked after last buttonhole), dec 1 st for neckline towards mid front - READ DECREASE TIP. Dec like this every other row (i.e. every row from RS) a total of 10-12-12-12-13-13 times and then every 4th row (i.e. every other row from RS) 4 times in total in all sizes. After all inc and dec, there are 57-61-61-63-68-68 sts on needle. When piece measures 68-70-72-74-76-78 cm / 26¾"-27½"-28⅜"-29⅛"-30"-30¾", bind off the outermost 29-33-33-33-38-38 sts on shoulder = 28-28-28-30-30-30 sts remain for collar. Continue back and forth in garter st over these sts as follows: * 1 ridge over all sts, 1 ridge over only the outermost 18-18-18-20-20-20 sts *, repeat from *-* until collar measures approx. 9-9-9-10-10-10 cm / 3½"-3½"-3½"-4"-4"-4" inside on the most narrow (collar measures approx. 18-18-18-20-20-20 cm / 7"-7"-7"-8"-8"-8" at the edge on the widest). Bind off. RIGHT FRONT PIECE: Work as left but reversed. NOTE: Do not dec for buttonholes on right band. When working 1 ridge over only the outermost 10 sts towards mid front, adjust according to left front piece. SLEEVE: Cast on 56-56-63-63-63-70 sts on double pointed needles size 3 mm / US 2.5 with Karisma. K 1 round. Work next round as follows: * K 3, P 4 *, repeat from *-* the entire round. When piece measures 6 cm / 2⅜", work next round as follows: * K 3, P 2, P 2 tog *, repeat from *-* the entire round = 48-48-54-54-54-60 sts. Switch to double pointed needles size 4 mm / US 6 and work pattern in the round according to diagram A.3A. Insert 1 marker in last st on round (i.e. in st in garter st = mid under sleeve) and move the marker upwards. When piece measures 8 cm / 3⅛", inc 2 sts mid under sleeve - READ INCREASE TIP-2. Inc a total of 18-20-20-22-25-25 times in Size S: On every 7th round, in size M + L: On every 6th round, in size XL: On every 5th round, in size XXL: Alternately on every 4th and 5th round and size XXXL: On every 4th round = 84-88-94-98-104-110 sts. When piece measures 53-53-51-49-49-46 cm / 21"-21"-20"-19¼"-19¼"-18" (NOTE: Shorter measurements in the larger sizes because of longer sleeve cap and wider shoulders) bind off the middle 7 sts under sleeve (bind off st with marker + 3 sts on each side of this). Now work sleeve cap back and forth on circular needle. Continue with the pattern while AT THE SAME TIME binding off at beg of every row in each side as follows: bind off 3 sts 1 time, 2 sts 1-1-2-3-3-4 time and 1 st 2-2-3-3-3-6 times. Continue to cast off 2 sts in each side of piece until piece measures 59 cm / 23¼" in all sizes, bind off 3 sts 1 time in each side and bind off the remaining sts. Sleeve measures approx. 60 cm / 23½" in all sizes. Make another sleeve the same way. ASSEMBLY: Sew the shoulder seams. Sew collar tog mid back (make sure that seam is not visible when collar is folded down). Sew collar to neckline in the back of neck. Sew in sleeves. Sew the buttons on to the right band. |
|||||||||||||||||||
Diagram explanations |
|||||||||||||||||||
|
|||||||||||||||||||
 |
|||||||||||||||||||
 |
|||||||||||||||||||
 |
|||||||||||||||||||
Have you finished this pattern?Tag your pictures with #dropspattern #jacksoncardigan or submit them to the #dropsfan gallery. Do you need help with this pattern?You'll find 25 tutorial videos, a Comments/Questions area and more by visiting the pattern on garnstudio.com. © 1982-2026 DROPS Design A/S. We reserve all rights. This document, including all its sub-sections, has copyrights. Read more about what you can do with our patterns at the bottom of each pattern on our site. |
|||||||||||||||||||


With over 40 years in knitting and crochet design, DROPS Design offers one of the most extensive collections of free patterns on the internet - translated to 17 languages. As of today we count 324 catalogs and 12290 patterns - 12280 of which are translated into English (US/in).
We work hard to bring you the best knitting and crochet have to offer, inspiration and advice as well as great quality yarns at incredible prices! Would you like to use our patterns for other than personal use? You can read what you are allowed to do in the Copyright text at the bottom of all our patterns. Happy crafting!
Post a comment to pattern DROPS 174-1
We would love to hear what you have to say about this pattern!
If you want to leave a question, please make sure you select the correct category in the form below, to speed up the answering process. Required fields are marked *.