
Popular categories
Looking for a yarn?


Comments / Questions (241)
![]() Yulia wrote:
Yulia wrote:
Hi, somehow I can't find the collar knit instructions in the pattern. Can you refer me to it? Also, is there a video tutorial for the buttonholes? Thanks
10.12.2024 - 03:44DROPS Design answered:
Hi Yulia, The collar instructions are incorporated into the front piece instructions. Here is a link to working buttonholes: https://www.garnstudio.com/videos.php?c=knitting-videos-tips-tricks-band-butto&lang=en Happy knitting!
10.12.2024 - 06:43
![]() Athena wrote:
Athena wrote:
Hello! I am knitting the body in size XS/S. The instructions say that I decrease for the last buttonhole when the piece measures 50cm but when knitting the body, the piece must measure 46cm before casting off for the armholes. I've already knitted about 35cm of the body. What could I do?
06.12.2024 - 21:18DROPS Design answered:
Dear Athena, the last buttonhole is worked when you work the separate front pieces at the top, after the armholes. You can see in the picture that the last buttonhole is slightly above the armhole, which would fit the 4cm difference you stated. The actual front pieces, up to the shoulders, measures 68 cm for the smallest size (you can also find this measurement in the size chart below). Happy knitting!
08.12.2024 - 00:56
![]() Norah Carr wrote:
Norah Carr wrote:
Hi I’m at the stage to stitch the neck and collar on but it’s just not working colder is to big , I am really struck please advise me . Help .
17.11.2024 - 21:44DROPS Design answered:
Dear Norah, take into account that this type of neck is quite big, since it's a shawl collar, where the edges are later on folded outwards, so it will look very big before folding it. If it seems too big for you you could work less increases for the neck before casting off for the shoulder. Happy knitting!
18.11.2024 - 00:13
![]() María Soledad Gil Micharet wrote:
María Soledad Gil Micharet wrote:
En la chaqueta Jackson, en el delantero, después de cerrar el hombro, cuando dice pliegue sobre los 20 puntos más externos, cuales son?, los más cercanos o los más alejados del hombro Muchas gracias
21.10.2024 - 00:53DROPS Design answered:
Hola María Soledad, son los 20 puntos más alejados del hombro, los que después se doblarán hacia fuera.
27.10.2024 - 13:20
![]() Marianne Verduin wrote:
Marianne Verduin wrote:
Ik ben met het linker voorpand bezig. Ik heb 73 st. Dan moet ik 20x meerderen en 12 minderen en nog eens 4x minderen. Dan heb ik: 73+20=93-12=81-4=77., In de beschrijving staat dat ik dan 63 st over heb. Waar gaat het fout?
10.10.2024 - 15:29DROPS Design answered:
Dag Marianne,
Je kant daarnaast ook in totaal 14 steken af voor het armsgat. Dan klopt het precies met het aantal steken.
19.10.2024 - 12:11
![]() Julia wrote:
Julia wrote:
Hello. On the left front part of the knitting, how exactly should increases and shortened rows be done? Are increases done before the last st of the row (edge) or before the first st of the band? And when knitting shortened rows (every 10 rows), should we knit both the band sts and the collar sts (20 sts of the collar + 10 sts of the band) or only the last band sts (10 sts)? This is the part of the knitting from dividing the main part into the left, the back and the right front to shoulder(xl).
14.08.2024 - 13:18DROPS Design answered:
Dear Julia, starting from RS, work the first 10 sts turn and work these 10 sts back (from WS), turn and work 1 row over all stitches (from RS), turn and work the first 10 sts (from WS), turn and work these 10 sts back (from RS), turn and work 1 row over all stitches (from WS). You have now worked 2 extra rows over the 10 sts on each side (right front piece and left front piece). Happy knitting!
16.08.2024 - 07:06
![]() Angelica Gracia Garcia wrote:
Angelica Gracia Garcia wrote:
Quiero dejar una sugerencia En la parte de las disminuciones del cuello deberían aclarar que un método es para el lado izquierdo y el otro es para el derecho, me demore un buen rato comprendiendolo
08.08.2024 - 21:40
![]() Sofie wrote:
Sofie wrote:
Når der skal felles på innsiden av 10 stolpemasker + økte masker, hvor skal jeg felle da?
24.07.2024 - 22:59DROPS Design answered:
Hei Sofie, Du feller rett etter rillemaskene på begynnelsen av pinnen og rett før rillemaskene på slutten av pinnen, slik at stolpen/kraven fortsetter med samme antall masker hele veien. God fornøyelse!
30.07.2024 - 06:58
![]() María Soledad Gil Micharet wrote:
María Soledad Gil Micharet wrote:
Tengo dudas en los aumentos y disminuciones del cuello. Donde se hace la disminución, antes o después del aumento?. Si la hago después no aumentan los puntos para el cuello, y si la hago antes disminuyen los puntos del delantero. Podría aclararme esta duda? Gracias
21.05.2024 - 00:15DROPS Design answered:
Hola María, los aumentos se trabajan según el TIP-1 PARA LOS AUMENTOS, el aumento para el cuello chal es en el penúltimo pt hacia el centro del delantero. La disminución para el escote se hace entre el cuello chal y el delantero; entre los pts del delantero y los pts del borde (así que más lejos del centro del delantero que el aumento), puedes ver más información en TIP PARA LAS DISMINUCIONES (línea del escote)
27.05.2024 - 01:20
![]() María Soledad Gil Micharet wrote:
María Soledad Gil Micharet wrote:
No comprendo la explicación respecto a como hacer el pliegue en el delantero. Es lo mismo que una vuelta corta?
16.05.2024 - 13:24DROPS Design answered:
Hola María Soledad, sí, sería como si trabajaras vueltas o filas acortadas; solo trabajas sobre los puntos del pliegue y no el resto de la fila.
19.05.2024 - 23:24
|
|||||||||||||||||||
Jackson#jacksoncardigan |
|||||||||||||||||||
 |
 |
||||||||||||||||||
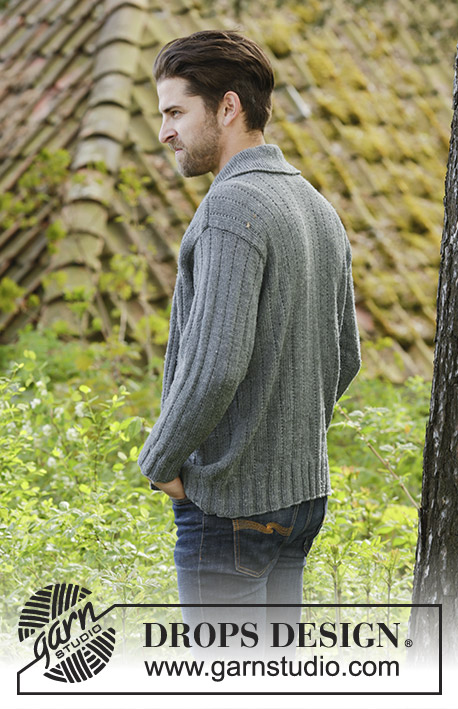
Knitted DROPS men’s jacket with simple cable, textured pattern and shawl collar in Karisma. Size: XS - XXXL.
DROPS 174-1 |
|||||||||||||||||||
|
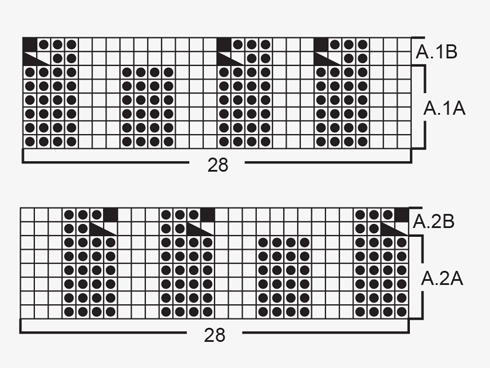
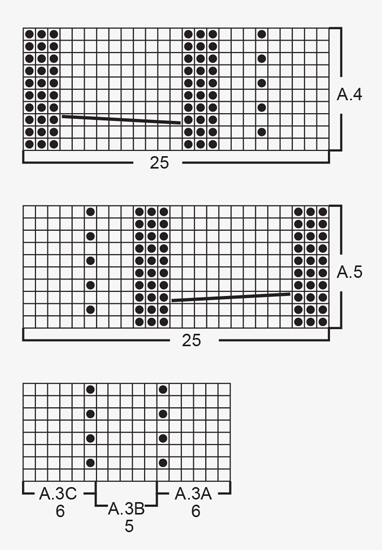
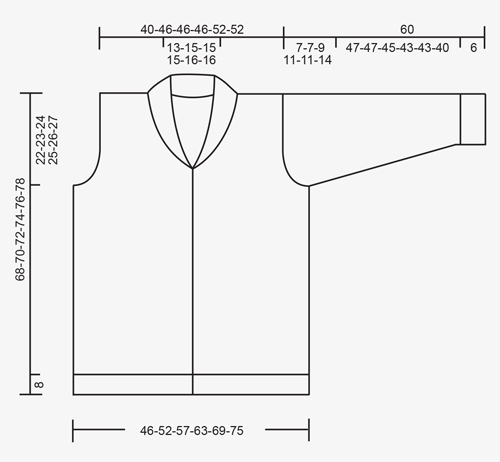
GARTER ST (back and forth): K all rows. 1 ridge = K2 rows. PATTERN: See diagrams A.1 to A.5. The diagrams show all rows in pattern seen from RS. KNITTING TIP (applies to bands): To keep the bands from contracting vertically work short rows over bands as follows: * Beg mid front and K the outermost 10 sts (= band), turn piece, slip 1st st as if to K, tighten yarn and K the rest of row *, repeat from *-* after approx. every 10 rows in piece. INCREASE TIP-1 (applies to shawl collar): Inc 1 st in next to last st towards mid front by K in front and back loop of same st. INCREASE TIP-2 (applies to mid under sleeve): Inc 1 st on each side of st with marker mid under sleeve. Inc 1 st by making 1 YO, on next round work YO twisted to avoid holes. Work the inc sts in the pattern A.3. DECREASE TIP (applies to neckline): Dec inside 10 band sts in garter st + inc sts for shawl collar. All dec are done from RS! Dec as follows before band + collar: K 2 tog. Dec as follows after collar + band: Slip 1 st as if to K, K 1, psso. BUTTONHOLES: Dec for buttonholes from RS on left band (when garment is worn). 1 buttonhole = work 6 band sts as before, slip next to last st on right needle over outermost st on right needle, K 1, slip next to last st on right needle over outermost st on right needle (2 sts bind off), K the last 3 sts. On next row cast on 2 new sts over the bind off sts. Dec for buttonholes when piece measures: SIZE XS/S: 2, 12, 21, 31, 40 and 50 cm SIZE M: 2, 12, 21, 31, 41 and 51 cm Size L: 2, 12, 22, 32, 42 and 52 cm SIZE XL: 3, 13, 23, 33, 43 and 53 cm Size XXL: 3, 13, 23, 33, 43 and 54 cm SIZE XXXL: 3, 13, 24, 34, 45 and 55 cm ---------------------------------------------------------- JACKET: Worked back and forth on circular needle from mid front. BODY: Cast on 243-271-299-327-355-383 sts (includes 10 band sts in each side towards mid front) on circular needle size 3 mm / US 2.5 with Karisma. P 1 row from WS. Work next row as follows from RS: 10 band sts in GARTER ST – see explanation above, A.1A (= 28 sts), * K 3, P 4 *, repeat from *-* 11-13-15-17-19-21 times in total, K 3, P 7 (= mid back), * K 3, P 4 *, repeat from *-* 11-13-15-17-19-21 times in total, K 3, A.2A (= 28 sts) and 10 band sts in garter st. Work back from WS with garter st over garter st, P over P, K over K. Continue rib until piece measures 8 cm / 3⅛", remember BUTTONHOLES on left band – see explanation above and KNITTING TIP. Work next row as follows from RS: 10 band sts as before, A.1B (= 28 sts dec to 25 sts), * K 3, P 2, P 2 tog *, repeat from *-* 11-13-15-17-19-21 times in total, K 3, P 2 tog, P 3, P 2 tog, * K 3, P 2, P 2 tog *, repeat from *-* 11-13-15-17-19-21 times in total, K 3, A.2B (= 28 sts dec to 25 sts) and 10 band sts as before = 213-237-261-285-309-333 sts. Work back from WS with garter st over garter st, P over P, K over K, (work A.1B and A.2B as shown in diagram). Switch to circular needle size 4 mm / US 6 and work next row from RS as follows: 10 band sts as before, A.4 (= 25 sts), work A.3A over the next 72-84-96-108-120-132 sts (= 12-14-16-18-20-22 repetitions of 6 sts), work A.3B (= 5 sts), work A.3C over the next 66-78-90-102-114-126 sts (= 11-13-15-17-19-21 repetitions of 6 sts), work A.5 (= 25 sts) and finish with 10 band sts as before. Insert 1 marker in the 59th-65th-71st-77th-83rd-89th st in from each side (markers are in a st in garter st in the sides on body). Continue the pattern like this and move the markers upwards when working. REMEMBER THE KNITTING GAUGE When piece measures 46-47-48-49-50-51 cm / 18"-18½"-19"-19¼"-19¾"-20", bind off 7 sts in each side for armholes (i.e. Bind off st with marker + 3 sts on each side of this). Then finish front and back piece separately. BACK PIECE: = 89-101-113-125-137-149 sts. Continue A.3 on back piece as before and bind off for armholes at beg of every row in each side as follows: bind off 2 sts 0-0-2-5-5-7 times and 1 st 2-2-4-4-4-6 times = 85-97-97-97-109-109 sts. Continue to work until piece measures 66-68-70-72-74-76 cm / 26"-26¾"-27½"-28⅜"-29⅛"-30". Now bind off the middle 23-27-27-27-29-29 sts for neck and finish each shoulder separately. Bind off 2 st on next row from neck = 29-33-33-33-38-38 sts remain on the shoulder. Continue to work until piece measures 68-70-72-74-76-78 cm / 26¾"-27½"-28⅜"-29⅛"-30"-30¾" and loosely bind off. Repeat on the other shoulder. LEFT FRONT PIECE: = 55-61-67-73-79-85 sts. Continue the pattern as before and bind off for armhole at beg of every row from the side as on back piece. AT THE SAME TIME when 2 rows have been worked after last buttonhole on band work 1 ridge (i.e. 2 rows K) over only the outermost 10 band sts towards mid front (do not work the other sts on row). Then work over all sts on row as before. AT THE SAME TIME inc 1 st for shawl collar towards mid front – READ INCREASE TIP-1. Inc like this every other row 18-18-18-20-20-20 times in total. AT THE SAME TIME when piece measures 52-53-54-55-56-57 cm / 20½"-21"-21¼"-21⅝"-22"-22½" (2 cm / ¾" should now be worked after last buttonhole), dec 1 st for neckline towards mid front - READ DECREASE TIP. Dec like this every other row (i.e. every row from RS) a total of 10-12-12-12-13-13 times and then every 4th row (i.e. every other row from RS) 4 times in total in all sizes. After all inc and dec, there are 57-61-61-63-68-68 sts on needle. When piece measures 68-70-72-74-76-78 cm / 26¾"-27½"-28⅜"-29⅛"-30"-30¾", bind off the outermost 29-33-33-33-38-38 sts on shoulder = 28-28-28-30-30-30 sts remain for collar. Continue back and forth in garter st over these sts as follows: * 1 ridge over all sts, 1 ridge over only the outermost 18-18-18-20-20-20 sts *, repeat from *-* until collar measures approx. 9-9-9-10-10-10 cm / 3½"-3½"-3½"-4"-4"-4" inside on the most narrow (collar measures approx. 18-18-18-20-20-20 cm / 7"-7"-7"-8"-8"-8" at the edge on the widest). Bind off. RIGHT FRONT PIECE: Work as left but reversed. NOTE: Do not dec for buttonholes on right band. When working 1 ridge over only the outermost 10 sts towards mid front, adjust according to left front piece. SLEEVE: Cast on 56-56-63-63-63-70 sts on double pointed needles size 3 mm / US 2.5 with Karisma. K 1 round. Work next round as follows: * K 3, P 4 *, repeat from *-* the entire round. When piece measures 6 cm / 2⅜", work next round as follows: * K 3, P 2, P 2 tog *, repeat from *-* the entire round = 48-48-54-54-54-60 sts. Switch to double pointed needles size 4 mm / US 6 and work pattern in the round according to diagram A.3A. Insert 1 marker in last st on round (i.e. in st in garter st = mid under sleeve) and move the marker upwards. When piece measures 8 cm / 3⅛", inc 2 sts mid under sleeve - READ INCREASE TIP-2. Inc a total of 18-20-20-22-25-25 times in Size S: On every 7th round, in size M + L: On every 6th round, in size XL: On every 5th round, in size XXL: Alternately on every 4th and 5th round and size XXXL: On every 4th round = 84-88-94-98-104-110 sts. When piece measures 53-53-51-49-49-46 cm / 21"-21"-20"-19¼"-19¼"-18" (NOTE: Shorter measurements in the larger sizes because of longer sleeve cap and wider shoulders) bind off the middle 7 sts under sleeve (bind off st with marker + 3 sts on each side of this). Now work sleeve cap back and forth on circular needle. Continue with the pattern while AT THE SAME TIME binding off at beg of every row in each side as follows: bind off 3 sts 1 time, 2 sts 1-1-2-3-3-4 time and 1 st 2-2-3-3-3-6 times. Continue to cast off 2 sts in each side of piece until piece measures 59 cm / 23¼" in all sizes, bind off 3 sts 1 time in each side and bind off the remaining sts. Sleeve measures approx. 60 cm / 23½" in all sizes. Make another sleeve the same way. ASSEMBLY: Sew the shoulder seams. Sew collar tog mid back (make sure that seam is not visible when collar is folded down). Sew collar to neckline in the back of neck. Sew in sleeves. Sew the buttons on to the right band. |
|||||||||||||||||||
Diagram explanations |
|||||||||||||||||||
|
|||||||||||||||||||
 |
|||||||||||||||||||
 |
|||||||||||||||||||
 |
|||||||||||||||||||
Have you finished this pattern?Tag your pictures with #dropspattern #jacksoncardigan or submit them to the #dropsfan gallery. Do you need help with this pattern?You'll find 25 tutorial videos, a Comments/Questions area and more by visiting the pattern on garnstudio.com. © 1982-2026 DROPS Design A/S. We reserve all rights. This document, including all its sub-sections, has copyrights. Read more about what you can do with our patterns at the bottom of each pattern on our site. |
|||||||||||||||||||


With over 40 years in knitting and crochet design, DROPS Design offers one of the most extensive collections of free patterns on the internet - translated to 17 languages. As of today we count 324 catalogs and 12290 patterns - 12280 of which are translated into English (US/in).
We work hard to bring you the best knitting and crochet have to offer, inspiration and advice as well as great quality yarns at incredible prices! Would you like to use our patterns for other than personal use? You can read what you are allowed to do in the Copyright text at the bottom of all our patterns. Happy crafting!
Post a comment to pattern DROPS 174-1
We would love to hear what you have to say about this pattern!
If you want to leave a question, please make sure you select the correct category in the form below, to speed up the answering process. Required fields are marked *.