
Popular categories
Looking for a yarn?


Comments / Questions (241)
![]() Riedel Buijs wrote:
Riedel Buijs wrote:
Are the sleeves knitted in the round or back and forth?
11.05.2025 - 23:42DROPS Design answered:
Dear Riedel, the sleeves are knitted in the round up to the sleeve cap, which is worked back and forth (because you cast off stitches to join to the armhole). Happy knitting!
11.05.2025 - 23:51
![]() Fiona wrote:
Fiona wrote:
I am a bit confused with the pattern please could someone post a photo of the back of there finished cardigan. Why is there P7 stitches in the band. Thank you so much
11.05.2025 - 05:20DROPS Design answered:
Dear Fiona, the 7 purl stitches in the mid-back are part of the design of the pattern. Later on, you will: "P 2 tog, P 3, P 2 tog" these stitches, so you will have 5 purl stitches and it will fit better into the rib. Happy knitting!
11.05.2025 - 23:29
![]() Riedel Buijs wrote:
Riedel Buijs wrote:
Moeten de mouwen in het rond gebreid worden of heen en weer? Ik zie dit nl pas vermeld staan ná het breien van het boord. Alvast bedankt.
08.05.2025 - 13:09DROPS Design answered:
Dag Riedel,
Ja, je breit de mouw vanaf het begin steeds in de rondte op sokkenbreinaalden. Het kan ook met een rondbreinaald.
14.05.2025 - 13:03
![]() Ann-Charlotte Ahlborg wrote:
Ann-Charlotte Ahlborg wrote:
Hur många cm rörelsevidd räknar ni med?
27.02.2025 - 16:59DROPS Design answered:
Hej Ann-Charlotte. Måtten på måttskissen är mått på plagget så välj den storlek som passar utifrån den rörelsevidd som önskas (mät gärna ett redan befintligt plagg). Mvh DROPS Design
28.02.2025 - 08:05
![]() Moyra Hopkinson wrote:
Moyra Hopkinson wrote:
Direction of knit arrows not shown on diagrams, is this an error?
09.02.2025 - 10:46
![]() Marie Noëlle wrote:
Marie Noëlle wrote:
Bonjour, Je reprends les devants arrêtés à 47 cm. J'ai vu qu'il fallait commencer les augmentations 2 rangs après la dernière boutonnière, soit à 53 cm (taille M) - Mais a quel moment dois-je commencer les diminutions ? est-ce en même temps ?
14.01.2025 - 18:59DROPS Design answered:
Bonjour Marie Noëlle, vous augmentez pour le col châle au 1er rang juste après la dernière boutonnière (qui se fait à 51 cm en taille M, donc 51 cm + 2 rangs et vous commencez à diminuer pour l'encolure quand le devant mesure 53 cm, donc vous allez commencer les diminutions de l'encolure 2 cm après la dernière boutonnière. Bon tricot!
15.01.2025 - 08:33
![]() Darla wrote:
Darla wrote:
Hello everybody! Thank you for the pattern for this beautiful cardigan. My question may have been asked, but there are so many different languages, (which is great!). I’m a left handed knitter. I would like to start the next row where I bind off 7 stitches for armholes. Do I put the front stitches on a stitch holder while working the back? Bind off means to slip 2nd last stitch over last stitch? Thank you,
27.12.2024 - 19:30DROPS Design answered:
Dear Darla, you can see this video on how to bind off stitches: https://www.garnstudio.com/video.php?id=15&lang=en. And yes, you put the front stitches on a stitch holder while you work the back and put them back on the needles when you finish the back. Happy knitting!
30.12.2024 - 00:30
![]() Kathleen De Greef wrote:
Kathleen De Greef wrote:
Moet men bij het meerderen en minderen van de kraag steeds de dubbele rij van 10 st aan het begin herhalen? Om de naald dus, of enkel de eerste keer?
24.12.2024 - 10:37
![]() Ann-Charlotte Ahlborg wrote:
Ann-Charlotte Ahlborg wrote:
På bilden ser framkanten ut som vartannat varv från rätsidan är avigt. Är det inte så?
16.12.2024 - 15:12DROPS Design answered:
Hej Ann-Charlotte, framkanten är rätstickat med räta på alla varv :)
17.12.2024 - 14:02
![]() Laurie wrote:
Laurie wrote:
Hi, I'm excited to start this beautiful cardigan for my husband. Is there any reason not to put a pair of matching cables up the back to match the ones in the front?
12.12.2024 - 16:10
|
|||||||||||||||||||
Jackson#jacksoncardigan |
|||||||||||||||||||
 |
 |
||||||||||||||||||
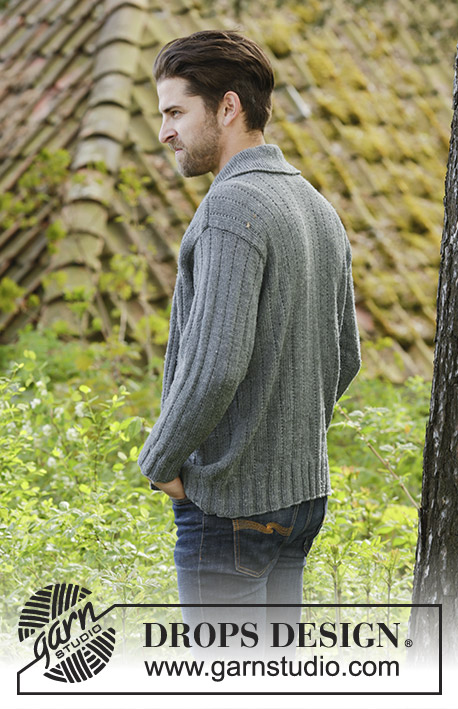
Knitted DROPS men’s jacket with simple cable, textured pattern and shawl collar in Karisma. Size: XS - XXXL.
DROPS 174-1 |
|||||||||||||||||||
|
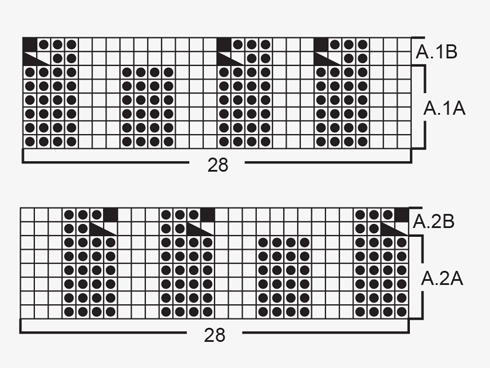
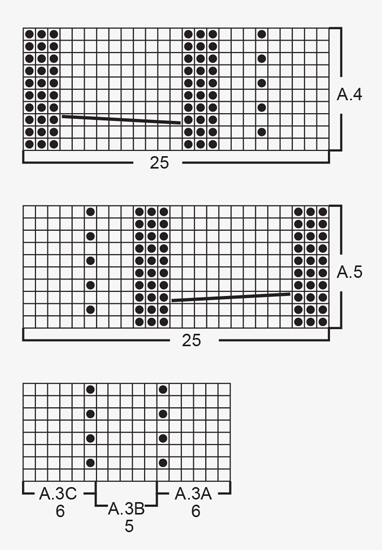
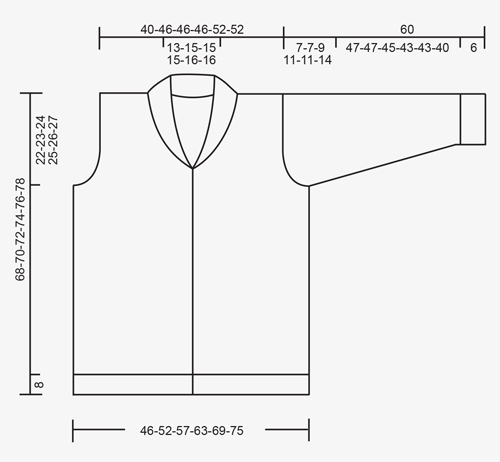
GARTER ST (back and forth): K all rows. 1 ridge = K2 rows. PATTERN: See diagrams A.1 to A.5. The diagrams show all rows in pattern seen from RS. KNITTING TIP (applies to bands): To keep the bands from contracting vertically work short rows over bands as follows: * Beg mid front and K the outermost 10 sts (= band), turn piece, slip 1st st as if to K, tighten yarn and K the rest of row *, repeat from *-* after approx. every 10 rows in piece. INCREASE TIP-1 (applies to shawl collar): Inc 1 st in next to last st towards mid front by K in front and back loop of same st. INCREASE TIP-2 (applies to mid under sleeve): Inc 1 st on each side of st with marker mid under sleeve. Inc 1 st by making 1 YO, on next round work YO twisted to avoid holes. Work the inc sts in the pattern A.3. DECREASE TIP (applies to neckline): Dec inside 10 band sts in garter st + inc sts for shawl collar. All dec are done from RS! Dec as follows before band + collar: K 2 tog. Dec as follows after collar + band: Slip 1 st as if to K, K 1, psso. BUTTONHOLES: Dec for buttonholes from RS on left band (when garment is worn). 1 buttonhole = work 6 band sts as before, slip next to last st on right needle over outermost st on right needle, K 1, slip next to last st on right needle over outermost st on right needle (2 sts bind off), K the last 3 sts. On next row cast on 2 new sts over the bind off sts. Dec for buttonholes when piece measures: SIZE XS/S: 2, 12, 21, 31, 40 and 50 cm SIZE M: 2, 12, 21, 31, 41 and 51 cm Size L: 2, 12, 22, 32, 42 and 52 cm SIZE XL: 3, 13, 23, 33, 43 and 53 cm Size XXL: 3, 13, 23, 33, 43 and 54 cm SIZE XXXL: 3, 13, 24, 34, 45 and 55 cm ---------------------------------------------------------- JACKET: Worked back and forth on circular needle from mid front. BODY: Cast on 243-271-299-327-355-383 sts (includes 10 band sts in each side towards mid front) on circular needle size 3 mm / US 2.5 with Karisma. P 1 row from WS. Work next row as follows from RS: 10 band sts in GARTER ST – see explanation above, A.1A (= 28 sts), * K 3, P 4 *, repeat from *-* 11-13-15-17-19-21 times in total, K 3, P 7 (= mid back), * K 3, P 4 *, repeat from *-* 11-13-15-17-19-21 times in total, K 3, A.2A (= 28 sts) and 10 band sts in garter st. Work back from WS with garter st over garter st, P over P, K over K. Continue rib until piece measures 8 cm / 3⅛", remember BUTTONHOLES on left band – see explanation above and KNITTING TIP. Work next row as follows from RS: 10 band sts as before, A.1B (= 28 sts dec to 25 sts), * K 3, P 2, P 2 tog *, repeat from *-* 11-13-15-17-19-21 times in total, K 3, P 2 tog, P 3, P 2 tog, * K 3, P 2, P 2 tog *, repeat from *-* 11-13-15-17-19-21 times in total, K 3, A.2B (= 28 sts dec to 25 sts) and 10 band sts as before = 213-237-261-285-309-333 sts. Work back from WS with garter st over garter st, P over P, K over K, (work A.1B and A.2B as shown in diagram). Switch to circular needle size 4 mm / US 6 and work next row from RS as follows: 10 band sts as before, A.4 (= 25 sts), work A.3A over the next 72-84-96-108-120-132 sts (= 12-14-16-18-20-22 repetitions of 6 sts), work A.3B (= 5 sts), work A.3C over the next 66-78-90-102-114-126 sts (= 11-13-15-17-19-21 repetitions of 6 sts), work A.5 (= 25 sts) and finish with 10 band sts as before. Insert 1 marker in the 59th-65th-71st-77th-83rd-89th st in from each side (markers are in a st in garter st in the sides on body). Continue the pattern like this and move the markers upwards when working. REMEMBER THE KNITTING GAUGE When piece measures 46-47-48-49-50-51 cm / 18"-18½"-19"-19¼"-19¾"-20", bind off 7 sts in each side for armholes (i.e. Bind off st with marker + 3 sts on each side of this). Then finish front and back piece separately. BACK PIECE: = 89-101-113-125-137-149 sts. Continue A.3 on back piece as before and bind off for armholes at beg of every row in each side as follows: bind off 2 sts 0-0-2-5-5-7 times and 1 st 2-2-4-4-4-6 times = 85-97-97-97-109-109 sts. Continue to work until piece measures 66-68-70-72-74-76 cm / 26"-26¾"-27½"-28⅜"-29⅛"-30". Now bind off the middle 23-27-27-27-29-29 sts for neck and finish each shoulder separately. Bind off 2 st on next row from neck = 29-33-33-33-38-38 sts remain on the shoulder. Continue to work until piece measures 68-70-72-74-76-78 cm / 26¾"-27½"-28⅜"-29⅛"-30"-30¾" and loosely bind off. Repeat on the other shoulder. LEFT FRONT PIECE: = 55-61-67-73-79-85 sts. Continue the pattern as before and bind off for armhole at beg of every row from the side as on back piece. AT THE SAME TIME when 2 rows have been worked after last buttonhole on band work 1 ridge (i.e. 2 rows K) over only the outermost 10 band sts towards mid front (do not work the other sts on row). Then work over all sts on row as before. AT THE SAME TIME inc 1 st for shawl collar towards mid front – READ INCREASE TIP-1. Inc like this every other row 18-18-18-20-20-20 times in total. AT THE SAME TIME when piece measures 52-53-54-55-56-57 cm / 20½"-21"-21¼"-21⅝"-22"-22½" (2 cm / ¾" should now be worked after last buttonhole), dec 1 st for neckline towards mid front - READ DECREASE TIP. Dec like this every other row (i.e. every row from RS) a total of 10-12-12-12-13-13 times and then every 4th row (i.e. every other row from RS) 4 times in total in all sizes. After all inc and dec, there are 57-61-61-63-68-68 sts on needle. When piece measures 68-70-72-74-76-78 cm / 26¾"-27½"-28⅜"-29⅛"-30"-30¾", bind off the outermost 29-33-33-33-38-38 sts on shoulder = 28-28-28-30-30-30 sts remain for collar. Continue back and forth in garter st over these sts as follows: * 1 ridge over all sts, 1 ridge over only the outermost 18-18-18-20-20-20 sts *, repeat from *-* until collar measures approx. 9-9-9-10-10-10 cm / 3½"-3½"-3½"-4"-4"-4" inside on the most narrow (collar measures approx. 18-18-18-20-20-20 cm / 7"-7"-7"-8"-8"-8" at the edge on the widest). Bind off. RIGHT FRONT PIECE: Work as left but reversed. NOTE: Do not dec for buttonholes on right band. When working 1 ridge over only the outermost 10 sts towards mid front, adjust according to left front piece. SLEEVE: Cast on 56-56-63-63-63-70 sts on double pointed needles size 3 mm / US 2.5 with Karisma. K 1 round. Work next round as follows: * K 3, P 4 *, repeat from *-* the entire round. When piece measures 6 cm / 2⅜", work next round as follows: * K 3, P 2, P 2 tog *, repeat from *-* the entire round = 48-48-54-54-54-60 sts. Switch to double pointed needles size 4 mm / US 6 and work pattern in the round according to diagram A.3A. Insert 1 marker in last st on round (i.e. in st in garter st = mid under sleeve) and move the marker upwards. When piece measures 8 cm / 3⅛", inc 2 sts mid under sleeve - READ INCREASE TIP-2. Inc a total of 18-20-20-22-25-25 times in Size S: On every 7th round, in size M + L: On every 6th round, in size XL: On every 5th round, in size XXL: Alternately on every 4th and 5th round and size XXXL: On every 4th round = 84-88-94-98-104-110 sts. When piece measures 53-53-51-49-49-46 cm / 21"-21"-20"-19¼"-19¼"-18" (NOTE: Shorter measurements in the larger sizes because of longer sleeve cap and wider shoulders) bind off the middle 7 sts under sleeve (bind off st with marker + 3 sts on each side of this). Now work sleeve cap back and forth on circular needle. Continue with the pattern while AT THE SAME TIME binding off at beg of every row in each side as follows: bind off 3 sts 1 time, 2 sts 1-1-2-3-3-4 time and 1 st 2-2-3-3-3-6 times. Continue to cast off 2 sts in each side of piece until piece measures 59 cm / 23¼" in all sizes, bind off 3 sts 1 time in each side and bind off the remaining sts. Sleeve measures approx. 60 cm / 23½" in all sizes. Make another sleeve the same way. ASSEMBLY: Sew the shoulder seams. Sew collar tog mid back (make sure that seam is not visible when collar is folded down). Sew collar to neckline in the back of neck. Sew in sleeves. Sew the buttons on to the right band. |
|||||||||||||||||||
Diagram explanations |
|||||||||||||||||||
|
|||||||||||||||||||
 |
|||||||||||||||||||
 |
|||||||||||||||||||
 |
|||||||||||||||||||
Have you finished this pattern?Tag your pictures with #dropspattern #jacksoncardigan or submit them to the #dropsfan gallery. Do you need help with this pattern?You'll find 25 tutorial videos, a Comments/Questions area and more by visiting the pattern on garnstudio.com. © 1982-2026 DROPS Design A/S. We reserve all rights. This document, including all its sub-sections, has copyrights. Read more about what you can do with our patterns at the bottom of each pattern on our site. |
|||||||||||||||||||


With over 40 years in knitting and crochet design, DROPS Design offers one of the most extensive collections of free patterns on the internet - translated to 17 languages. As of today we count 324 catalogs and 12290 patterns - 12280 of which are translated into English (US/in).
We work hard to bring you the best knitting and crochet have to offer, inspiration and advice as well as great quality yarns at incredible prices! Would you like to use our patterns for other than personal use? You can read what you are allowed to do in the Copyright text at the bottom of all our patterns. Happy crafting!
Post a comment to pattern DROPS 174-1
We would love to hear what you have to say about this pattern!
If you want to leave a question, please make sure you select the correct category in the form below, to speed up the answering process. Required fields are marked *.