
Popular categories
Looking for a yarn?


Comments / Questions (241)
![]() Cecilie wrote:
Cecilie wrote:
Når jeg skal begynde rygstykket står der, at jeg skal lukke 2 m af i begyndelsen af hver pind i begge sider. Skal jeg så også lukke af i til slut på pinden? Ellers kan jeg ikke få masketallet til at passe.
12.04.2026 - 18:06DROPS Design answered:
Hei Cecilie. Det skal felles av til ermhull på begynnelsen av hver pinne i hver side slik, ikke på slutten også. Men hvilken str. strikker du og hva er maskeantallet ditt? mvh DROPS Design
13.04.2026 - 14:36
![]() José wrote:
José wrote:
Te snel op verzenden gedrukt. Als je aan het eind van een verkorte toer 1 steek afhaalt, dan wordt je bies toch steeds smaller? Of moet je dan in de eerstvolgende “gewone” toer weer een streek opzetten?
21.03.2026 - 10:36DROPS Design answered:
Dag José,
Je haalt de steek af, maar je kant hem niet a, dus je hebt nog steeds evenveel steken op de naald staan.
11.04.2026 - 11:22
![]() Hannele Hirvonen wrote:
Hannele Hirvonen wrote:
Mallitilkun mukaan koossa XL villatakin ympärys olisi 155 cm. Eli 21 silmukkaa on 10 cm. 327 silmukkaa / 21 silmukalla 15,5 x 10 cm = 155 cm. Olenko ymmärtänyt oikein ? Eli jos teen XL kokoiselle miehelle niin pitääkin tehdä L tai M koko.
18.03.2026 - 15:07DROPS Design answered:
Hei, koossa XL takin ympärys on 126 cm. Takissa on palmikoita ja raitoja, joten siitä tulee kapeampi kuin jos neulottaisiin pelkkää sileää neuletta kuten mallitilkussa.
18.03.2026 - 18:08
![]() J De Jong wrote:
J De Jong wrote:
Er staat “ga verder in boordsteek” maar ik zie nergens wat de boordsteek is? Of is dat de beschrijving “ A.1A (= 28 st), * 3 r, 4 av *, herhaal van *-* 11-13-15-17-19-21 keer in totaal, 3 r, 7 av (= middenachter), * 3 r, 4 av *, herhaal van *-* 11-13-15-17-19-21 keer in totaal, 3 r, A.2A (= 28 st)” ? Ik kom er niet uit.
15.03.2026 - 15:08DROPS Design answered:
Dag J De Jong,
Je gaat inderdaad gewoon verder met de gecreëerde boordsteek in combinatie met A.1a en A.2a.
15.03.2026 - 19:01
![]() Linda wrote:
Linda wrote:
Hallo, In de tekst staat beschreven brei als volgt aan de goede kant 10 steken daarna patroon A4 , A3A, A3B, A3C, A5 en eindig met 10 steken. Ga zo verder in patroon. Betekent dit dat ik op de terugrij / verkeerde kant alles tegen gesteld moet doen? Dus 10 steken , A5, A3C, A3B,A3A, A4 en 10 steken? Of moet ik weer dezelfde reeks doen maar dan de tweede rij van het patroon aanhouden? Ik doe nu het eerste maar ik weet niet zeker of dat juist is
19.02.2026 - 21:29DROPS Design answered:
Dag Linda,
Ja, dat klopt, op de teruggaande naald brei je als tegenovergesteld en lees je de patronen ook in tegenovergestelde richting.
20.02.2026 - 17:38
![]() Sharlene Parker wrote:
Sharlene Parker wrote:
Read all the information, all instructions are there, you just need to read til you find it,. Whenever I got confused I went back reread instructions and tips and followed as it was written and it worked. I think because they are European patterns our western mind read things differently. But the information says what it means. After I got past my western interpretation and followed what it said it became easy to understand.
22.01.2026 - 23:16
![]() Sharlene Parker wrote:
Sharlene Parker wrote:
I made a sweater in this pattern, last fall, for my husband. He is very fussy about what he wears, mainly because once he likes something it stays with him for ever. So after Christmas he asked me to knit him another sweater. Lo and behold he like this pattern so much he ask me to knit it again in another color. So if you have a fussy husband this pattern should do the trick. PS; it is true to size if you use the right gage yarn.
22.01.2026 - 23:08
![]() Myriam wrote:
Myriam wrote:
Linkervoorpand: Meerder TEGELIJKERTIJD 1st voor de sjaalkraag ‘middenvoor’. Wat moet ik als middenvoor zien: De steek naast het voorpand of de laatste steek van de ribbels van de bies?
22.01.2026 - 09:38DROPS Design answered:
Dag Myriam,
Je meerdert niet letterlijk op het punt midden voor maar op het einde van de naald aan de voorkant, zoals beschreven onder 'LEES TIP VOOR HET MEERDEREN-1'.
25.01.2026 - 20:27
![]() Lissi wrote:
Lissi wrote:
Diagram : Hvordan skal jeg gøre dette ? : ingen m (den er taget ind), spring over denne rude = ingen maske Og er det på vrangsiden jeg strikker denne
20.01.2026 - 21:41DROPS Design answered:
Hei Lissi. På raden før strikket du 2 masker sammen, så når du kommer til det sorte diagramikonet, er det ingen maske, bare strikk neste maske som forklart i oppskriften. Og det er når du er på vrangsiden (men det er ingen maske å strikke). mvh DROPS Design
30.01.2026 - 11:21
![]() Lora wrote:
Lora wrote:
Where can I find the sizing measurements for this sweater so I can figure out the amount of balls I need?
28.12.2025 - 20:54DROPS Design answered:
Hi Lora, the sizing measurements are at the bottom of the pattern. How to choose the right size you will find HERE. Happy knitting!
28.12.2025 - 21:12
|
|||||||||||||||||||
Jackson#jacksoncardigan |
|||||||||||||||||||
 |
 |
||||||||||||||||||
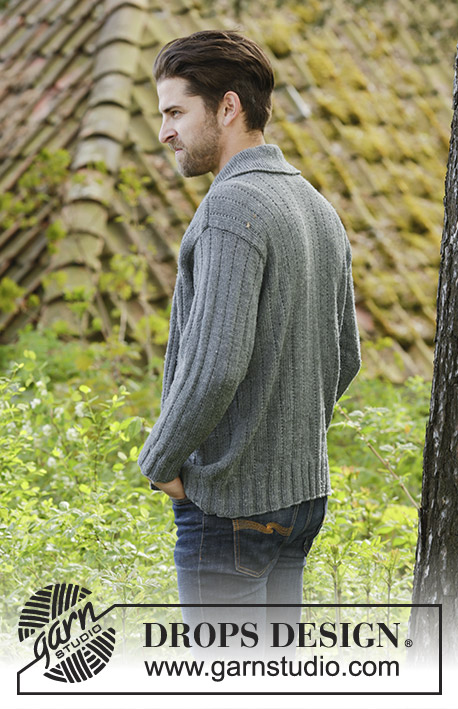
Knitted DROPS men’s jacket with simple cable, textured pattern and shawl collar in Karisma. Size: XS - XXXL.
DROPS 174-1 |
|||||||||||||||||||
|
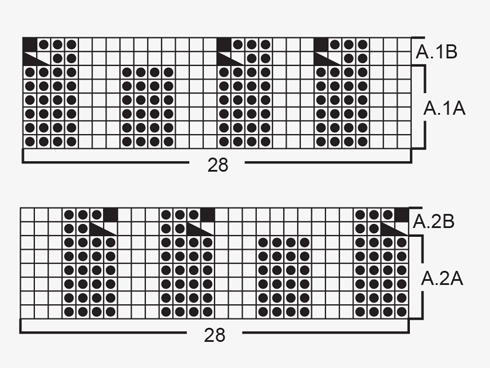
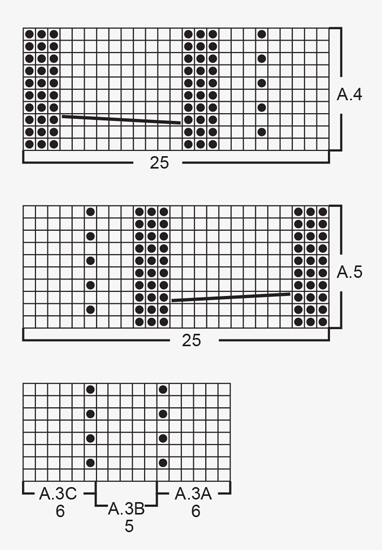
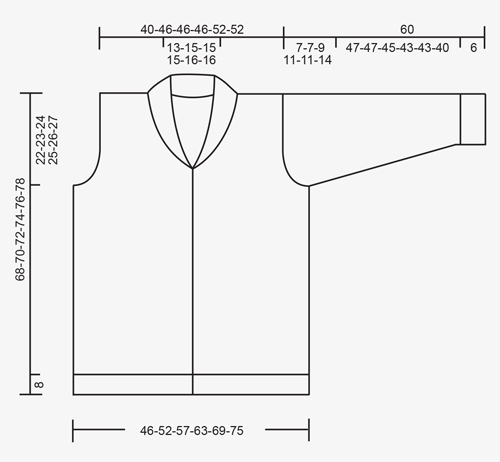
GARTER ST (back and forth): K all rows. 1 ridge = K2 rows. PATTERN: See diagrams A.1 to A.5. The diagrams show all rows in pattern seen from RS. KNITTING TIP (applies to bands): To keep the bands from contracting vertically work short rows over bands as follows: * Beg mid front and K the outermost 10 sts (= band), turn piece, slip 1st st as if to K, tighten yarn and K the rest of row *, repeat from *-* after approx. every 10 rows in piece. INCREASE TIP-1 (applies to shawl collar): Inc 1 st in next to last st towards mid front by K in front and back loop of same st. INCREASE TIP-2 (applies to mid under sleeve): Inc 1 st on each side of st with marker mid under sleeve. Inc 1 st by making 1 YO, on next round work YO twisted to avoid holes. Work the inc sts in the pattern A.3. DECREASE TIP (applies to neckline): Dec inside 10 band sts in garter st + inc sts for shawl collar. All dec are done from RS! Dec as follows before band + collar: K 2 tog. Dec as follows after collar + band: Slip 1 st as if to K, K 1, psso. BUTTONHOLES: Dec for buttonholes from RS on left band (when garment is worn). 1 buttonhole = work 6 band sts as before, slip next to last st on right needle over outermost st on right needle, K 1, slip next to last st on right needle over outermost st on right needle (2 sts bind off), K the last 3 sts. On next row cast on 2 new sts over the bind off sts. Dec for buttonholes when piece measures: SIZE XS/S: 2, 12, 21, 31, 40 and 50 cm SIZE M: 2, 12, 21, 31, 41 and 51 cm Size L: 2, 12, 22, 32, 42 and 52 cm SIZE XL: 3, 13, 23, 33, 43 and 53 cm Size XXL: 3, 13, 23, 33, 43 and 54 cm SIZE XXXL: 3, 13, 24, 34, 45 and 55 cm ---------------------------------------------------------- JACKET: Worked back and forth on circular needle from mid front. BODY: Cast on 243-271-299-327-355-383 sts (includes 10 band sts in each side towards mid front) on circular needle size 3 mm / US 2.5 with Karisma. P 1 row from WS. Work next row as follows from RS: 10 band sts in GARTER ST – see explanation above, A.1A (= 28 sts), * K 3, P 4 *, repeat from *-* 11-13-15-17-19-21 times in total, K 3, P 7 (= mid back), * K 3, P 4 *, repeat from *-* 11-13-15-17-19-21 times in total, K 3, A.2A (= 28 sts) and 10 band sts in garter st. Work back from WS with garter st over garter st, P over P, K over K. Continue rib until piece measures 8 cm / 3⅛", remember BUTTONHOLES on left band – see explanation above and KNITTING TIP. Work next row as follows from RS: 10 band sts as before, A.1B (= 28 sts dec to 25 sts), * K 3, P 2, P 2 tog *, repeat from *-* 11-13-15-17-19-21 times in total, K 3, P 2 tog, P 3, P 2 tog, * K 3, P 2, P 2 tog *, repeat from *-* 11-13-15-17-19-21 times in total, K 3, A.2B (= 28 sts dec to 25 sts) and 10 band sts as before = 213-237-261-285-309-333 sts. Work back from WS with garter st over garter st, P over P, K over K, (work A.1B and A.2B as shown in diagram). Switch to circular needle size 4 mm / US 6 and work next row from RS as follows: 10 band sts as before, A.4 (= 25 sts), work A.3A over the next 72-84-96-108-120-132 sts (= 12-14-16-18-20-22 repetitions of 6 sts), work A.3B (= 5 sts), work A.3C over the next 66-78-90-102-114-126 sts (= 11-13-15-17-19-21 repetitions of 6 sts), work A.5 (= 25 sts) and finish with 10 band sts as before. Insert 1 marker in the 59th-65th-71st-77th-83rd-89th st in from each side (markers are in a st in garter st in the sides on body). Continue the pattern like this and move the markers upwards when working. REMEMBER THE KNITTING GAUGE When piece measures 46-47-48-49-50-51 cm / 18"-18½"-19"-19¼"-19¾"-20", bind off 7 sts in each side for armholes (i.e. Bind off st with marker + 3 sts on each side of this). Then finish front and back piece separately. BACK PIECE: = 89-101-113-125-137-149 sts. Continue A.3 on back piece as before and bind off for armholes at beg of every row in each side as follows: bind off 2 sts 0-0-2-5-5-7 times and 1 st 2-2-4-4-4-6 times = 85-97-97-97-109-109 sts. Continue to work until piece measures 66-68-70-72-74-76 cm / 26"-26¾"-27½"-28⅜"-29⅛"-30". Now bind off the middle 23-27-27-27-29-29 sts for neck and finish each shoulder separately. Bind off 2 st on next row from neck = 29-33-33-33-38-38 sts remain on the shoulder. Continue to work until piece measures 68-70-72-74-76-78 cm / 26¾"-27½"-28⅜"-29⅛"-30"-30¾" and loosely bind off. Repeat on the other shoulder. LEFT FRONT PIECE: = 55-61-67-73-79-85 sts. Continue the pattern as before and bind off for armhole at beg of every row from the side as on back piece. AT THE SAME TIME when 2 rows have been worked after last buttonhole on band work 1 ridge (i.e. 2 rows K) over only the outermost 10 band sts towards mid front (do not work the other sts on row). Then work over all sts on row as before. AT THE SAME TIME inc 1 st for shawl collar towards mid front – READ INCREASE TIP-1. Inc like this every other row 18-18-18-20-20-20 times in total. AT THE SAME TIME when piece measures 52-53-54-55-56-57 cm / 20½"-21"-21¼"-21⅝"-22"-22½" (2 cm / ¾" should now be worked after last buttonhole), dec 1 st for neckline towards mid front - READ DECREASE TIP. Dec like this every other row (i.e. every row from RS) a total of 10-12-12-12-13-13 times and then every 4th row (i.e. every other row from RS) 4 times in total in all sizes. After all inc and dec, there are 57-61-61-63-68-68 sts on needle. When piece measures 68-70-72-74-76-78 cm / 26¾"-27½"-28⅜"-29⅛"-30"-30¾", bind off the outermost 29-33-33-33-38-38 sts on shoulder = 28-28-28-30-30-30 sts remain for collar. Continue back and forth in garter st over these sts as follows: * 1 ridge over all sts, 1 ridge over only the outermost 18-18-18-20-20-20 sts *, repeat from *-* until collar measures approx. 9-9-9-10-10-10 cm / 3½"-3½"-3½"-4"-4"-4" inside on the most narrow (collar measures approx. 18-18-18-20-20-20 cm / 7"-7"-7"-8"-8"-8" at the edge on the widest). Bind off. RIGHT FRONT PIECE: Work as left but reversed. NOTE: Do not dec for buttonholes on right band. When working 1 ridge over only the outermost 10 sts towards mid front, adjust according to left front piece. SLEEVE: Cast on 56-56-63-63-63-70 sts on double pointed needles size 3 mm / US 2.5 with Karisma. K 1 round. Work next round as follows: * K 3, P 4 *, repeat from *-* the entire round. When piece measures 6 cm / 2⅜", work next round as follows: * K 3, P 2, P 2 tog *, repeat from *-* the entire round = 48-48-54-54-54-60 sts. Switch to double pointed needles size 4 mm / US 6 and work pattern in the round according to diagram A.3A. Insert 1 marker in last st on round (i.e. in st in garter st = mid under sleeve) and move the marker upwards. When piece measures 8 cm / 3⅛", inc 2 sts mid under sleeve - READ INCREASE TIP-2. Inc a total of 18-20-20-22-25-25 times in Size S: On every 7th round, in size M + L: On every 6th round, in size XL: On every 5th round, in size XXL: Alternately on every 4th and 5th round and size XXXL: On every 4th round = 84-88-94-98-104-110 sts. When piece measures 53-53-51-49-49-46 cm / 21"-21"-20"-19¼"-19¼"-18" (NOTE: Shorter measurements in the larger sizes because of longer sleeve cap and wider shoulders) bind off the middle 7 sts under sleeve (bind off st with marker + 3 sts on each side of this). Now work sleeve cap back and forth on circular needle. Continue with the pattern while AT THE SAME TIME binding off at beg of every row in each side as follows: bind off 3 sts 1 time, 2 sts 1-1-2-3-3-4 time and 1 st 2-2-3-3-3-6 times. Continue to cast off 2 sts in each side of piece until piece measures 59 cm / 23¼" in all sizes, bind off 3 sts 1 time in each side and bind off the remaining sts. Sleeve measures approx. 60 cm / 23½" in all sizes. Make another sleeve the same way. ASSEMBLY: Sew the shoulder seams. Sew collar tog mid back (make sure that seam is not visible when collar is folded down). Sew collar to neckline in the back of neck. Sew in sleeves. Sew the buttons on to the right band. |
|||||||||||||||||||
Diagram explanations |
|||||||||||||||||||
|
|||||||||||||||||||
 |
|||||||||||||||||||
 |
|||||||||||||||||||
 |
|||||||||||||||||||
Have you finished this pattern?Tag your pictures with #dropspattern #jacksoncardigan or submit them to the #dropsfan gallery. Do you need help with this pattern?You'll find 25 tutorial videos, a Comments/Questions area and more by visiting the pattern on garnstudio.com. © 1982-2026 DROPS Design A/S. We reserve all rights. This document, including all its sub-sections, has copyrights. Read more about what you can do with our patterns at the bottom of each pattern on our site. |
|||||||||||||||||||


With over 40 years in knitting and crochet design, DROPS Design offers one of the most extensive collections of free patterns on the internet - translated to 17 languages. As of today we count 324 catalogs and 12290 patterns - 12280 of which are translated into English (US/in).
We work hard to bring you the best knitting and crochet have to offer, inspiration and advice as well as great quality yarns at incredible prices! Would you like to use our patterns for other than personal use? You can read what you are allowed to do in the Copyright text at the bottom of all our patterns. Happy crafting!
Post a comment to pattern DROPS 174-1
We would love to hear what you have to say about this pattern!
If you want to leave a question, please make sure you select the correct category in the form below, to speed up the answering process. Required fields are marked *.