
Popular categories
Looking for a yarn?


Comments / Questions (100)
![]() Odette wrote:
Odette wrote:
Please assist, I am trying to add this to my ‘favorites’ but it only allows me one no matter if I press the 💗. A family member recommended you, and I am looking forward trying your patterns
14.03.2026 - 09:21DROPS Design answered:
Dear Odette, when clickin the heart, you will be linked to this page - add your e-mail there then click on "next" to save the pattern as a favorite. Happy knitting!
16.03.2026 - 08:10
![]() De Lena Giovanna wrote:
De Lena Giovanna wrote:
Buonasera, sono ancora in speranzosa attesa di risposta, vi ho chiesto aiuto ormai 23 giorni fa e da sola 🙏 non riesco a proseguire il lavoro!
28.05.2025 - 20:30DROPS Design answered:
Buongiorno Giovanna, gli aumenti non sono indicati nel conteggio maglie. In ogni caso abbiamo inoltrato la sua segnalazione al settore design: se necessario troverà il modello corretto direttamente online nei prossimi giorni. Buon lavoro!
01.06.2025 - 16:40
![]() De Lena Giovanna wrote:
De Lena Giovanna wrote:
Salve! Per la mia tg XL, dopo l'aumento uniforme di 9 m.a. tra le 4 m a da lavorare nei 57 archetti mi trovo 249 m. Nel giro successivo, con gli ulteriori 16 aum si dovrebbe arrivare ad avere 265 m, in teoria, perché 38+8+44+8+60+8+44+8+38 sono 256, quindi mi restano 9 maglie in più! Ho sfilato diverse volte ma non riesco a capire cosa sbaglio. Potete aiutarmi?
05.05.2025 - 15:24DROPS Design answered:
Buongiorno Giovanna, gli aumenti non sono indicati nel conteggio maglie. In ogni caso abbiamo inoltrato la sua segnalazione al settore design: se necessario troverà il modello corretto direttamente online nei prossimi giorni. Buon lavoro!
01.06.2025 - 16:40
![]() Wilma Strijbosch wrote:
Wilma Strijbosch wrote:
Ik heb allang gelezen hoe je telpatronen moet interpreteren en het is niet het eerste wat ik haak. Met hulp van vriendin ben ik er uit gekomen, maar het telpatroon is gewoon erg onduidelijk. Lijkt we of de vasten uit toer 4 bij toer 3 horen, en nogmaals: de overgang van A1 naar A2 is in het telpatroon niet goed te volgen. Jammer dat jullie mensen niet hiermee helpen door het patroon gewoon uit te schrijven.
02.03.2025 - 14:42
![]() Wilma Strijbosch wrote:
Wilma Strijbosch wrote:
Kunt u het telpatroon voor de pas (A1 t/m A4) in letters per toer uitschrijven? Ik snap er namelijk helemaal niks van, met name overgang naar A2 en A2 zelf. Ik loop al vast in de derde toer.
26.02.2025 - 21:22DROPS Design answered:
Dag Wilma,
Er is helaas alleen een tekening van het telpatroon. Wellicht heb je iets aan het artikel 'Hoe u telpatronen voor haken leest'.
02.03.2025 - 10:21
![]() Christine wrote:
Christine wrote:
Leider kam bis jetzt noch keine Reaktion auf meine Fragen. Wahrscheinlich ist die Korrektur sehr aufwendig. Ich habe inzwischen aber eine Lösung für mich gefunden und bin jetzt bei der Halsblende. Da ergibt sich eine weitere Unstimmigkeit : Bei Größe S habe ich 139 Maschen, beim Addieren der verschiedenen Maschen in der ersten Reihe komme ich aber nur auf 138. Sollte ich in der Mitte dann vielleicht 33 statt 32 feste Maschen häkeln ? Freundliche Grüße !
13.08.2024 - 20:18
![]() Christine wrote:
Christine wrote:
Haben Sie mich vielleicht vergessen ? Ich warte noch auf eine Reaktion meiner Fragen... Ich habe inzwischen sebst versucht, die Übergänge zu den Blenden rechts und links anzugleichen. Dabei ergibt sich aber ein zusätzlicher Luftmaschenbogen in den letzten Reihen, so daß man in der allerletzten Reihe 4 Stäbchen mehr häkeln muß. Können Sie die Anleitung bitte noch einmal überprüfen ? Freundliche Grüße !
02.05.2024 - 14:52DROPS Design answered:
Liebe Christine, Ihre Frage wurde unsere Design Team weitergeleitet, gerne frage ich noch mal. Danke für Ihre Geduld.
02.05.2024 - 15:39
![]() Christine wrote:
Christine wrote:
Danke für Ihre Antwort vom 2.04. Wann ist denn mit einer Reaktion des Design-Teams zu rechnen ? Freundliche Grüße !
13.04.2024 - 21:55
![]() Nancy wrote:
Nancy wrote:
Wederom een lastig patroon. In de diagrammen A1 t/m A4 tel ik verschil in het aantal toeren. A1 en A4 tel ik 10 toeren! A2 en A3 tel ik 11 toeren!
07.04.2024 - 14:35
![]() Nancy wrote:
Nancy wrote:
Ook ik heb een vraag over de “bobbel”. Hoe ik hem moet haken weet ik, maar hoe kom ik van de vorige steek naar de eerste bobbel. En van de laatste bobbel naar de volgende steek? Ik had namelijk ergens gelezen dat je vanaf de lossenboog moet beginnen met de bobbel.
07.04.2024 - 09:28DROPS Design answered:
Dag Nancy,
Vlak voor de bobbel haak je een vaste in de lossenboog van de vorige toer (dit is het symbool met het kruisje), de bobbel haakje ook in een lossenboogje en de vaste daarna haak je weer in het daaropvolgende lossenboogje.
07.04.2024 - 18:49
|
||||||||||||||||||||||||||||||||||
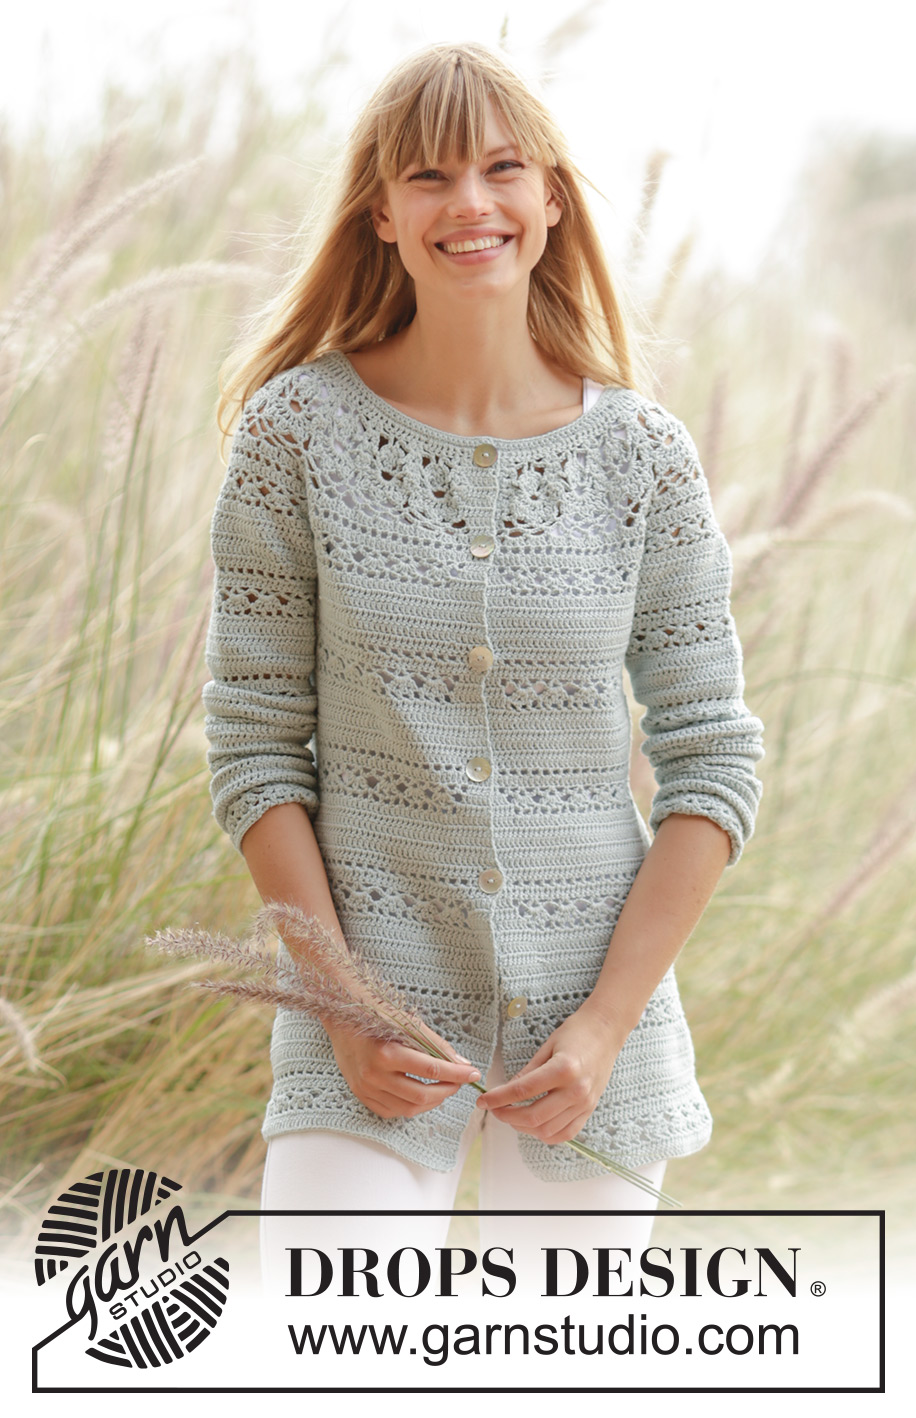
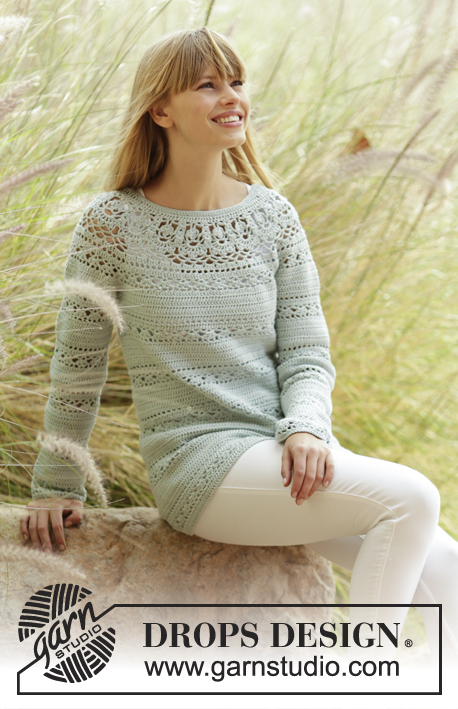
Sweet Mint Cardigan#sweetmintcardigan |
||||||||||||||||||||||||||||||||||
|
|
||||||||||||||||||||||||||||||||||
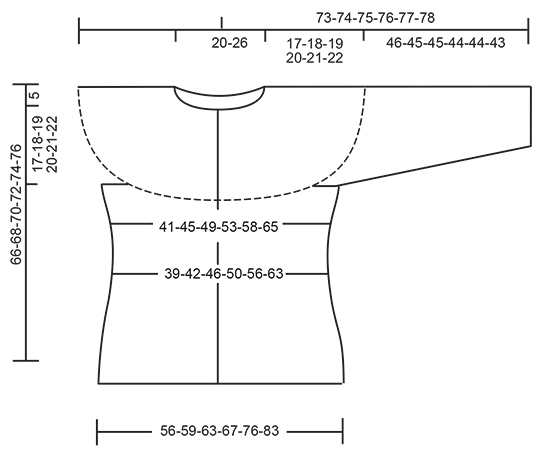
Crochet DROPS jacket with lace pattern and round yoke in ”Safran”. The piece is worked top down. Size: S - XXXL.
DROPS 169-32 |
||||||||||||||||||||||||||||||||||
|
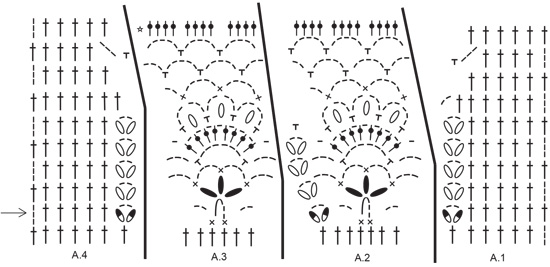
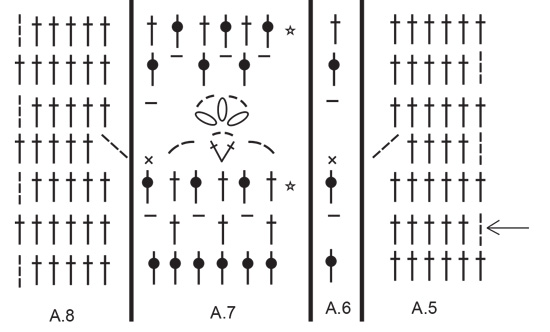
PATTERN: See diagrams A.1 to A.8. CROCHET INFO: On every dc row replace first dc with 3 ch. On every sc row replace first sc with 1 ch. Replace first dc at on every dc round with ch 3, finish the round with 1 sl st in 3rd ch from beg of round. Replace first sc at on every sc round with ch 1, finish the round with 1 sl st in first ch from beg of round. INCREASE TIP-1: Inc 1 dc by working 2 dc in same st. INCREASE TIP-2: Work until 2 dc/ch remain before marker, work 2 dc in/around next dc/ch (= 1 dc inc), work 1 dc in/around each of the next 2 dc/ch, markers is in the middle of these dc/ch, work 2 dc in/around next dc/ch (= 1 dc inc). Repeat inc at every marker. PATTERN-1 (applies to body): Work 1 dc in every dc until 6-8-10-10-10-10 rows have been worked, * work from RS: Work A.5 over the first 6 dc, A.6 over next dc, repeat A.7 until 6 dc remain, A.8 over the last 6 dc. When A.5 to A.8 have been worked 1 time vertically, work 6-8-10-10-10-10 rows with 1 dc in every dc *, repeat pattern from *-* until finished measurements. PATTERN-2 (applies to sleeve): * Work A.7 over all dc. When A.7 has been worked 1 time vertically, continue as follows: Work 6-8-10-10-10-10 rounds with 1 dc in every dc *, repeat from *-* until finished measurements. DECREASE TIP: Dec 1 dc by working the next 2 dc tog as follows: Work 1 dc but wait with last pull through (= 2 loops on hook), then work next dc but on last pull through, pull yarn through all 3 loops on hook. BUTTONHOLES: Make buttonholes on right band. 1 buttonhole = replace fourth dc from edge with 1 ch. On next row work band st as before (work 1 dc around ch). Work for buttonholes when piece measures: SIZE S: 2, 11, 20, 29, 38 and 47 cm SIZE M: 2, 11, 20, 29, 38 and 47 cm SIZE L: 2, 10, 18, 26, 34, 42 and 50 cm SIZE XL: 2, 10, 18, 26, 34, 42 and 50 cm SIZE XXL: 2, 11, 20, 29, 38, 47 and 55 cm SIZE XXXL: 2, 11, 20, 29, 38, 47 and 55 cm ---------------------------------------------------------- YOKE: Worked back and forth, top down. Work 163-163-172-172-180-180 ch on hook size 3.5 mm/E/4 with Safran. Work next row as follows: Work 1 dc in 4th ch from hook (= 2 dc) - READ CROCHET INFO, 1 dc in each of the next 5-5-0-0-1-1 ch, * skip ch 1, 1 dc in each of the next 6 ch *, repeat from *-* the entire row = 139-139-146-146-153-153 dc. Then work next row from WS as follows: Work A.4 over the first 7 dc (= right band), A.3 over the next 6 dc, repeat A.2 until 7 dc remain (= 17-17-18-18-19-19 times in width), finish with A.1 over the last 7 dc (= left band). Continue like this, i.e. work as follows from RS: A.1, A.2 17-17-18-18-19-19 times in total, A.3 and A.4. REMEMBER THE CROCHET GAUGE! Remember BUTTONHOLES - see explanation above. On last row in A.1-A.4 (= from WS) insert 8 markers and inc as follows: NOTE: Continue as shown in diagrams A.1-A.4. Work and inc like as follows AT THE SAME TIME inc in addition 0-3-3-9-3-3 dc evenly on the entire row – READ INCREASE TIP-1: Work 36-36-38-38-40-40 dc, insert 1 marker in piece, work 4 dc and inc 2-4-4-4-4-4 dc evenly (= right front piece), insert 1 marker, work 42-42-44-44-46-46 dc, insert 1 marker, work 4 dc and inc 2-4-4-4-4-4 dc evenly, insert 1 marker (= sleeve), work 56-56-60-60-64-64 dc, insert 1 marker, work 4 dc and inc 2-4-4-4-4-4 dc evenly, insert 1 marker (= back piece), work 42-42-44-44-46-46 dc, insert 1 marker, work 4 dc and inc 1-4-4-4-4-4 dc evenly, insert 1 marker (= sleeve), work 36-36-38-38-40-40 dc (= left front piece) = 235-247-259-265-271-271 dc on row. Move the markers upwards when working. Piece measures approx. 9 cm / 3½". Work 0-0-0-0-2-2 row with 1 dc in every dc and inc 0-0-0-0-12-15 dc evenly on every row (= 0-0-0-0-24-30 dc in total) = 235-247-259-265-295-301 dc. Work A.5 to A.7 as follows (first row is from RS): Work A.5 over the first 6 dc (= left band), A.6 over next dc, repeat A.7 until 6 dc remain (= 37-39-41-42-47-48 times in width), finish with A.8 over the last 6 dc (= right band). On 2nd row (i.e. dc row) inc at every marker – READ INCREASE TIP-2 and inc 2-8-8-8-8-8 dc evenly on row (= 2 dc in at every marker and 2-8-8-8-8-8 dc inc evenly = 18-24-24-24-24-24 dc inc in total on row) = 253-271-283-289-319-325 dc. Now repeat A.7 40-43-45-46-51-52 times in width. Repeat inc (i.e. 2 dc inc at every marker and 2-8-8-8-8-8 dc inc evenly = 18-24-24-24-24-24 dc inc in total on row). On last row in A.5 to A.8 = 271-295-307-313-343-349 dc. * Work 1 row with 1 dc in every dc. Work 1 row with dc and inc 18-18-16-17-24-26 dc evenly *, repeat from *-* 1-1-2-3-2-3 times in total = 289-313-339-364-391-427 dc. Work 0-1-1-0-1-0 rows with 1 dc in every dc. Piece measures approx. 17-18-19-20-21-22 cm / 6¾"-7"-7½"-8"-8¼"-8¾". On next row (= from RS), work as follows: Work 1 dc in each of the first 46-50-54-58-64-70 dc (= left front piece), work 8 ch, skip 60-64-69-73-75-79 dc from previous row (= sleeve), 1 dc in each of the next 77-85-93-102-113-129 dc (= back piece), 8 ch, skip 60-64-69-73-75-79 dc from previous round (= sleeve), 1 dc in each of the last 46-50-54-58-64-70 dc (= right front piece) = 185-201-217-234-257-285 dc/ch on row. Insert 1 marker in piece, NOW MEASURE PIECE FROM HERE. Work 1 row with 1 dc in every dc/ch. Then work PATTERN-1 from RS - see explanation above and dec 4-2-0-5-4-2 dc evenly in first row of dc- READ DECREASE TIP = 181-199-217-229-253-283 dc. When piece measures 12 cm / 4¾", adjust so that next row is a row with dc, dec 6-12-12-6-6-6 dc evenly = 175-187-205-223-247-277 dc. Continue with pattern as before. When piece measures 19-20-21-22-23-24 cm / 7½"-8"-8¼"-8¾"-9"-9½" – adjust so that next row is a row with dc, inc 12 dc evenly. Repeat inc every 3 cm / 1" 5-5-5-5-6-6 more times = 247-259-277-295-331-361 dc. Work pattern as before until piece measures 44-45-46-47-48-49 cm / 17¼"-17¾"-18"-18½"-19"-19¼" from marker. Fasten off. SLEEVE: Sleeve is worked in the round, top down. Beg by working mid under sleeve as follows: Work 1 sc in 5th ch of the 8 ch work in armhole on body, 3 ch (= 1 dc), work 1 dc in each of the next ch 3, work 1 dc in every dc over sleeve, work 1 dc in each of the remaining 4 ch under sleeve = 68-72-77-81-83-87 dc. Insert 1 marker thread mid under sleeve. Insert 1 marker in piece, NOW MEASURE PIECE FROM HERE. Leave marker in piece, move marker thread when working. SIZE S-M: Work 1 dc in every dc and dec 2-0 dc evenly = 66-72 dc. SIZE L-XL-XXL-XXXL: Work 1 dc in every dc and inc 1-3-1-3 dc evenly = 78-84-84-90 dc. ALL SIZES: READ ALL OF THE FOLLOWING SECTION BEFORE CONTINUING! WORK PATTERN AND DEC AT THE SAME TIME: PATTERN: Work 1 dc in every dc until 5-7-9-9-9-9 round with dc have been worked in total. Work PATTERN-2 - see explanation above. DECREASE: When piece measures 4 cm / 1½", adjust so that next round is 1 round with dc, dec 6 dc evenly, repeat dec every 15-10-8-8-8-6 cm / 6"-4"-3"-3"-3"-2½" 2-3-4-4-4-5 more times = 48-48-48-54-54-54 dc. Fasten off when sleeve measures 46-45-45-44-44-43 cm / 18"-17¾"-17¾"-17¼"-17¼"-17". Work the other sleeve the same way. NECK EDGE: Worked back and forth from mid front. Beg from RS. Work in ch where the dc were worked (i.e. do not work over the ch skipped = 139-139-146-146-153-153 dc). Work 1 sc in each of the first 22-22-24-24-26-26 dc, * 1 hdc in each of the next ch 3, 1 dc in each of the next ch 3, 1 tr in each of the next 19 ch, 1 dc in each of the next ch 3, 1 hdc in each of the next 3 ch *, 1 sc in each of the next 33-33-36-36-39-39 ch, repeat from *-* 1 time, 1 sc in each of the last 22-22-24-24-26-26 ch. Work next row as follows: Work 1 sc in each of the first 26-26-28-28-30-30 sts, ** 1 hdc in each of the next 3 sts, 1 dc in each of the next 3 sts, * work the next 2 tr tog *, repeat from *-* 5 more times, 1 dc in each of the next 3 sts, 1 hdc in each of the next 3 sts **, 1 sc in each of the next 39-39-42-42-45-45 sts, repeat from **-** 1 more time, finish with 1 sc in each of the last 26-26-28-28-30-30 sts = 127-127-134-134-141-141 sts. Work 1 row with 1 sc in every st. Fasten off. ASSEMBLY: Sew the buttons on to the left front band. |
||||||||||||||||||||||||||||||||||
Diagram explanations |
||||||||||||||||||||||||||||||||||
|
||||||||||||||||||||||||||||||||||
 |
||||||||||||||||||||||||||||||||||
 |
||||||||||||||||||||||||||||||||||
 |
||||||||||||||||||||||||||||||||||
Have you finished this pattern?Tag your pictures with #dropspattern #sweetmintcardigan or submit them to the #dropsfan gallery. Do you need help with this pattern?You'll find 15 tutorial videos, a Comments/Questions area and more by visiting the pattern on garnstudio.com. © 1982-2026 DROPS Design A/S. We reserve all rights. This document, including all its sub-sections, has copyrights. Read more about what you can do with our patterns at the bottom of each pattern on our site. |
||||||||||||||||||||||||||||||||||


With over 40 years in knitting and crochet design, DROPS Design offers one of the most extensive collections of free patterns on the internet - translated to 17 languages. As of today we count 324 catalogs and 12290 patterns - 12280 of which are translated into English (US/in).
We work hard to bring you the best knitting and crochet have to offer, inspiration and advice as well as great quality yarns at incredible prices! Would you like to use our patterns for other than personal use? You can read what you are allowed to do in the Copyright text at the bottom of all our patterns. Happy crafting!
Post a comment to pattern DROPS 169-32
We would love to hear what you have to say about this pattern!
If you want to leave a question, please make sure you select the correct category in the form below, to speed up the answering process. Required fields are marked *.