
Popular categories
Looking for a yarn?


Comments / Questions (177)
![]() Maria wrote:
Maria wrote:
Hey, I started this project a few days ago and I kept having issues with it not being flat and becoming almost like a hat. I realize that there are 2 different versions of this same pattern. One has dc in the magic circl and the other has sc, and all the dc are tr. I was going to add picture but I cannot.
20.10.2025 - 00:00
![]() Greer wrote:
Greer wrote:
No, that is not what i mean. I am working on A3. In the corners on the second row, you ch only 2 just before the corner. In the video, on the third row with all the double crochets, it looks like there are 4 double crochets in that 2 ch space, then 2 chain in the corner space, then 1 treble, 3 ch, 1 treble, then 2 double crochets ( all in the same corner space.) Then follow with 2 ch space after the corner. In the video it looks like there are 4 double crochets put into this 2 ch space. Should i
07.08.2025 - 17:40DROPS Design answered:
Dear Mrs Greer, in A.3 you will crochet 4 double crochets in each chain space working: *2 double crochet in next chain space, 4 double crochet in next chain space, 2 double crochet in next chain space*, then repeating from *to* the 2 dc next repeat will be worked around same chain space as the 2 double crochets previous repeat. So that you will have 4 double crochets around each chain space except in the corner where you work 2 double crochets (last 2 sts A.3), then the corner (1 treble, 3 ch, 1 treble), then you start A.3 again with 2 double crochets in the same ch-space as previous stitches. Just as shown in th video. Happy crocheting!
08.08.2025 - 07:47
![]() Greer wrote:
Greer wrote:
My garment keeps coming out to big, with too many repetitions each side. I have watched the videos many times. My question...On the picot row ...in the corners you have 2 ch before the corner (1 treble, 3 ch, 1 treble) from the previous row. On the picot row, do you put 4 double crochet or 2 in that 2 ch spot?
07.08.2025 - 14:03DROPS Design answered:
Dear Mrs Greer, make sure you get and keep the correct tension - you should repeat A.2 a total of 4 times around the circle A.1 (so that you get 4 corners - on 2nd row in A.2 work the picots over the 3 chains from previous round: with 3 chains, 3 double crochets (US-English terminology) in the first of the 3 chains, and 1 double crochet in each double crochet from previous round. Hope it can help. Happy crocheting!
07.08.2025 - 15:11
![]() Kirsten Bjørneboe wrote:
Kirsten Bjørneboe wrote:
Tusind tak for videoen med sektion A.3 - den kunne jeg ikke finde ud af, men den fine gennemgang hjalp mig!
20.05.2025 - 12:42
![]() Marianne wrote:
Marianne wrote:
Hei. På diagram A2 andre rad picot . Jeg forstår ikke hvordan denne rasen skal begynne og forsette rundt omg. Ikke ser jegvatvdet er noe video om dette
01.05.2025 - 12:54
![]() Regina Lindeman wrote:
Regina Lindeman wrote:
Jag hoppas att mina två tidigare inlägg "kommentarer" kommit fram, tack!
24.04.2025 - 08:22
![]() Regina wrote:
Regina wrote:
Ärm: jag har virkat A.3 , 3ggr och därmed minskat 3x8st =24st . På mönster står, totalt 32st ? ? Vad har jag missat? Snälla jag väntar svar för att förstå, hur gå vidare ♡•~•♡
15.04.2025 - 19:17DROPS Design answered:
Hej Regina. Vi menar att du har 32 st kvar (56-24= 32 st). Mvh DROPS Design
25.04.2025 - 11:30
![]() Regina wrote:
Regina wrote:
Godmorgon, jag tror att mitt problem har löst sig. Det som kändes hopplöst, kan jag nu hantera hoppas jag. Tack för alla svar, nu ser jag framåt. Jag vill såå gärna se denna vackra tröja färdigvirkad ♡ ha bra dag ♡
11.04.2025 - 08:23
![]() Regina wrote:
Regina wrote:
Hej igen bästa Drops! Tyvärr saknar jag komplett svar på min fråga. Jag vet att jag börjar där garnet klipps av. Min fråga☆ skall jag virka runt hela arbetet, fyra sidor, jag känner mig osäker vad ni menar med fram o tillbaka i detta fall. Antingen fram o tillbaks, eller runt arbetet, fyra sidor. Frågan kanske är dum, men snälla svara på mitt hjälprop ♡☆♡
10.04.2025 - 12:44DROPS Design answered:
Hej Regina, ja du hækler fra mærket ved halsen og så langs med de 4 sider til mærket ved halsen i den anden side. Når du kommer til halsen ved det andet mærke, vender du arbejdet og hækler tilbage igen. Det kan du se i videoen :)
10.04.2025 - 14:02
![]() Regina wrote:
Regina wrote:
Tack för snabbt svar. Tyvärr kvarstår min fråga gäller "virka fram och tillbaka" ?? Förstår att börja där jag klippt av garnet. Fråga 1 virka endast axelpartier eller runt alla fyra sidor? Jag hoppas att går förstå min fråga. Mycket tacksam för svar på frågorna ( 1 o 2). Jag vill så gärna komma vidare på arbetet ♡
10.04.2025 - 09:03DROPS Design answered:
Hej Regina, har du set de 2 videoer vi har lavet til blusen, nr 2 viser fra der hvor du klipper tråden og begynder at hækle frem og tilbage :)
10.04.2025 - 12:24
|
||||||||||||||||||||||||||||||||||||||||||||||
Janis#janissweater |
||||||||||||||||||||||||||||||||||||||||||||||
|
|
||||||||||||||||||||||||||||||||||||||||||||||
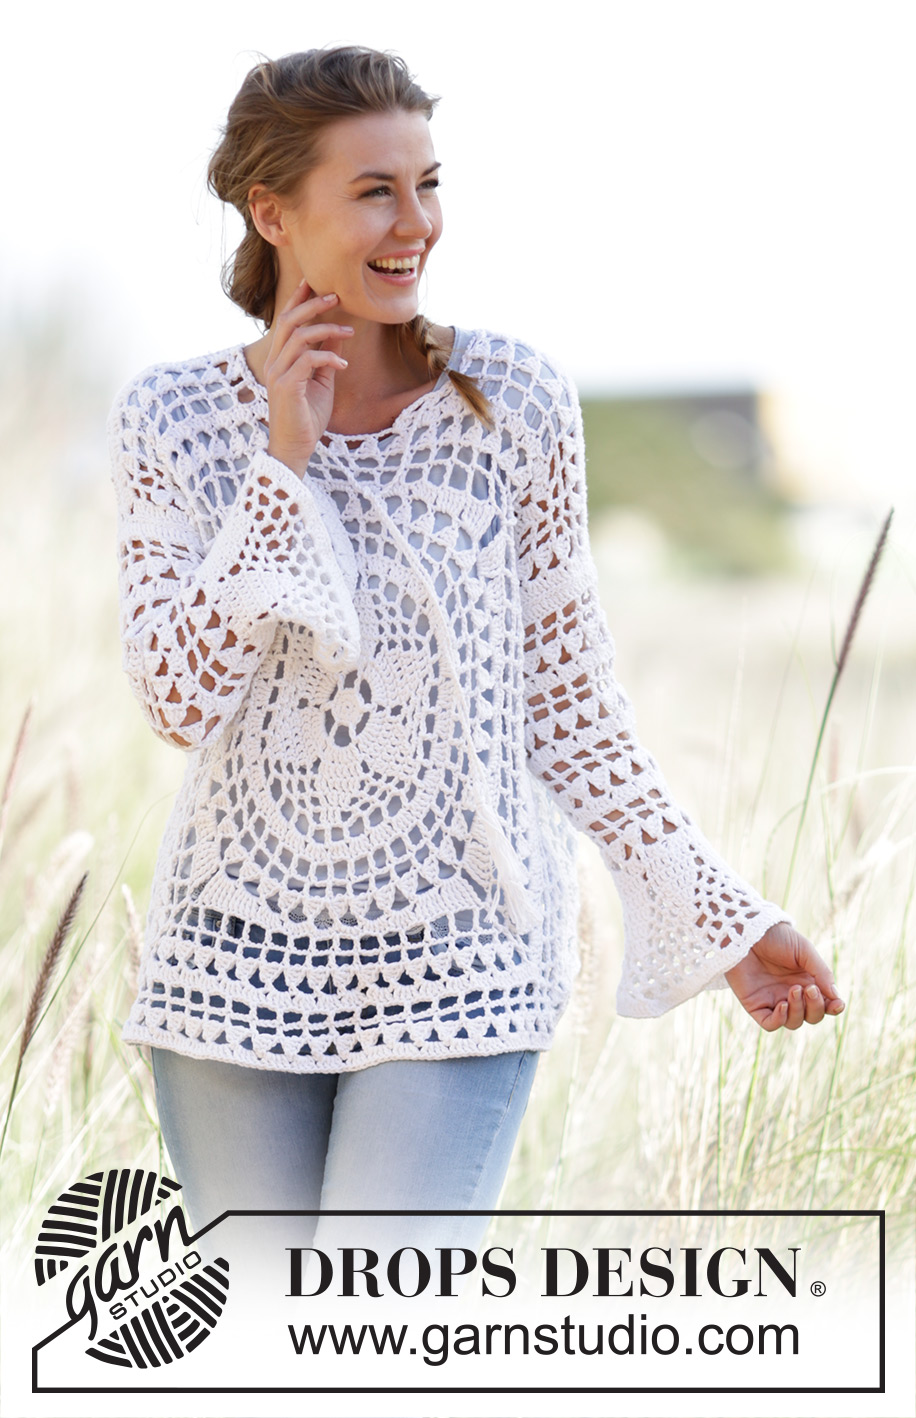
Crochet DROPS jumper worked in a square with flounce sleeves and lace pattern in ”Paris”. Size: S - XXXL.
DROPS 170-2 |
||||||||||||||||||||||||||||||||||||||||||||||
|
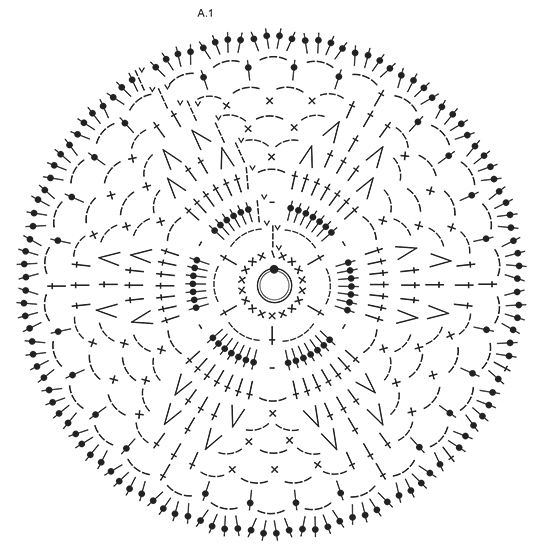
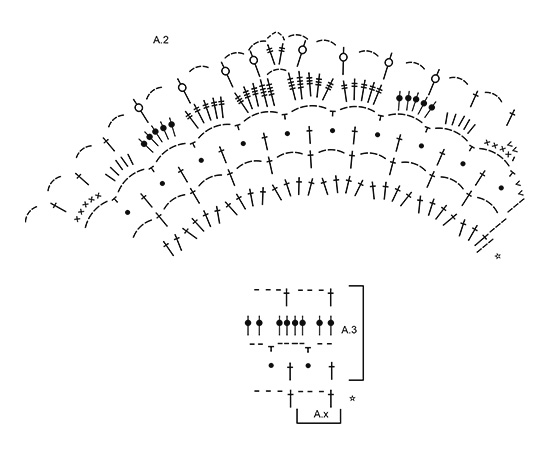
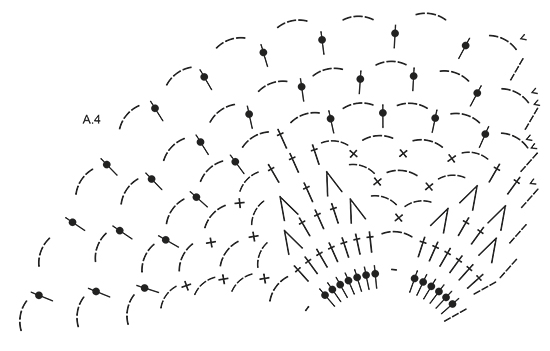
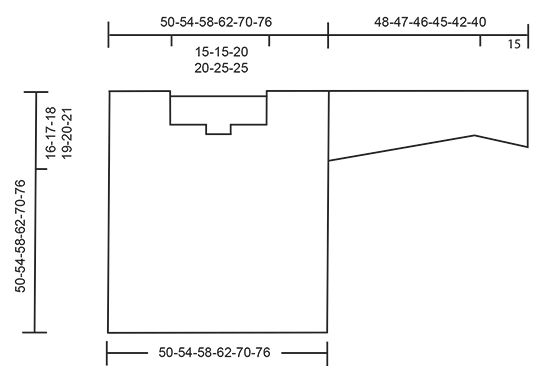
MAGIC CIRCLE: To avoid hole in the middle beg with this technique: Hold yarn end in the left hand and make a loop around left index finger (from left to right). Hold the loop with left thumb and index finger. Insert hook through loop, get the yarn from ball, pull yarn through loop, make 1 YO on hook and pull YO through st on hook = 1 sc, then work 8 sc around loop, finish with 1 sl st in first dc = 9 sc. Continue as explained in pattern – AT THE SAME TIME pull yarn end so that loop is tighten tog and the hole disappears. CROCHET INFO: Replace first sc on round with 1 ch. Finish round with one sl st in first ch from beg of round. Replace first dc on round/row with 3 ch. Finish round with one sl st in third ch from beg of round. PATTERN: See diagrams A.1 to A.4. TRIPLE TR: Make 4 YOs on hook, insert hook around ch-space and pull yarn around ch-space, * 1 YO on hook, pull yarn through the next 2 loops on hook *, repeat from *-* 4 more times = 1 loop on hook. DECREASE TIP: Dec 1 dc by working the next 2 dc tog as follows: Work 1 dc but wait with last pull through (= 2 loops on hook), then work next dc but on last pull through, pull yarn through all 3 loops on hook. ---------------------------------------------------------- JUMPER: BACK PIECE: Work back piece in a circle, then as a square from mid back. Work up along one side of square for shoulder/neck at the end. Work a MAGIC CIRCLE on hook size 4.5 mm/US 7 with Paris – see explanation above = 9 sc around circle. Then work according to A.1 (on first round in A1 work 2 sc in each of the 9 sc = 18 sc). REMEMBER THE CROCHET GAUGE! READ CROCHET INFO! When A.1 has been worked, there are 120 dc on round and piece measures approx. 22 cm / 8¾" in diameter. Then work according to A.2, work 4 repetitions of A.2 around the circle - beg on second round in A.2. NOTE: Sl sts at beg of A.2 are only worked at beg of round. When A.2 has been worked, continue according to A.3. A.x shows 1 repetition of A.3 in width. Work A.3, in every corner work 1 tr + 3 ch + 1 tr, work 2 repetitions more of A.3 between every corner for every round worked. Continue with A.3 until piece measures 23-25-27-29-33-36 cm / 9"-9¾"-10½"-11½"-13"-14¼" from middle (46-50-54-58-66-72 cm / 18"-19¾"-21¼"-22¾"-26"-28½" in total), there are now approx. 18-20-22-24-28-30 repetitions of A.3 along each side of square. Now work piece back and forth and dec for neck in the middle of the first side of square. Cut the yarn and skip the middle 6-6-8-8-10-10 repetitions (= neck) on the first side of square, continue A.3 with inc in the corners until row has been worked, do not work over the 6-6-8-8-10-10 repetitions skipped at beg of row. Fasten off, piece measures 25-27-29-31-35-38 cm / 9¾"-10½"-11½"-12¼"-13¾"-15" from middle (50-54-58-62-70-76 cm / 19¾"-21¼"-22¾"-24½"-27½"-30" in total), there are approx. 7-8-8-9-10-11 repetitions on each shoulder, and approx. 20-22-24-26-30-32 repetitions along each of the other 3 sides. Insert 1 marker in each side, 16-17-18-19-20-21 cm / 6¼"-6¾"-7"-7½"-8"-8¼" down from shoulder, this shows where sleeve is sewn in. FRONT PIECE: Work as back piece until piece measures 17-19-21-23-27-30 cm / 6¾"-7½"-8¼"-9"-10½"-11¾" from middle (32-36-40-44-52-58 cm / 12½"-14¼"-15¾"-17¼"-20½"-22¾" in total), there are now approx. 14-16-18-20-24-26 repetitions of A.3 along each side of square. Now work piece back and forth and dec for neck in the middle of the first side of square. Cut the yarn and skip the middle 2 repetitions (= neck) on the first side of square, continue with A.3 with inc in the corners until row has been worked, do not work over the 2 repetitions skipped at beg of row. Turn and work a row from WS. Cut the yarn, skip the first 2-2-3-3-4-4 repetitions, continue with A.3 and inc in the corners, but turn when 2-2-3-3-4-4 repetitions remain on row, 6-6-8-8-10-10 repetitions have been dec mid front for neck. Continue back and forth with A.3 and inc until piece measures 25-27-29-31-35-38 cm / 9¾"-10½"-11½"-12¼"-13¾"-15" from middle (50-54-58-62-70-76 cm / 19¾"-21¼"-22¾"-24½"-27½"-30" in total), there are approx. 7-8-8-9-10-11 repetitions on each shoulder, and approx. 20-22-24-26-30-32 repetitions along each of the other 3 sides, adjust according to back piece. Fasten off. Insert 1 marker in each side, 16-17-18-19-20-21 cm / 6¼"-6¾"-7"-7½"-8"-8¼" down from shoulder, this shows where sleeve is sewn in. SLEEVE: Sleeve is worked in the round, top down. Work 64-64-69-69-74-74 ch and form a ring with one sl st in first ch. Work 3 ch (= 1 dc), 1 dc in each of the next 6-6-3-3-0-0 ch, skip ch 1, * work 1 dc in each of the next ch 7, skip 1 st *, repeat from *-* the entire round = 56-56-60-60-64-64 dc. Remember CROCHET INFO! Then work in the round and according to A.3. On 3rd round in A.3 dec 8 dc evenly - READ DECREASE TIP. Repeat dec every time 3th round in diagram is worked 3 times in total = 32-32-36-36-40-40 dc. Work A.3 until piece measures 33-32-31-30-27-25 cm / 13"-12½"-12¼"-11¾"-10½"-9¾", finish after 2nd or 4th round in A.3. Work 40-40-40-48-48-48 dc in total around ch-spaces. Then work according to A.4 (5-5-5-6-6-6 repetitions in width, diagram shows 2 repetitions in width), work first round as follows: * Work 1 dc in each of the first 7 dc, ch 1, skip 1 dc *, repeat from *-* 4-4-4-5-5-5 more times. NOTE: Sl sts at beg of A.4 are only worked at beg of round. Work A.4 1 time vertically. Fasten off. Sleeve measures approx. 48-47-46-45-42-40 cm / 19"-18½"-18"-17¾"-16½"-15¾". Work another sleeve the same way. ASSEMBLY: Sew the shoulder seams. Sew side seams from markers in the side and down. Sew in sleeves. TWINED STRING: Cut 2 lengths of 3 metres/ 3¼ yds each. Twine the strands tog until they resist, fold the string double so that it twines again. Make a knot at each end. Thread tie up and down around the neck. Cut 8 lengths of yarn of 20 cm / 8". Thread the ends through the end of the tie and fold them double. Twine one of the strand around the top of tassel. Make another fringe in the other end of tie. |
||||||||||||||||||||||||||||||||||||||||||||||
Diagram explanations |
||||||||||||||||||||||||||||||||||||||||||||||
|
||||||||||||||||||||||||||||||||||||||||||||||
 |
||||||||||||||||||||||||||||||||||||||||||||||
 |
||||||||||||||||||||||||||||||||||||||||||||||
 |
||||||||||||||||||||||||||||||||||||||||||||||
 |
||||||||||||||||||||||||||||||||||||||||||||||
Have you finished this pattern?Tag your pictures with #dropspattern #janissweater or submit them to the #dropsfan gallery. Do you need help with this pattern?You'll find 16 tutorial videos, a Comments/Questions area and more by visiting the pattern on garnstudio.com. © 1982-2026 DROPS Design A/S. We reserve all rights. This document, including all its sub-sections, has copyrights. Read more about what you can do with our patterns at the bottom of each pattern on our site. |
||||||||||||||||||||||||||||||||||||||||||||||


With over 40 years in knitting and crochet design, DROPS Design offers one of the most extensive collections of free patterns on the internet - translated to 17 languages. As of today we count 325 catalogs and 12298 patterns - 12288 of which are translated into English (US/in).
We work hard to bring you the best knitting and crochet have to offer, inspiration and advice as well as great quality yarns at incredible prices! Would you like to use our patterns for other than personal use? You can read what you are allowed to do in the Copyright text at the bottom of all our patterns. Happy crafting!
Post a comment to pattern DROPS 170-2
We would love to hear what you have to say about this pattern!
If you want to leave a question, please make sure you select the correct category in the form below, to speed up the answering process. Required fields are marked *.