
Popular categories
Looking for a yarn?


Comments / Questions (40)
![]() Monica Berta wrote:
Monica Berta wrote:
Hola, quiero hacer este modelo (164-33) en la talla XXL, pero quiero usar una combinación de hilos: Fabel + Kid-Silk; Por favor, me pueden indicar la cantidad de cada hilo necesaria para hacer este modelo en la talla indicada? Muchas gracias.
05.10.2023 - 20:55DROPS Design answered:
Hola Monica, Son 9 ovillos o 1350m de DROPS Air, que serían 7 ovillos de Fabel + 7 ovillos de Kid-Silk aproximadamente. Puedes leer la siguiente lección para más información: https://www.garnstudio.com/lesson.php?id=14&cid=23.
09.10.2023 - 00:47
![]() Stefania wrote:
Stefania wrote:
Non è specificato quanti punti si devono diminuire a ogni giro nella manica. Nelle spiegazioni in alto c'è scritto di farne due, ma non c' è niente che faccia capire che si tratta delle maniche. Sto facendo per una cliente la misura più grande e vorrei sapere se le diminuzioni devono essere fatte a giri alterni. Grazie resto in attesa di Vs chiarimenti.
21.09.2023 - 11:06DROPS Design answered:
Buonasera Stefania, nelle spiegazioni della manica si dice di fare riferimento a quanto scritto nel suggerimento per le diminuzioni. Buon lavoro!
22.09.2023 - 23:40
![]() Stefania wrote:
Stefania wrote:
Gruppo di M.A : quante maglie alte sono in tutto 4 oppure 5 ? controllate le vostre spiegazioni perchè credo ci sia un'incongruenza tra la legenda dello schema e la spiegazione riportata all'inizio delle spiegazioni. Aspetto Vostro chiarimento. Grazie Buona serata
16.09.2023 - 18:42DROPS Design answered:
Buonasera Stefania, abbiamo corretto la legenda: è corretta la spiegazione all'inizio del modello. Buon lavoro!
16.09.2023 - 20:51
![]() Stefania wrote:
Stefania wrote:
Sprone. Non è chiaro come si facciano gli aumenti su gli 8 segnapunti. Ho finito tutti gli aumenti, ma mi sono trovata con un davanti più corto e uno più lungo. Vorrei di chiarimenti perché alternando un giro di aumenti a destra e uno a sinistra gli aumenti vengono sempre allo stesso posto e il lavoro è diverso tra un lato e l'altro dello sprone , Andrebbero forse fatti in modo speculare tra le due metà del lavoro oppure in entrambi i lati del segnapunti? Grazie - Saluti
12.09.2023 - 16:26DROPS Design answered:
Buonasera Stefania, gli aumenti sono speculari perchè si lavorano a sinistra e a destra del segnapunti. Buon lavoro!
12.09.2023 - 19:46
![]() Stefania wrote:
Stefania wrote:
2° riga dello sprone si lavorano 4 m alte per il bordo e poi si lavora a m bassa. allo stesso tempo si devono distribuire gli aumenti a maglia alta. E' un errore? gli aumenti secondo me andrebbero lavorati a maglia bassa. Vi chiedo chiarimenti. Grazie .
08.09.2023 - 21:13DROPS Design answered:
Buonasera Stefania, grazie per la segnalazione, abbiamo corretto il testo: la 2° riga è a maglie alte. Buon lavoro!
08.09.2023 - 21:42
![]() Samantha wrote:
Samantha wrote:
Where can I find the size chart please? I'm making this for a friend so I'll need the measurements to make sure I pick the right size.
11.05.2023 - 12:03DROPS Design answered:
Dear Samantha, measure a similar garment she has and likes the shape and compare these measurements to the chart - this lesson will also help you understanding how to choose the appropriate size. Happy crocheting!
11.05.2023 - 16:38
![]() MARIE-CAROLINE CATTANEO wrote:
MARIE-CAROLINE CATTANEO wrote:
Bonjour, le modèle lakeside cardigan me plaît beaucoup, cependant j ai une laine de 50 g pour crocheter avec un crochet 5. Votre modèle se fait avec un crochet 6. Je n'arrive pas à convertir votre patron. Pourriez vous me aider ?
09.11.2021 - 09:05DROPS Design answered:
Bonjour Mme Cattaneo, ce modèle se crochète sur la base d'un échantillon de 12 brides x 7 rangs = 10 x 10 cm, si vous n'avez pas le bon échantillon, il vous faudra recalculer ou bien choisir un modèle adapté à votre laine. N'hésitez pas à demander de l'aide auprès du magasin où vous l'avez achetée. Bon crochet!
09.11.2021 - 13:11
![]() Jana wrote:
Jana wrote:
Ik heb alle opmerkingen gelezen en het blijft onduidelijk. Welke van deze twee mogelijkheden klopt? A: Meerder ik naald 1 rechts van de steekmarkeerders en naald 2 links van de steekmarkeerders? B: Naald 1 rechts van de markeerders en naald twee rechts van de markeerders? Als je de tekst letterlijk leest zou het B moeten zijn. Als het A is haal dan de tekst tussen de haakjes (gezien aan de goede kant) weg, want dat zorgt voor verwarring.
02.10.2020 - 17:12DROPS Design answered:
Dag Jana,
Als het werk klaar zou zijn en je bekijkt het vanaf de goede kant dan zou je in de eerste toer meerderingen zien rechts van elke markeerder, op de tweede toer links van elke markeerder en op de derde toer rechts van elke markeerder en zo verder, dus afwisselend aan de ene of de andere kant van de markeerder.
19.11.2020 - 11:36
![]() Marie-eve wrote:
Marie-eve wrote:
Bonjour, j'aimerais savoir comment faire les augmentations. Au rang 2 j'ai 65 ms - les 8 pour les 4 de bordure de ch côté je doit augmenter 6 fois dans ce rang pour arriver a 71. Comment vous faite pour savoir ou les faire ses augmentations ? Est ce qu'il y a un calcule mathématique spéciale ou quelque chose pour savoir ou exactement les faire ? Merci d'avance !!
04.05.2020 - 22:48DROPS Design answered:
Bonjour Marie-Eve, cette leçon explique comment répartir des augmentations (ou diminutions). Bon crochet!
05.05.2020 - 10:55
![]() Stacey wrote:
Stacey wrote:
Which side is the right side ?
13.09.2019 - 19:58DROPS Design answered:
Dear Stacey, it's not that important when you work back and forth, you can have a look on the video to this pattern to help you to decide. Happy crocheting!
18.09.2019 - 15:41
|
|||||||||||||||||||||||||
Lakeside Cardigan#lakesidecardigan |
|||||||||||||||||||||||||
|
|
|||||||||||||||||||||||||
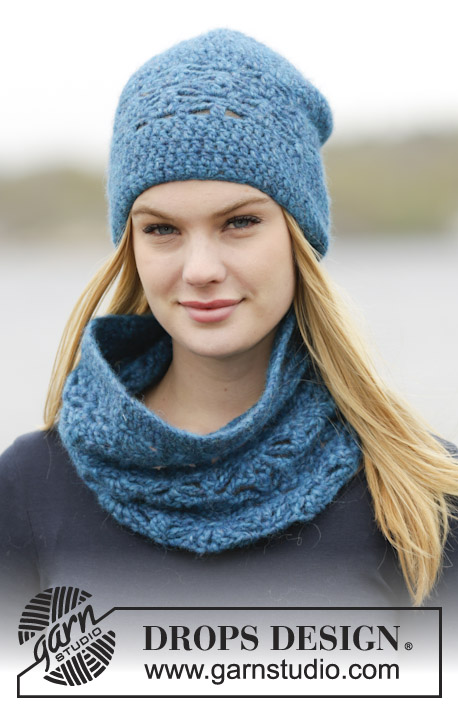
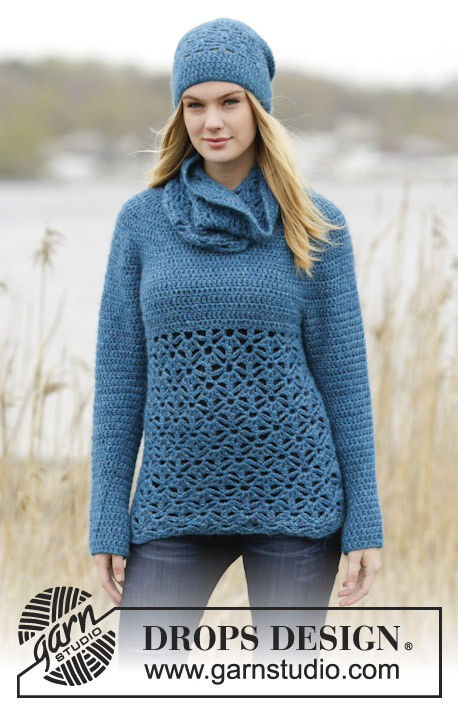
Crochet DROPS jacket round yoke, double crochet and lace pattern, worked top down in ”Air”. Size: S - XXXL.
DROPS 164-33 |
|||||||||||||||||||||||||
|
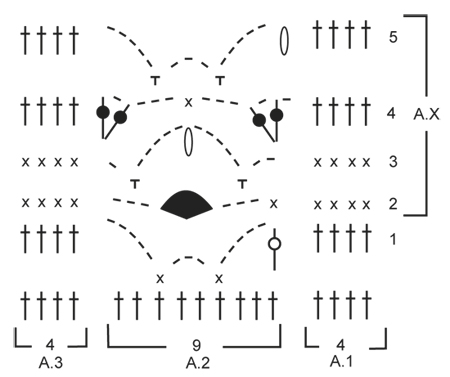
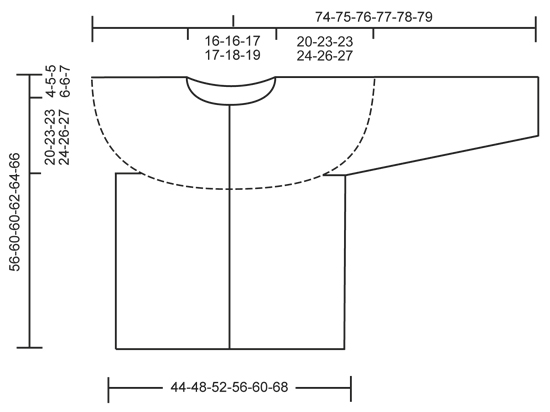
CROCHET INFO: At beg of every row with sc work 1 ch to turn with. Ch does not replace first sc. Replace first dc at beg of every dc row with 3 ch. Sleeve: When working in the round, finish every round with 1 sl st in 3rd ch at beg of round. PATTERN: See diagrams A.1 to A.3. CROCHET 2 dc TOG (in dc): Work 1 dc in next dc but wait with last pull through, work 1 dc more in same dc, but on last pull through, pull through all sts on hook. CROCHET 2 dc TOG (AROUND CH): Work 1 dc around the middle chin dc-group but wait with last pull through, work 1 dc more around same ch, but on last pull through, pull through all sts on hook. DC-GROUP: Work a dc-group around ch-space as follows: Work * 1 dc, 1 ch *, repeat from *-* 2 more times around same ch-space, 1 dc around same ch-space. INCREASE TIP: Inc 1 dc by working 2 dc in 1 sc/dc. DECREASE TIP: Dec 1 dc at beg and end of round as follows: Work 1 dc (= 3 ch at beg of row), * work 1 dc but wait with last pull through (= 2 sts on hook), then work next dc but on last pull through, pull yarn through all sts on hook *, repeat from *-* when 3 dc remain on round = 1 st dec on each side of marker. ---------------------------------------------------------- JACKET: The piece is worked top down. Worked back and forth from mid front. YOKE: Work 75-78-84-89-93-98 ch (includes 1 ch to turn with) on hook size 6 mm / J/10 with Air. Work next row as follows - READ CROCHET INFO: ROW 1: Work 1 sc in 2nd ch from hook, work 1 sc in each of the next 1-4-2-7-3-8 ch, * skip ch 1, work 1 sc in each of the next 7 ch *, repeat from *-* 8-8-9-9-10-10 more times = 65-68-73-78-81-86 sc. ROW 2: Work 1 dc in each of the first 4 sc (= band), continue with 1 dc in every sc until 4 sc remain on row, AT THE SAME TIME inc 6-8-8-10-12-23 dc evenly - READ INCREASE TIP, 1 dc in each of the remaining 4 sc = 71-76-81-88-93-109 dc. Now insert 8 markers in the piece for raglan increasing without working the sts. Insert 4 markers from each side of piece as follows: Insert a marker after 13-13-14-14-16-19 dc, insert next marker after 2 dc, then insert next marker after 9-11-12-14-14-17 dc, and finish with last marker after 2 dc. There are now 19-20-21-24-25-29 dc between the 2 middle markers towards mid back on jacket. Now continue with 1 dc in every dc, AT THE SAME TIME inc 1 dc on right side of each of the 8 markers. Then inc alternately on right and left side of every marker (seen from RS). Repeat inc every row 9-9-11-12-13-16 more times, and every other row 2-3-2-2-2-0 times = 167-180-193-208-221-245 dc on row. Piece measures approx. 20-23-23-24-26-27 cm / 8"-9"-9"-9½"-10¼"-10½". REMEMBER THE CROCHET GAUGE! On next round work as follows: Work 25-27-29-31-34-38 dc (front piece), 8 ch (under sleeve), skip 38-40-42-45-47-50 dc from previous row (= sleeve), 41-46-51-56-59-69 dc (back piece), 8 ch (under sleeve), skip 38-40-42-45-47-50 dc from previous row (= sleeve) and 25-27-29-31-34-38 dc (front piece). Insert a marker, now measure piece from here! BODY: There are now 107-116-125-134-143-161 sts for body. Now measure the piece from here. Now continue with 1 dc in every dc/ch on row, turn and work next row in PATTERN - see explanation above, as follows: ROW 1: Work 1 dc in each of the first 4 dc (= A.1), then work A.2 as follows: * Work 2 dc TOG (in dc) - see explanation above, ch 5, skip 2 dc, 1 sc in next dc, ch 3, skip 2 dc, 1 sc in next dc, ch 5, skip 2 dc *, repeat from *-* 10-11-12-13-14-16 more times, work 1 dc in each of the remaining dc (= A.3). ROW 2: Work 1 sc in each of the first 4 dc, * work ch 3, skip 1 ch-space, work 1 dc-GROUP - see explanation above, around next ch-space, ch 3, skip 1 ch-space, 1 sc in the 2 dc worked tog *, repeat from *-* 10-11-12-13-14-16 more times, work 1 sc in each of the last 4 dc. ROW 3: Work 1 sc in each of the first 4 sc, * ch 2, 1 sc around next ch-space, ch 5, work 2 dc TOG (around ch) - see explanation above, ch 5, 1 sc around next ch-space after dc-group, 1 ch *, repeat from *-* 10-11-12-13-14-16 more times, 1 sc in each of the last 4 sc. ROW 4: Work 1 dc in each of the first 4 sc, (1 dc, ch 1, 1 dc) around first ch-space, ch 3, skip 1 ch-space, 1 sc in the 2 dc worked tog, ch 3, skip 1 ch-space, * (1 dc, ch 1, 1 dc, ch 1, 1 dc, ch 1, 1 dc) around next ch-space, ch 3, skip 1 ch-space, 1 sc in the 2 dc worked tog, ch 3, skip 1 ch-space *, repeat from *-* 9-10-11-12-13-15 more times, (1 dc, ch 1, 1 dc, 1 ch) around last ch-space, 1 dc in each of the last 4 sc. ROW 5: Work 1 dc in each of the first 4 dc, * work 2 dc TOG (around ch), ch 5, work 1 sc around ch-space after dc-group, ch 3, 1 sc around next ch-space, 5 ch *, repeat from *-* 10-11-12-13-14-16 more times, 1 dc in each of the last 4 dc. Continue like this and repeat A.X (= 2nd-5th row) back and forth until piece measures approx. 32 cm / 12½" in all sizes - adjust to finish after 2nd or 4th row in A.1-A.3. Piece measures 56-60-60-62-64-66 cm / 22"-23½"-23½"-24½"-25¼"-26" in total. SLEEVE: Sleeve is worked in the round, top down. Insert a marker in the middle of the 8 ch worked under sleeve. Now measure the piece from here. Let marker follow in piece until finished measurements. Fasten yarn with 1 sl st in the 5th ch of the 8 ch worked in armhole on body. Work 3 ch (= 1 dc) continue with 1 dc in each of the next ch 3, 1 dc in each of the dc for sleeve and then 1 dc in the remaining 4 ch under sleeve = 46-48-50-53-55-58 dc - remember CROCHET INFO! Continue with 1 dc in every dc AT THE SAME TIME when piece measures approx. 4 cm / 1½" beg dec - READ DECREASE TIP. Repeat the same dec every 3rd-2nd-2nd-2nd-2nd-1st round 8-9-10-10-11-12 more times = 28-28-28-31-31-32 dc remain. Fasten off when piece measures 46-44-44-43-42-40 cm / 18"-17¼"-17¼"-17"-16½"-15¾". Work the other sleeve the same way. ASSEMBLY: Fasten the buttons on left front piece, the top button approx. 1 cm / ⅜" from neck edge, fasten the remaining button approx. 8-8-9-9-9-10 cm / 3"-3"-3½"-3½"-3½"-4" apart. Button between 2 dc on right front piece. |
|||||||||||||||||||||||||
Diagram explanations |
|||||||||||||||||||||||||
|
|||||||||||||||||||||||||
 |
|||||||||||||||||||||||||
 |
|||||||||||||||||||||||||
Have you finished this pattern?Tag your pictures with #dropspattern #lakesidecardigan or submit them to the #dropsfan gallery. Do you need help with this pattern?You'll find 17 tutorial videos, a Comments/Questions area and more by visiting the pattern on garnstudio.com. © 1982-2026 DROPS Design A/S. We reserve all rights. This document, including all its sub-sections, has copyrights. Read more about what you can do with our patterns at the bottom of each pattern on our site. |
|||||||||||||||||||||||||


With over 40 years in knitting and crochet design, DROPS Design offers one of the most extensive collections of free patterns on the internet - translated to 17 languages. As of today we count 324 catalogs and 12290 patterns - 12280 of which are translated into English (US/in).
We work hard to bring you the best knitting and crochet have to offer, inspiration and advice as well as great quality yarns at incredible prices! Would you like to use our patterns for other than personal use? You can read what you are allowed to do in the Copyright text at the bottom of all our patterns. Happy crafting!
Post a comment to pattern DROPS 164-33
We would love to hear what you have to say about this pattern!
If you want to leave a question, please make sure you select the correct category in the form below, to speed up the answering process. Required fields are marked *.