
Popular categories
Looking for a yarn?


Comments / Questions (83)
![]() Ágnes wrote:
Ágnes wrote:
A raglán készitésénél hogy kell érteni azt, hogy "elkezdjük a fogyasztást a raglánvonal kialakításához a köv módon: Ismételjük meg a fogyasztást minden 4. sorban 7-5-3-0-0 alkalommal majd minden körben 8-14-20-27-29-30 alkalommal. Miután minden fogyasztást elkészítettünk 180-176-176-180-196-220 szem marad a kötőtűn." Sehogy sem tudok eligazogni sem a sorok száma, sem a szemszámon...Köszönöm előre is Várszegi Ági
20.01.2026 - 12:01
![]() Geneviève wrote:
Geneviève wrote:
Bonjour, J'ai une question au sujet du 59ème rg: je comprends comment faire le côté droit, début du rg, mais arrivé à la fin du A 1, coté gauche, je suis un peu coincée. Pour avoir une idée claire du A.1 je mets des marqueurs enter chaque dessin.
09.11.2025 - 19:40DROPS Design answered:
Bonjour Geneviève, au début du tour, vous allez glisser les 2 premières mailles sans les tricoter (d'où les 2 "trous" dans le diagramme), à la fin de chaque diagramme / A.1, tricotez la dernière maille avec les 2 premières mailles du A.1 suivant, le jeté avant la double diminution est désormais la dernière maille de ce A.1 et la diminution + le jeté à la fin de ce A.1 sont désormais la 1ère et la 2ème maille du A.1 suivant; tricotez ainsi tout le tour, et, à la fin du tour, tricotez la dernière maille du dernier A.1 avec les 2 premières mailles du premier A.1 (celles que vous aviez glissé au début du tour). Bon tricot!
10.11.2025 - 07:53
![]() Geneviève wrote:
Geneviève wrote:
Hi ! I'm working on the 59th row and I'm having trouble with the left part of the A.1 pattern. I understand the decrease but I'm stuck with the "black triangle" pattern on the left. Thanks for your help.
08.11.2025 - 20:39DROPS Design answered:
Hi Genevieve, The 2 extra stitches on the left-hand side of the pattern are the 2 first stitches at the beginning of the next repeat (right-hand side of the pattern). Regards, Drops Team.
11.11.2025 - 07:10
![]() Dinorah Lopez Frahsl wrote:
Dinorah Lopez Frahsl wrote:
Buenas tardes, son una gran admiradora de sus modelos y ya he hecho muchos de ellos. Estoy empezando con el número 161- 22 y justamente la misma pregunta que hizo LAURA en italiano el 16.12.2019 era mi dura al seguir el diagrama. Su respuesta me aclcaró mi duda y ahora sí me cuadra el centrado del diagrama. Mil gracias!!
25.04.2025 - 10:51
![]() Brigitte wrote:
Brigitte wrote:
Kann man diese Anleitung auch von oben nach unten Stricken? Und wenn was muss man dabei beachten. Vielen Dank im Voraus
10.02.2025 - 12:36DROPS Design answered:
Liebe Brigitte, es würde viel einfacher der Pullover so von unten nach oben zu stricken, wenn Sie lieber von oben nach unten stricken, dann finden Sie Anleitugen dafür hier. Viel Spaß beim Stricken!
10.02.2025 - 17:00
![]() Quynh wrote:
Quynh wrote:
For the first round of increase, is this the correct way? - [BOR marker] knit 1, yo, knit to 1 stitch before marker, yo, knit 2, yo, knit to 1 stitch before marker, yo, knit 1.
03.11.2023 - 07:16DROPS Design answered:
Dear Mrs Quanh, that's correct. Happy knitting!
03.11.2023 - 13:57
![]() MississippiLead wrote:
MississippiLead wrote:
Similar
10.10.2022 - 00:39
![]() CodeiherbLEasp wrote:
CodeiherbLEasp wrote:
Iherb promo code june
06.10.2022 - 23:24
![]() Evelyne Bachofer wrote:
Evelyne Bachofer wrote:
Guten Tag Wenn ich bei der 5. Reihe des Diagramms starte, geht es nicht auf. Ich stricke das überzogene Abnehmen und müsste nachher 3 M sticken 1 U 3 re 1U 3 re. Das funktioniert nicht. 1 überz. Abn. 2 re, statt 3, damit zwischen den U 3 M sind. Was ist nocht richtig? Besten Dank für Ihre Hilfe. Gruss E. bachofer
13.02.2021 - 19:58DROPS Design answered:
Liebe Frau Bachofer, meinen Sie am Anfang A.1? die erste Abnahme in A.1 wird mit der letzte Masche von der vorrigen Runde angefangen, und dann immer die letzte Masche vom Diagram mit den 2 ersten Maschen vom nächsten Diagram stricken, so nehmen Sie 2 Maschen in jedem Diagram ab. Kann es Ihnen helfen? Viel Spaß beim stricken!
15.02.2021 - 08:36
![]() Sztupovszki Lászlóné wrote:
Sztupovszki Lászlóné wrote:
Üdvözlöm, ezt a mintát csak körben lehet kötni? Oda-vissza nem? Köszönöm
02.12.2020 - 08:15DROPS Design answered:
Üdvözlöm, inkább igen. Át lehet alakítani a körkötőtűre írt kötésmintákat. Happy knitting!
02.12.2020 - 10:44
|
||||||||||||||||
Juliana#julianasweater |
||||||||||||||||
 |
 |
|||||||||||||||
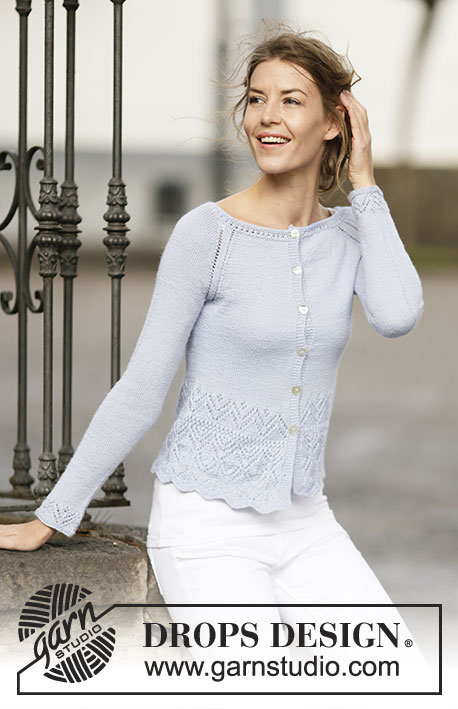
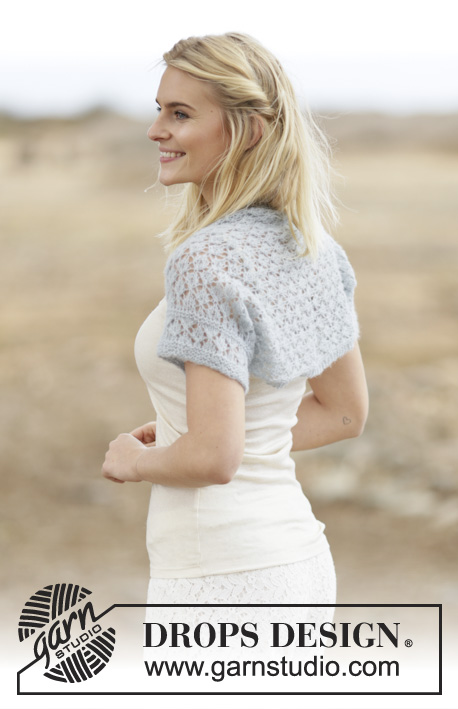
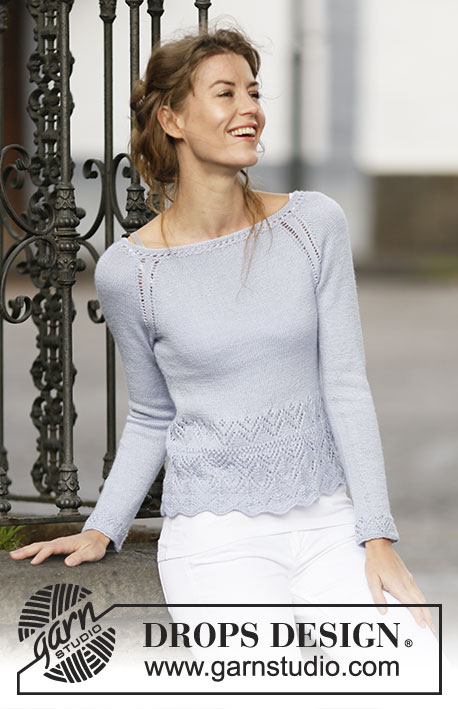
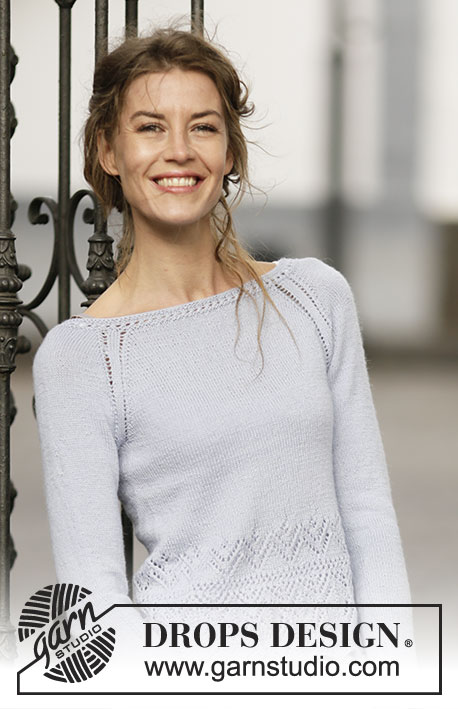
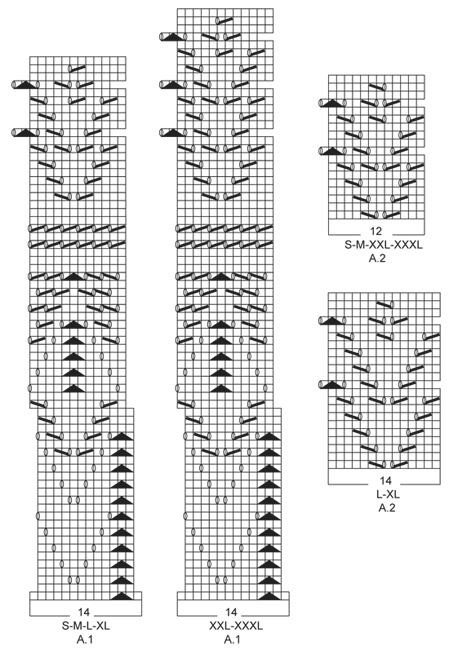
Knitted DROPS jumper with raglan and lace pattern in ”BabyAlpaca Silk” or "DROPS ♥ You #7". Size: S - XXXL.
DROPS 161-22 |
||||||||||||||||
|
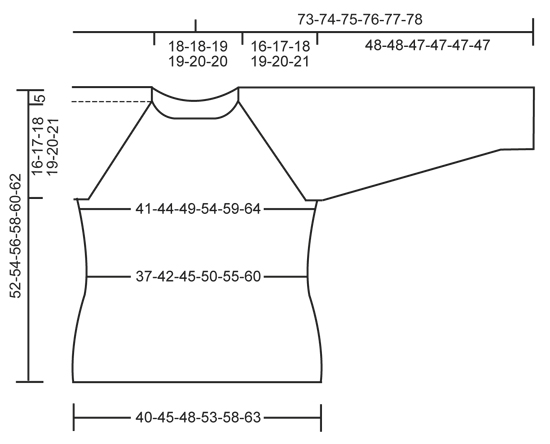
GARTER ST (worked in the round): 1 ridge = 2 rounds. * K 1 round and P 1 round *, repeat from *-*. PATTERN: See diagrams A.1-A.2. Adjust so that pattern comes above each other as in diagram A.1. INCREASE TIP: Work until 1 st remains before marker, 1 YO, K 2 (marker is in the middle of these sts), 1 YO. On next round K YO twisted (i.e. work in back loop of st instead of front) to avoid holes. RAGLAN: Dec 1 st on each side of each marker. DEC EVERY 4TH ROUND AS FOLLOWS: Dec only on 1st round but all 4 rounds are explained to continue the lace pattern. ROUND 1: Beg 5 sts before each marker and work as follows: K 3 tog, 1 YO, K 1 twisted, K 2 (marker is in the middle of these 2 sts), K 1 twisted, 1 YO, K 3 twisted tog. ROUND 2: K all sts, do not work YOs twisted; they should make holes. ROUND 3: Beg 4 sts before each marker and work as follows: K 2 tog, 1 YO, K 1 twisted, K 2 (marker is in the middle of these 2 sts), K 1 twisted, 1 YO, K 2 twisted tog. ROUND 4: Work as 2nd round. DEC EVERY OTHER ROUND AS FOLLOWS: ROUND 1: Beg 5 sts before each marker and work as follows: K 3 tog, 1 YO, K 1 twisted, K 2 (marker is in the middle of these 2 sts), K 1 twisted, 1 YO, K 3 twisted tog. ROUND 2: K all sts, do not work YOs twisted; they should make holes. PATTERN-1: ROUND 1: P all sts. ROUND 2: K all sts. ROUND 3: K all sts. ROUND 4: * K 2 tog, 1 YO *, repeat from *-* the rest of the rnd. ROUND 5: Work as 3rd round. ---------------------------------------------------------- JUMPER: Worked bottom up, in the round on circular needle. BODY: Cast on 224-252-266-294-322-350 sts on circular needle size 3 mm / US 2.5 with BabyAlpaca Silk. Work 2 ridges in GARTER ST - see explanation above - over all sts. Then work A.1 (= 14 sts) 16-18-19-21-23-25 times in total in width. When A.1 has been worked 1 time vertically, there are 192-216-228-252-276-300 sts on needle. REMEMBER THE KNITTING GAUGE On next round, dec 16-16-12-12-12-12 sts evenly = 176-200-216-240-264-288 sts. Piece measures approx. 21-21-21-21-24-24 cm / 8¼"-8¼"-8¼"-8¼"-9½"-9½". Continue in stockinette st. Insert 1 marker at beg of round, then 1 marker after 88-100-108-120-132-144 sts. There are 88-100-108-120-132-144 sts on front and back piece. When piece measures 25-25-25-25-28-28 cm / 9¾"-9¾"-9¾"-9¾"-11"-11", inc 1 st on each side of both markers (= 4 sts inc) – see INCREASE TIP. Repeat inc every 1-2-1-1-1-1 cm / ½"-¾"-½"-½"-½"-½" 4-2-4-4-4-4 more times = 196-212-236-260-284-308 sts. When piece measures 31-32-33-34-35-36 cm / 12¼"-12½"-13"-13 ⅜"-13¾"-14¼", bind off for armholes in each side as follows: bind off the first 6 sts, work until 6 sts remain before marker in the side, bind off the next 12 sts, work until 6 sts remain, bind off the last 6 sts. Fasten off. There are 86-94-106-118-130-142 sts on back piece and front piece. Put piece aside and knit the sleeves. SLEEVE: Worked in the round on double pointed needles. Cast on 46-46-50-52-56-58 sts on double pointed needles size 3 mm / US 2.5 with BabyAlpaca Silk. Work 2 ridges. On next round, K and inc 2-2-6-4-4-2 sts evenly = 48-48-56-56-60-60 sts. Then work A.2 (= 12-12-14-14-12-12 sts) 4-4-4-4-5-5 times in total in width. When A.2 has been worked 1 time vertically, continue in stockinette st. Insert 1 marker at the beg of the round. When piece measures 7-6-8-8-8-7 cm / 2¾"-2½"-3"-3"-3"-2¾", inc 1 st on each side of marker (= mid under sleeve). Repeat inc every 3-2½-2½-2-2-2 cm / 1⅛"-⅞"-⅞"-¾"-¾"-¾" 13-16-14-17-17-19 more times = 76-82-86-92-96-100 sts. When piece measures 48-48-47-47-47-47 cm / 19"-19"-18½"-18½"-18½"-18½" (shorter measurements in the larger sizes because of longer sleeve cap and wider shoulders), bind off 12 sts mid under sleeve = 64-70-74-80-84-88 sts. Put piece aside and make another sleeve. YOKE: Slip sleeves on to same circular needle as body where armholes were bound off = 300-328-360-396-428-460 sts. Insert 1 marker in all transitions between sleeves and body (= 4 markers). Continue in stockinette st AT THE SAME TIME dec for RAGLAN – see explanation above as follows: Dec every 4th round 7-5-3-0-0-0 times, then every other round 8-14-20-27-29-30 times. After all dec for raglan 180-176-176-180-196-220 sts remain on needle. P 1 round, K 1 round while AT THE SAME TIME dec 36-32-28-32-44-68 sts evenly = 144-144-148-148-152-152 sts. Then work PATTERN-1 - see explanation above. Work 2 ridges. Then loosely bind off all sts. ASSEMBLY: Sew the openings under the sleeves. |
||||||||||||||||
Diagram explanations |
||||||||||||||||
|
||||||||||||||||
 |
||||||||||||||||
 |
||||||||||||||||
Have you finished this pattern?Tag your pictures with #dropspattern #julianasweater or submit them to the #dropsfan gallery. Do you need help with this pattern?You'll find 30 tutorial videos, a Comments/Questions area and more by visiting the pattern on garnstudio.com. © 1982-2026 DROPS Design A/S. We reserve all rights. This document, including all its sub-sections, has copyrights. Read more about what you can do with our patterns at the bottom of each pattern on our site. |
||||||||||||||||


With over 40 years in knitting and crochet design, DROPS Design offers one of the most extensive collections of free patterns on the internet - translated to 17 languages. As of today we count 324 catalogs and 12290 patterns - 12280 of which are translated into English (US/in).
We work hard to bring you the best knitting and crochet have to offer, inspiration and advice as well as great quality yarns at incredible prices! Would you like to use our patterns for other than personal use? You can read what you are allowed to do in the Copyright text at the bottom of all our patterns. Happy crafting!
Post a comment to pattern DROPS 161-22
We would love to hear what you have to say about this pattern!
If you want to leave a question, please make sure you select the correct category in the form below, to speed up the answering process. Required fields are marked *.