
Popular categories
Looking for a yarn?


Comments / Questions (137)
![]() Martine wrote:
Martine wrote:
Bonjour J'ai bien avancé sur ce modèle et j'en suis à la fin du diagramme A5. Il faut donc commencer la réhausse dos mais je ne comprends pas comment il faut faire...Mon fil est à la fin du tour sur 1 des aiguilles (je travaille avec 4 aiguilles en rond) comment faire pour commencer milieu dos? et du coup on travaille comme à 2 aiguilles donc 1 rg endroit, 1 rg envers? Merci beaucoup de m'éclairer...j'espère que vous pourrez le faire malgré le confinement.. Cordialement.
24.03.2020 - 15:42DROPS Design answered:
Bonjour Martine, vous pouvez poser votre ouvrage à plat pour trouver le milieu dos, enfilez les mailles en attente sur un fil ou sur une aiguille circulaire si c'est plus simple pour vous. Ensuite vous tricotez en rangs donc à partir du milieu dos: 1 rang sur l'endroit jusqu'à ce qu'il reste 14 à 20 m avant le marqueur du milieu devant, tournez et tricotez sur l'envers jusqu'à ce qu'il reste 14 à 20 m de l'autre côté du marqueur du milieu devant (= vous aurez donc 28 à 40 m non tricotées au milieu devant), tournez et continuez ainsi en rangs raccourcis. cf vidéo. Bon tricot!
24.03.2020 - 17:02
![]() Richard wrote:
Richard wrote:
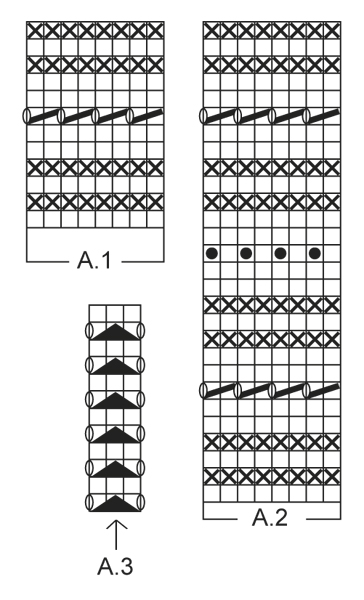
Hi again. Thanks for the reply. I will knit a test piece (of 40 sts) then proceed as if it were the sleeve. Then when I have knitted the sts I should be able to count the sts easily, to see if I have the right number. But where I am confused, the A3 pattern chart shows that 12 rounds are used! That means 12 rounds (where the YO makes holes, yet the holes do not show in the picture of the pattern. Or are they & I just cannot see them! Thank you. Richard.
23.03.2020 - 13:10DROPS Design answered:
Since you will work 8 dec round every 4th round = you will work a total of 32 rounds with A.3, ie always 1 round with hole/1 round knitting all stitches. Happy knitting!
23.03.2020 - 13:39
![]() Richard wrote:
Richard wrote:
Hi again. Thanks for the reply. I will knit a test piece (of 40 sts) then proceed as if it were the sleeve. Then when I have knitted the sts I should be able to count the sts easily, to see if I have the right number. But where I am confused, the A3 pattern chart shows that 12 rounds are used! That means 12 rounds (where the YO makes holes, yet the holes do not show in the picture of the pattern. Or are they & I just cannot see them! Thank you. Richard.
23.03.2020 - 13:08DROPS Design answered:
Dear Richard, there are just a few raglan rounds (8 decrease round on every 4th round in size L), that's why we cannot see them on the picture, they are coming before the round yoke part. But I made a mistake on previous answer, you should work 68 sts between decreases on sleeve (just always make sure the stitch with marker is the one in the middle of A.3 and that you decrease 1 stitch before + after A.3 so that your total number of sts should be then right after all raglan decreases = 308 sts. Happy knitting!
23.03.2020 - 13:38
![]() Richard wrote:
Richard wrote:
Hello. When I begin to knit the round, starting with the left sleeve (which has 76 sts); I should have 74sts (dec 1st at each end); but I have many less! This is always the case when I have tried (on two occassions). I bought the wool from a supplier in Denmark... Thanks. Richard.
23.03.2020 - 11:52DROPS Design answered:
Dear Richard, not sure why you don't have, theh 74 sts now ... you should have 1 st from back piece, 1 st from sleeve (= with marker), 1 st from sleeve = 3 sts in A.3 dec to 1 with 1 yarn over before (= belongs to back piece) + 1 yarn over after (= belongs to sleeve), decrease 1 stitch then work until 5 sts remain before next marker = 72 sts decrease 1 st and work A.3. Happy knitting!
23.03.2020 - 12:41
![]() Richard wrote:
Richard wrote:
Thank you. I will try once more, as you say, but I may have to send you pictures of my work! I have tried , twice with the left sleeve & each time, I have many less sts than I should have (74)! Richard.
23.03.2020 - 10:02DROPS Design answered:
Dear Richard, you cannot upload pictures here but you can send some to the store where you bought the yarn :) When you say you have 74 sts left, which piece does it match?
23.03.2020 - 11:42
![]() Richard wrote:
Richard wrote:
Hi, it's me again (at least I keep you busy :>) I'm still struggling! I have slipped the last st. from the back, so it is the first st. on the left sleeve. I've put a marker between this st & the first st of the sleeve. (transition between the back & the sleeve). Please tell me what I should do, now. I've tried various ways & end up with many less stitches than I should have (74)! The 'Lemon Parfait' that I finished recently for a woman of 84, was brilliant.
21.03.2020 - 18:08DROPS Design answered:
Dear Richard, you now work A.3 at the transition of piece for raglan lines and decrease 1 stitch on each side of A.3: start with the last st on back piece on left needle, then make YO, dec, YO (= A.3), decrease 1 st for raglan, *work until 3 sts remain before next st with marker, decrease, and work YO, dec, YO (= A.3), decrease* repeat from *-* on each marker and finish round with 1 decrease (end of back piece), just before the first A.3 of the round. Hope this helps. You can also show your work to your store (even by mail), they could have a look at your piece and help you further if required. Happy knitting!
23.03.2020 - 09:37
![]() Richard wrote:
Richard wrote:
Yes - This is Richard.... Thanks a million - I live in the UK.
20.03.2020 - 16:13
![]() Richard wrote:
Richard wrote:
Thanks a million. Richard.
20.03.2020 - 16:11
![]() Richard wrote:
Richard wrote:
Hi. I must seem dumb! OK, I start with left sleeve. So will the first decrease be with the last st of the back & the first st of the sleeve, where I k tog! Then slip the 2nd st. Then to knit the 3rd st & psso? Help... Thank you in anticipation in this hour of crisis. Richard.
20.03.2020 - 15:13DROPS Design answered:
Dear Richard, well rounds might have to start 1 stitch before marker so that you work: YO, 3 sts in A.3, YO (= raglan line) then dec (=1st dec for raglan) and end rounds on back piece with the dec for raglan (before the YO in A.3). Happy knitting!
20.03.2020 - 16:06
![]() Richard wrote:
Richard wrote:
Good morning. I have put the two sleeves on the main body & now I must follow 'A3'. I am starting from the front (110 sts) - I have now to decrease (k tog). After this do I then do 'YO', followed by slip 1 st & then k 2 tog, & psso? If this is right, shall I continue to the last 'A3' then slip 1 st, k 2 tog & psso? Help...
19.03.2020 - 11:17DROPS Design answered:
Dear Richard, rounds on yoke start with the left sleeve (not with front piece); the markers are in the middle stitch in A.3 you decrease now on each side of each A.3 as explained under RAGLAN,, ie: K2 tog, A.3 (= 3 sts with the marker in the middle stitch), slip 1 as if to K, K1, psso. Repeat these dec at each A.3 (= 4 times in the round = 8 sts decreased). Happy knitting!
19.03.2020 - 12:04
|
|||||||||||||||||||
Nordic Summer#nordicsummersweater |
|||||||||||||||||||
 |
 |
||||||||||||||||||
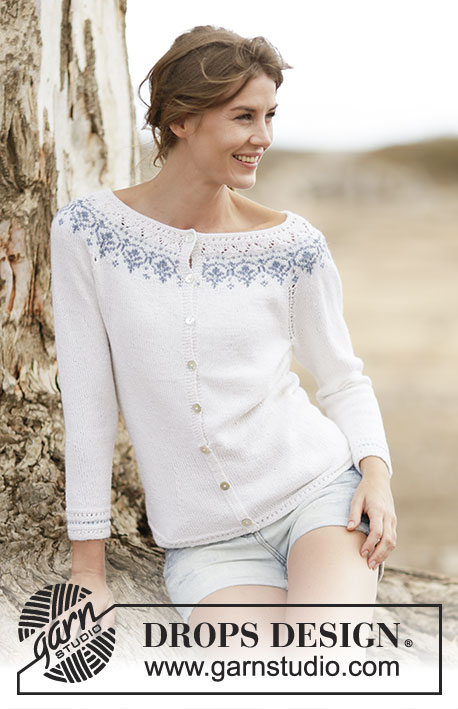
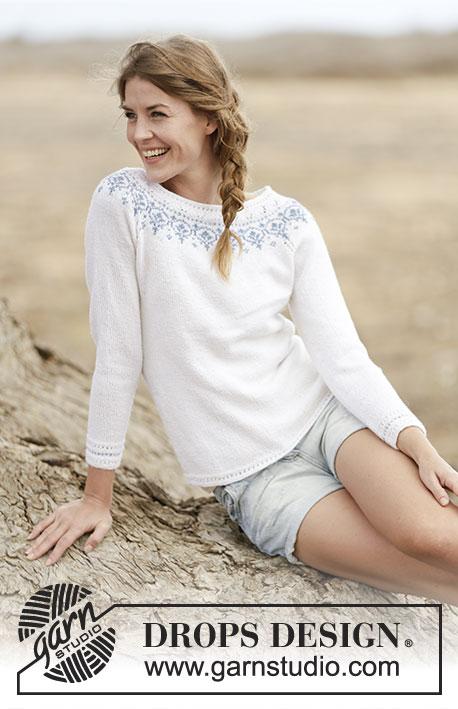
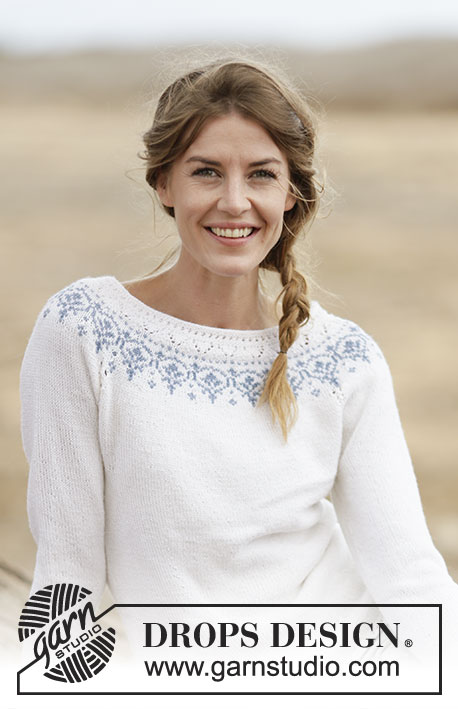
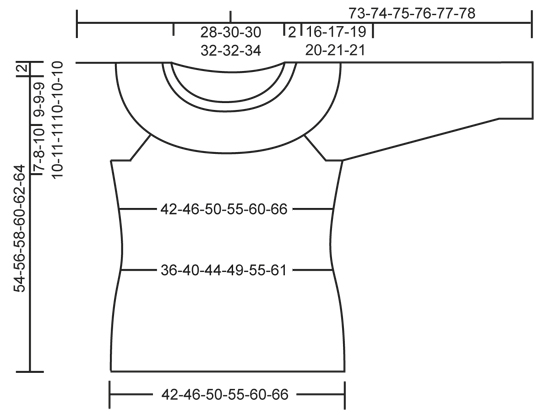
Knitted DROPS jumper with raglan and round yoke in ”BabyMerino”. Size: S - XXXL.
DROPS 161-33 |
|||||||||||||||||||
|
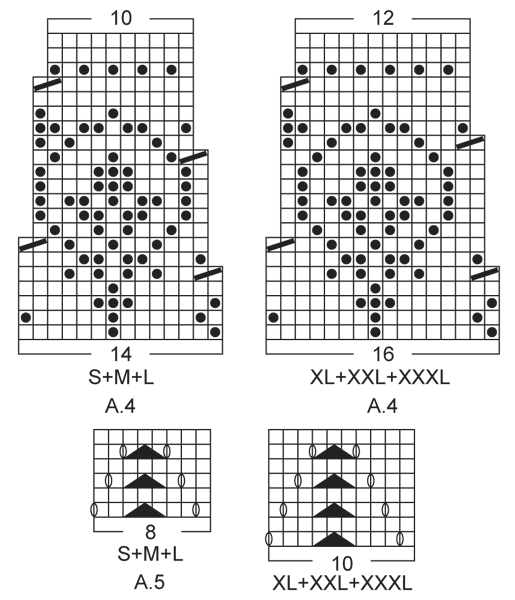
PATTERN: See diagrams A.1 to A.5. WAIST: Dec for waist at the 4 markers. Dec as follows after 1st and 3rd marker: K 2 tog. Dec as follows when 2 sts remain before 2nd and 4th marker: Slip 1 st as if to K, K 1, psso. INCREASE TIP: Inc for waist at the 4 markers as follows: Make 1 YO after 1st and 3rd marker and before 2nd and 4th marker. On next round K YOs twisted to avoid holes. RAGLAN: Dec for raglan on each side of A.3 in every transition between sleeves and body. Dec as follows after A.3: Slip 1 st as if to K, K 1, psso. Dec as follows 2 sts before A.3: K 2 tog. ---------------------------------------------------------- BODY: Worked in the round on circular needle. Cast on 200-220-240-264-288-316 sts on circular needle size 2.5 mm / US 1.5 with white. Work pattern according to diagram A.1. When A.1 has been worked 1 time vertically, switch to circular needle size 3 mm / US 2.5. Then work in stockinette st. REMEMBER THE KNITTING TENSION/GAUGE When piece measures 8-8-8-8-10-10 cm / 3"-3"-3"-3"-4"-4", insert 4 markers in piece as follows: Insert 1st marker after the first 24-28-31-36-42-48 sts, 2nd marker after the next 52-54-58-60-60-62 sts, 3rd marker after the next 48-56-62-72-84-96 sts and 4th marker after the next 52-54-58-60-60-62 sts (24-28-31-36-42-48 sts remain on needle after last marker). Then dec for WAIST at the 4 markers – see explanation above (= 4 sts dec). Repeat dec on every 4th round 7-7-7-7-6-6 times in total = 172-192-212-236-264-292 sts. When piece measures 22 cm / 8¾" in all sizes, inc after 1st and 3rd marker and before 2nd and 4th marker – READ INCREASE TIP (= 4 sts inc). Repeat inc every 4th-4th-6th-6th-8th-8th round 7-7-7-7-6-6 times in total = 200-220-240-264-288-316 sts. Continue to work until piece measures 38-39-39-40-41-43 cm / 15"-15¼"-15¼"-15¾"-16"-17". Work next round as follows: Cast/bind off 5-5-5-6-6-6 sts for armhole, work 90-100-110-120-132-146 sts in stockinette st (= front piece), cast/bind off 10-10-10-12-12-12 sts for armhole, work 90-100-110-120-132-146 sts in stockinette st (= back piece) and cast/bind off the last 5-5-5-6-6-6 sts for armhole. Put piece aside and knit the sleeves. SLEEVE: Worked in the round on double pointed needles. Cast on 56-56-58-60-62-64 sts on double pointed needles size 2.5 mm / US 1.5 with white. Work pattern according to diagram A.2. When A.2 has been worked 1 time vertically, switch to double pointed needles size 3 mm / US 2.5. Insert 1 marker at beg of round (= mid under sleeve) and work in stockinette st. When piece measures 8 cm / 3⅛", inc 2 sts mid under sleeve. Repeat inc every 9th-7th-7th-6th-6th-5th round 12-14-14-16-16-17 times in total = 80-84-86-92-94-98 sts. When piece measures 41-40-39-38-38-38 cm / 16"-15¾"-15¼"-15"-15"-15" (NOTE: shorter measurements in the larger sizes because of longer sleeve cap and wider shoulders), cast/bind off the middle 10-10-10-12-12-12 sts under sleeve (i.e. cast/bind off 5-5-5-6-6-6 sts on each side of marker) = 70-74-76-80-82-86 sts remain on needle. Put piece aside and Make another sleeve. YOKE: Slip sleeves on to same circular needle as body as follows: Continue with white and work sts from first sleeve AT THE SAME TIME insert 1 marker in first st and 1 marker in last st on sleeve, work sts from front piece, work sts from the other sleeve AT THE SAME TIME insert 1 marker in first st and 1 marker in last st on sleeve and work sts from back piece = 320-348-372-400-428-464 sts on needle and 4 markers in piece. Then work in stockinette st in the round AT THE SAME TIME work A.3 in every transition between body and sleeves (arrow in diagram should match against st with marker). AT THE SAME TIME dec for RAGLAN on each side of A.3 in every transition between body and sleeves – see explanation above (= 8 sts dec). Repeat dec for raglan every 4th round 6-7-8-8-9-9 times in total = 272-292-308-336-356-392 sts. After last dec K 1 round while AT THE SAME TIME dec 20-26-28-32-36-40 sts evenly = 252-266-280-304-320-352 sts on needle. Then work pattern in the round according to A.4 AT THE SAME TIME dec as shown in diagram - choose diagram for correct size. When A.4 has been worked 1 time vertically, there are 180-190-200-228-240-264 sts on needle. K 1 round with white while AT THE SAME TIME dec 4-6-8-28-30-44 sts evenly = 176-184-192-200-210-220 sts. Now work pattern according to A.5 – choose diagram for correct size. When A.5 has been worked, work an elevation in the back of neck. Insert 1 marker mid front. Beg mid back and K (with white) until 14-14-16-16-18-20 sts remain before marker. Turn, K back until 14-14-16-16-18-20 sts remain before marker in the other side. Turn, K until 30-30-34-34-38-42 sts remain before marker. Turn, K back until 30-30-34-34-38-42 sts remain before marker in the other side. Turn, K until 46-46-52-52-58-64 sts remain before marker. Turn, K back until 46-46-52-52-58-64 sts remain before marker in the other side. Turn, K until 62-62-70-70-76-86 sts remain before marker. Turn, K back until 62-62-70-70-76-86 sts remain before marker in the other side. Turn and K back to beg of round. NECK EDGE: Switch to circular needle size 2.5 mm / US 1.5 and work pattern in the round over all sts according to diagram A.1 AT THE SAME TIME dec 30-28-36-34-44-44 sts evenly = 146-156-156-166-166-176 sts. When A.1 has been worked 1 time vertically, loosely cast/bind off with K. ASSEMBLY: Sew the openings under the sleeves. |
|||||||||||||||||||
Diagram explanations |
|||||||||||||||||||
|
|||||||||||||||||||
 |
|||||||||||||||||||
 |
|||||||||||||||||||
 |
|||||||||||||||||||
Have you finished this pattern?Tag your pictures with #dropspattern #nordicsummersweater or submit them to the #dropsfan gallery. Do you need help with this pattern?You'll find 29 tutorial videos, a Comments/Questions area and more by visiting the pattern on garnstudio.com. © 1982-2026 DROPS Design A/S. We reserve all rights. This document, including all its sub-sections, has copyrights. Read more about what you can do with our patterns at the bottom of each pattern on our site. |
|||||||||||||||||||


With over 40 years in knitting and crochet design, DROPS Design offers one of the most extensive collections of free patterns on the internet - translated to 17 languages. As of today we count 324 catalogs and 12290 patterns - 12280 of which are translated into English (US/in).
We work hard to bring you the best knitting and crochet have to offer, inspiration and advice as well as great quality yarns at incredible prices! Would you like to use our patterns for other than personal use? You can read what you are allowed to do in the Copyright text at the bottom of all our patterns. Happy crafting!
Post a comment to pattern DROPS 161-33
We would love to hear what you have to say about this pattern!
If you want to leave a question, please make sure you select the correct category in the form below, to speed up the answering process. Required fields are marked *.