
Popular categories
Looking for a yarn?


Comments / Questions (137)
![]() Kara wrote:
Kara wrote:
I’m getting ready to cast on but not sure about which size to select. The finished sizing doesn’t make any sense. Are the numbers given for a flat piece? I’m not sure how you measure the bust. Thank you
01.04.2020 - 18:12DROPS Design answered:
Dear Kara, correct, measurements are always taken flat from side to side - compare a similar garment you have and like the shape to find out the matching size. Read more about sizing here. Happy knitting!
02.04.2020 - 07:50
![]() Richard wrote:
Richard wrote:
To all the Drops team, Hi all, I am such an idiot! This morning I questioned myself, once again, "where was I going wrong"? I was trying to knit 'A3' for the total 76 stitches of the sleeve! It suddenly came to me, that 'A3' was ONLY kitted either side of the transitions, between the sleeve & the body :>) So, the completed garment will show 1 hole, running the length of the Raglan decreases, of the sleev & the body... Thank you.
29.03.2020 - 11:50DROPS Design answered:
Dear Richard, glad to see you found out how to work A.3 :) Thanks for your feedback and enjoy the rest of the jumper - come back if necessary! Happy knitting!
30.03.2020 - 09:38
![]() Richard wrote:
Richard wrote:
Hi, again. I will try again, but using double-pointed needles with 20 sts cast on, as follows:- I have placed a marker 5 sts along & now knitted 2sts tog. The remaining 3 sts are the 'A3' I continue as follows:- Y.O. - slip 1 st. - knit 2 sts tog. - psso. At this stage all is correct! - I have 4 sts. before the marker. But if I continue to knit in A3 (Y.O. - slip 1 st. - knit 2 sts tog. - psso). I do not have 7 sts. - I HAVE ONLY 6 STS! Help. Richard.
28.03.2020 - 14:48
![]() Brigitte Veerman wrote:
Brigitte Veerman wrote:
Ik begrijp niet helemaal hoe de ronding gebreid moet worden op het achterpand voor de hals. Waar moet ik de markeerder middenvoor zetten. Ook de mouwen staan op de rondbreinaald. In totaal heb je 184 steken. Dus 2x92 st. Dus midden is steek 45 of 46. Maar dat lijkt mij niet middenvoor. Eerste stuk is mouw. Moet je dan gewoon middenachter aanhechten en breien tot middenvoor. Tot 14 st voor markeerder. En dan omdraaien terugbreien voorbij middenachter tot 14 st voor markeerder?
28.03.2020 - 00:01DROPS Design answered:
Dag Brigitte,
Nadat het telpatroon op de pas klaar is, kun je een verhoging op het achterpand breien in de vorm van verkorte toeren. Voordat je de mouwen en de panden op één rondbreinaald zet, heb je 100 steken op het voorpand en 100 steken op het achterpand. In het midden van deze 100 steken is midden voor/midden achter. Daar kun je dus een markeerder zetten en doortrekken naar boven. Voor de verhoging midden achter brei je verkorte toeren zoals aangegeven in de beschrijving.
29.03.2020 - 12:04
![]() Richard wrote:
Richard wrote:
Thank you for your response. Good luck. Richard
27.03.2020 - 10:20
![]() Richard wrote:
Richard wrote:
Good morning/afternoon. Once again, I am struggling! I understand that the first & last stitches will have the markers & that their are 74 stitches between the two markers. Do I knit AFTER the first marker (Y.O. - slip 1 st - k 2 tog - psso ). But at what stage do I do the raglan decease? It is difficult knitting the sleeve in, as they are 'bunched' together. Alternatively, if I disregarded A3 all-together (no holes in garment), I could continue as the pattern, up to the yoke.
27.03.2020 - 09:22DROPS Design answered:
Dear Richard, the raglan decreases are worked on each side of each A.3 = k2 tog, (A.3 = yo, slip 1 as if to K, K2 tog, psso, YO), slip 1 as if to K, K1, psso- if you choose to not work A.3, just remember to work the raglan decreases so that you get the correct number of stitches for the circular yoke. Happy knitting!
27.03.2020 - 10:11
![]() Richard wrote:
Richard wrote:
Good morning. Hope you are all well. thank you for the last reply. So, tell me, Is it correct that the last stitch of the back is the first stitch of the left sleeve (which is the middle stitch of A3)? So, do I knit YO "BEFORE this last stitch" or AFTER it?? I have knitted quite a few of your patterns, but this part has given me the greatest problem... Help. Thank you, Richard.
26.03.2020 - 10:06DROPS Design answered:
Dear Richard, the last st on back piece will be the last st on A.3 (at the transition of left sleeve and back piece), ie: sleeve, A.3 (= next to last st on sleeve + last st on sleeve = the one with the marker + 1st st on back piece), back piece. So that these 3 st will be worked as follows in A.3: YO, slip next to last st on sleeve, work tog st with marker + next st, psso (= 1 st remains), YO = there are now 3 sts (1 yarn over, 1 st, 1 yarn over) and the marker is still in the mid st (= the dec). Same should happen on other transitions, ie the middle st in each A.3 should be the st with the marker = the first or last stitch on sleeves. Hope this helps :)
26.03.2020 - 10:33
![]() Marisa wrote:
Marisa wrote:
Bonjour, est-il possible de faire ce pull avec une encolure moins ouverte (pour qu’on ne voit pas le t-shirt, je porte toujours un sous mes pulls) ? Merci d’avance !
25.03.2020 - 15:08DROPS Design answered:
Bonjour Marisa, vous pouvez essayer de modifier un peu l'encolure, mais le résultat sera automatiquement différent - n'hésitez pas à contacter votre magasin, même par mail ou téléphone, pour toute assistance personnalisée. Retrouvez tous nos modèles de pulls tricotés de bas en haut ici. Bon tricot!
25.03.2020 - 17:17
![]() Martine wrote:
Martine wrote:
Merci beaucoup. J'ai compris, mais je voudrais savoir si il est obligatoire pour ce modèle de faire la réhausse dos..je ne la vois pas sur la photo du modèle. Existe 'il une vue du dos au niveau de l'encolure pour que je me rende compte de l'effet visuel? Encore merci ;-)
24.03.2020 - 19:08DROPS Design answered:
Bonjour Martine, la réhausse encolure dos permet simplement au pull d'être plus haut dans le dos que devant, autrement dit il permet de former une "vraie" encolure devant. Vous pouvez tout à fait ne pas la faire, l'encolure dos et devant seront alors identiques. Bon tricot!
25.03.2020 - 09:30
![]() Richard wrote:
Richard wrote:
Hello again. Sorry to trouble you. I have knitted 30 sts using double pointed needles. Then I have followed the pattern:- YO, slip 1 st, knit 2 sts tog, psso...Repeat to end. But when I count the stitches, I only have 21! What am I doing wrong. Tell me, the markers 4 total), are only placed on the sleeves (first & last st itch respectively) - that is correct! I hope you all are keeping clear of the dreadful environment, that the whole World is now facing. Thank you. Richard.
24.03.2020 - 16:23DROPS Design answered:
Dear Richard, yes that's right, the marker is in the first stitch on sleeve (= middle stitch in A.3 at the beg of sleeve) + marker in the last st on sleeve (= middle stitch in A.3 at the end of sleeve), in between you should have (in L): 74 sts between both markers, then you will work A.3 (= 1st + 2nd st on sleeve = 1st + 2nd sleeve A.3), dec 1, K70, dec 1, A.3 (=1st +2nd st in A.3 = next to last st + last st on sleeve = the one with the marker + the one before marker). Hope this will help :)
24.03.2020 - 17:45
|
|||||||||||||||||||
Nordic Summer#nordicsummersweater |
|||||||||||||||||||
 |
 |
||||||||||||||||||
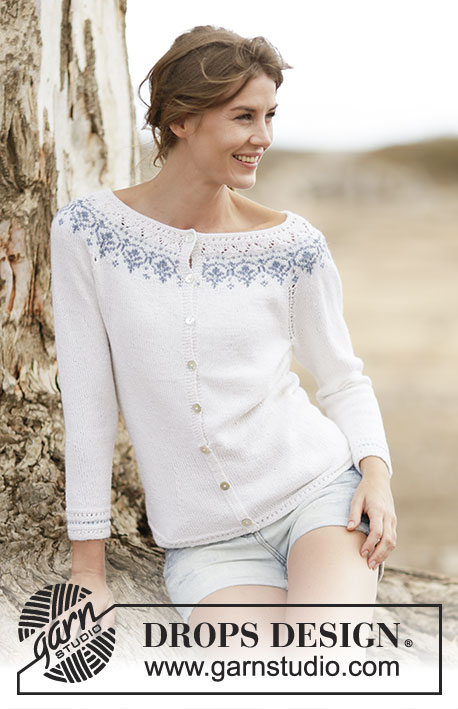
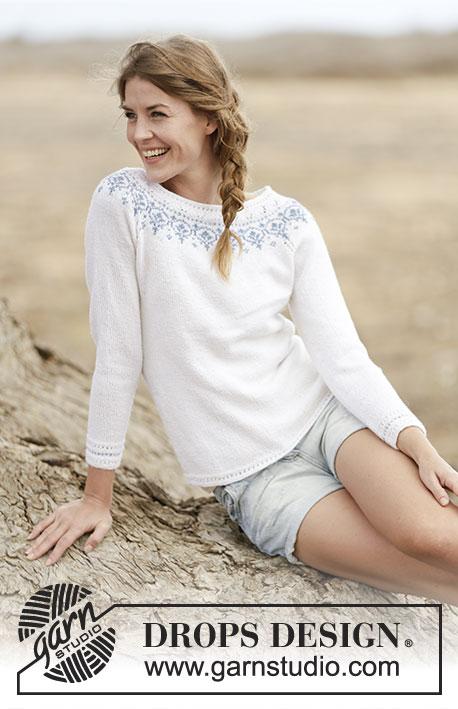
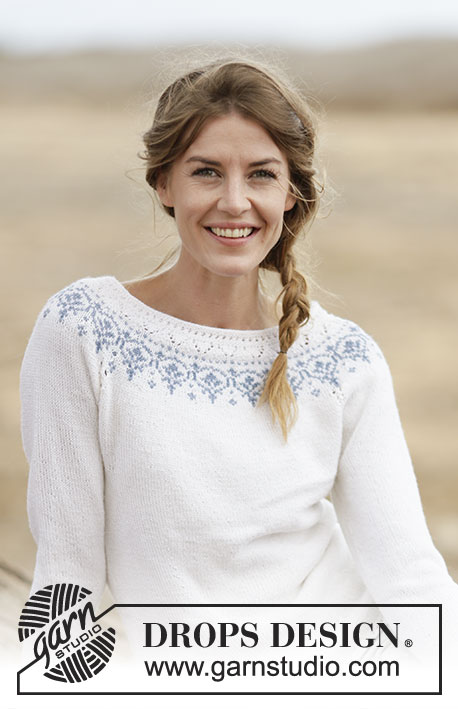
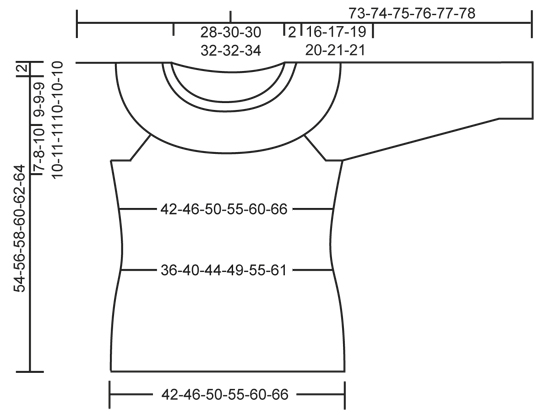
Knitted DROPS jumper with raglan and round yoke in ”BabyMerino”. Size: S - XXXL.
DROPS 161-33 |
|||||||||||||||||||
|
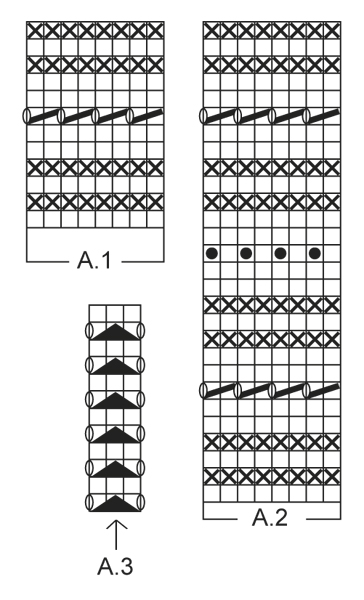
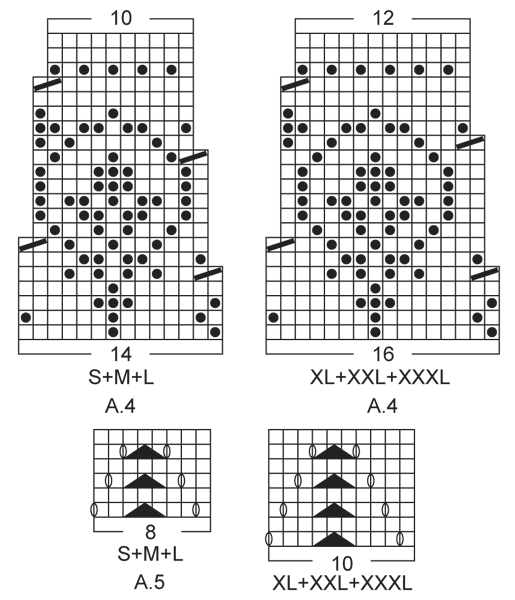
PATTERN: See diagrams A.1 to A.5. WAIST: Dec for waist at the 4 markers. Dec as follows after 1st and 3rd marker: K 2 tog. Dec as follows when 2 sts remain before 2nd and 4th marker: Slip 1 st as if to K, K 1, psso. INCREASE TIP: Inc for waist at the 4 markers as follows: Make 1 YO after 1st and 3rd marker and before 2nd and 4th marker. On next round K YOs twisted to avoid holes. RAGLAN: Dec for raglan on each side of A.3 in every transition between sleeves and body. Dec as follows after A.3: Slip 1 st as if to K, K 1, psso. Dec as follows 2 sts before A.3: K 2 tog. ---------------------------------------------------------- BODY: Worked in the round on circular needle. Cast on 200-220-240-264-288-316 sts on circular needle size 2.5 mm / US 1.5 with white. Work pattern according to diagram A.1. When A.1 has been worked 1 time vertically, switch to circular needle size 3 mm / US 2.5. Then work in stockinette st. REMEMBER THE KNITTING TENSION/GAUGE When piece measures 8-8-8-8-10-10 cm / 3"-3"-3"-3"-4"-4", insert 4 markers in piece as follows: Insert 1st marker after the first 24-28-31-36-42-48 sts, 2nd marker after the next 52-54-58-60-60-62 sts, 3rd marker after the next 48-56-62-72-84-96 sts and 4th marker after the next 52-54-58-60-60-62 sts (24-28-31-36-42-48 sts remain on needle after last marker). Then dec for WAIST at the 4 markers – see explanation above (= 4 sts dec). Repeat dec on every 4th round 7-7-7-7-6-6 times in total = 172-192-212-236-264-292 sts. When piece measures 22 cm / 8¾" in all sizes, inc after 1st and 3rd marker and before 2nd and 4th marker – READ INCREASE TIP (= 4 sts inc). Repeat inc every 4th-4th-6th-6th-8th-8th round 7-7-7-7-6-6 times in total = 200-220-240-264-288-316 sts. Continue to work until piece measures 38-39-39-40-41-43 cm / 15"-15¼"-15¼"-15¾"-16"-17". Work next round as follows: Cast/bind off 5-5-5-6-6-6 sts for armhole, work 90-100-110-120-132-146 sts in stockinette st (= front piece), cast/bind off 10-10-10-12-12-12 sts for armhole, work 90-100-110-120-132-146 sts in stockinette st (= back piece) and cast/bind off the last 5-5-5-6-6-6 sts for armhole. Put piece aside and knit the sleeves. SLEEVE: Worked in the round on double pointed needles. Cast on 56-56-58-60-62-64 sts on double pointed needles size 2.5 mm / US 1.5 with white. Work pattern according to diagram A.2. When A.2 has been worked 1 time vertically, switch to double pointed needles size 3 mm / US 2.5. Insert 1 marker at beg of round (= mid under sleeve) and work in stockinette st. When piece measures 8 cm / 3⅛", inc 2 sts mid under sleeve. Repeat inc every 9th-7th-7th-6th-6th-5th round 12-14-14-16-16-17 times in total = 80-84-86-92-94-98 sts. When piece measures 41-40-39-38-38-38 cm / 16"-15¾"-15¼"-15"-15"-15" (NOTE: shorter measurements in the larger sizes because of longer sleeve cap and wider shoulders), cast/bind off the middle 10-10-10-12-12-12 sts under sleeve (i.e. cast/bind off 5-5-5-6-6-6 sts on each side of marker) = 70-74-76-80-82-86 sts remain on needle. Put piece aside and Make another sleeve. YOKE: Slip sleeves on to same circular needle as body as follows: Continue with white and work sts from first sleeve AT THE SAME TIME insert 1 marker in first st and 1 marker in last st on sleeve, work sts from front piece, work sts from the other sleeve AT THE SAME TIME insert 1 marker in first st and 1 marker in last st on sleeve and work sts from back piece = 320-348-372-400-428-464 sts on needle and 4 markers in piece. Then work in stockinette st in the round AT THE SAME TIME work A.3 in every transition between body and sleeves (arrow in diagram should match against st with marker). AT THE SAME TIME dec for RAGLAN on each side of A.3 in every transition between body and sleeves – see explanation above (= 8 sts dec). Repeat dec for raglan every 4th round 6-7-8-8-9-9 times in total = 272-292-308-336-356-392 sts. After last dec K 1 round while AT THE SAME TIME dec 20-26-28-32-36-40 sts evenly = 252-266-280-304-320-352 sts on needle. Then work pattern in the round according to A.4 AT THE SAME TIME dec as shown in diagram - choose diagram for correct size. When A.4 has been worked 1 time vertically, there are 180-190-200-228-240-264 sts on needle. K 1 round with white while AT THE SAME TIME dec 4-6-8-28-30-44 sts evenly = 176-184-192-200-210-220 sts. Now work pattern according to A.5 – choose diagram for correct size. When A.5 has been worked, work an elevation in the back of neck. Insert 1 marker mid front. Beg mid back and K (with white) until 14-14-16-16-18-20 sts remain before marker. Turn, K back until 14-14-16-16-18-20 sts remain before marker in the other side. Turn, K until 30-30-34-34-38-42 sts remain before marker. Turn, K back until 30-30-34-34-38-42 sts remain before marker in the other side. Turn, K until 46-46-52-52-58-64 sts remain before marker. Turn, K back until 46-46-52-52-58-64 sts remain before marker in the other side. Turn, K until 62-62-70-70-76-86 sts remain before marker. Turn, K back until 62-62-70-70-76-86 sts remain before marker in the other side. Turn and K back to beg of round. NECK EDGE: Switch to circular needle size 2.5 mm / US 1.5 and work pattern in the round over all sts according to diagram A.1 AT THE SAME TIME dec 30-28-36-34-44-44 sts evenly = 146-156-156-166-166-176 sts. When A.1 has been worked 1 time vertically, loosely cast/bind off with K. ASSEMBLY: Sew the openings under the sleeves. |
|||||||||||||||||||
Diagram explanations |
|||||||||||||||||||
|
|||||||||||||||||||
 |
|||||||||||||||||||
 |
|||||||||||||||||||
 |
|||||||||||||||||||
Have you finished this pattern?Tag your pictures with #dropspattern #nordicsummersweater or submit them to the #dropsfan gallery. Do you need help with this pattern?You'll find 29 tutorial videos, a Comments/Questions area and more by visiting the pattern on garnstudio.com. © 1982-2026 DROPS Design A/S. We reserve all rights. This document, including all its sub-sections, has copyrights. Read more about what you can do with our patterns at the bottom of each pattern on our site. |
|||||||||||||||||||


With over 40 years in knitting and crochet design, DROPS Design offers one of the most extensive collections of free patterns on the internet - translated to 17 languages. As of today we count 324 catalogs and 12290 patterns - 12280 of which are translated into English (US/in).
We work hard to bring you the best knitting and crochet have to offer, inspiration and advice as well as great quality yarns at incredible prices! Would you like to use our patterns for other than personal use? You can read what you are allowed to do in the Copyright text at the bottom of all our patterns. Happy crafting!
Post a comment to pattern DROPS 161-33
We would love to hear what you have to say about this pattern!
If you want to leave a question, please make sure you select the correct category in the form below, to speed up the answering process. Required fields are marked *.