
Popular categories
Looking for a yarn?


Comments / Questions (137)
![]() Els Van Zantvliet wrote:
Els Van Zantvliet wrote:
Ik ben net begonnen en heb de eerste 8 cm gebreid. nu heb ik de steekmarkeerders geplaatst. Nu lees ik het volgende: TAILLE: Minder voor de taille bij de 4 markeerders. Minder als volgt na de 1e en 3e markeerder: 2 r samen. Minder als volgt als er 2 st over zijn voor de 2e en 4e markeerder: 1 r afh, 1 r, afgeh st overh. Dan klopt mijn telling toch niet? Ik brei maat xl. dan heb ik toch maar 14 steken geminderd ipv totaal 28? alvast bedankt. Groetjes Els
18.05.2020 - 08:28DROPS Design answered:
Dag Els,
Voor de taille minder je telkens bij alle 4 de markeerders, dus je maakt 4 minderingen per mindernaald, waardoor je op 28 minderingen in totaal komt.
19.05.2020 - 13:26
![]() Richard wrote:
Richard wrote:
Brilliant. Thank you all very very much. Take care...
09.04.2020 - 19:19
![]() Richard wrote:
Richard wrote:
Hi, once again. Thank you for your last reply. My final question is:- Because I finish A5 at the beginning of left sleeve, do I CAST OFF?.....OR do I join new yarn in white to the mid back & then, knit as described up to 16 sts before the mid front marker?? Hopefully you can help me to complete the is garment. It is for a woman of 84. Thanks all.
09.04.2020 - 18:20DROPS Design answered:
Dear Richard, no you don't need to cast off just work from the current begin of the rounds until 16 sts remain before marker on front piece, turn and work row back same way. You will work last row of the short rows to your beg of round again to work neck edge. Happy knitting!
09.04.2020 - 18:34
![]() Richard wrote:
Richard wrote:
Hi, again I don't understand, because the pattern states "When A5 has been worked, work an elevation in the back of neck. Insert 1 marker mid front. Beg mid back and K (with white) until 16 sts remain before the marker". Now, you are saying "you have to work to the mid back (find it as explained previously) and another one on the mid front". I'm so sorry, but how can this be? I really appreciate all your efforts to help me.
09.04.2020 - 17:25DROPS Design answered:
Dear Richard, I'm sorry to have been confusing, you don't need marker on mid back here, so you just need to find the mid front (put the piece flat and insert a marker on mid front), and now work the short rows working until the given number of stitches remain before the marker on mid front (you will work more rows on the other stitches but always less stitches). Hope this is clearer now, sorry for confusion. Happy knitting!
09.04.2020 - 18:05
![]() Richard wrote:
Richard wrote:
Thank you, thank you... But please tell me, as I have finished A5 on the last stitch of the back, do I cut the yarn & then rejoin a new yarn (in white) as you say, at the mid-back. Then I would knit until 16 sts before the marker of the mid-front : then turn?? I am so near to finishing & will post a photo to the Drops Gallery, when I have done so. Thank you all, during this most difficult time.
09.04.2020 - 14:24DROPS Design answered:
Dear Richard, you have to work to the mid back (find it as explained previously) and another one on the mid front. Now work from RS until 16 sts remain before marker on mid front, turn and work from WS until 16 sts remain before marker on mid front on the other side (= there are now 32 unworked sts on mid front), turn and continue working back & forth leaving then always more stitches before marker mid front at the end of each row both from RS and WS. Happy knitting!
09.04.2020 - 16:37
![]() Richard wrote:
Richard wrote:
Good morning. How do I get to work the elevation in the back of neck? I understand how this works, but if my piece finishes at the end of the back/beginning of left sleeve; how do I begin knitting from the mid-back? Do I cast off & then begin at the mid-back with a new yarn. Also, when I 'turn', do I 'knit' or 'purl'?? Sorry to trouble you at this difficult time. Richard.
08.04.2020 - 11:18DROPS Design answered:
Dear Richard, elevation is worked in garter stitch: you will knit from RS and knit from WS. Happy knitting :)
09.04.2020 - 16:34
![]() Richard wrote:
Richard wrote:
Hi, everyone. I trust that you are all well, in this difficult time. Having completed A4, the remaining A5 does not present a problem. However, because I will finish at the beginning of the left sleeve, how do I get to work the elevation in the back of neck? The instructions are to insert 1 marker mid-front! How do I end the yarn between the back & the left sleeve? Do I join new yarn at mid neck, to continue. Thank you. Richard.
06.04.2020 - 10:59DROPS Design answered:
Dear Richard, lie your work flat so that you can find the mid back of jumper, insert a marker ther and work to this marker, then start the elevation from this marker. Happy knitting!
09.04.2020 - 14:14
![]() Richard wrote:
Richard wrote:
OK. Thanks.
03.04.2020 - 11:50
![]() Richard wrote:
Richard wrote:
Thanks for the prompt reply, given the current crisis. I've looked at the video link, but regrettably, there is no sound. I'll 'Google' it & see if I can find another link. All the best. Richard.
03.04.2020 - 11:34DROPS Design answered:
Dear Richard, our videos do not have sounds because we are a worldwide company and our videos are watched by people around the world, speaking different languages, many of whom do not understand English. That's why we always recommend to follow written pattern/read the text/explanations at the same time. Happy knitting!
03.04.2020 - 11:48
![]() Richard wrote:
Richard wrote:
Hi everyone. Having completed the raglan stage of the garment, I now have to decrease evenly for the next round, as follows:- I have 308 sts/28 sts = 11. Do I knits every 10th st & 11th st together OR 11th st & 12th st together??When A5 has been worked, can you explain what is meant when you say "work an elevation in the back of the neck"? Otherwise, I am doing fine & expect to complete the garment during the next few days. Be sure to keep away from Coronavirus. Good luck.
03.04.2020 - 11:11DROPS Design answered:
Dear Richard, work the 10th and 11 th st tog a total of 28 times (= 28x11=308 sts, you then have: 28 x 10 = 280 sts). This video shows how to make an elevation on mid back of a jumper (worked here top down but the idea is the same), you will work extra rows with short rows on the back of piece only so that the neckline on back piece is higher than the neckline on front piece. Happy knitting!
03.04.2020 - 11:27
|
|||||||||||||||||||
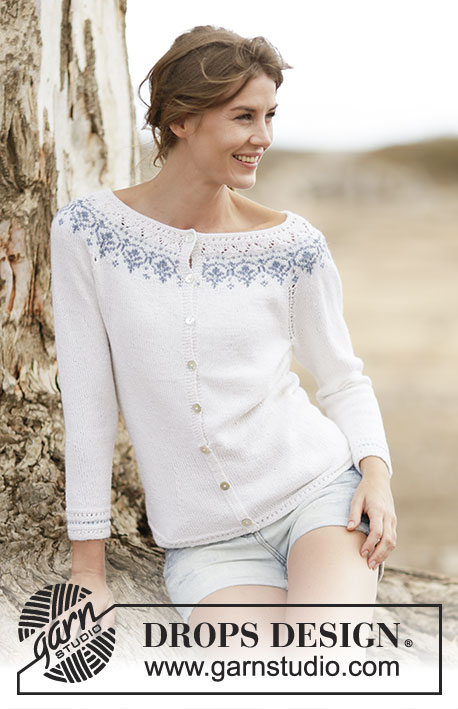
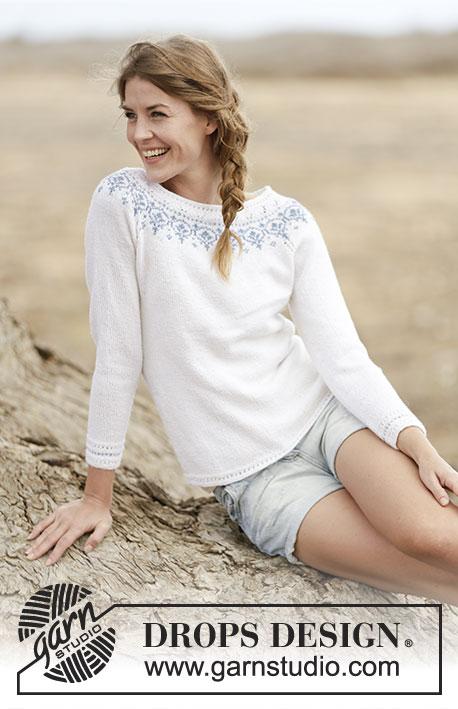
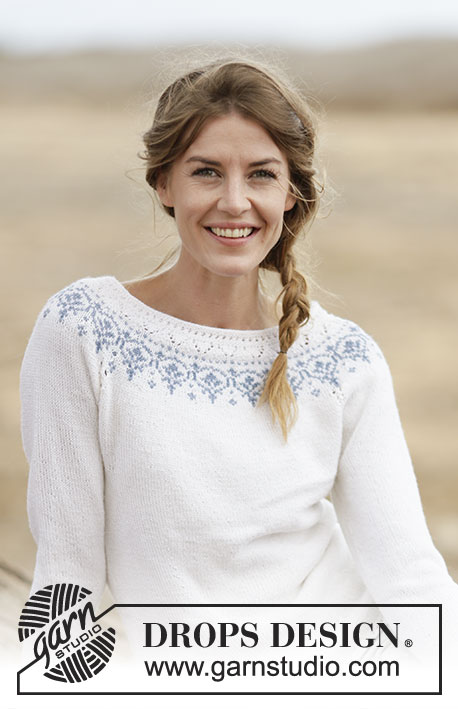
Nordic Summer#nordicsummersweater |
|||||||||||||||||||
 |
 |
||||||||||||||||||
Knitted DROPS jumper with raglan and round yoke in ”BabyMerino”. Size: S - XXXL.
DROPS 161-33 |
|||||||||||||||||||
|
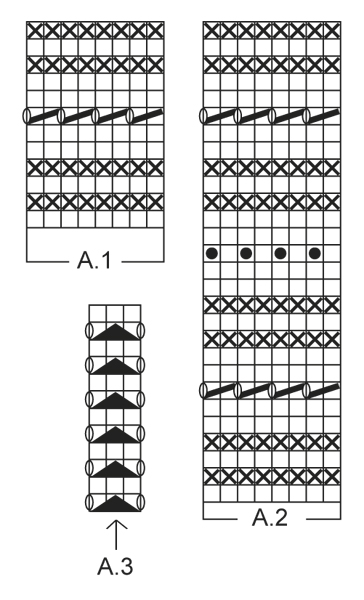
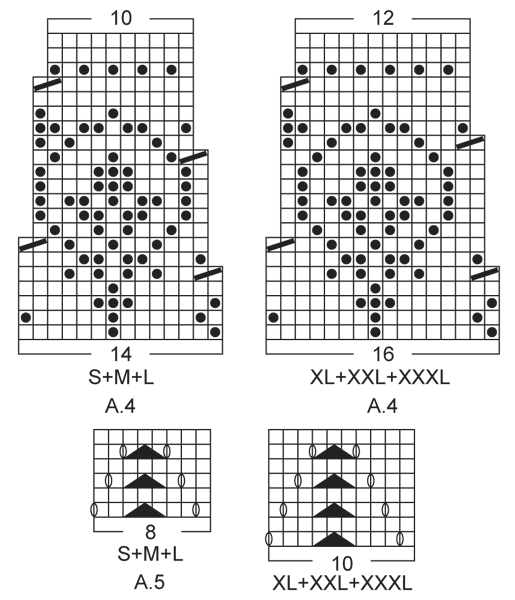
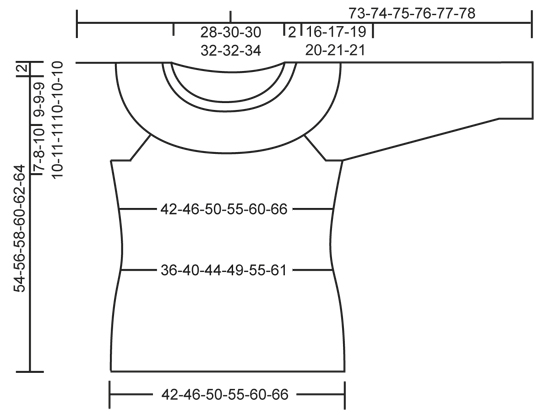
PATTERN: See diagrams A.1 to A.5. WAIST: Dec for waist at the 4 markers. Dec as follows after 1st and 3rd marker: K 2 tog. Dec as follows when 2 sts remain before 2nd and 4th marker: Slip 1 st as if to K, K 1, psso. INCREASE TIP: Inc for waist at the 4 markers as follows: Make 1 YO after 1st and 3rd marker and before 2nd and 4th marker. On next round K YOs twisted to avoid holes. RAGLAN: Dec for raglan on each side of A.3 in every transition between sleeves and body. Dec as follows after A.3: Slip 1 st as if to K, K 1, psso. Dec as follows 2 sts before A.3: K 2 tog. ---------------------------------------------------------- BODY: Worked in the round on circular needle. Cast on 200-220-240-264-288-316 sts on circular needle size 2.5 mm / US 1.5 with white. Work pattern according to diagram A.1. When A.1 has been worked 1 time vertically, switch to circular needle size 3 mm / US 2.5. Then work in stockinette st. REMEMBER THE KNITTING TENSION/GAUGE When piece measures 8-8-8-8-10-10 cm / 3"-3"-3"-3"-4"-4", insert 4 markers in piece as follows: Insert 1st marker after the first 24-28-31-36-42-48 sts, 2nd marker after the next 52-54-58-60-60-62 sts, 3rd marker after the next 48-56-62-72-84-96 sts and 4th marker after the next 52-54-58-60-60-62 sts (24-28-31-36-42-48 sts remain on needle after last marker). Then dec for WAIST at the 4 markers – see explanation above (= 4 sts dec). Repeat dec on every 4th round 7-7-7-7-6-6 times in total = 172-192-212-236-264-292 sts. When piece measures 22 cm / 8¾" in all sizes, inc after 1st and 3rd marker and before 2nd and 4th marker – READ INCREASE TIP (= 4 sts inc). Repeat inc every 4th-4th-6th-6th-8th-8th round 7-7-7-7-6-6 times in total = 200-220-240-264-288-316 sts. Continue to work until piece measures 38-39-39-40-41-43 cm / 15"-15¼"-15¼"-15¾"-16"-17". Work next round as follows: Cast/bind off 5-5-5-6-6-6 sts for armhole, work 90-100-110-120-132-146 sts in stockinette st (= front piece), cast/bind off 10-10-10-12-12-12 sts for armhole, work 90-100-110-120-132-146 sts in stockinette st (= back piece) and cast/bind off the last 5-5-5-6-6-6 sts for armhole. Put piece aside and knit the sleeves. SLEEVE: Worked in the round on double pointed needles. Cast on 56-56-58-60-62-64 sts on double pointed needles size 2.5 mm / US 1.5 with white. Work pattern according to diagram A.2. When A.2 has been worked 1 time vertically, switch to double pointed needles size 3 mm / US 2.5. Insert 1 marker at beg of round (= mid under sleeve) and work in stockinette st. When piece measures 8 cm / 3⅛", inc 2 sts mid under sleeve. Repeat inc every 9th-7th-7th-6th-6th-5th round 12-14-14-16-16-17 times in total = 80-84-86-92-94-98 sts. When piece measures 41-40-39-38-38-38 cm / 16"-15¾"-15¼"-15"-15"-15" (NOTE: shorter measurements in the larger sizes because of longer sleeve cap and wider shoulders), cast/bind off the middle 10-10-10-12-12-12 sts under sleeve (i.e. cast/bind off 5-5-5-6-6-6 sts on each side of marker) = 70-74-76-80-82-86 sts remain on needle. Put piece aside and Make another sleeve. YOKE: Slip sleeves on to same circular needle as body as follows: Continue with white and work sts from first sleeve AT THE SAME TIME insert 1 marker in first st and 1 marker in last st on sleeve, work sts from front piece, work sts from the other sleeve AT THE SAME TIME insert 1 marker in first st and 1 marker in last st on sleeve and work sts from back piece = 320-348-372-400-428-464 sts on needle and 4 markers in piece. Then work in stockinette st in the round AT THE SAME TIME work A.3 in every transition between body and sleeves (arrow in diagram should match against st with marker). AT THE SAME TIME dec for RAGLAN on each side of A.3 in every transition between body and sleeves – see explanation above (= 8 sts dec). Repeat dec for raglan every 4th round 6-7-8-8-9-9 times in total = 272-292-308-336-356-392 sts. After last dec K 1 round while AT THE SAME TIME dec 20-26-28-32-36-40 sts evenly = 252-266-280-304-320-352 sts on needle. Then work pattern in the round according to A.4 AT THE SAME TIME dec as shown in diagram - choose diagram for correct size. When A.4 has been worked 1 time vertically, there are 180-190-200-228-240-264 sts on needle. K 1 round with white while AT THE SAME TIME dec 4-6-8-28-30-44 sts evenly = 176-184-192-200-210-220 sts. Now work pattern according to A.5 – choose diagram for correct size. When A.5 has been worked, work an elevation in the back of neck. Insert 1 marker mid front. Beg mid back and K (with white) until 14-14-16-16-18-20 sts remain before marker. Turn, K back until 14-14-16-16-18-20 sts remain before marker in the other side. Turn, K until 30-30-34-34-38-42 sts remain before marker. Turn, K back until 30-30-34-34-38-42 sts remain before marker in the other side. Turn, K until 46-46-52-52-58-64 sts remain before marker. Turn, K back until 46-46-52-52-58-64 sts remain before marker in the other side. Turn, K until 62-62-70-70-76-86 sts remain before marker. Turn, K back until 62-62-70-70-76-86 sts remain before marker in the other side. Turn and K back to beg of round. NECK EDGE: Switch to circular needle size 2.5 mm / US 1.5 and work pattern in the round over all sts according to diagram A.1 AT THE SAME TIME dec 30-28-36-34-44-44 sts evenly = 146-156-156-166-166-176 sts. When A.1 has been worked 1 time vertically, loosely cast/bind off with K. ASSEMBLY: Sew the openings under the sleeves. |
|||||||||||||||||||
Diagram explanations |
|||||||||||||||||||
|
|||||||||||||||||||
 |
|||||||||||||||||||
 |
|||||||||||||||||||
 |
|||||||||||||||||||
Have you finished this pattern?Tag your pictures with #dropspattern #nordicsummersweater or submit them to the #dropsfan gallery. Do you need help with this pattern?You'll find 29 tutorial videos, a Comments/Questions area and more by visiting the pattern on garnstudio.com. © 1982-2026 DROPS Design A/S. We reserve all rights. This document, including all its sub-sections, has copyrights. Read more about what you can do with our patterns at the bottom of each pattern on our site. |
|||||||||||||||||||


With over 40 years in knitting and crochet design, DROPS Design offers one of the most extensive collections of free patterns on the internet - translated to 17 languages. As of today we count 324 catalogs and 12290 patterns - 12280 of which are translated into English (US/in).
We work hard to bring you the best knitting and crochet have to offer, inspiration and advice as well as great quality yarns at incredible prices! Would you like to use our patterns for other than personal use? You can read what you are allowed to do in the Copyright text at the bottom of all our patterns. Happy crafting!
Post a comment to pattern DROPS 161-33
We would love to hear what you have to say about this pattern!
If you want to leave a question, please make sure you select the correct category in the form below, to speed up the answering process. Required fields are marked *.