
Popular categories
Looking for a yarn?


Comments / Questions (60)
![]() Sylvie Roy wrote:
Sylvie Roy wrote:
Bonjour jaimerais savoir la grosseur du fils svp et si je prend une autre sorte de laine acrylique cela va til deranger parce que je ne peu pas prendre alpaga et laine merci
06.08.2019 - 15:18DROPS Design answered:
Bonjour Mme Roy, Nous sommes en mesure de pouvoir proposer des modèles gratuits grâce à nos fils à tricoter et à crocheter vendus dans le monde entier. Vous comprendrez ainsi que nous ne pouvons que vous recommander d’utiliser l’une de nos qualités. N’hésitez pas à contacter votre magasin DROPS en France pour toute assistance au choix d'une alternative correspondant à vos besoins. Merci pour votre compréhension. Bon tricot!
07.08.2019 - 11:58Diane wrote:
I would like to know what sizes the pattern is for. S/M, L/XL, XXL, XXXL. What are the actual sizes??
25.08.2018 - 22:02DROPS Design answered:
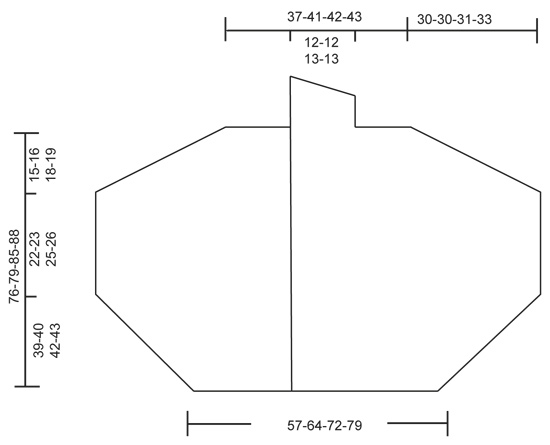
Hi Diane, The measurements for each size are shown in a diagram at the bottom of the pattern, Happy knitting!
26.08.2018 - 07:54
![]() Amandine wrote:
Amandine wrote:
Bonjour je suis que au debut du modele . Je viens de tricoter les 2 cotes au point mousse . Ensuite pour le premier rang A1 j ai fais 3 maille en jersey , puis j ai repeter 6 fois le premier rang du diagramme A1 (1 jeté , 6 mailles endroit , une maille glisser 2 m ensemble a l endroit , faire glisser la maille sur les mailles ensemble , 6 maille endroit , 1 jeter ) et apres les 6 fois il me reste 10 mailles .. je ne comprends pas quoi faire merci
18.05.2018 - 16:46DROPS Design answered:
Bonjour Amandine, A.1 se lit en commençant en bas à droite et de droite à gauche sur l'endroit (de gauche à droite sur l'envers), il commence dans toutes les tailles par 1 m end, 1 jeté. En taille L/XL, vous avez 103 m: 3 m jersey, 6 fois A.1 (= 6x 16 m = 96 m), 1 m point mousse, 3 m jersey soit: 3+96+1+3= 103 m. Bon tricot!
22.05.2018 - 08:04
![]() Johanna wrote:
Johanna wrote:
Hallo nochmal! Jetzt weiß ich es, da ist ein Fehler in der Anleitung. Es müssen 76 (-79-81-84) M Richtung Ärmel abgekettet werden (s. englische Anleitung), dann passt es. Viele Grüße!
17.02.2018 - 09:59DROPS Design answered:
Liebe Johanna, Sie sind ja recht, die deutsche Anleitung wird korrigiert. Viel Spaß beim stricken!
19.02.2018 - 08:58
![]() Johanna wrote:
Johanna wrote:
Liebes Drops Team, eine Frage zu dem Schalkragen: (rechtes Vorderteil, Gr.S, Schultern/Ärmel/Schalkragen) Wie komme ich von ca. 97M auf 16M? Laut der Anleitung sollen die ersten 48M abgekettet werden, aber dann bleiben doch noch 41M übrig, nicht 16... Vielen Dank für Ihre Hilfe!
13.02.2018 - 09:21
![]() Jeannie Cheatham wrote:
Jeannie Cheatham wrote:
I love this pattern but cannot follow your instructions. Can you simply convert all the diagram instructions to plain English instructions without the diagrams? I would appreciate this.
12.01.2018 - 18:48DROPS Design answered:
Dear Mrs Cheatham, there are only diagrams to this pattern, start reading diagram from RS from the bottom corner on the right side and read towards the left, read WS rows from the left towards the right. You will find key to diagrams just above them. Happy knitting!
15.01.2018 - 10:57
![]() CHEVALLIER Ursula wrote:
CHEVALLIER Ursula wrote:
Quand est-ce-qu'il faut commencer avec le point phantasie 1 ? en même temps qu'avec A2 et A5 ?
10.10.2017 - 00:55DROPS Design answered:
Bonjour Mme Chevalier, le point fantaisie 1 va se tricoter à partir du moment où on commence A.6 et A.3 (après A.2 et A.5), les jetés de A.6/A.3 vont se tricoter torse en point fantaisie 1 et le nombre de mailles en point fantaisie 1 va progressivement augmenter. Bon tricot!
10.10.2017 - 09:54Kelsey K wrote:
Ok, so I finally got the displacement issue worked out. But I'm still having trouble with starting A.9/10. The pattern says A.9 for the right side, but there is no garter stitch line due to the displacement, correct? And it looks like they should be switched. I don't want to give up, but are there plans to make a video of this? I've been knitting for a while and this pattern is extremely difficult to follow.
04.10.2017 - 03:30DROPS Design answered:
Dear Kelsey, the ridges belong to PATTERN-1: you are working the yos in A.3/A.6 twisted in PATTERN-1, so that the lace pattern will be worked over less sts and the sts worked in pattern-1 over more sts. Happy knitting!
04.10.2017 - 11:33
![]() Kelsey K wrote:
Kelsey K wrote:
Ok, what is displacement in knitting? I don't understand that or how it works. And also with A.2/5, it starts with 2 stitches, than by the 3rd row, there are 3, then eventually 4. How and where do you add these stitches?
26.09.2017 - 15:48DROPS Design answered:
Dear Kelsey, you will work 1 st less in A.1 on every other row, so A.2/A.5 will be displaced 1 st towards mid back, so that there will be less sts in A.1 but more sts in PATTERN-1. Happy knitting!
27.09.2017 - 08:53Kelsey K wrote:
I'm struggling understanding the whole displacement issue when dealing with the second A.1 into A.9/10 and getting A.5/2 to work. I understand it's supposed to slant towards the middle of the back, but I'm helplessly lost. I've tried to understand what has been said before, but I need more specific instructions. What is written down is too vague
26.09.2017 - 01:38DROPS Design answered:
Dear Kelsey K, maybe adding a marker between each repeat could help getting correct number of sts matching on each row. Work A.2/A.5 (and then A.3/A.6) and when you won't have enough sts in A.1, work A.9/A.10. Happy knitting!
26.09.2017 - 09:06
|
||||||||||||||||||||||
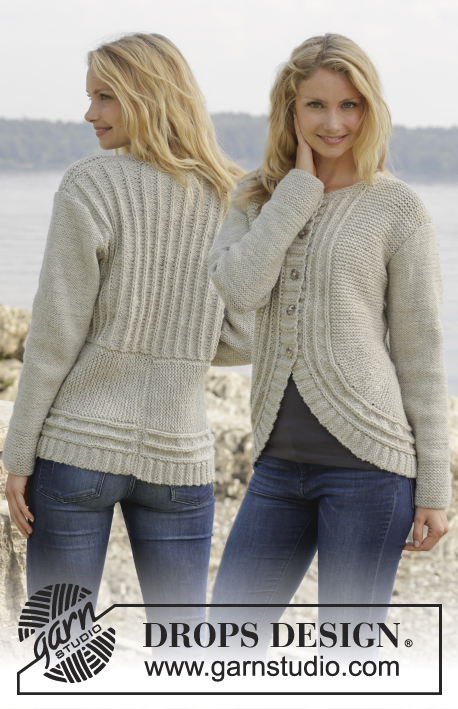
Ripple Tide#rippletidecardigan |
||||||||||||||||||||||
 |
 |
|||||||||||||||||||||
Knitted DROPS jacket in garter st with lace pattern and shawl collar in ”Nepal”. Size: S - XXXL.
DROPS 157-40 |
||||||||||||||||||||||
|
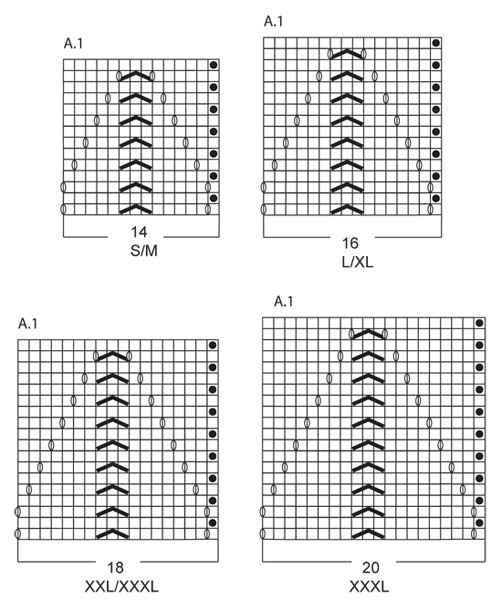
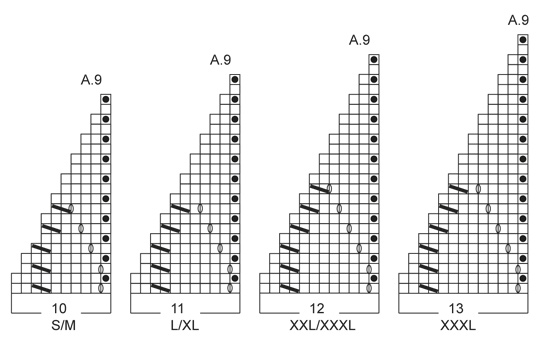
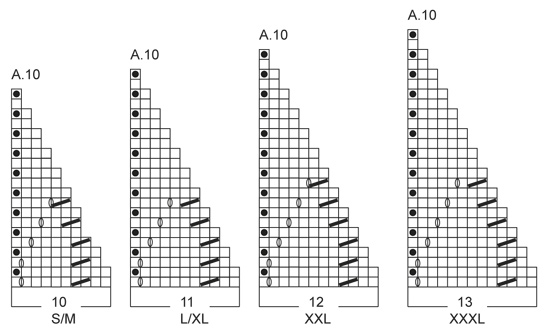
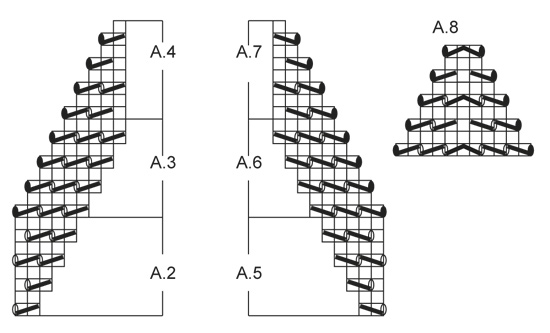
GARTER ST (back and forth on needle): K all rows. 1 ridge = K2 rows. PATTERN: See diagrams A.1-A.10. See diagrams for correct size. The diagrams show all rows in pattern seen from RS. Diagrams A.3 and A.6 do not fit vertically when repeated but eyelet rows are continued diagonally upwards as before. DIAGRAM A.1. A.1 is repeated differently vertically. When there are 2 sts between first YO (towards A.3/A.6) in A.1 and A.3/A.6, stop repetition of A.1 vertically. I.e. seen from RS A.1 is repeated towards mid front and mid back 6 times in total vertically. Middle A.1 is repeated 4 times in total vertically. A.1 towards the side is repeated 2 times in total vertically. Then work as follows: When A.1 does not fit no of sts, i.e. after repetitions explained above, work A.9 over A.1 on right front piece and right side of back piece (= 3 repetitions of A.1) and A.10 over A.1 on left front piece and left side of back piece (= 3 repetitions of A.1). PATTERN 1: Row 1: K from RS. Row 2: P from WS. Repeat 1st and 2nd row 4 more times (= 10 rows). Row 11: K from RS. Row 12: K from WS. Row 13: K from RS. Row 14: P from WS. Row 15: P from RS. Row 16: P from WS. Repeat row 1 to 16. BUTTONHOLES: Dec from RS for 6 buttonholes on right band. 1 BUTTONHOLE = work 3 sts from mid front, make 1 YO, K the next 2 tog. On next row K the YO. Dec for buttonholes when piece measures: SIZE S/M: 10, 18, 30, 38, 50 and 58 cm / 4",7",11¾",15",19¾",22¾" SIZE L/XL: 12, 20, 32, 40, 52 and 60 cm / 4¾",8",12½",15¾",20½",23½" SIZE XXL: 14, 22, 35, 43, 56 and 64 cm / 5½",8¾",13¾",17",22",25¼". SIZE XXXL: 13, 22, 35, 44, 57 and 66 cm / 5",8¾",13¾",17¼",22½",26. ---------------------------------------------------------- BACK PIECE: Worked back and forth on circular needle. Cast on 91-103-115-127 sts on circular needle size 5.5 mm / US 9 with Nepal. Work 2 ridges in GARTER ST - see explanation above. Then work as follows from RS: 3 sts in stockinette st, A.1 (= 14-16-18-20 sts) 6 times in total – READ PATTERN, 1 st in garter st, 3 sts in stockinette st. Continue the pattern like this. REMEMBER THE GAUGE! When piece measures 3 cm / 1", inc 1 st in each side of piece inside 3 sts in stockinette st. Repeat inc every 4th-4th-6th-6th row 2 more times = 97-109-121-133 sts. Work inc sts in stockinette st. READ ALL OF THE FOLLOWING SECTION BEFORE CONTINUING – WORK PATTERN AND INC AT THE SAME TIME. PATTERN: When A.1 has been worked 1 time vertically, work the first 2 rows of A.1, then work as follows from RS: 3 sts in stockinette st, A.5, K 1 and A.1 as before until 7 sts remain, 1 st in garter st, K 1, A.2, 3 sts in stockinette st. Diagrams A.2/A.5 are displaced 1 st towards mid back on every row from RS, i.e. work 1 st less of A.1 on every other row - see DIAGRAM A.1. When A.2 and A.5 have been worked 1 time vertically, continue displacement with A.3 and A.6. Work the twisted YOs in A.3/A.6 in to PATTERN 1 – see explanation above. INCREASE: All inc are done from RS. Inc 1 st in each side of piece inside 3 sts in stockinette st as follows: Inc 1 st every 4th row 6-9-13-16 times, then 1 st every other row 19-13-6-0 times = 147-153-159-165 sts. Work the inc sts in to pattern 1. When all inc are done, cast on 4 new sts in each side of piece for sleeve at end of the next 2 rows = 155-161-167-173 sts. Piece measures approx. 39-40-42-43 cm / 15¼"-15¾"-16½"-17". Work the new sts in garter st. Continue with pattern as before. READ ALL OF THE FOLLOWING SECTION BEFORE CONTINUING – WORK PATTERN AND DEC AT THE SAME TIME. PATTERN: When 1 st remains between lace rows A.3 and A.6, work A.8 over A.3, A.6 and the 1 st between them. When A.8 has been worked 1 time vertically, piece measures approx. 57-64-70-77 cm / 22½"-25¼"-27½"-30½". Now continue piece in pattern 1. DECREASE: When piece measures 61-63-67-69 cm / 24"-24¾"-26½"-27", work the 4 sts in garter st, then slip them on 1 stitch holder, work the rest of row, repeat on next row = 147-153-159-165 sts. Then slip sts on 1 stitch holder for diagonal shoulder as follows: Work the first 4 sts, then slip them on 1 stitch holder, work the rest of row. Repeat in each side of piece on every row 6-5-4-4 more times, then work the first 2 sts, then slip them on a stitch holder, work the rest of row. Repeat in each side of piece on every row 7-9-12-13 more times = 48-48-50-52 sts on the thread for each shoulder and 59-65-67-69 sts on needle. AT THE SAME TIME when piece measures 74-77-83-85 cm / 29"-30½"-32¾"-33½", bind off the middle 17-17-19-19 sts and finish each shoulder separately. On next row from neck bind off 1 st for neck. When all bind offs are done, 20-23-23-24 sts remain on needle for each shoulder. Piece measures approx. 76-79-85-88 cm / 30"-31"-33½"-34½". Cut the yarn. SHOULDER/SLEEVE: Slip all sts from stitch holder back on needle = 68-71-73-76 sts. Now inc to avoid a tight shoulder, from RS as follows: K 20-23-25-28, * 1 YO, K 6 *, repeat from *-* the rest of row = 76-79-81-84 sts. K 1 row from WS, K YOs twisted. Work 1 ridge. Loosely bind off. Work the other shoulder the same way but reversed. RIGHT FRONT PIECE: Worked back and forth on circular needle. Cast on 52-58-64-70 sts (includes 6 band sts) on circular needle size 5.5 mm / US 9 with Nepal. Work 2 ridges. Then work as follows from RS: 6 band sts in garter st, A.1 3 times in total, 1 st in garter st, 3 sts in stockinette st. Work band sts in garter st until finished measurements. Continue the pattern like this. When piece measures 3 cm / 1", inc 1 st in the side of piece at the end of row from RS inside 3 sts in stockinette st. Repeat inc every 4th-4th-6th-6th row 2 more times = 55-61-67-73 sts. Work inc sts in stockinette st. READ ALL OF THE FOLLOWING SECTION BEFORE CONTINUING – WORK PATTERN AND INC AT THE SAME TIME. PATTERN: When A.1 has been worked 1 time vertically, work the first 2 rows of A.1, then work as follows from RS: 6 band sts in garter st, A.1 as before until 7 sts remain, 1 st in garter st, K 1, A.2, 3 sts in stockinette st. Diagram A.2 is displaced 1 st towards mid front on every row from RS, i.e. work 1 st less of A.1 on every other row - see DIAGRAM A.1. When A.2 has been worked 1 time vertically, continue displacement with A.3. Work the twisted YOs in A.3 in to pattern 1. Remember BUTTONHOLES - see explanation above. INCREASE: All inc are done from RS. Inc 1 st in the side of piece inside 3 sts in stockinette st as follows: Inc 1 st every 4th row 6-9-13-16 times, then 1 st every other row 19-13-6-0 times = 80-83-86-89 sts. Work the inc sts in to pattern 1. When all inc are done, cast on 4 new sts in the side for sleeve at the end of next row from RS = 84-87-90-93 sts. Piece measures approx. 39-40-42-43 cm / 15¼"-15¾"-16½"-17". Work the new sts in garter st. Continue with pattern as before. READ ALL OF THE FOLLOWING SECTION BEFORE CONTINUING – WORK PATTERN AND DEC AT THE SAME TIME. PATTERN: When A.3 meets band sts, work A.4 over A.3. When A.4 has been worked 1 time vertically, piece measures approx. 57-64-70-77 cm / 22½"-25¼"-27½"-30½". Now continue piece in pattern 1 and garter st. DECREASE: When piece measures 61-63-67-69 cm / 24"-24¾"-26½"-27", adjust so that next row is from WS and work as follows: Work the first 4 sts in garter st in the side, then slip them on a stitch holder, work the rest of row = 80-83-86-89 sts. On next row from WS, slip sts on 1 stitch holder for diagonal shoulder as follows: Work the first 4 sts, then slip them on 1 stitch holder, work the rest of row. Repeat on every row from WS 6-5-4-4 more times, then work the first 2 sts, then slip them on a stitch holder, work the rest of row. Repeat on every row from WS 7-9-12-13 more times = 48-48-50-52 sts on stitch holder and 36-39-40-41 sts on needle. Cut the yarn. SHOULDER/SLEEVE: Slip all sts from stitch holder back on needle = 84-87-90-93 sts. Now inc to avoid a tight shoulder, from RS as follows: K 36-39-42-45, * 1 YO, K 6 *, repeat from *-* the rest of row. K 1 row from WS, K YOs twisted = 92-95-98-101 sts. Work 1 ridge. Then loosely cast off 76-79-81-84 sts towards the side = 16-16-17-17 sts remain for shawl collar. SHAWL COLLAR: Work from mid front: * 2 rows over all sts, work 2 rows over the first 12-12-13-13 sts *, repeat from *-* until piece measures 8-8-9-9 cm / 3"-3"-3½"-3½" measured closest to the shoulder. Bind off. LEFT FRONT PIECE: Work as right front piece but reversed. Work A.5-A.7 instead of A.2-A.4. Do not dec for buttonholes. When all inc are done, cast on 4 new sts in the side for sleeve at the end of row from WS. Work shoulder/sleeve from RS as follows: * K 6, 1 YO *, repeat from *-* until 36-39-42-45 sts remain, finish with K 36-39-42-45. ASSEMBLY: Sew side seams in outer loops of edge sts up to and including the 4 inc sts in garter st. Sew shoulder seams in outer loops of edge sts from and with the 4 inc sts in garter st up to shawl collar. Sew shawl collar tog mid back and sew it to the neckline. Sew the buttons on to the left band. |
||||||||||||||||||||||
Diagram explanations |
||||||||||||||||||||||
|
||||||||||||||||||||||
 |
||||||||||||||||||||||
 |
||||||||||||||||||||||
 |
||||||||||||||||||||||
 |
||||||||||||||||||||||
 |
||||||||||||||||||||||
Have you finished this pattern?Tag your pictures with #dropspattern #rippletidecardigan or submit them to the #dropsfan gallery. Do you need help with this pattern?You'll find 28 tutorial videos, a Comments/Questions area and more by visiting the pattern on garnstudio.com. © 1982-2026 DROPS Design A/S. We reserve all rights. This document, including all its sub-sections, has copyrights. Read more about what you can do with our patterns at the bottom of each pattern on our site. |
||||||||||||||||||||||


With over 40 years in knitting and crochet design, DROPS Design offers one of the most extensive collections of free patterns on the internet - translated to 17 languages. As of today we count 324 catalogs and 12285 patterns - 12275 of which are translated into English (US/in).
We work hard to bring you the best knitting and crochet have to offer, inspiration and advice as well as great quality yarns at incredible prices! Would you like to use our patterns for other than personal use? You can read what you are allowed to do in the Copyright text at the bottom of all our patterns. Happy crafting!
Post a comment to pattern DROPS 157-40
We would love to hear what you have to say about this pattern!
If you want to leave a question, please make sure you select the correct category in the form below, to speed up the answering process. Required fields are marked *.