
Popular categories
Looking for a yarn?


Comments / Questions (68)
![]() Amy wrote:
Amy wrote:
To whom it may concern: I was wondering when I am knitting the 12 stitches do I knit both ends of the row in garter stitch or just the last stitch of the row. Thank you in advance for your help Amy
31.10.2015 - 16:27DROPS Design answered:
Dear Amy, when you are working the 12 sts for mid upper part, work the 1st and last st in garter st. See also the video in previous answer. Happy knitting!
31.10.2015 - 18:20
![]() Amy wrote:
Amy wrote:
To whom it may concern: The problem I am having is I have the 10 stitches on my needle for the top portion of the slipper but when I reach the 7 cm am I suppose to increase on those 10 stitches to reach the number 61 stitches that I need or do I start increasing after after the 7 cm. It says to pick up 12 stitches after I reach the 7 cm on either side of the edge stitch. That is where I am having the problem. Thank you again for your help
29.10.2015 - 04:56DROPS Design answered:
Dear Amy, after you have worked the 7 cm over the mid sts, and 10 sts left, pick up 12 sts along both side of the upper foot (along right side of the middle part + along left side of the middle part) + slip sts from thread back on needle = you have a total of 61 sts on needle and your work looks like as in video, time code 5:18 approx. Happy knitting!
29.10.2015 - 09:32
![]() Amy wrote:
Amy wrote:
To whom it may concern: I am still confused as to how many rows I need because there is no explanation for when I go to start the pattern 2 portion of the slipper part and how many increases I need to reach the required amount of sts as well. I tried to watch the video but it was hard to follow when the sped up the knitting part. Thank you again for your help Amy
28.10.2015 - 16:04DROPS Design answered:
Dear Amy, wijth pattern 2 portion of the slipper part, do you mean the edge around leg? Work first 4 ridges in garter st (= 8 K rows) but on the 8th K row increase 6 sts evenly - see here how to increase evenly. Then work following A.1 until 35-38 cm, work 4 ridges (8 K rows), but on the 1st of these 8 rows, decrease 6 sts evenly. Happy knitting!
28.10.2015 - 18:26
![]() Amy wrote:
Amy wrote:
Amy 25.10.2015 kl. 00:38: To whom it may concern: I am currently working on the slipper boot pattern and am wondering how I am suppose to do the heel of the slipper when it doesn't say how many rows to do it just say to work back and forth on the needles. If you could let me know it would be appreciated Thank you in advance for your help
25.10.2015 - 15:33
![]() Amy wrote:
Amy wrote:
To whom it may concern: I am currently working on the slipper boot pattern and am wondering how I am suppose to do the heel of the slipper when it doesn't say how many rows to do it just say to work back and forth on the needles. If you could let me know it would be appreciated Thank you in advance for your help
25.10.2015 - 00:38
![]() Yvonne wrote:
Yvonne wrote:
Kan ik de slof ook op 2 pennen breien ?
10.06.2015 - 23:26DROPS Design answered:
Hoi Yvonne. Nee, enkele delen van deze slof worden in de rondte gebreid.
11.06.2015 - 13:44
![]() Trudy wrote:
Trudy wrote:
I guess I did not make myself clear. I understand about putting the stitches back on the needles, although I am not sure if we are using three now or four. If we are using four - then I need to know how many stitches are put onto the fourth needle which would be the heal area of the boot.
12.04.2015 - 17:54DROPS Design answered:
Dear Trudy, distribute the sts on 4 needle or as in the video, making sure the markers are on the correct places. Happy knitting!
13.04.2015 - 09:32
![]() Elaine Langille wrote:
Elaine Langille wrote:
I don't understand "knit over knit" and "purl over purl" I watched the video, but still didn't know how to do it
11.02.2015 - 03:56DROPS Design answered:
Dear Mrs Langille, you work pattern 2 over the 12 sts as follows from RS: 1 edge st in garter st, *K2,P2* over the next 10 sts and finish with 1 edge st in garter st. On next row from WS work 1 edge st in garter st, *P2/K2* over the next 2 sts, 1 edge st in garter st. Happy knitting!
11.02.2015 - 09:14
![]() M Damen wrote:
M Damen wrote:
Een opmerking niet over de sloffen maar over de gebruikte taal. gecontroleerd is met 1 L niet met 2. Deze fout staat al enkele jaren bij ieder patroon.
04.01.2015 - 20:21Dianne Perrin wrote:
Drops 158-47 pattern no an-025 I do not understand the directions for A.1 which is the first row and which x box is a p from rs and which x box is k from ws and which blank box is k from rs and which blank box is p from ws
16.12.2014 - 07:15DROPS Design answered:
Dear Mrs Perrin, please click here to read more about diagrams. Row 1 = K5, (P2, K2) repeat (to) a total of 5 times, K3. Row2= K3, (P2, K2) repeat (to) a total of 5 times, P2, K3. Happy knitting!
16.12.2014 - 09:58
|
|||||||
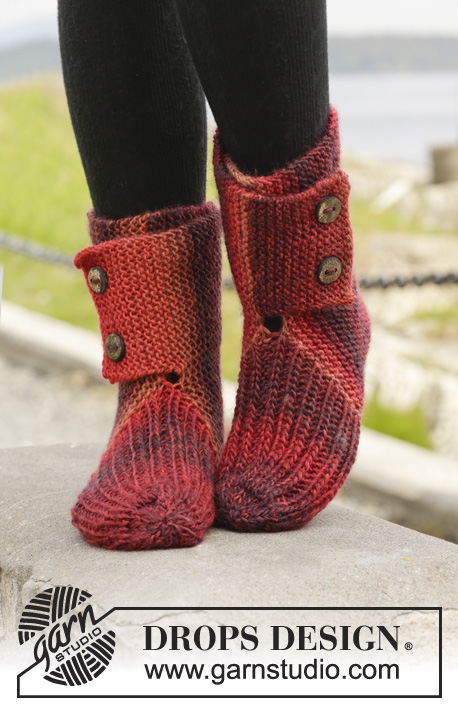
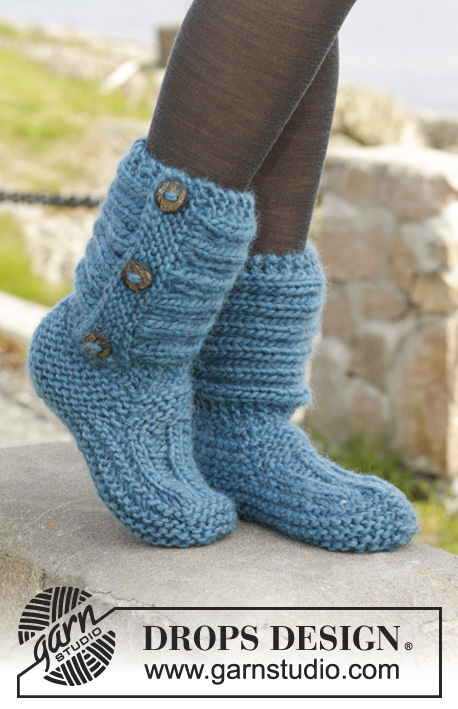
One Step Ahead#onestepaheadslippers |
|||||||
 |
 |
||||||
Knitted DROPS slippers in garter st with rib in "Andes".
DROPS 158-47 |
|||||||
|
GARTER ST (in the round on double pointed needles): * K 1 round and P 1 round *, repeat from *-*. 1 ridge = 2 rounds. GARTER ST (back and forth on needle): K all rows. 1 ridge = K2 rows. PATTERN: See diagram A.1. PATTERN 2: Row 1 (= RS): * K 2, P 2 *, repeat from *-* until 2 sts remain, K 2. Row 2 (= WS): K over K and P over P. Repeat 2nd row ---------------------------------------------------------- SLIPPER: First work an edge at the bottom of leg, then work the foot. Then work a loose leg across. LEG: Cast on 37-37-39 sts on double pointed needles size 6 mm / US 10 with Andes. Work in GARTER ST in the round - see explanation above - until piece measures approx. 4 cm / 1½'', finish after 1 round P. REMEMBER THE GAUGE! FOOT: Now work piece back and forth. Now keep the first 10 sts on the needle, slip the remaining 27-27-29 sts on 1 stitch holder. Now work a middle part according to PATTERN 2 – see explanation above, over the 10 sts – AT THE SAME TIME at the end of the next 2 rows cast on 1 new edge st (work edge st in GARTER ST - see explanation above) = 12 sts. When middle part measures 7-8½-10 cm / 2 3/4"-3 1/4"-4'', dec 1 edge st in each side = 10 sts. Then slip the sts from stitch holder back on needle and pick up 12-14-16 sts on each side of middle part (inside 1 edge st) = 61-65-71 sts on needle. NOW MEASURE PIECE FROM HERE! Insert 1 marker in the middle of the 10 sts on middle part (= mid front on toe) and 1 marker in st at the back of heel, there are 30-32-35 sts between markers in each side. Now continue piece in the round in garter st. When piece measures 2 cm / 3/4'', K 2 sts tog on each side of every marker on every other round (= 4 sts less per round). Continue dec until piece measures 5-5-6 cm / 2"-2"-2½". Bind off the remaining sts. Sew seams under foot in outer loops of edge sts to avoid a chunky seam. LOOSE LEG WORKED ACROSS: Worked back and forth on needle. Cast on 22 sts on needle size 6 mm / US 10 with Andes. Work 4 ridges AT THE SAME TIME on last row inc 6 sts evenly = 28 sts. Work according to A.1 (= 28 sts) until piece measures approx. 35-36-38 cm / 13 3/4"-14 1/4"-15". Work 4 ridges AT THE SAME TIME on 1st row dec 6 sts evenly = 22 sts. Bind off. Place bind-off edge over cast-on edge and sew on 3 buttons for decoration through ridges on the leg. ASSEMBLY: Sew the loose leg worked across to cast-on edge on leg (i.e. cast-on edge for leg at beg of pattern). Sew the loose leg so that buttons are placed on the outside of slipper with opening faced backwards towards the heel – sew from WS so that seam is invisble. Knit another slipper the same way, make sure that the leg opening is in the opposite side. |
|||||||
Diagram explanations |
|||||||
|
|||||||
 |
|||||||
Have you finished this pattern?Tag your pictures with #dropspattern #onestepaheadslippers or submit them to the #dropsfan gallery. Do you need help with this pattern?You'll find 17 tutorial videos, a Comments/Questions area and more by visiting the pattern on garnstudio.com. © 1982-2026 DROPS Design A/S. We reserve all rights. This document, including all its sub-sections, has copyrights. Read more about what you can do with our patterns at the bottom of each pattern on our site. |
|||||||


With over 40 years in knitting and crochet design, DROPS Design offers one of the most extensive collections of free patterns on the internet - translated to 17 languages. As of today we count 325 catalogs and 12298 patterns - 12288 of which are translated into English (US/in).
We work hard to bring you the best knitting and crochet have to offer, inspiration and advice as well as great quality yarns at incredible prices! Would you like to use our patterns for other than personal use? You can read what you are allowed to do in the Copyright text at the bottom of all our patterns. Happy crafting!
Post a comment to pattern DROPS 158-47
We would love to hear what you have to say about this pattern!
If you want to leave a question, please make sure you select the correct category in the form below, to speed up the answering process. Required fields are marked *.