
Popular categories
Looking for a yarn?


Comments / Questions (47)
![]() Lena Jensinger wrote:
Lena Jensinger wrote:
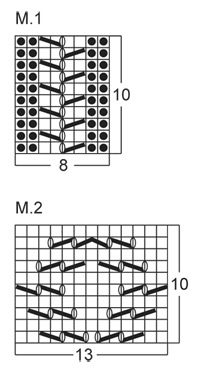
M2 den näst sista varven uppifrån stämmer den? Jag får det till 14 m istället för 13 m Från rätsidan: 3 rm, 1 omslag, lyft 1rm , 1 rm, drag den lyfta över, 1 omslag, lyft 1, 1 rm, drag den lyfta över, 2 rm tills, 1 omslag, 2rm tills, 1 omslag 3 rm. Hur löser jag detta? Md vänliga hälsningar Lena
31.05.2025 - 18:56DROPS Design answered:
Hei Lena. Er bare 13 masker. Strikk slik: Från rätsidan: (3 rm), (1 omslag), (lyft 1rm, 1 rm, drag den lyfta över), (1 omslag), (lyft 1 m, 2 rm tills, drag den lyfta m över), (1 omslag), (2rm tills), (1 omslag) og (3 rm). Ser ut som i din beskrivelse kun strikker 1 rett maske i midte, når man skal strikke 2 rett sammen. Se på / les det siste diagamikonet som går over 3 masker. mvh DROPS Design
02.06.2025 - 12:53
![]() LE GUEN Monique wrote:
LE GUEN Monique wrote:
En persistant j'ai fais un èchantillon et j'ai compris la façon de faire ce point fantaisie diagramme M1 de ce modèle.....je suis soulagée car j'étais bloquée!!!!
10.01.2021 - 17:28
![]() LE GUEN Monique wrote:
LE GUEN Monique wrote:
J'ai commencé ce modèle 137-7, seulement au 2ème rang de point fantaisie je me heurte a une difficulté: le diagramme M1 me semble erroné...au 2ém rang a l'envers....probléme! le motif se fait il sur un rang sur 2? je ne comprends pas! l'allèe et retour de ce point merci de m'aider pour pouvoir continuer mon ouvrage le plus rapidement possible
10.01.2021 - 15:54
![]() Sharon Ditton wrote:
Sharon Ditton wrote:
There appears to be missing information when going from page 3 to 4 in the instructions. Page 4 starts with the end of a bracketed instruction. Has anyone else found this and if so what is the missing information? It comes just as you divide the piece at the armholes.
11.11.2020 - 15:22DROPS Design answered:
Dear Ms Ditton, did you find something similar inthe online pattern? We print a test to this pattern and got everything matching the online pattern - please check online pattern and maybe the settings of your printer? let us know if you find the same issue in the online pattern we might have missed. Happy knitting!
11.11.2020 - 16:13
![]() Bloem wrote:
Bloem wrote:
Bij het lijf staat: Minder bij een hoogte van 5 cm ... Bedoelt u vanaf de opzetnaald gemeten 5 cm, of 5 cm in telpatroon gebreid? Alvast dank voor uw antwoord!
16.09.2018 - 15:14DROPS Design answered:
Dag Bloem, Dit is vanaf het begin gemeten, dus vanaf de opzetrand.
17.09.2018 - 12:25
![]() Bonnet wrote:
Bonnet wrote:
Merci pour votre réponse. Pour les diminutions et les augmentations, il faut se baser sur quel échantillon? Celui de 28rgs ou de 30rgs?
23.08.2018 - 18:14DROPS Design answered:
Bonjour Bonnet. Vous allez diminuer à la mesure (en cm) indiquée dans les explications. Bon tricot!
24.08.2018 - 14:35
![]() Bonnet wrote:
Bonnet wrote:
Bonjour, je voudrais savoir quel échantillon doit-on prendre en compte pour réaliser l'ouvrage? le jersey : 10cm=28rgs ou le point fantaisie 10cm=30rgs? Merci pour votre aide.
23.08.2018 - 12:20DROPS Design answered:
Bonjour Bonnet. Vous devez choisir les aiguilles qui vous donnent 10 cm = 28 rangs en jersey et en même temps 10 cm = 30 rangs suivant le point fantaisie. Bon tricot !
23.08.2018 - 16:23
![]() Anna wrote:
Anna wrote:
Prachtig patroon, maar M2 wil niet echt lukken. Is er misschien ook een video van M1 en M2 voor dit vest? Alvast dank, Anna
07.08.2018 - 14:28DROPS Design answered:
Dag Anna, Helaas is er geen video specifiek voor deze trui. Er is wel een algemene instructie over hoe je de teltekening leest. Die vindt je via deze link. Je kunt ook altijd hulp vragen bij de winkel waar je het garen hebt gekocht.
08.08.2018 - 08:36
![]() Angie wrote:
Angie wrote:
This pattern is very pretty. Do you recommend a warmer type of yarn in this pattern rather than Drops MUSKAT? I would like to make it to wear in the colder weather.
15.12.2015 - 12:12
![]() Pabou wrote:
Pabou wrote:
Bonjour, je n'arrive pas à faire le motif M.1. Je suis les explications, mais le résultat ne correspond pas au rendu de la photo. Je n'arrive pas à comprendre ce que je ne fais pas correctement : deux mailles envers, deux mailles endroit ensemble, un jeté, deux mailles endroits et deux mailles envers, tout cela sur l'endroit. Je n'ai pas le croisement comme sur la photo, est-ce que quelqu'un peut me guider ?
13.12.2015 - 20:17DROPS Design answered:
Bonjour Mme Pabou, les 4 m centrales de M.1 se tricotent ainsi sur l'endroit: 2 m ens à l'end, 1 jeté, 2 m end et sur l'envers: 2 m ens à l'env, 1 jeté, 2 m env. Le motif se forme ensuite de lui même. Bon tricot!
14.12.2015 - 13:43
|
|||||||||||||||||||
Melody#melodycardigan |
|||||||||||||||||||
 |
 |
||||||||||||||||||
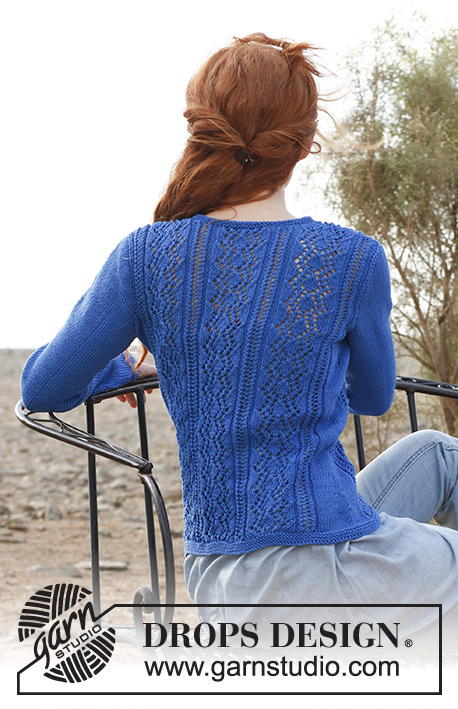
Knitted DROPS jacket with lace pattern in ”Muskat”. Size: S - XXXL
DROPS 137-7 |
|||||||||||||||||||
|
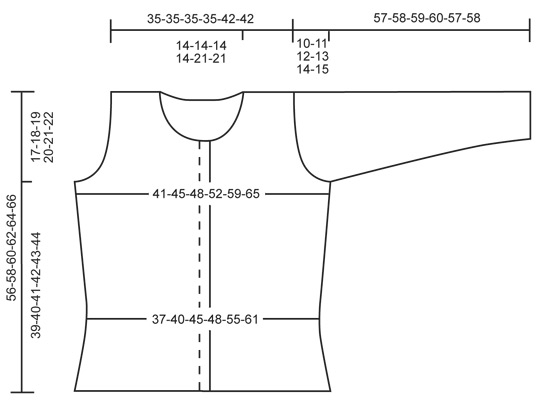
GARTER ST (back and forth on needle): K all rows. GARTER ST (in the round on double pointed needles): * K 1 round and P 1 round *, repeat from *-*. PATTERN: See diagrams M.1 and M.2. The diagrams show the pattern from RS. DECREASE TIP: Dec 1 st on each side of marker as follows: Work until 3 sts remain before marker, work the next 2 sts tog, work 2 sts (marker is between these), work the next 2 sts tog. INCREASE TIP: Inc 1 st on each side of marker as follows: Work until 1 st remains before marker, make 1 YO, work 2 sts (marker is between these), make 1 YO. On next row work YOs twisted (i.e. work in back loop of st instead of front) to avoid holes. BUTTON HOLES: bind off for 6 button holes on right band. 1 BUTTON HOLE = bind off 5th and 6th st from edge and cast on 2 new sts on next row over these sts. bind off for button holes when piece measures approx: SIZE S: 2, 10, 18, 25, 32, 39 cm / ¾",4",7",9¾",12½",15¼" SIZE M: 2, 10, 18, 26, 34, 41 cm / ¾",4",7",10¼",13⅜",16⅛". SIZE L: 2, 10, 18, 26, 34, 42 cm / ¾",4",7",10¼",13⅜",16½". SIZE XL: 2, 11, 19, 27, 35, 43 cm / ¾",4⅜",7½",10⅝"13¾",17". SIZE XXL: 2, 11, 20, 29, 37, 45 cm / ¾",4⅜",8",11⅜",14½",17¾". SIZE XXXL: 2, 11, 20, 29, 38, 47 cm / ¾",4⅜",8",11⅜",15",18½". Approx. 7-7-8-8-8-8 cm / 2¾"-2¾"-3⅛"-3⅛"-3⅛"-3⅛" remain up to neck edge after last button hole. In addition bind off for 1 button hole on neck edge. ---------------------------------------------------------- BODY: Back and front piece are worked in one from mid front. Worked back and forth on circular needle. Cast on 177-193-209-225-257-281 sts with Muskat on circular needle size 4 mm / US 6. Work in garter st - Read explanation above - for approx. 2 cm / ¾" (1st row = RS, finish with 1 row from WS). Then work 2 rows in stockinette st with 8 sts in garter st in each side (= bands mid front). REMEMBER THE GAUGE! Work next row from RS as follows: Size S - M - L - XL: 4 sts in garter st, bind off for 1st button hole - Read BUTTON HOLES above, 2 sts in garter st, 4 sts in stockinette st, diagram M.1, diagram M.2, then diagram M.1 1 more time, 6-10-14-18 sts in stockinette st, insert a marker (= right side), 6-10-14-18 sts in stockinette st, * diagram M.1, diagram M.2 *, repeat from *-* 3 times, then diagram M.1 1 more time, 6-10-14-18 sts in stockinette st, insert a marker (= left side), 6-10-14-18 sts in stockinette st, diagram M.1, diagram M.2, then diagram M.1 1 more time, finish with 4 sts in stockinette st and 8 sts in garter st. Move the markers upwards when working. Size XXL - XXXL: 4 sts in garter st, bind off for 1st button hole - Read BUTTON HOLES above, 2 sts in garter st, 4 sts in stockinette st, diagram M.1 2 times, then diagram M.2 1 time and diagram M.1 1 time, 18-24 sts in stockinette st, insert a marker (= right side), 18-24 sts in stockinette st, diagram M.1 1 time and diagram M.2 1 time, diagram M.1 2 times, diagram M.2 1 time, diagram M.1 2 times, then diagram M.2 1 time and diagram M.1 1 time, 18-24 sts in stockinette st, insert a marker (= left side), 18-24 sts in stockinette st, diagrams M.1 and M.2 1 time, then diagram M.1 2 times, finish with 4 sts in stockinette st and 8 sts in garter st. Move the markers upwards when working. All sizes: Continue with pattern and 8 sts in garter st and 4 sts in stockinette st in each side of piece. REMEMBER TO BIND OFF FOR BUTTON HOLES ON RIGHT BAND! When piece measures 5 cm / 2", dec 1 st on each side of every marker - Read DECREASE TIP above = 4 sts dec. Repeat dec every 2-2-2½-2½-3-3 cm / ¾"-¾"-⅞"-⅞"-1⅛"-1⅛" a total of 4 times = 161-177-193-209-241-265 sts on needle (= 2-6-10-14-14-20 sts in stockinette st on each side of every marker). Continue until piece measures 16-17-18-19-20-21 cm / 6¼"-6¾"-7"-7½"-8"-8¼", then inc 1 st on each side of every marker - Read INCREASE TIP above. Repeat inc every 6 cm / 2⅜" a total of 4 times = 177-193-209-225-257-281 sts. When piece measures 39-40-41-42-43-44 cm / 15¼"-15¾"-16⅛"-16½"-17"-17¼", divide the piece at the markers and finish each part separately. BACK PIECE: = 83-91-99-107-123-135 sts. Continue with pattern as before - AT THE SAME TIME bind off for armholes in each side on every other row as follows: bind off 3 sts 0-1-1-1-1-2 times, 2 sts 1-1-2-3-4-6 times, and 1 st 3-4-6-8-6-5 times = 73-73-73-73-89-89 sts. Continue with pattern as before with 1 edge st in garter st in each side. When piece measures 53-55-57-59-61-63 cm / 21"-21⅝"-22½"-23¼"-24"-24¾", bind off the middle 17-17-17-17-33-33 sts for neck and finish each shoulder separately. Bind off 2 sts at beg of the next 2 rows from neck, and 1 st on next row from neck = 23 sts remain on shoulder. Loosely bind off all sts when piece measures 56-58-60-62-64-66 cm / 22"-22¾"-23⅝"-24⅜"-25¼"-26". RIGHT FRONT PIECE: = 47-51-55-59-67-73 sts. Bind off for armhole in the side as on back piece = 42-42-42-42-50-50 sts. Continue with pattern as before with 1 edge st in garter st in the side, and 4 sts in stockinette st and 8 sts in garter st mid front until piece measures 46-48-50-51-53-55 cm / 18"-19"-19¾"-20"-21"-21⅝". On next row from WS work until 8 sts in garter st remain (= right band), slip the remaining 8 sts on a stitch holder, turn piece. Then bind off for neck at the beg of every row from RS (= every other row) - AT THE SAME TIME continue pattern as follows: bind off 4-4-4-4-12-12 sts 1 time, 2 sts 2 times, and 1 st 1 time. Then bind off 1 st at the beg of every other row from RS (= every 4th row) 2 times = 23 sts remain on shoulder. Loosely bind off all sts when piece measures 56-58-60-62-64-66 cm / 22"-22¾"-23⅝"-24⅜"-25¼"-26". LEFT FRONT PIECE: Work the same way as on right front piece but reversed and without button holes. SLEEVE: Worked in the round on double pointed needles. Cast on 44-46-48-50-52-54 sts on double pointed needles size 4 mm / US 6. Work in garter st - Read explanation above - for 2 cm / ¾" and insert a marker at beg of round (= mid under sleeve). Then work in stockinette st. When piece measures 6-6-6-6-6-5 cm / 2⅜"-2⅜"-2⅜"–2⅜"-2⅜"-2", inc 1 st on each side of marker = 2 new sts. Repeat inc every 4½-4-3½-3-2½-2½ cm / 1¾"-1½"-1¼"-1⅛"-⅞"-⅞" a total of 9-10-11-13-14-15 times = 62-66-70-76-80-84 sts. Continue until piece measures 47-47-47-47-43-43 cm / 18½-18½"-18½"-18½"-17"-17" (shorter measurements in the larger sizes because of wider shoulders and longer sleeve cap). From here work back and forth until finished measurements. Bind off for sleeve cap at the beg of every row in each side as follows: bind off 3 sts 1 time, 2 sts 2 times and then 1 st until piece measures approx. 55-56-57-58-55-56 cm / 21⅝"-22"-22½"-22¾"-21⅝"-22". Continue to bind off at beg of every row in each side as follows: bind off 2 sts 2 times, 3 sts 1 time. Loosely bind off all sts, piece measures approx. 57-58-59-60-57-58 cm / 22½"-22¾"-23¼"-23⅝"-22½"-22¾". Work another sleeve the same way. ASSEMBLY: Sew shoulder seams from RS with stitches. Sew the sleeves inside 1 edge st. NECK EDGE: Work an edge from RS on circular needle size 4 mm / US 6 as follows: Start on right band, slip the 8 sts from stitch holder back on needle and work these sts, knit up approx. 80 to 100 sts inside 1 edge st, slip the 8 sts from stitch holder on left band back on needle and work these sts. K next row from WS - while AT THE SAME TIME adjusting no of sts to 84-84-84-88-102-102 sts (do not adjust over the 8 sts in garter st in each side) = 100-100-100-104-118-118 sts on needle. Then work in garter st until finished measurements - while AT THE SAME TIME casting/binding off for the last button hole at beg of 1st row from RS. When neck edge measures approx. 1 cm / ⅜", loosely bind off all sts. Sew the buttons on to the left band. |
|||||||||||||||||||
Diagram explanations |
|||||||||||||||||||
|
|||||||||||||||||||
 |
|||||||||||||||||||
 |
|||||||||||||||||||
Have you finished this pattern?Tag your pictures with #dropspattern #melodycardigan or submit them to the #dropsfan gallery. Do you need help with this pattern?You'll find 16 tutorial videos, a Comments/Questions area and more by visiting the pattern on garnstudio.com. © 1982-2026 DROPS Design A/S. We reserve all rights. This document, including all its sub-sections, has copyrights. Read more about what you can do with our patterns at the bottom of each pattern on our site. |
|||||||||||||||||||


With over 40 years in knitting and crochet design, DROPS Design offers one of the most extensive collections of free patterns on the internet - translated to 17 languages. As of today we count 324 catalogs and 12290 patterns - 12280 of which are translated into English (US/in).
We work hard to bring you the best knitting and crochet have to offer, inspiration and advice as well as great quality yarns at incredible prices! Would you like to use our patterns for other than personal use? You can read what you are allowed to do in the Copyright text at the bottom of all our patterns. Happy crafting!
Post a comment to pattern DROPS 137-7
We would love to hear what you have to say about this pattern!
If you want to leave a question, please make sure you select the correct category in the form below, to speed up the answering process. Required fields are marked *.