
Popular categories
Looking for a yarn?


Comments / Questions (82)
![]() Dorothee Berger wrote:
Dorothee Berger wrote:
Hallo, ich verzweifle gerade wieder an der Maschenprobe. Sie ist immer mit der angegebenen Maschenzahl zu klein. Ich brauche mindestens doppelt so viele Maschen, um auf 10 cm zu kommen. Passe ich die Nadelstärke an, wird das Gestrick ein Netz! Gibt es jemanden der ähnliche Erfahrungen hat, und wie löst ihr das Problem? Danke schon im Voraus.
01.05.2015 - 21:44DROPS Design answered:
Es könnte zu einem Teil daran liegen, dass sich Ihr Maschenprobenstück zu sehr zusammenzieht, weil es nicht groß genug ist. Probieren Sie dies: Schlagen Sie ca. die 1,5-fache Menge an M an, die für die MP angegeben ist (also ca. 35-40 M). Stricken Sie 15 cm hoch und messen Sie dann in der Mitte die 10 cm ab. Sie können die Maschenprobe auch waschen und trocknen lassen, dann sehen Sie auch, wie sich das Garn beim Waschen verhält. Die hier angegebene MP ist jedenfalls normalerweise gut zu erreichen.
03.05.2015 - 10:15Margaret wrote:
Hi, the arrow pointing right (knitting direction) at the bottom of the diagram really confuses me. Normally a diagram is read from left to right. Hope to hear from you soon as if I don't guess correctly what the arrow means I'll have to reknit everything, thanks!
15.02.2015 - 17:52Margaret answered:
Hi, worked it out! The arrow refers to the direction of the total knit. Not to where to start the diagram. Sorry!
15.02.2015 - 17:59
![]() Alex wrote:
Alex wrote:
Bonjour, juste un petit doute concernant l'empiècement ... lorsqu'on relève les mailles, est-ce du côté des "3m au point mousse" ou du côté "jersey avec 1m lisière en point mousse" ? Merci d'avance :) !
19.06.2014 - 02:06DROPS Design answered:
Bonjour Alex, on relève les mailles à gauche, vu sur l'endroit (= côté avec 1 m lis point mousse). Bon tricot!
19.06.2014 - 08:37
![]() Gislaine wrote:
Gislaine wrote:
Un gros merci, j'ai compri et je vais m'y mettre, ce top est trè beau. Merci de répondre si vite! Gislaine
19.06.2014 - 00:34Gislaine wrote:
Pourquoi le Canada n'apparait pas dans le choix des pays? J'ai acheté mon fil pour faire ce beau débardeur, mais je ne comprend pas c'est quoi l'empiècement. Est-ce que c'est le haut du top?
16.06.2014 - 00:08DROPS Design answered:
Bonjour Gislaine, le Canada figure dans le 4ème onglet (après France, Belgique, Suisse). Le débardeur se tricote de haut en bas en commençant par la bordure ajourée en haut (qui se fait dans le sens de la longueur - cf schéma), puis on relève les mailles le long d'un des côtés pour tricoter la partie jusqu'après les emmanchures avant de tout reprendre en rond jusqu'en bas. Bon tricot!
16.06.2014 - 09:08
![]() Kaja wrote:
Kaja wrote:
Denne har jeg strikket og er superfornøyd! Skal strikke minst en til!
20.02.2014 - 19:47
![]() Ingridf wrote:
Ingridf wrote:
Jeg forstår ikke hva jeg skal gjøre med bærestykket når det står: "Deretter strikkes det 0-1-1-0-1-0 p vrang fra vrangen med 4 rillem i hver side"
30.06.2013 - 01:41DROPS Design answered:
Hej Ingrid. Dvs, at strikker du f.eks. str S skal du strikke 0 p fra vrangen (altsaa ikke strikke) og str M 1 p vrang fra vrangen med 4 rillem i hver side og saa videre.
02.07.2013 - 11:42
![]() Kathi wrote:
Kathi wrote:
Soll das Top von vorne und hinten gleich aussehen?
22.05.2013 - 14:24DROPS Design answered:
Liebe Kathi, ja das Top sieht hinten und vorne gleich aus. Man strickt zunächst 2 separate Passen und dann in Runden weiter nach unten.
23.05.2013 - 08:53Patati0 wrote:
Bonjour, J'ai vu cette belle laine,y-a-t-il des modèles en aiguilles droites?.
11.05.2013 - 21:01DROPS Design answered:
Bonjour Patati0, ce modèle peut se tricoter en 2 pièces si vous le souhaitez, il suffit simplement d'ajouter des m lis. Demandez conseil à votre magasin DROPS, il saura vous aider. Bon tricot !
13.05.2013 - 09:24
![]() Sandra wrote:
Sandra wrote:
Hallo, untenstehende Frage kann ignoriert werden. Manchmal sollte man halt einfach mal machen und nicht so viel drüber nachdenken :) Mit einer Runde rechts bis zur 2. Markierung kommt alles wunderbar hin :) Gruß, Sandra
19.04.2013 - 19:01
|
||||||||||||||||||||||
Vanilla Lace#vanillalacetop |
||||||||||||||||||||||
 |
 |
|||||||||||||||||||||
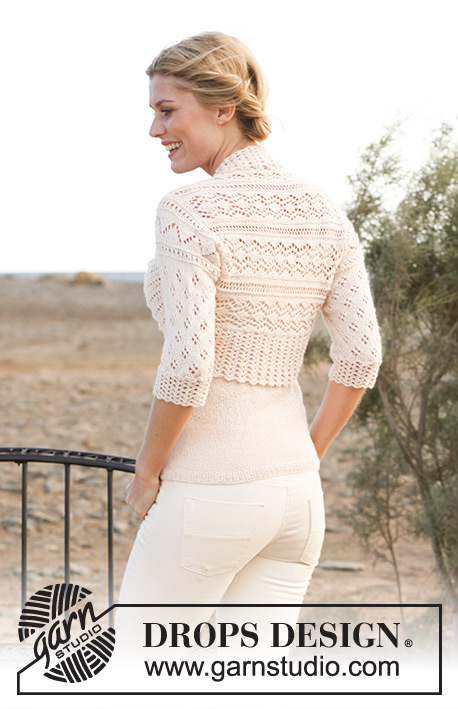
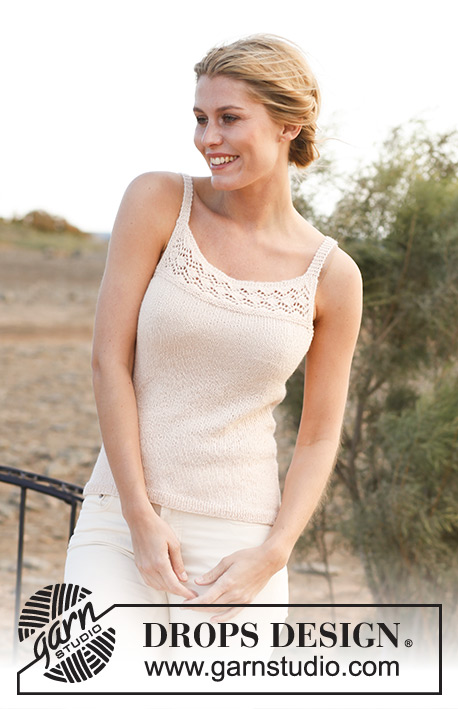
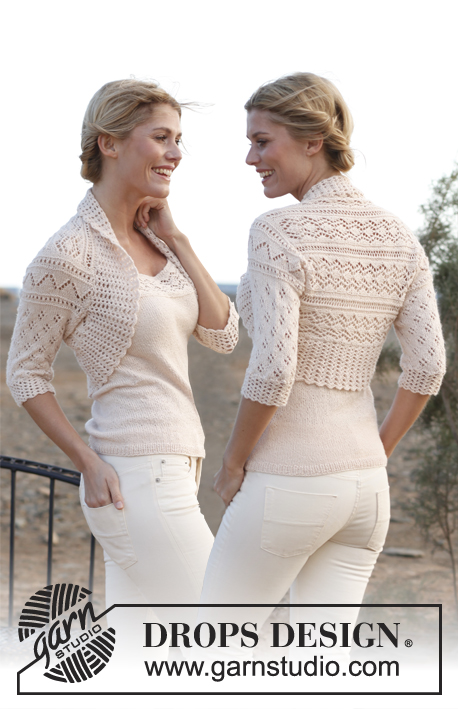
Knitted DROPS top with lace pattern in ”BabyAlpaca Silk”. Size: S – XXXL.
DROPS 139-6 |
||||||||||||||||||||||
|
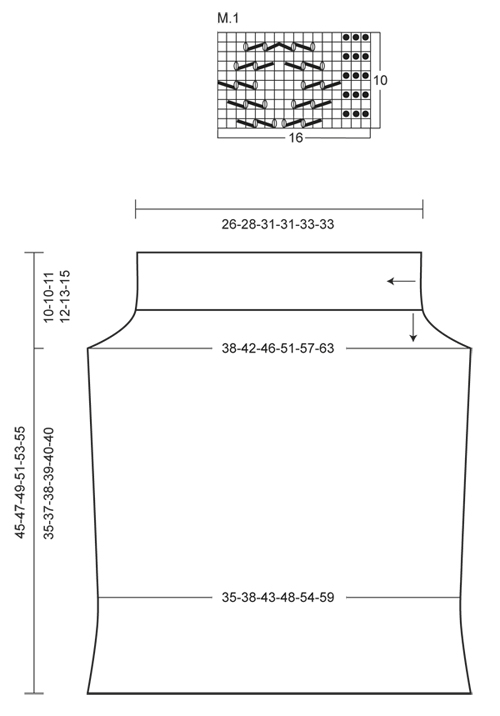
GARTER ST (back and forth on needle): K all rows. PATTERN: See diagram M.1. Diagram shows the pattern from RS. KNITTING TIP: No of sts is adjusted with inc or dec as follows: Dec 1 st by K 2 sts tog, or inc 1 st by making 1 YO. On next row K YO twisted (i.e. work in back loop of st instead of front) to avoid holes. DECREASE TIP (applies to body): Dec 1 st on each side of marker as follows: Work until 2 sts remain before marker, slip 1 st as if to K, K 1, psso, (marker), K 2 tog. INCREASE TIP: Inc 1 st by making 1 YO, on next row/round work YO twisted (i.e. work in back loop of st instead front) to avoid holes. ---------------------------------------------------------- YOKE: Worked sideways back and forth on needle. Cast on 17 sts on needle size 3 mm / US 2or3 with BabyAlpaca Silk. Work in garter st - Read explanation above - for approx. 1½ cm / ½" (1st row = RS). Work next row from RS as follows: Work diagram M.1 and finish with 1 edge st in garter st. REMEMBER THE GAUGE! Continue diagram M.1 with 1 edge st in garter st in the left side (seen from RS) until piece measures approx. 24-26-29-29-31-31 cm / 9½"-10¼"-11½"-11½"-12¼"-12¼" from cast on edge - NOTE: Finish with last row in diagram M.1 (= approx. 10-11-12-12-13-13 repetitions of diagram M.1 vertically). Then work in garter st over all sts for 1½ cm / ½", bind off all sts (piece measures approx. 26-28-31-31-33-33 cm / 10¼"-11"-12¼"-12¼"-13"-13" vertically). Then work on circular needle size 3.5 mm / US 4 top down from yoke. Pick up from RS approx. 70 to 90 sts along the left side on yoke inside 1 edge st in garter st. K next row from WS while AT THE SAME TIME adjusting no of sts to 68-72-78-78-84-84 - Read KNITTING TIP above. K 2 more rows (= 4 rows in garter st = 2 ridges in total). Work next row from RS as follows: 4 sts in garter st, inc 1 st - Read INCREASE TIP above, K until 4 sts remain on needle, inc 1 st, 4 sts in garter st. Then work in stockinette st - AT THE SAME TIME inc 1 st inside 4 sts in garter st in each side on every row (i.e. from RS and WS) a total of 6-7-9-14-17-22 times = 80-86-96-106-118-128 sts. Then P 0-1-1-0-1-0 rows from WS with 4 sts in garter st in each side, piece now measures approx. 10-10-11-12-13-15 cm / 4"-4"-4⅜"-4¾"-5⅛"-6". Slip sts on a stitch holder and put piece aside. Work 1 more yoke the same way and work up along the left side the same way but leave the sts on the needle (last row = WS). BODY: = 80-86-96-106-118-128 sts. On next round, work in the round as follows: K the 80-86-96-106-118-128 sts on needle, cast on 8-10-10-12-14-16 sts, K the 80-86-96-106-118-128 sts from stitch holder on to needle, and cast on 8-10-10-12-14-16 sts = 176-192-212-236-264-288 sts. Insert a marker in the middle of the 8-10-10-12-14-16 new sts in each side (= 1 marker in the middle of each side). NOTE: Now round beg at the 2nd marker. Move the markers upwards when working. On next round K until 2nd marker. Then work next round as follows: * (marker), P 8-9-9-10-11-12, K 72-78-88-98-110-120, P 8-9-9-10-11-12, (marker), P 8-9-9-10-11-12, K 72-78-88-98-110-120, P 8-9-9-10-11-12 *. Then K 1 round. Repeat from *-* 1 more time (= 2 rounds with 16-18-18-20-22-24 P sts under armhole in each side), then K all sts. When piece measures 15-16-17-19-19-21 cm / 6"-6¼"-6¾"-7½"-7½"-8¼" (measured from the upper edge on yoke), dec 1 st on each side of each marker - Read DECREASE TIP above = 4 dec sts. Repeat dec every 5½-5½-6-6-6½-6½ cm / 2¼"-2¼"-2⅜"-2⅜"-2½"-2½" a total of 4 times = 160-176-196-220-248-272 sts. When piece measures 37-39-41-42-44-46 cm / 14½"-15¼"-16⅛"-16½"-17¼"-18", remove the marker in each side and insert 4 new markers in the piece as follows: Work 20-20-24-24-28-28 sts, 1 marker, work 40-48-50-62-68-80 sts, 1 marker, work 40-40-48-48-56-56 sts, 1 marker, work 40-48-50-62-68-80 sts, 1 marker, work the remaining 20-20-24-24-28-28 sts (= 2 marker at the front and 2 markers at the back). On next round, inc 1 st on each side of each marker - Read INCREASE TIP above = 8 new sts. Repeat inc one more time when piece measures 41-43-45-46-48-50 cm / 16⅛"-17"-17¾"-18"-19"-19¾" = 176-192-212-236-264-288 sts. Continue to work until piece measures 43-45-47-49-51-53 cm / 17"-17¾"-18½"-19¼"-20"-21". Then work rib (K 1/P 1) until piece measures 45-47-49-51-53-55 cm / 17¾"-18½"-19¼"-20"-21"-21⅝", then loosely bind off all sts with K over K and P over P. SHOULDER STRAP: Pick up 6-6-7-7-8-8 sts in the right corner along the upper edge on one yoke (= front). Work in garter st for 16-16-16-18-18-18 cm / 6¼"-6¼"-6¼"-7"-7"-7", bind off. Sew strap along the upper edge on the second yoke (= back). Repeat on the left side. |
||||||||||||||||||||||
Diagram explanations |
||||||||||||||||||||||
|
||||||||||||||||||||||
 |
||||||||||||||||||||||
Have you finished this pattern?Tag your pictures with #dropspattern #vanillalacetop or submit them to the #dropsfan gallery. Do you need help with this pattern?You'll find 20 tutorial videos, a Comments/Questions area and more by visiting the pattern on garnstudio.com. © 1982-2026 DROPS Design A/S. We reserve all rights. This document, including all its sub-sections, has copyrights. Read more about what you can do with our patterns at the bottom of each pattern on our site. |
||||||||||||||||||||||


With over 40 years in knitting and crochet design, DROPS Design offers one of the most extensive collections of free patterns on the internet - translated to 17 languages. As of today we count 324 catalogs and 12290 patterns - 12280 of which are translated into English (US/in).
We work hard to bring you the best knitting and crochet have to offer, inspiration and advice as well as great quality yarns at incredible prices! Would you like to use our patterns for other than personal use? You can read what you are allowed to do in the Copyright text at the bottom of all our patterns. Happy crafting!
Post a comment to pattern DROPS 139-6
We would love to hear what you have to say about this pattern!
If you want to leave a question, please make sure you select the correct category in the form below, to speed up the answering process. Required fields are marked *.