
Popular categories
Looking for a yarn?


Comments / Questions (54)
![]() Françoise wrote:
Françoise wrote:
J'aime beaucoup ce modèle, peut-être avec une laine plus fine et des manches pour la frileuse que je suis.
22.05.2011 - 22:21
![]() Joyce Van Vorst wrote:
Joyce Van Vorst wrote:
Such a great addition to one's wardrobe!
22.05.2011 - 14:34
![]() Barbara wrote:
Barbara wrote:
Den är fin vill ha den,
22.05.2011 - 13:48
![]() Nadia wrote:
Nadia wrote:
Trés joli
22.05.2011 - 10:58
![]() Janice wrote:
Janice wrote:
Love the way its n knitted from edge to edge
21.05.2011 - 20:05
![]() Jaanika wrote:
Jaanika wrote:
Väga vahva kudum! Jään põnevusega juhendit ootama!!!
21.05.2011 - 16:00
![]() Magalie wrote:
Magalie wrote:
Le motif horizontal est très joli et la forme ample semble confortable.
21.05.2011 - 11:32Zuleide wrote:
É lindooo
21.05.2011 - 02:31
![]() Luisa wrote:
Luisa wrote:
Excelente ideia, vou faze-lo quanto antes. Parabens!
20.05.2011 - 21:17
![]() Katalin wrote:
Katalin wrote:
I'm so ready for this one
20.05.2011 - 17:19
|
||||||||||||||||
Lady of the Lake#ladyofthelakecardigan |
||||||||||||||||
|
|
||||||||||||||||
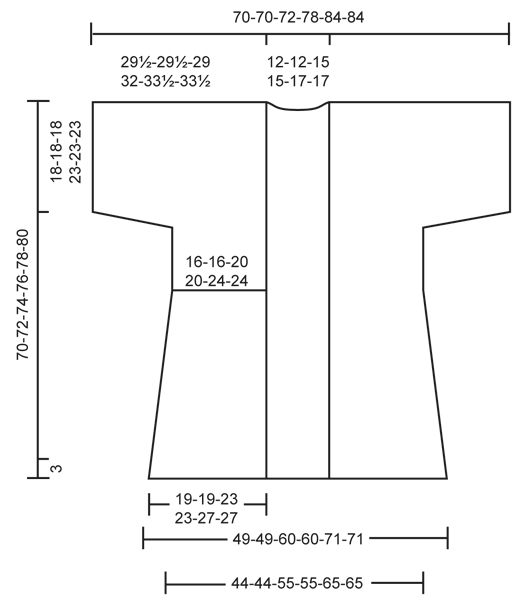
Knitted DROPS jacket with lace pattern worked sideways in ”Snow” or “Andes”. Size: S - XXXL.
DROPS 134-48 |
||||||||||||||||
|
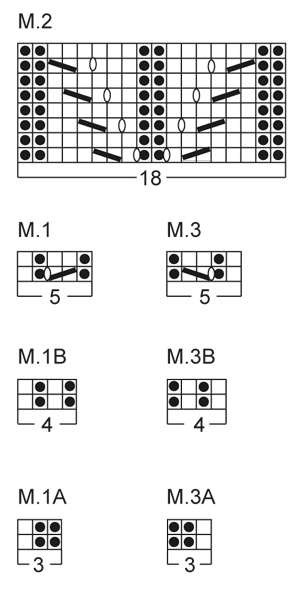
INCREASE TIP 1: Inc 1 st by picking up the yarn between 2 sts from previous row - P this st twisted, i.e. work in back loop of st instead of front to avoid holes. INCREASE TIP 2: Inc 1 st by picking up the yarn between 2 sts from previous row - K this st twisted, i.e. work in back loop of st instead of front to avoid holes. PATTERN: See diagrams M.1 to M.3B (the diagrams show all rows in the pattern seen from RS). BUTTON HOLES: Bind off for 3 button holes on right front band. 1 BUTTON HOLE = bind off 1 st and cast on 1 new st on next row over this st. -------------------------------------------------------- LEFT BACK AND FRONT PIECE: Left back and front piece is worked in one. Worked back and forth on circular needle, beg from mid back. Cast on 81-83-85-88-90-92 sts for back piece on circular needle size 8 mm / US 11 with Snow. On 1st row (= WS) K all sts. Work next row (2nd row = RS) as follows: Work diagram M.1A (= 3 sts), work diagram M.1 (= 5 sts) 5-5-5-6-6-6 times, then work diagram M.2 (= 18 sts), 31-33-35-33-35-37 sts in stockinette st, finish with P 1, K 1, P 1 and K 1 (= 4 edge sts in rib until finished measurements). Work another 2-2-4-4-6-6 rows like this with 4 edge sts in rib in the side. Then inc for neck as follows: Row 1 (= WS): Work until 3 sts remain on needle (= diagram M.1A), P 1, K 1, inc 1 st - Read INCREASE TIP 1 above, finish with K 1. Row 2 (= RS): Work diagram M.1B over the first 4 sts on needle, continue with pattern. Row 3: Work until 4 sts remain on needle (= diagram M.1B), P 1, K 1, P 1, inc 1 st and finish with K 1 = 83-85-87-90-92-94 sts. Row 4: Work diagram M.1 over the first 5 sts on needle, continue with pattern (= 6-6-6-7-7-7 repetitions of diagram M.1 in total). Row 5: Work the entire row, cast on 84-86-88-91-93-95 sts for front piece at the end of row = 167-171-175-181-185-189 sts on needle. Row 6 (= RS): K 1, P 1, K 1, P 1 (= 4 edge sts in rib until finished measurements), 31-33-35-33-35-37 sts in stockinette st, 1st row in diagram M.2, K 1, then diagram M.1 a total of 12-12-12-14-14-14 times (= 60-60-60-70-70-70 sts), diagram M.2, 31-33-35-33-35-37 sts in stockinette st, finish with P 1, K 1, P 1 and K 1 (= 4 edge sts in rib until finished measurements). Continue with pattern and 4 edge sts in rib in each side of piece. REMEMBER THE GAUGE! When diagram M.2 on back piece has been worked a total of 4-4-5-5-6-6 times (back piece measures approx. 23-23-28-28-33-33 cm / 9"-9"-11"-11"-13"-13" from cast on edge), insert 2 markers in the piece from RS as follows: 58-60-62-60-62-64 sts (= front piece), 1 marker, 51-51-51-61-61-61 sts (= sleeve), 1 marker, 58-60-62-60-62-64 sts (= back piece). Now divide the piece at the markers and finish each part separately. LEFT FRONT PIECE: Work 1st row (= RS) as follows: Work 58-60-62-60-62-64 sts (until 1st marker) in pattern and stockinette st as before, turn piece. At beg of next row (= WS) bind off 23 sts (= 1 repetition of diagram M.1 and diagram M.2) in all sizes, work the rest of row. Bind off 10-12-12-12-12-12 sts at beg of the next 2 rows from WS = 15-13-15-13-15-17 sts remain on needle, loosely bind off all sts on next row. SLEEVE: = 51-51-51-61-61-61 sts (= 1 K st + 10-10-10-12-12-12 repetitions of diagram M.1). K 2 rows in diagram M.1 (1st row = RS). At beg of the next 2 rows bind off 1 st. Repeat bind off at beg of every row in each side a total of 5 times = 41-41-41-51-51-51 sts (1 K st + 8-8-8-10-10-10 repetitions of diagram M.1). When piece measures approx. 35-35-36-39-42-42 cm / 13¾"-13¾"-14¼"-15¼"-16½"-16½" (adjust so that last row is 2nd row in diagram M.1), loosely bind off all sts with K over K and P over P. LEFT BACK PIECE: = 58-60-62-60-62-64 sts. On 1st row from RS bind off 23 sts at beg of row in all sizes, work the rest of row. Bind off 10-12-12-12-12-12 sts at beg of the next 2 rows from RS = 15-13-15-13-15-17 sts remain on needle, loosely bind off all sts on next row. RIGHT BACK AND FRONT PIECE: Right back and front piece is worked in one. Cast on 81-83-85-88-90-92 sts for back piece on circular needle size 8 mm / US 11 with Snow. On 1st row (= WS) K all sts. Work next row (2nd row = RS) as follows: K 1, P 1, K 1 and P 1 (= 4 edge sts in rib until finished measurements), 31-33-35-33-35-37 sts in stockinette st, then work diagram M.2 (= 18 sts), diagram M.3 (= 5 sts) 5-5-5-6-6-6 times, finish with diagram M.3A (= 3 sts). Work another 3-3-5-5-7-7 rows like this with 4 edge sts in rib in the side. Then inc for neck as follows: Row 1 (= RS): Work until 3 sts remain on needle (= diagram M.3A), K 1, P 1, inc 1 st - Read INCREASE TIP 2 above, finish with P 1. Row 2 (= WS): Work diagram M.3B over the first 4 sts on needle, continue with pattern. Row 3: Work until 4 sts remain on needle (= diagram M.3B), K 1, P 1, K 1, inc 1 st and finish with P 1 = 83-85-87-90-92-94 sts. Row 4: Work diagram M.3 over the first 5 sts on needle, work the rest of row (= 6-6-6-7-7-7 repetitions of diagram M.3 in total). Row 5 (= RS): Work the entire row. At the end of row, cast on 84-86-88-91-93-95 new sts for front piece = 167-171-175-181-185-189 sts on the needle. Row 6 (= WS): P 1, K 1, P 1, K 1 (= 4 edge sts in rib until finished measurements), 31-33-35-33-35-37 sts in stockinette st, 8th row in diagram M.2, P 1, then diagram M.3 a total of 12-12-12-14-14-14 times (= 60-60-60-70-70-70 sts), diagram M.2, 31-33-35-33-35-37 sts in stockinette st, finish with K 1, P 1, K 1 and P 1 (= 4 edge sts in rib until finished measurements). On next row from RS, work 1st row in diagram M.2 on front piece. Work as on left back and front piece but reversed. ASSEMBLY: Sew/graft tog both parts mid back with neat stitches. Sew sleeve and side seams in one. FRONT BANDS: Worked back and forth on circular needle size 7 mm / US 10½. Beg at the bottom edge on right front piece, knit up from RS approx. 180-210 sts up along right front piece, around the neck and down along left front piece. K next row (= WS) - while at the same time adjusting no of sts to 191-195-201-209-215-219. Work next row from RS as follows: K 1, * P 1, K 1 *, repeat from *-* the rest of row. Continue like this with rib for approx. 4-4-4-5-5-5 cm / 1½"-1½"-1½"-2"-2"-2". Then insert 2 markers; 78-80-80-84-86-88 sts in from each side = 35-35-41-41-43-43 sts between markers in back of neck. On next row from RS, inc 17-17-20-20-21-21 sts between markers as follows: Work until 1st marker, then K 1, * inc 1 st, P 1, K 1 *, repeat from *-* until 2nd marker, work the rest of row = 208-212-221-229-236-240 sts. Continue with K over K and P over P. When band measures 5-5-5-6-6-6 cm / 2"-2"-2"-2⅜"-2⅜"-2⅜", evenly bind off for 3 button holes on left band next to diagram M.2 - Read explanation above. When band measures 8-8-8-9-9-9 cm / 3⅛"-3⅛"-3⅛"-3½"-3½"-3½", loosely bind off all sts. |
||||||||||||||||
Diagram explanations |
||||||||||||||||
|
||||||||||||||||
 |
||||||||||||||||
 |
||||||||||||||||
Have you finished this pattern?Tag your pictures with #dropspattern #ladyofthelakecardigan or submit them to the #dropsfan gallery. Do you need help with this pattern?You'll find 12 tutorial videos, a Comments/Questions area and more by visiting the pattern on garnstudio.com. © 1982-2026 DROPS Design A/S. We reserve all rights. This document, including all its sub-sections, has copyrights. Read more about what you can do with our patterns at the bottom of each pattern on our site. |
||||||||||||||||


With over 40 years in knitting and crochet design, DROPS Design offers one of the most extensive collections of free patterns on the internet - translated to 17 languages. As of today we count 324 catalogs and 12290 patterns - 12280 of which are translated into English (US/in).
We work hard to bring you the best knitting and crochet have to offer, inspiration and advice as well as great quality yarns at incredible prices! Would you like to use our patterns for other than personal use? You can read what you are allowed to do in the Copyright text at the bottom of all our patterns. Happy crafting!
Post a comment to pattern DROPS 134-48
We would love to hear what you have to say about this pattern!
If you want to leave a question, please make sure you select the correct category in the form below, to speed up the answering process. Required fields are marked *.