Comments / Questions (54)
![]() Diane wrote:
Diane wrote:
Bonjour, Merci pour votre réponse. Mon commentaire concernait la portion de la manche. Puisque nous devons lire les diagrammes de même façon, que ce soit en faisant M2 ou ceux de la manche, soit end/env, j'ai obtenu un style tout à fait différent sur la portion de la manche que ce que je vois sur le modèle de la photo. La manche que je fais me donne un point de riz. Ce qui n'est pas le cas pour la manche du modèle de la photo. C'est tout de même très joli.
12.11.2015 - 12:53
![]() Diane wrote:
Diane wrote:
Bonjour, je termine la seconde moitié de cette veste et je remarque que le motif de la manche me donne un point de riz, avec un jour régulier. C'est tres joli mais bien différent du modèle de la photo. Est-ce que la lecture des mailles pour la section des manches devrait être différente de M.2 pour qu'elles soient comme celles de la photo? Quoi qu'il en soit, je trouve que mon tricot est vraiment très beau! Merci
07.11.2015 - 12:51DROPS Design answered:
Bonjour Diane, dans M.2, on n'a pas de point de riz, mais 2 m env au début, 2 m env au milieu et 2 m env à la fin - les cases blanches se tricotent en jersey endroit. Bon tricot!
09.11.2015 - 11:38
![]() Diane wrote:
Diane wrote:
Bonjour, Je ne comprends pas comment je dois faire le diagramme M1 dans la manche de la demi gauche de la veste. On dit "au début des rangs suivants, rabattre 1 m. Répéter ces diminutions d'1 m. Au début... Comment dois-je faire pour conserver le même motif en faisant ces diminutions? Je m'y suis repris à 2 fois et je bloque toujours à cet endroit! Merci pour vos conseils toujours appréciés.
10.10.2015 - 02:54DROPS Design answered:
Bonjour Diane, pendant les diminutions de la manche, tricotez les m de M.1 comme elles se présentent (end/env), mais sans tricoter le jour du milieu après avoir diminué la 1ère de ces 2 m end pour que le nombre de m soit juste. Bon tricot!
12.10.2015 - 09:18
![]() Mimma wrote:
Mimma wrote:
Thank you for answering but what about the bottom part of the cardigan I have knitted it 2 and it does not look lie the picture I appreciate if you could help me as I like it for my daughter Thank you Mimma
10.07.2015 - 21:09DROPS Design answered:
Dear Mimma, the bottom part (in stockinette) of front piece is cast on at the end of row 5 (the bottom part - in stockinette - on back piece is worked from the beg: 31-37 sts in st st at the end of row from RS). Happy knitting!
27.07.2015 - 09:50
![]() Mimma wrote:
Mimma wrote:
Please explain better this pattern would like the back of this pattern to explain how it looks please and thank you
09.07.2015 - 21:00DROPS Design answered:
Dear Mimma, you start working the left half-back piece + front piece in 1 piece sideways starting from mid back/mid front towards side/sleeve then work another piece reversed (right half back piece + front piece) and sew them tog in mid back (sew cast on edge tog). Happy knitting!
10.07.2015 - 08:39
![]() Maigrot wrote:
Maigrot wrote:
Bonjour, j'ai des difficultés de compréhension concernant le 1er rang du 1/2 dos gauche et devant ; il est indiqué de tricoter le mailles du 1er rang (soit l'envers du tricot)à l'endroit. Or, une fois les mailles montées, le 1er rang que l'on tricote est toujours un rang endroit.Dois je comprendre que vous parlez du rang suivant le 1er rang endroit?
25.02.2012 - 18:22DROPS Design answered:
Bonjour Maigrot, le 1er rang peut être indifféremment sur l'endroit ou sur l'envers d'un ouvrage. Dans ce cas, le 1er rang sera un rang sur l'envers, et le 2ème rang sera l'endroit de l'ouvrage. Bon tricot !
27.02.2012 - 10:33
![]() DROPS Deutsch wrote:
DROPS Deutsch wrote:
Das Video "Schulternaht" kann Ihnen weiterhelfen.
28.11.2011 - 08:43
![]() Jutta wrote:
Jutta wrote:
Hallo, wie stricke ich denn die Naht hinten in der Mitte? Das sind doch die Am Anfang aufgenommenen Maschen und diese sind ja nicht mehr auf der Nadel. Bei unsichtbarer Naht müssen die auf der Nadel sein. Gibt es für das Zusammenstricken auch eine Videoanleitung? Viele Grüße Jutta
26.11.2011 - 14:01
![]() DROPS Design wrote:
DROPS Design wrote:
Det stemmer med 8. i M.2. Det gjøres at mønsteret stemmer overens.
02.09.2011 - 08:58
![]() Mia wrote:
Mia wrote:
Høyre stykke : hvor det står 8.p M2 bør det stå 1.p M2?
01.09.2011 - 13:04
Lady of the Lake#ladyofthelakecardigan |
||||||||||||||||
|
|
||||||||||||||||
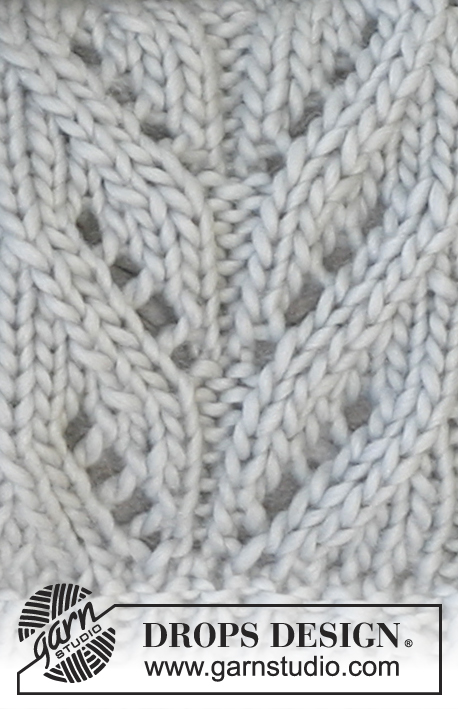
Knitted DROPS jacket with lace pattern worked sideways in ”Snow” or “Andes”. Size: S - XXXL.
DROPS 134-48 |
||||||||||||||||
|
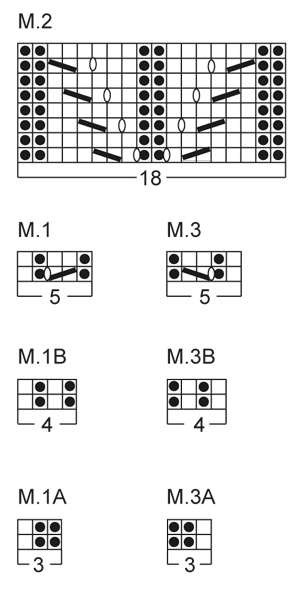
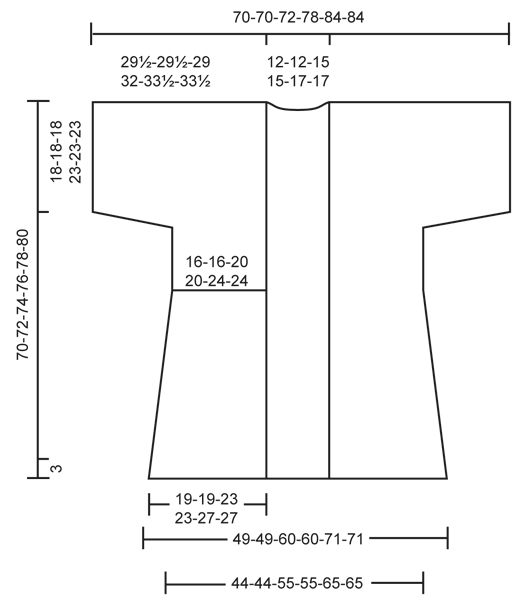
INCREASE TIP 1: Inc 1 st by picking up the yarn between 2 sts from previous row - P this st twisted, i.e. work in back loop of st instead of front to avoid holes. INCREASE TIP 2: Inc 1 st by picking up the yarn between 2 sts from previous row - K this st twisted, i.e. work in back loop of st instead of front to avoid holes. PATTERN: See diagrams M.1 to M.3B (the diagrams show all rows in the pattern seen from RS). BUTTON HOLES: Bind off for 3 button holes on right front band. 1 BUTTON HOLE = bind off 1 st and cast on 1 new st on next row over this st. -------------------------------------------------------- LEFT BACK AND FRONT PIECE: Left back and front piece is worked in one. Worked back and forth on circular needle, beg from mid back. Cast on 81-83-85-88-90-92 sts for back piece on circular needle size 8 mm / US 11 with Snow. On 1st row (= WS) K all sts. Work next row (2nd row = RS) as follows: Work diagram M.1A (= 3 sts), work diagram M.1 (= 5 sts) 5-5-5-6-6-6 times, then work diagram M.2 (= 18 sts), 31-33-35-33-35-37 sts in stockinette st, finish with P 1, K 1, P 1 and K 1 (= 4 edge sts in rib until finished measurements). Work another 2-2-4-4-6-6 rows like this with 4 edge sts in rib in the side. Then inc for neck as follows: Row 1 (= WS): Work until 3 sts remain on needle (= diagram M.1A), P 1, K 1, inc 1 st - Read INCREASE TIP 1 above, finish with K 1. Row 2 (= RS): Work diagram M.1B over the first 4 sts on needle, continue with pattern. Row 3: Work until 4 sts remain on needle (= diagram M.1B), P 1, K 1, P 1, inc 1 st and finish with K 1 = 83-85-87-90-92-94 sts. Row 4: Work diagram M.1 over the first 5 sts on needle, continue with pattern (= 6-6-6-7-7-7 repetitions of diagram M.1 in total). Row 5: Work the entire row, cast on 84-86-88-91-93-95 sts for front piece at the end of row = 167-171-175-181-185-189 sts on needle. Row 6 (= RS): K 1, P 1, K 1, P 1 (= 4 edge sts in rib until finished measurements), 31-33-35-33-35-37 sts in stockinette st, 1st row in diagram M.2, K 1, then diagram M.1 a total of 12-12-12-14-14-14 times (= 60-60-60-70-70-70 sts), diagram M.2, 31-33-35-33-35-37 sts in stockinette st, finish with P 1, K 1, P 1 and K 1 (= 4 edge sts in rib until finished measurements). Continue with pattern and 4 edge sts in rib in each side of piece. REMEMBER THE GAUGE! When diagram M.2 on back piece has been worked a total of 4-4-5-5-6-6 times (back piece measures approx. 23-23-28-28-33-33 cm / 9"-9"-11"-11"-13"-13" from cast on edge), insert 2 markers in the piece from RS as follows: 58-60-62-60-62-64 sts (= front piece), 1 marker, 51-51-51-61-61-61 sts (= sleeve), 1 marker, 58-60-62-60-62-64 sts (= back piece). Now divide the piece at the markers and finish each part separately. LEFT FRONT PIECE: Work 1st row (= RS) as follows: Work 58-60-62-60-62-64 sts (until 1st marker) in pattern and stockinette st as before, turn piece. At beg of next row (= WS) bind off 23 sts (= 1 repetition of diagram M.1 and diagram M.2) in all sizes, work the rest of row. Bind off 10-12-12-12-12-12 sts at beg of the next 2 rows from WS = 15-13-15-13-15-17 sts remain on needle, loosely bind off all sts on next row. SLEEVE: = 51-51-51-61-61-61 sts (= 1 K st + 10-10-10-12-12-12 repetitions of diagram M.1). K 2 rows in diagram M.1 (1st row = RS). At beg of the next 2 rows bind off 1 st. Repeat bind off at beg of every row in each side a total of 5 times = 41-41-41-51-51-51 sts (1 K st + 8-8-8-10-10-10 repetitions of diagram M.1). When piece measures approx. 35-35-36-39-42-42 cm / 13¾"-13¾"-14¼"-15¼"-16½"-16½" (adjust so that last row is 2nd row in diagram M.1), loosely bind off all sts with K over K and P over P. LEFT BACK PIECE: = 58-60-62-60-62-64 sts. On 1st row from RS bind off 23 sts at beg of row in all sizes, work the rest of row. Bind off 10-12-12-12-12-12 sts at beg of the next 2 rows from RS = 15-13-15-13-15-17 sts remain on needle, loosely bind off all sts on next row. RIGHT BACK AND FRONT PIECE: Right back and front piece is worked in one. Cast on 81-83-85-88-90-92 sts for back piece on circular needle size 8 mm / US 11 with Snow. On 1st row (= WS) K all sts. Work next row (2nd row = RS) as follows: K 1, P 1, K 1 and P 1 (= 4 edge sts in rib until finished measurements), 31-33-35-33-35-37 sts in stockinette st, then work diagram M.2 (= 18 sts), diagram M.3 (= 5 sts) 5-5-5-6-6-6 times, finish with diagram M.3A (= 3 sts). Work another 3-3-5-5-7-7 rows like this with 4 edge sts in rib in the side. Then inc for neck as follows: Row 1 (= RS): Work until 3 sts remain on needle (= diagram M.3A), K 1, P 1, inc 1 st - Read INCREASE TIP 2 above, finish with P 1. Row 2 (= WS): Work diagram M.3B over the first 4 sts on needle, continue with pattern. Row 3: Work until 4 sts remain on needle (= diagram M.3B), K 1, P 1, K 1, inc 1 st and finish with P 1 = 83-85-87-90-92-94 sts. Row 4: Work diagram M.3 over the first 5 sts on needle, work the rest of row (= 6-6-6-7-7-7 repetitions of diagram M.3 in total). Row 5 (= RS): Work the entire row. At the end of row, cast on 84-86-88-91-93-95 new sts for front piece = 167-171-175-181-185-189 sts on the needle. Row 6 (= WS): P 1, K 1, P 1, K 1 (= 4 edge sts in rib until finished measurements), 31-33-35-33-35-37 sts in stockinette st, 8th row in diagram M.2, P 1, then diagram M.3 a total of 12-12-12-14-14-14 times (= 60-60-60-70-70-70 sts), diagram M.2, 31-33-35-33-35-37 sts in stockinette st, finish with K 1, P 1, K 1 and P 1 (= 4 edge sts in rib until finished measurements). On next row from RS, work 1st row in diagram M.2 on front piece. Work as on left back and front piece but reversed. ASSEMBLY: Sew/graft tog both parts mid back with neat stitches. Sew sleeve and side seams in one. FRONT BANDS: Worked back and forth on circular needle size 7 mm / US 10½. Beg at the bottom edge on right front piece, knit up from RS approx. 180-210 sts up along right front piece, around the neck and down along left front piece. K next row (= WS) - while at the same time adjusting no of sts to 191-195-201-209-215-219. Work next row from RS as follows: K 1, * P 1, K 1 *, repeat from *-* the rest of row. Continue like this with rib for approx. 4-4-4-5-5-5 cm / 1½"-1½"-1½"-2"-2"-2". Then insert 2 markers; 78-80-80-84-86-88 sts in from each side = 35-35-41-41-43-43 sts between markers in back of neck. On next row from RS, inc 17-17-20-20-21-21 sts between markers as follows: Work until 1st marker, then K 1, * inc 1 st, P 1, K 1 *, repeat from *-* until 2nd marker, work the rest of row = 208-212-221-229-236-240 sts. Continue with K over K and P over P. When band measures 5-5-5-6-6-6 cm / 2"-2"-2"-2⅜"-2⅜"-2⅜", evenly bind off for 3 button holes on left band next to diagram M.2 - Read explanation above. When band measures 8-8-8-9-9-9 cm / 3⅛"-3⅛"-3⅛"-3½"-3½"-3½", loosely bind off all sts. |
||||||||||||||||
Diagram explanations |
||||||||||||||||
|
||||||||||||||||
 |
||||||||||||||||
 |
||||||||||||||||
Have you finished this pattern?Tag your pictures with #dropspattern #ladyofthelakecardigan or submit them to the #dropsfan gallery. Do you need help with this pattern?You'll find 12 tutorial videos, a Comments/Questions area and more by visiting the pattern on garnstudio.com. © 1982-2026 DROPS Design A/S. We reserve all rights. This document, including all its sub-sections, has copyrights. Read more about what you can do with our patterns at the bottom of each pattern on our site. |
||||||||||||||||


Post a comment to pattern DROPS 134-48
We would love to hear what you have to say about this pattern!
If you want to leave a question, please make sure you select the correct category in the form below, to speed up the answering process. Required fields are marked *.