
Popular categories
Looking for a yarn?


Comments / Questions (54)
![]() Civario Marie wrote:
Civario Marie wrote:
Diagramme M2 peut il être fait pour le devant droit et gauche d'un gilet . Sans modification .
17.04.2023 - 18:07DROPS Design answered:
Bonjour Mme Civario,fort probablement oui. Bon tricot!
18.04.2023 - 10:02
![]() Céline Adelon wrote:
Céline Adelon wrote:
Bonjour, je veux tricoter ce modèle mais je ne comprends pas toutes les explications car vous dites que le demi-dos gauche se tricotent en une seule pièce, mais ensuite vous donnez des instructions séparées pour le dos gauche et le devant. Pouvez-vous m'apporter plus de précisions s'il vous plaît, car j'avoue que je suis perdue. Merci beauoup !
21.03.2023 - 07:12DROPS Design answered:
Bonjour Mme Adelon, effectivement, on tricote le demi-dos gauche et le devant gauche en une seule partie jusqu'aux emmanchures/épaules, puis on termine le devant gauche, on tricote la manche sur les mailles en attente et on termine le demi-dos gauche, ce ne sont que quelques rangs pour former les côtés sous la manche (emmanchures et côtés). Suivez attentivement les explications, votre ouvrage prendra forme progressivement. Bon tricot!
21.03.2023 - 11:08
![]() Eva wrote:
Eva wrote:
Jag stickar ärmen och undrar om man mäter arbetet från mitt bak, när man ska maska av.
25.02.2022 - 10:29DROPS Design answered:
Hej Eva. Ja det stämmer, du ser också alla mått längst ner på måttskissen. Mvh DROPS Design
25.02.2022 - 13:10
![]() Eva wrote:
Eva wrote:
Jag är på varv 4 på vänster bak & framstycke. Hur stickar jag? M1 6 ggr? Och sen? Det ser inte ut att stämma! Jag stickar i stl L. Jag har börjat öka för halsen och är på ca varv 12 totalt. Det ser inte ut som mönstret fortsätter som jag stickat det tidigare.
25.01.2022 - 16:55DROPS Design answered:
Hej Eva, sæt et mærke mellem hver diagram, så er du sikker på at du strikker de rigtige diagrammer på de rigtige steder. Mønsteret skal passe over hinanden hele vejen rundt. God fornøjelse!
27.01.2022 - 10:59
![]() Eva wrote:
Eva wrote:
Jag är på varv 4 på vänster bak & framstycke. Hur stickar jag? M1 6 ggr? Och sen? Det ser inte ut att stämma!
24.01.2022 - 19:25DROPS Design answered:
Hei Eva. For at vi skal kunne hjelpe deg, er det fint om du skriver hvilken størrelse du strikker og er du på 4. pinne fra starten av eller 4. pinne fra der det økes til hals? mvh DROPS Design
25.01.2022 - 14:15
![]() Kristin Toft wrote:
Kristin Toft wrote:
Er nettopp startet på venstre bak og forstykk, og står allerede fast. Jeg har strikket 1 pinne rett, 2 pinne etter oppskrifta; Hva er så neste pinne???????? Følger jeg de samme diagrammene bare speilvendt?????? Det står; Strikk ytterligere 2 p (strikker str M) slik med 4 kantm i vrbord i siden. Så går man over til økning til hals.
17.12.2021 - 00:22DROPS Design answered:
Hei Kristin. Når du har strikket 1. rad av diagrammene (2.pinne), snu og strikk 2. rad av diagrammene (da leser du diagrammene fra venstre mot høyre, husk å lese diagramforklaringen på hvordan maskene skal strikkes fra vrangen). Så skal det strikkes ytterligere 2 pinner (etter forklaringen og diagrammene). Deretter økes det til hals slik det står forklart i oppskriften. Usikker på hvordan strikke etter diagram, kan du ta en titt her: Hvordan lese strikkediagrammer mvh DROPS Design
21.12.2021 - 09:19
![]() Maureen wrote:
Maureen wrote:
Hello, I'm a knitting beginner, and so want to be sure before I start. I want to make the small size for a short person, and want to change the overall length, by 11 stitches/4”. Please correct if I’m wrong, but I should cast on 70 stitches and in stockinette section work 20 instead of 31, yes? Thank you Drops for beautiful patterns and for lovely Eskimo in petrol.
21.11.2020 - 17:20DROPS Design answered:
Dear Maureen, we are unfortunately not able to adjust every pattern to every single request - please contact the store where you bought the yarn or any knitting forum for any individual assistance. Thanks for your comprehension. Happy knitting!
23.11.2020 - 08:40
![]() Sonja L Greco wrote:
Sonja L Greco wrote:
Just to clarify - the first row after cast on is worked as a KNIT which is opposite of the remainder of the stockinette area? Because it is the wrong side? And, the additional stitches cast on - are the the front or the back?
31.10.2020 - 18:23DROPS Design answered:
Dear Mrs Greco, in this pattern, we want that the first worked row is the wrong side of piece, and this row will be knitted from the wrong side. Then the next row = 2nd row of piece will be the right side of piece. This way, we have a small ridge before the first row in pattern. Happy knitting!
02.11.2020 - 07:52
![]() Mika Frost wrote:
Mika Frost wrote:
Hej! Det är alldeles för lite tilltaget med garnet... har ingen annan sagt det. Jag är nu uppe i 600 g och det räcker ändå inte, så nu får den ligga eftersom det blir andra gången jag får ombeställa och det blir dyrt med portot och jag inte ska göra fler stickprojekt för nu. Ni får gärna bjuda på portot så beställer jag två nystan till... Mvh Mika
28.01.2020 - 07:35
![]() Małgorzata Zaraś wrote:
Małgorzata Zaraś wrote:
Tłumaczenie: tragedia!
07.05.2019 - 18:46
|
||||||||||||||||
Lady of the Lake#ladyofthelakecardigan |
||||||||||||||||
|
|
||||||||||||||||
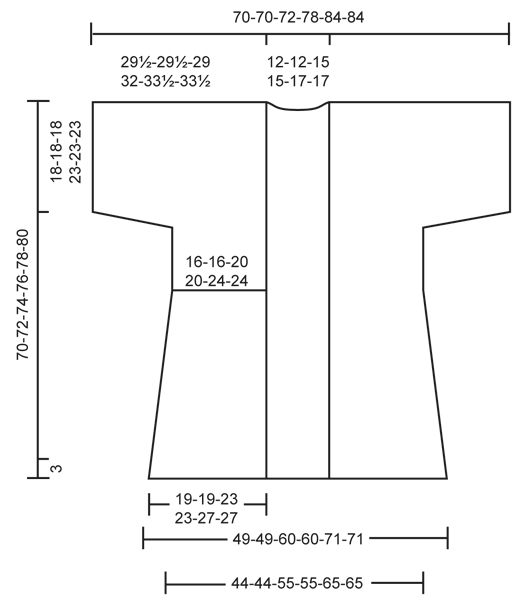
Knitted DROPS jacket with lace pattern worked sideways in ”Snow” or “Andes”. Size: S - XXXL.
DROPS 134-48 |
||||||||||||||||
|
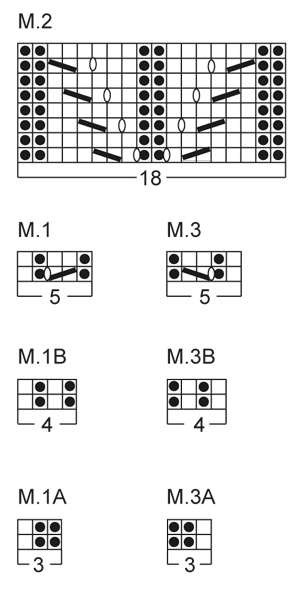
INCREASE TIP 1: Inc 1 st by picking up the yarn between 2 sts from previous row - P this st twisted, i.e. work in back loop of st instead of front to avoid holes. INCREASE TIP 2: Inc 1 st by picking up the yarn between 2 sts from previous row - K this st twisted, i.e. work in back loop of st instead of front to avoid holes. PATTERN: See diagrams M.1 to M.3B (the diagrams show all rows in the pattern seen from RS). BUTTON HOLES: Bind off for 3 button holes on right front band. 1 BUTTON HOLE = bind off 1 st and cast on 1 new st on next row over this st. -------------------------------------------------------- LEFT BACK AND FRONT PIECE: Left back and front piece is worked in one. Worked back and forth on circular needle, beg from mid back. Cast on 81-83-85-88-90-92 sts for back piece on circular needle size 8 mm / US 11 with Snow. On 1st row (= WS) K all sts. Work next row (2nd row = RS) as follows: Work diagram M.1A (= 3 sts), work diagram M.1 (= 5 sts) 5-5-5-6-6-6 times, then work diagram M.2 (= 18 sts), 31-33-35-33-35-37 sts in stockinette st, finish with P 1, K 1, P 1 and K 1 (= 4 edge sts in rib until finished measurements). Work another 2-2-4-4-6-6 rows like this with 4 edge sts in rib in the side. Then inc for neck as follows: Row 1 (= WS): Work until 3 sts remain on needle (= diagram M.1A), P 1, K 1, inc 1 st - Read INCREASE TIP 1 above, finish with K 1. Row 2 (= RS): Work diagram M.1B over the first 4 sts on needle, continue with pattern. Row 3: Work until 4 sts remain on needle (= diagram M.1B), P 1, K 1, P 1, inc 1 st and finish with K 1 = 83-85-87-90-92-94 sts. Row 4: Work diagram M.1 over the first 5 sts on needle, continue with pattern (= 6-6-6-7-7-7 repetitions of diagram M.1 in total). Row 5: Work the entire row, cast on 84-86-88-91-93-95 sts for front piece at the end of row = 167-171-175-181-185-189 sts on needle. Row 6 (= RS): K 1, P 1, K 1, P 1 (= 4 edge sts in rib until finished measurements), 31-33-35-33-35-37 sts in stockinette st, 1st row in diagram M.2, K 1, then diagram M.1 a total of 12-12-12-14-14-14 times (= 60-60-60-70-70-70 sts), diagram M.2, 31-33-35-33-35-37 sts in stockinette st, finish with P 1, K 1, P 1 and K 1 (= 4 edge sts in rib until finished measurements). Continue with pattern and 4 edge sts in rib in each side of piece. REMEMBER THE GAUGE! When diagram M.2 on back piece has been worked a total of 4-4-5-5-6-6 times (back piece measures approx. 23-23-28-28-33-33 cm / 9"-9"-11"-11"-13"-13" from cast on edge), insert 2 markers in the piece from RS as follows: 58-60-62-60-62-64 sts (= front piece), 1 marker, 51-51-51-61-61-61 sts (= sleeve), 1 marker, 58-60-62-60-62-64 sts (= back piece). Now divide the piece at the markers and finish each part separately. LEFT FRONT PIECE: Work 1st row (= RS) as follows: Work 58-60-62-60-62-64 sts (until 1st marker) in pattern and stockinette st as before, turn piece. At beg of next row (= WS) bind off 23 sts (= 1 repetition of diagram M.1 and diagram M.2) in all sizes, work the rest of row. Bind off 10-12-12-12-12-12 sts at beg of the next 2 rows from WS = 15-13-15-13-15-17 sts remain on needle, loosely bind off all sts on next row. SLEEVE: = 51-51-51-61-61-61 sts (= 1 K st + 10-10-10-12-12-12 repetitions of diagram M.1). K 2 rows in diagram M.1 (1st row = RS). At beg of the next 2 rows bind off 1 st. Repeat bind off at beg of every row in each side a total of 5 times = 41-41-41-51-51-51 sts (1 K st + 8-8-8-10-10-10 repetitions of diagram M.1). When piece measures approx. 35-35-36-39-42-42 cm / 13¾"-13¾"-14¼"-15¼"-16½"-16½" (adjust so that last row is 2nd row in diagram M.1), loosely bind off all sts with K over K and P over P. LEFT BACK PIECE: = 58-60-62-60-62-64 sts. On 1st row from RS bind off 23 sts at beg of row in all sizes, work the rest of row. Bind off 10-12-12-12-12-12 sts at beg of the next 2 rows from RS = 15-13-15-13-15-17 sts remain on needle, loosely bind off all sts on next row. RIGHT BACK AND FRONT PIECE: Right back and front piece is worked in one. Cast on 81-83-85-88-90-92 sts for back piece on circular needle size 8 mm / US 11 with Snow. On 1st row (= WS) K all sts. Work next row (2nd row = RS) as follows: K 1, P 1, K 1 and P 1 (= 4 edge sts in rib until finished measurements), 31-33-35-33-35-37 sts in stockinette st, then work diagram M.2 (= 18 sts), diagram M.3 (= 5 sts) 5-5-5-6-6-6 times, finish with diagram M.3A (= 3 sts). Work another 3-3-5-5-7-7 rows like this with 4 edge sts in rib in the side. Then inc for neck as follows: Row 1 (= RS): Work until 3 sts remain on needle (= diagram M.3A), K 1, P 1, inc 1 st - Read INCREASE TIP 2 above, finish with P 1. Row 2 (= WS): Work diagram M.3B over the first 4 sts on needle, continue with pattern. Row 3: Work until 4 sts remain on needle (= diagram M.3B), K 1, P 1, K 1, inc 1 st and finish with P 1 = 83-85-87-90-92-94 sts. Row 4: Work diagram M.3 over the first 5 sts on needle, work the rest of row (= 6-6-6-7-7-7 repetitions of diagram M.3 in total). Row 5 (= RS): Work the entire row. At the end of row, cast on 84-86-88-91-93-95 new sts for front piece = 167-171-175-181-185-189 sts on the needle. Row 6 (= WS): P 1, K 1, P 1, K 1 (= 4 edge sts in rib until finished measurements), 31-33-35-33-35-37 sts in stockinette st, 8th row in diagram M.2, P 1, then diagram M.3 a total of 12-12-12-14-14-14 times (= 60-60-60-70-70-70 sts), diagram M.2, 31-33-35-33-35-37 sts in stockinette st, finish with K 1, P 1, K 1 and P 1 (= 4 edge sts in rib until finished measurements). On next row from RS, work 1st row in diagram M.2 on front piece. Work as on left back and front piece but reversed. ASSEMBLY: Sew/graft tog both parts mid back with neat stitches. Sew sleeve and side seams in one. FRONT BANDS: Worked back and forth on circular needle size 7 mm / US 10½. Beg at the bottom edge on right front piece, knit up from RS approx. 180-210 sts up along right front piece, around the neck and down along left front piece. K next row (= WS) - while at the same time adjusting no of sts to 191-195-201-209-215-219. Work next row from RS as follows: K 1, * P 1, K 1 *, repeat from *-* the rest of row. Continue like this with rib for approx. 4-4-4-5-5-5 cm / 1½"-1½"-1½"-2"-2"-2". Then insert 2 markers; 78-80-80-84-86-88 sts in from each side = 35-35-41-41-43-43 sts between markers in back of neck. On next row from RS, inc 17-17-20-20-21-21 sts between markers as follows: Work until 1st marker, then K 1, * inc 1 st, P 1, K 1 *, repeat from *-* until 2nd marker, work the rest of row = 208-212-221-229-236-240 sts. Continue with K over K and P over P. When band measures 5-5-5-6-6-6 cm / 2"-2"-2"-2⅜"-2⅜"-2⅜", evenly bind off for 3 button holes on left band next to diagram M.2 - Read explanation above. When band measures 8-8-8-9-9-9 cm / 3⅛"-3⅛"-3⅛"-3½"-3½"-3½", loosely bind off all sts. |
||||||||||||||||
Diagram explanations |
||||||||||||||||
|
||||||||||||||||
 |
||||||||||||||||
 |
||||||||||||||||
Have you finished this pattern?Tag your pictures with #dropspattern #ladyofthelakecardigan or submit them to the #dropsfan gallery. Do you need help with this pattern?You'll find 12 tutorial videos, a Comments/Questions area and more by visiting the pattern on garnstudio.com. © 1982-2026 DROPS Design A/S. We reserve all rights. This document, including all its sub-sections, has copyrights. Read more about what you can do with our patterns at the bottom of each pattern on our site. |
||||||||||||||||


With over 40 years in knitting and crochet design, DROPS Design offers one of the most extensive collections of free patterns on the internet - translated to 17 languages. As of today we count 324 catalogs and 12290 patterns - 12280 of which are translated into English (US/in).
We work hard to bring you the best knitting and crochet have to offer, inspiration and advice as well as great quality yarns at incredible prices! Would you like to use our patterns for other than personal use? You can read what you are allowed to do in the Copyright text at the bottom of all our patterns. Happy crafting!
Post a comment to pattern DROPS 134-48
We would love to hear what you have to say about this pattern!
If you want to leave a question, please make sure you select the correct category in the form below, to speed up the answering process. Required fields are marked *.