
Popular categories
Looking for a yarn?


Comments / Questions (286)
![]() Allou wrote:
Allou wrote:
Could you maybe give the information about the size and height of the models wearing the cardigans/pullovers? It would be a help to decide whether a particular design would be flattering for different body types. Also perhaps use some "average and mature" models? Personally I am average size (167 cm tall and US8/European 38/40)but I think most of your photomodels are much slimmer?
28.12.2013 - 16:25DROPS Design answered:
Dear Allou, sizes are different from a country to another, that is the reason why we choose to work with measurements chart. You will find at the end of each pattern a measurement chart with all measures in cm, flat, from side to side. Compare these to those of a garment you like the shape to choose your own size for each pattern. Happy knnitng!
02.01.2014 - 10:10
![]() Hely wrote:
Hely wrote:
Encore un souci,devant droit,pour les augmentations du col,ne comprends pas a partir de ´´faire un jeté après m² jusque tricoter les augmentations au point mousse,je ne vois pas du tout le dessin de ce nouveau point mousse..merci de me l'indiquer en utilisant le diagramme car sur la photo on ne voit pas bien
10.11.2013 - 19:37DROPS Design answered:
Bonjour Mme Hely, pour augmenter pour le col, vous tricotez d'abord les mailles de M2 comme dans le diagramme, puis augmentez avec 1 jeté (à tricoter au point mousse). Le nbe de mailles au point mousse va ainsi augmenter, mais les mailles de bordure tricotées en M2 restent inchangées. Bon tricot!
11.11.2013 - 10:19
![]() Hely wrote:
Hely wrote:
Bonjour,pour bordure/devant droit,il est indiqué:mesurer sur le côté le plus court.merci de préciser le côté de quoi?et pourquoi!et un peu plus loin:continuer sur toutes les mailles comme avant..mais je ne comprends pas...et avant quoi?abientot.merci encore
09.11.2013 - 11:16DROPS Design answered:
Bonjour Mme Hely, les devants se tricotent à partir du milieu dos, dans le sens de la longueur d'abord, puis on fait des rangs raccourcis pour former l'arrondi du bas du devant. On continue ensuite de façon plus "classique", les 7 cm mesurés du côté le plus court le sont à gauche, vu sur l'endroit, à partir de la fin des rangs raccourcis (côté couture dos). Continuer comme avant signifie tricoter les mailles dans les différents points comme auparavant. Bon tricot!
11.11.2013 - 10:14
![]() BOURDEAU wrote:
BOURDEAU wrote:
Je commence à tricoter ce modèle, j'ai un souci sur le 2E rang DOS Je tricote 16 m point mousse ensuite 6 m env. et 2 fois à l'end chacune des 4 m suiv 6 m env et répéter 3 fois au total et ensuite 16 m point mousse.Il me reste beaucoup de mailles. 16 m + 30 m + 16 = 62 m et initialement j'ai 80 m il me reste 18 m par ailleurs les tailles M OU L correspondent à quelle taille française. J'espère avoir été assez claire.Grand merci pour votre réponse.
21.10.2013 - 10:37DROPS Design answered:
Bonjour Mme Bourdeau, en taille L, vous avez: 16 m point mousse, (6 m env, 4 m end à tricoter 2 fois, 6 m env) répétez de (à) 3 fois au total, et terminez par 16 m point mousse = 80m. Pour choisir votre taille, reportez-vous au schéma des mesures en bas de page et comparez ces mesures à celles d'un de vos vêtements analogues. Bon tricot!
21.10.2013 - 11:55Simona wrote:
Mám dotaz na zkrácené řady. V popisu u zkrácených řad je uvedeno: Upleteme 20 řad vroubkovým vzorem z vnější strany dílu a 2 řady vroubkovým vzorem z vnitřní strany dílu. Vůbec nerozumím jak mám plést. To po dopletení zkrácených řad až do konce mám plést dalších 20 řad vroubkovým vzorem? V tom případě jak ho plést z vnitřní a vnější strany?
19.10.2013 - 08:36Rosa wrote:
Perdone ud.al comienzo parte de la espalda en la segunda linea dice 6r,2d en cada uno de los 4 puntos sgtes. igual a 8 d,6r, repetir de a en a por favor si puede ayudeme en esta parte ya k ahi estoy perdida muchas gracias por leerme y nuevamente le pido disculpa por ests molestias bye un besito
25.07.2013 - 07:23DROPS Design answered:
Hola Rosa! si, son *6 reveses, 2 derechos en cada uno de los 4 puntos siguientes (esto suma 8 derechos), 6 reveses más* y todo esto, que está entre asteriscos (*) se repite 3 veces
26.07.2013 - 15:51Rosa wrote:
Disculpen uds y me diran donde se halla M1 qu elo mencionan yo no veo ese diagrama dosculpen eh bye
24.07.2013 - 03:51DROPS Design answered:
Hola Rosa! M.1 es el cuadrado grande del diagrama
26.07.2013 - 15:37Rosa wrote:
Disculpe la molestia sobre los diagrams es lamentable que no le hayan enumerado y tan poco visible k ni con unalupa logre contar los cuadritos mas bien verlos y tratar de contarlos me duelen ya la vista por favor ayudenmeee necesito tejer esta hermosa chompa si no lkogro sacarla me vuelvo loca debera k si y por favor no vayan a eliminar este hermoso modelo por ser yo tan cargosa un besote a todas las k elaboran esta bella manualidad un besoteeeeeeee.
24.07.2013 - 01:19DROPS Design answered:
Hola Rosa! Debido a las limitaciones de espacio de la página algunos diagramas salen pequeños y es mejor imprimirlos o ampliarlos en el ordenador
26.07.2013 - 15:40Rosa wrote:
No hay explicacion donde empieza la parte de atras de la paarte de arriba y la de abajo y a aprte de los puntos de musgo y de las M hay otros puntos mas cuales son esesa mi gran dificultad y no me quiero echar a llorar ms gracias
24.07.2013 - 00:26DROPS Design answered:
Hola Rosa! Te pediría que me explicaras un poco más concretamente a que parte te refieres para poder ayudarte
26.07.2013 - 15:46Rosa wrote:
Me encantan sus modelos son super extraordinarios, lo malo k no dice mucho sobre su explciacion es muy dificil, y eso k yo tejo hace mucho , es sobre el modelo 134-55 so pudiera hacelo mas facil se lo agradeceria es en la tira de la espalda y cuando loexplican la parte del montaje me ando perdiendo ya he destijido 3 veces y no le hagarro el asunto, pero realmente me enamore mucho de este bello modelo la felicito de veras que si un beso
23.07.2013 - 23:53DROPS Design answered:
Hola Rosa! En primer lugar cuando hagas una pregunta tienes que elegir "question" en lugar de "general" porque si no, aparece en otro apartado diferente y puede que tardemos más en contestar. Se trata de un modelo complicado y requiere mucha atención. Como veo que has hecho varias preguntas te voy contestando poco a poco. Una opción si te pierdes con el diagrama es imprimirlo en grande o guardar la imagen y ampliar después.
26.07.2013 - 15:35
|
|||||||||||||||||||||||||
Chocolate Passion#chocolatepassioncardigan |
|||||||||||||||||||||||||
 |
 |
||||||||||||||||||||||||
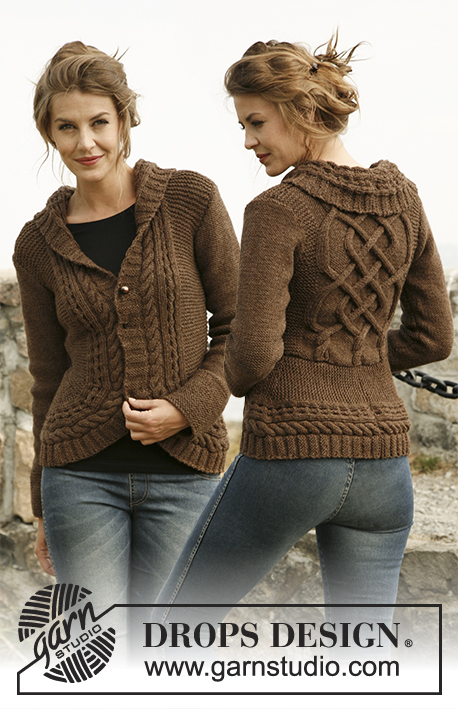
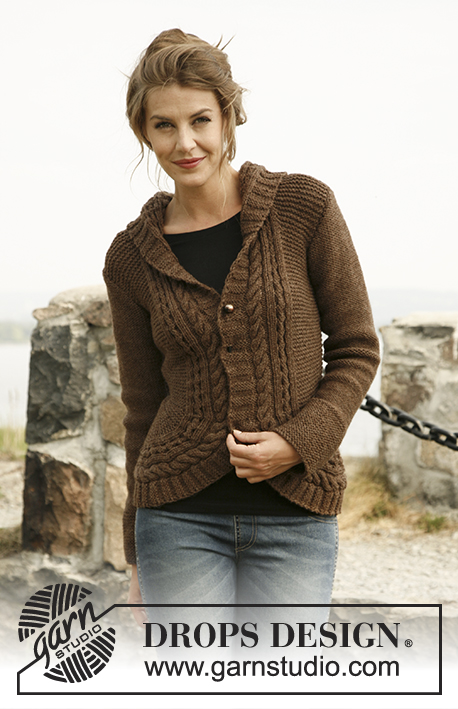
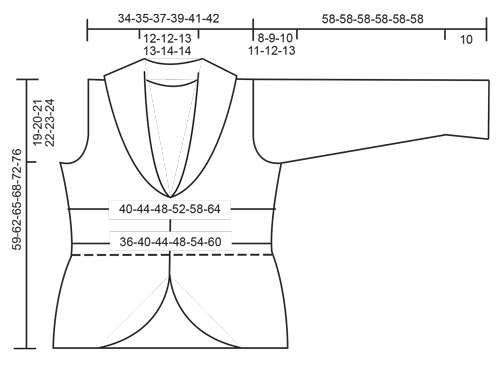
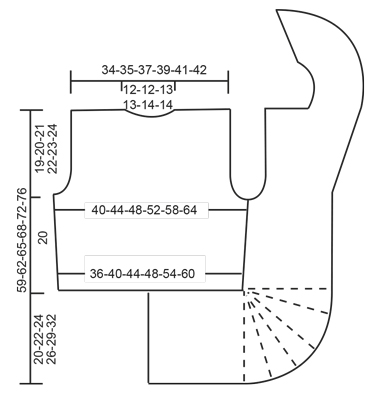
Knitted DROPS jacket with rounded front pieces and cables in ”Alaska”. Size: S to XXXL.
DROPS 134-55 |
|||||||||||||||||||||||||
|
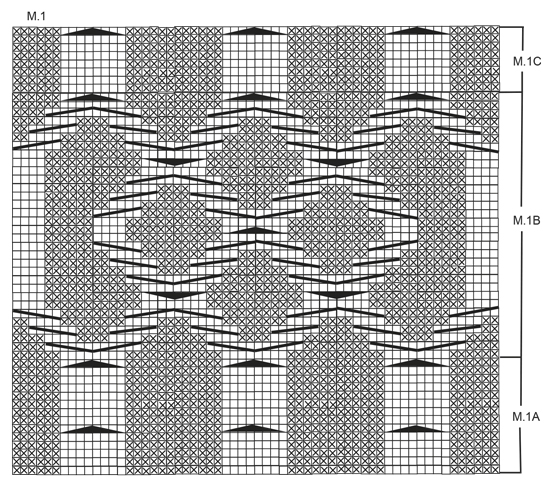
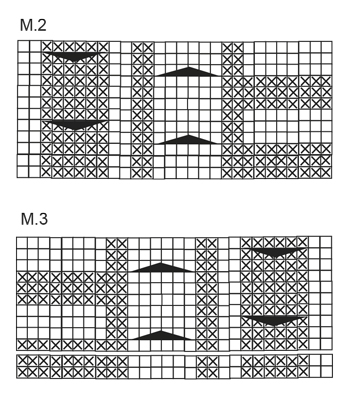
GARTER ST (back and forth on needle): K all rows. PATTERN: See diagrams M.1, M.2 and M.3 – diagrams shows all rows in pattern seen from RS. 1st row in diagrams is worked from WS. DECREASE TIP (applies to armhole): Dec from RS inside 3 sts. Dec AFTER 3 sts as follows: K 2 tog. Dec BEFORE 3 sts as follows: K 2 twisted tog. SHORT ROWS: Work short rows on front piece to get a rounded edge on the piece. Also work short rows between the cables in the pattern. This can make it difficult to read the diagram - make sure to work 5 rows between every cable. Work short rows as follows: Row 1 and 2: Work 10 sts in all sizes, turn and work back. Row 3 and 4: Work 16 sts in all sizes, turn and work back. Row 5 and 6: Work 20 sts in all sizes, turn and work back. Row 7 and 8: Work 26 sts in all sizes, turn and work back. Row 9 and 10: Work 28-28-29-29-31-30 sts, turn and work back. Row 11 and 12: Work 31-31-32-32-34-33 sts, turn and work back. Continue to work 3 sts more on every turn until all sts have been worked. 18-20-22-24-26-30 rows in garter st have been worked at the outer side and 2 rows in garter st have been worked on the inside. Repeat from 1st row a total of 5 times. The rounded edge now measures approx. 28-31-34-37-41-46 cm / 11"-12¼"-13⅜"-14½"-16⅛"-18" on the outer side and 3 cm / 1⅛" on the inside. -------------------------------------------------------- -------------------------------------------------------- BACK PIECE: Worked back and forth on needle. Cast on 68-74-80-88-98-108 sts on needle size 5 mm / US 8 with Alaska. K 1 row from WS. Work next row from RS as follows: 10-13-16-20-25-30 sts in GARTER ST – see explanation above, * P 6, K 2 sts in each of the next 4 sts (= K 8), P 6 *, repeat from *-* a total of 3 times, 10-13-16-20-25-30 sts in garter st. There are now 80-86-92-100-110-120 sts on needle. Then work as follows (1st row = WS): 10-13-16-20-25-30 sts in garter st, diagram M.1A (= 60 sts) and 10-13-16-20-25-30 sts in garter st. After M.1A continue with M.1B 2 times vertically, then repeat M.1C until finished measurements. REMEMBER THE GAUGE! When piece measures 7 cm / 2¾", inc 1 st in each side by working 1 YO inside outermost st – on next row K YO twisted (i.e. work in back loop of st instead of front) to avoid holes. Repeat inc every 5 cm / 2" a total of 3 times = 86-92-98-106-116-126 sts. When piece measures 20 cm / 8" in all sizes, bind off 3-4-5-6-7-8 sts at beg of the next 2 rows for armholes. Then dec 1 st in each side on every row from RS: 2-3-4-5-7-10 times– SEE DECREASE TIP! There are now 76-78-80-84-88-90 sts on needle. When piece measures 37-38-39-41-42-43 cm / 14½"-15"-15¼"-16⅛"-16½"-17", work the 8 sts over the middle cable tog 2 by 2. On next row bind off the middle 20-20-22-22-24-24 sts for neck = 26-27-27-29-30-31 sts remaining on each shoulder. Then work 3 rows over these as before, on next row work the 8 sts over the cable tog 2 by 2 = 22-23-23-25-26-27 sts. Then bind off all sts on next row. Piece measures approx. 39-40-41-42-43-44 cm / 15¼"-15¾"-16⅛"-16½"-17"-17¼" vertically. RIGHT EDGE PIECE/FRONT PIECE: All measurements should be done on the shorter side! Cast on 34-37-41-44-49-54 sts on needle size 5 mm / US 8 with Alaska. K 1 row from WS. Work next row from RS as follows: K 8, P 2, K 2 sts in each of the next 3 sts (= K 6), P 2, K 2, P 2 sts in each of the next 3 sts (= P 6), K 2, 12-15-19-22-27-32 sts in garter st. There are now 40-43-47-50-55-60 sts on needle. Continue like this: 12-15-19-22-27-32 sts in garter st and diagram M.2 (= 28 sts) – 1st row = WS. When piece measures 17-19-21-23-26-29 cm / 6¾"-7½"-8¼"-9"-10¼"-11⅜", work SHORT ROWS - see explanation above – 1st row is worked from RS! When all short rows have been worked, insert a marker. NOW MEASURE PIECE FROM HERE! Continue to work over all sts as before. When piece measures 7 cm / 2¾", beg to inc in the side as on back piece (i.e. the shorter side). After all inc, there are 43-46-50-53-58-63 sts on needle. When piece measures 20 cm / 8", bind off and dec for armhole in the side as on back piece (bind off and dec in same side as inc). At the same time when piece measures 23 cm / 9", beg to inc for collar. Inc inside diagram M.2 by making 1 YO, on next row K YO twisted (i.e. work in back loop of st instead of front) to avoid holes. Repeat inc every other row a total of 10-10-12-13-14-14 times - work inc sts in garter st. After all bind offs and dec for armhole and inc for collar, there are 48-49-53-55-58-59 sts on needle. When piece measures approx. 39-40-41-42-43-44 cm / 15¼"-15¾"-16⅛"-16½"-17"-17¼", adjust so that next row is worked from WS, bind off the first 22-23-23-25-26-27 sts in garter st = 26-26-30-30-32-32 sts remain on needle for collar. Continue to work as follows: * Work 2 rows over all sts, work 2 row only over the outermost 18-18-20-20-26-26 sts *, repeat from *-* until collar measures approx. 7-7-7½-7½-8-8 cm / 2¾"-2¾"-2⅞"-2⅞"-3⅛"-3⅛" on the inside (it will then be twice as long at the outer side). On next row work all 6 sts over both cables tog 2 by 2 = 20-20-24-24-26-26 sts. Bind off. LEFT EDGE PIECE/FRONT PIECE: Cast on and work as right front piece but reversed. I.e. work 2nd row as follows: 12-15-19-22-27-32 sts in garter st, K 2, P 2 sts in each of the next 3 sts (= P 6), K 2, P 2, K 2 sts in each of the next 3 sts (= K 6), P 2 and K 8. There are now 40-43-47-50-55-60 sts on needle. Continue as follows (1st row = WS): Diagram M.3 (= 28 sts), 12-15-19-22-27-32 sts in garter st. Continue as on right front piece but when working short rows work 1st row from WS! bind off shoulder sts from RS to avoid cutting the thread to work the collar. SLEEVE: Worked back and forth on needle. Cast on 42-42-44-44-46-48 sts (includes 1 edge st in each side) on needle size 5 mm / US 8 with Alaska. Work 10 cm / 4" in garter st. Continue in stockinette st. When piece measures 15 cm / 6", inc 1 st in each side. Repeat inc every 4-3-3-2½-2-2 cm / 1½"-1⅛"-1⅛"-⅞"-¾"-¾" a total of 9-11-11-13-14-15 times = 60-64-66-70-74-78 sts. When piece measures 50-49-48-47-46-45 cm / 19¾"-19¼"-19"-18½"-18"-17¾" (shorter measurements in the larger sizes because of longer sleeve cap and wider shoulder width) bind off for sleeve cap at beg of every row in each side: 3 sts 1 time, 2 sts 3 times and 1 st 1-2-3-4-5-6 times, then bind off 2 sts in each side until sleeve measures 57 cm / 22½", then bind off 3 sts 1 time in each side, bind off remaining sts. The piece measures approx. 58 cm / 22¾". ASSEMBLY: Sew cast on edge on edge pieces tog mid back - sew edge to edge to avoid a chunky seam. Then sew edge to bottom edge of back piece. Sew the shoulder seams. Sew side seam edge to edge. Sew the collar tog mid back and sew it to the neckline. Sew sleeve seams inside 1 edge st - sew so that WS is on the outside and sew sleeves on body. Close jacket with a pin or similar. |
|||||||||||||||||||||||||
Diagram explanations |
|||||||||||||||||||||||||
|
|||||||||||||||||||||||||
 |
|||||||||||||||||||||||||
 |
|||||||||||||||||||||||||
 |
|||||||||||||||||||||||||
 |
|||||||||||||||||||||||||
Have you finished this pattern?Tag your pictures with #dropspattern #chocolatepassioncardigan or submit them to the #dropsfan gallery. Do you need help with this pattern?You'll find 22 tutorial videos, a Comments/Questions area and more by visiting the pattern on garnstudio.com. © 1982-2026 DROPS Design A/S. We reserve all rights. This document, including all its sub-sections, has copyrights. Read more about what you can do with our patterns at the bottom of each pattern on our site. |
|||||||||||||||||||||||||


With over 40 years in knitting and crochet design, DROPS Design offers one of the most extensive collections of free patterns on the internet - translated to 17 languages. As of today we count 325 catalogs and 12298 patterns - 12288 of which are translated into English (US/in).
We work hard to bring you the best knitting and crochet have to offer, inspiration and advice as well as great quality yarns at incredible prices! Would you like to use our patterns for other than personal use? You can read what you are allowed to do in the Copyright text at the bottom of all our patterns. Happy crafting!
Post a comment to pattern DROPS 134-55
We would love to hear what you have to say about this pattern!
If you want to leave a question, please make sure you select the correct category in the form below, to speed up the answering process. Required fields are marked *.